搭建SpringMVC (Java配置)
2016-11-25 16:29
225 查看
配置DispatcherServlet
DispatcherServlet的是SpringMVC的核心。在这里请求会第一次接触都框架,它要负责将请求路由到其他的组件之中。
使用Java配置将DispatcherServlet配置在Servlet容器中。
WebAppInitializer.java
启用SpringMVC
WebConfig.java
RootConfig.java
web.xml 的Schema必须是3.0+的
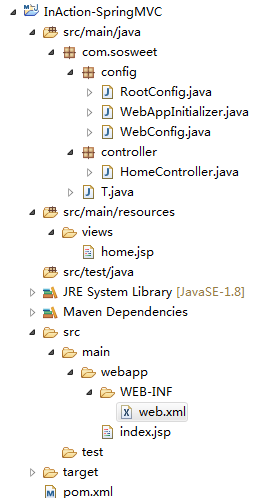
完整的项目目录结构:
pom.xml
添加Servlet、Filter、Listener
想往Web容器中注册其他组件的话,只需创建一个新的初始化器就可以了。最简单的方式就是实现Spring的WebApplicationInitializer接口。
添加Servlet
添加Filter
DispatcherServlet的是SpringMVC的核心。在这里请求会第一次接触都框架,它要负责将请求路由到其他的组件之中。
使用Java配置将DispatcherServlet配置在Servlet容器中。
WebAppInitializer.java
/**
* 配置DispatcherServlet
*
* @author wxz
*
*/
public class WebAppInitializer extends AbstractAnnotationConfigDispatcherServletInitializer{

/**
* 此方法返回的带有@Configuration注解的类将会用来配置ContextLoaderListener创建的应用上下文中的Bean
*/
@Override
protected Class<?>[] getRootConfigClasses() {
return new Class<?>[] {RootConfig.class};
}

/**
* 当DispatcherServlet启动的时候,它会创建Spring应用上下文,并加载配置文件或配置类中所声明的Bean。
* DispatcherServlet加载应用上下文时,使用定义在WebConfig配置类中的Bean
*
*/
@Override
protected Class<?>[] getServletConfigClasses() {
return new Class<?>[] {WebConfig.class}; // 指定配置类
}

/**
* 将一个或多个路径映射到DispatcherServlet上
*/
@Override
protected String[] getServletMappings() {
return new String[] {"/"}; // 将dispatcherServlet映射到“/”
}

}
启用SpringMVC
WebConfig.java
@Configuration
@EnableWebMvc // 启用SpringMVC
@ComponentScan("com.sosweet") // 启用组件扫描
public class WebConfig extends WebMvcConfigurerAdapter{

/** 视图解析器 */
@Bean
public InternalResourceViewResolver viewResolver(){
InternalResourceViewResolver viewResolver = new InternalResourceViewResolver();
viewResolver.setPrefix("/WEB-INF/classes/views/"); // 运行时的目录结构
viewResolver.setSuffix(".jsp");
viewResolver.setViewClass(JstlView.class);
return viewResolver;
}

/** 配置静态资源的处理 */
@Override
public void configureDefaultServletHandling(DefaultServletHandlerConfigurer configurer){
configurer.enable();
}

}
RootConfig.java
@Configuration
@ComponentScan(basePackages={"com.sosweet"}, excludeFilters={
@Filter(type=FilterType.ANNOTATION, value=EnableWebMvc.class)
})
public class RootConfig {

}
web.xml 的Schema必须是3.0+的
<?xml version="1.0" encoding="UTF-8"?>
<web-app xmlns:xsi="http://www.w3.org/2001/XMLSchema-instance"
xmlns="http://java.sun.com/xml/ns/javaee"
xsi:schemaLocation="http://java.sun.com/xml/ns/javaee http://java.sun.com/xml/ns/javaee/web-app_3_0.xsd" id="WebApp_ID" version="3.0">

<display-name>Archetype Created Web Application</display-name>
</web-app>
完整的项目目录结构:
pom.xml
<!-- Spring 4.3.3 -->
<!-- Core Container 核心容器 -->
<!-- 核心工具类,Spring其它模块大量使用Spring-core -->
<dependency>
<groupId>org.springframework</groupId>
<artifactId>spring-core</artifactId>
<version>4.3.3.RELEASE</version>
</dependency>
<!-- 运行时Spring容器 -->
<dependency>
<groupId>org.springframework</groupId>
<artifactId>spring-context</artifactId>
<version>4.3.3.RELEASE</version>
</dependency>
<!-- Spring容器对第三方包的集成 -->
<dependency>
<groupId>org.springframework</groupId>
<artifactId>spring-context-support</artifactId>
<version>4.3.3.RELEASE</version>
</dependency>
<!-- Spring定义Bean的支持 -->
<dependency>
<groupId>org.springframework</groupId>
<artifactId>spring-beans</artifactId>
<version>4.3.3.RELEASE</version>
</dependency>
<!-- 使用表达式语言在运行时查询和操作对象 -->
<dependency>
<groupId>org.springframework</groupId>
<artifactId>spring-expression</artifactId>
<version>4.3.3.RELEASE</version>
</dependency>
<!-- End Core Container 核心容器 -->

<!-- AOP -->
<!-- 基于代理的AOP支持 -->
<dependency>
<groupId>org.springframework</groupId>
<artifactId>spring-aop</artifactId>
<version>4.3.3.RELEASE</version>
</dependency>
<!-- 基于AspectJ的AOP支持 -->
<dependency>
<groupId>org.springframework</groupId>
<artifactId>spring-aspects</artifactId>
<version>4.3.3.RELEASE</version>
</dependency>
<!-- aspectj -->
<dependency>
<groupId>org.aspectj</groupId>
<artifactId>aspectjrt</artifactId>
<version>1.8.5</version>
</dependency>
<dependency>
<groupId>org.aspectj</groupId>
<artifactId>aspectjweaver</artifactId>
<version>1.8.5</version>
</dependency>
<!-- End AOP -->

<!-- web -->
<!-- 提供基础的web集成的功能,在web项目中提供Spring容器 -->
<dependency>
<groupId>org.springframework</groupId>
<artifactId>spring-web</artifactId>
<version>4.3.3.RELEASE</version>
</dependency>
<!-- 提供基于Servlet的SpringMVC -->
<dependency>
<groupId>org.springframework</groupId>
<artifactId>spring-webmvc</artifactId>
<version>4.3.3.RELEASE</version>
</dependency>
<!-- 提供WebSocket功能 -->
<dependency>
<groupId>org.springframework</groupId>
<artifactId>spring-websocket</artifactId>
<version>4.3.3.RELEASE</version>
</dependency>
<!-- 提供Portlet环境支持 -->
<dependency>
<groupId>org.springframework</groupId>
<artifactId>spring-webmvc-portlet</artifactId>
<version>4.3.3.RELEASE</version>
</dependency>
<!-- End web -->
<!-- End Spring 4.0 -->

<dependency>
<groupId>commons-io</groupId>
<artifactId>commons-io</artifactId>
<version>2.3</version>
</dependency>
<!-- javax -->
<dependency>
<groupId>javax.servlet</groupId>
<artifactId>javax.servlet-api</artifactId>
<version>3.1.0</version>
</dependency>
<plugins>
<plugin>
<artifactId>maven-compiler-plugin</artifactId>
<version>2.3.2</version>
<configuration>
<source>1.8</source>
<target>1.8</target>
<encoding>UTF-8</encoding>
</configuration>
</plugin>
</plugins>
添加Servlet、Filter、Listener
想往Web容器中注册其他组件的话,只需创建一个新的初始化器就可以了。最简单的方式就是实现Spring的WebApplicationInitializer接口。
public class MyServletInitializer implements WebApplicationInitializer{

@Override
public void onStartup(ServletContext servletContext) throws ServletException {
// TODO Auto-generated method stub

}

}
添加Servlet
public class MyServletInitializer implements WebApplicationInitializer{

@Override
public void onStartup(ServletContext servletContext) throws ServletException {

ServletRegistration.Dynamic myServlet = servletContext.addServlet("myServlet", MyServlet.class); // 注册Servlet
myServlet.addMapping("/custom/**"); // 映射Servlet

}

}
添加Filter
public class MyServletInitializer implements WebApplicationInitializer{

@Override
public void onStartup(ServletContext servletContext) throws ServletException {

/** 注册Servlet */
ServletRegistration.Dynamic myServlet = servletContext.addServlet("myServlet", MyServlet.class); // 注册Servlet
myServlet.addMapping("/custom/**"); // 映射Servlet

/** 注册Filter */
FilterRegistration.Dynamic myFilter = servletContext.addFilter("myFilter", MyFilter.class); // 注册Filter
myFilter.addMappingForUrlPatterns(null, false, "/custom/**"); // 添加Filter的映射路径

}

}

相关文章推荐
- [101]一步一步学懂spring - 使用Java配置的方式搭建SpringMvc
- 使用Java配置的方式完成SpringMVC的搭建
- java后台接口开发框架SpringMVC框架搭建,环境配置,Tomcate服务器搭建
- springMVC的快速搭建------Java配置
- java程序员菜鸟进阶(九)windows下搭建SVN服务器及配置myeclipse SVN客户端
- java程序员菜鸟进阶(九)windows下搭建SVN服务器及配置myeclipse SVN客户端
- java 中 springmvc + openjpa 配置 注解
- Hibernate3.5.4---java application的xml和annotation环境搭建(hibernate.cfg.xml配置文件说明,映射文件Student.hbm.xml说明)
- Windows7下Java环境搭建(JDK环境变量配置)
- linux VPS java 环境搭建 及Ubuntu 系统配置及内存优化
- java程序员菜鸟进阶(九)windows下搭建SVN服务器及配置myeclipse SVN客户端
- 如何搭建Eclipse +Apache Tomcat配置Java开发环境
- Win 8系统 Java开发环境搭建以及环境变量path的配置
- Java环境搭建与配置
- linux vps 配置搭建java服务器环境(jdk+tomcat+mysql)
- java程序员菜鸟进阶(九)windows下搭建SVN服务器及配置myeclipse SVN客户端
- SpringMvc环境搭建(配置文件)
- Windows7下Java环境搭建(JDK环境变量配置)
- Java安装配置 tinyos环境搭建基础
- java程序员菜鸟进阶(九)windows下搭建SVN服务器及配置myeclipse SVN客户端