IoC: 控制反转
2016-11-23 13:45
302 查看
:将传统的由程序代码直接操控对象的调用权交给容器.通过容器控制对象的装配及生命周期管理.
(一下这两段话摘自http://blog.csdn.net/m13666368773/article/details/7802126)
IOC中最基本的技术就是“反射(Reflection)”编程,目前.Net C#、Java和PHP5等语言均支持,其中PHP5的技术书籍中,有时候也被翻译成“映射”。有关反射的概念和用法,大家应该都很清楚,通俗来讲就是根据给出的类名(字符串方式)来动态地生成对象。这种编程方式可以让对象在生成时才决定到底是哪一种对象。反射的应用是很广泛的,很多的成熟的框架,比如象Java中的hibernate、Spring框架,.Net中 NHibernate、Spring.NET框架都是把“反射”做为最基本的技术手段。
我们可以把IOC容器的工作模式看做是工厂模式的升华,可以把IOC容器看作是一个工厂,这个工厂里要生产的对象都在配置文件中给出定义,然后利用编程语言的的反射编程,根据配置文件中给出的类名生成相应的对象。从实现来看,IOC是把以前在工厂方法里写死的对象生成代码,改变为由配置文件来定义,也就是把工厂和对象生成这两者独立分隔开来,目的就是提高灵活性和可维护性。
控制反转的两种实现方式:
1.依赖查找(DL)
2.依赖注入(DI): 程序在运行时,若需要调用另一个对象协助,无需在代码中创建而是依赖外部容器,由容器创建后传递给程序.
依赖注入是最优秀的解耦方式,依赖注入让Spring的bean 之间以配置文件方式组织在一起而不是硬编码的方式.
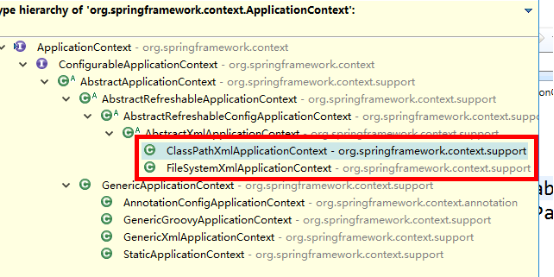
ApplicationContext 用于加载Spring 配置文件,在程序中充当容器.其实现类有两
a)基于xml的注入:
Bean的初始化由容器完成称为注入.根据注入方式不同分为 设值注入 和 构造注入
1)设值注入 : 通过setter 方法传入被调用者的实例中
2)构造注入 : 调用构造函数完成注入
Test01 结果截图:
Test02 结果截图:

b)基于注解的注入:
在Spring 配置文件中添加组件扫描器:
<context:component-scan base-package="com.xiehe.dao"/>
在xml配置了这个标签后,spring可以自动去扫描base-pack下面或者子包下面的Java文件,如果扫描到有@Component (普通bean)@Controller(控制器)@Service(服务器)等这些注解的类,则把这些类注册为bean.
运行截图:

(一下这两段话摘自http://blog.csdn.net/m13666368773/article/details/7802126)
IOC中最基本的技术就是“反射(Reflection)”编程,目前.Net C#、Java和PHP5等语言均支持,其中PHP5的技术书籍中,有时候也被翻译成“映射”。有关反射的概念和用法,大家应该都很清楚,通俗来讲就是根据给出的类名(字符串方式)来动态地生成对象。这种编程方式可以让对象在生成时才决定到底是哪一种对象。反射的应用是很广泛的,很多的成熟的框架,比如象Java中的hibernate、Spring框架,.Net中 NHibernate、Spring.NET框架都是把“反射”做为最基本的技术手段。
我们可以把IOC容器的工作模式看做是工厂模式的升华,可以把IOC容器看作是一个工厂,这个工厂里要生产的对象都在配置文件中给出定义,然后利用编程语言的的反射编程,根据配置文件中给出的类名生成相应的对象。从实现来看,IOC是把以前在工厂方法里写死的对象生成代码,改变为由配置文件来定义,也就是把工厂和对象生成这两者独立分隔开来,目的就是提高灵活性和可维护性。
控制反转的两种实现方式:
1.依赖查找(DL)
2.依赖注入(DI): 程序在运行时,若需要调用另一个对象协助,无需在代码中创建而是依赖外部容器,由容器创建后传递给程序.
依赖注入是最优秀的解耦方式,依赖注入让Spring的bean 之间以配置文件方式组织在一起而不是硬编码的方式.
控制反转Demo1:
/*dao层接口*/
public interface IStudentDao {
public void selectStudent(int cid);
}
/*dao层实现类*/
public class StudentDaoImpl implements IStudentDao {
public StudentDaoImpl() {
super();
System.out.println("构造函数执行!");
}
@Override
public void selectStudent(int cid) {
System.out.println("查找学生"+cid);
}
/*Sping配置文件中注册实现类bean*/
<?xml version="1.0" encoding="UTF-8"?>
<beans xmlns="http://www.springframework.org/schema/beans"
xmlns:xsi="http://www.w3.org/2001/XMLSchema-instance"
xsi:schemaLocation=" http://www.springframework.org/schema/beans http://www.springframework.org/schema/beans/spring-beans.xsd">
<!-- bean definitions here -->
<bean id="sdImpl" class="com.xiehe.dao.StudentDaoImpl"/>
</beans>
/*测试类中*/
public class MyTest {
@Test
public void test01(){
//1.获取容器
ApplicationContext context = new ClassPathXmlApplicationContext("applicationSpring.xml");
//2.从容器中获取对象
IStudentDao sdImpl = (IStudentDao) context.getBean("sdImpl");
sdImpl.selectStudent(1);
}
:结果截图

本例中可以明显看出,在测试类中获取StudentDaoImpl 是通过容器(调用了构造)而不是依赖于StudentDaoImpl
ApplicationContext 用于加载Spring 配置文件,在程序中充当容器.其实现类有两
a)基于xml的注入:
Bean的初始化由容器完成称为注入.根据注入方式不同分为 设值注入 和 构造注入
1)设值注入 : 通过setter 方法传入被调用者的实例中
2)构造注入 : 调用构造函数完成注入
/*实体类:schol*/
public class School {
private String name;
private String addr;
public School(String name, String addr) {
super();
this.name = name;
this.addr = addr;
}
public School() {
super();
}
Getter/setter
}
/*实体类:Student*/
public class Student {
private String name;
private int age;
private School mySchool;
public Student() {
super();
}
public Student(String name, int age, School mySchool) {
super();
this.name = name;
this.age = age;
this.mySchool = mySchool;
}
Getter/setter
}
/*spring配置文件*/
<?xml version="1.0" encoding="UTF-8"?>
<beans xmlns="http://www.springframework.org/schema/beans"
xmlns:xsi="http://www.w3.org/2001/XMLSchema-instance"
xsi:schemaLocation=" http://www.springframework.org/schema/beans http://www.springframework.org/schema/beans/spring-beans.xsd">
<!-- bean definitions here -->
<!-- 设值注入 -->
<bean id="mySchool" class="com.xiehe.dao.School">
<property name="name" value="北京大学"></property>
<property name="addr" value="海淀区"></property>
</bean>
<!-- 设值注入 -->
<bean id="sdImpl" class="com.xiehe.dao.Student" >
<property name="name" value="张赛"/>
<property name="age" value="58"/>
<!-- 域类型注入方式1:-- >
<!-- <property name="mySchool" ref="mySchool"/> -->
<!-- 域类型注入方式2:-- >
<property name="mySchool">
<ref bean="mySchool"/>
</property>
</bean>
<!-- 构造注入 -->
<bean id="sdImpl2" class="com.xiehe.dao.Student">
<constructor-arg name="name" value="张赛"/>
<constructor-arg name="age" value="58"/>
<constructor-arg name="mySchool" ref="mySchool"/>
</bean>
</beans>
/*测试类*/
public class MyTest {
@Test
public void test01(){
//1.获取容器
ClassPathXmlApplicationContext context = new ClassPathXmlApplicationContext("applicationSpring.xml");
//2.从容器中获取对象(设值注入)
Student dao = (Student) context.getBean("sdImpl");
System.out.println(dao);
}
@Test
public void test02(){
//1.获取容器
ClassPathXmlApplicationContext context = new ClassPathXmlApplicationContext("applicationSpring.xml");
//2.从容器中获取对象(构造注入)
Student dao = (Student) context.getBean("sdImpl2");
System.out.println(dao);
}
}
Test01 结果截图:
Test02 结果截图:
b)基于注解的注入:
在Spring 配置文件中添加组件扫描器:
<context:component-scan base-package="com.xiehe.dao"/>
在xml配置了这个标签后,spring可以自动去扫描base-pack下面或者子包下面的Java文件,如果扫描到有@Component (普通bean)@Controller(控制器)@Service(服务器)等这些注解的类,则把这些类注册为bean.
/*注解式注入 */
@Component("school1")
public class School {
@Value("清华大学")
private String name;
@Value("海淀区")
private String addr;
}
/*注解式注入*/
@Component(value="stu1")
public class Student {
@Value("张嘴")
private String name;
@Value("44")
private int age;
//默认 byType
@Autowired
private School mySchool;
}
/*spring 配置文件*/
<?xml version="1.0" encoding="UTF-8"?>
<beans xmlns="http://www.springframework.org/schema/beans"
xmlns:xsi="http://www.w3.org/2001/XMLSchema-instance"
xmlns:context="http://www.springframework.org/schema/context"
xsi:schemaLocation=" http://www.springframework.org/schema/beans http://www.springframework.org/schema/beans/spring-beans.xsd http://www.springframework.org/schema/context http://www.springframework.org/schema/context/spring-context.xsd">
<!-- bean definitions here -->
<!-- 配置组件扫描器 -->
<context:component-scan base-package="com.xiehe.dao"/>
</beans>
/*测试类*/
public class MyTest {
@Test
public void test01(){
//1.获取容器
ClassPathXmlApplicationContext context = new ClassPathXmlApplicationContext("com/xiehe/dao/applicationSpring.xml");
//2.从容器中获取对象
Student dao = (Student) context.getBean("stu1");
System.out.println(dao);
}
}
运行截图:

相关文章推荐
- idea 实现Spring讲解(Ioc-控制反转)/Aop(面向切面的编程)
- 控制反转IOC与依赖注入DI
- Spring控制反转(IoC)的理解
- 控制反转(IoC)与依赖注入(DI)
- 聊一聊PHP的依赖注入(DI) 和 控制反转(IoC)
- DI与IOC——控制反转容器和依赖注入模式
- 关于IoC控制反转的设计原则
- 控制反转(IoC)与依赖注入(DI)
- spring 2.x 之控制反转(ioc)
- 控制反转(IoC)与依赖注入(DI)
- Spring框架中IoC(控制反转)的原理
- Spring控制反转(IoC)的理解
- 反转控制(IOC)与依赖注入(DI)
- Asp.net MVC 示例项目"Suteki.Shop"分析之---IOC(控制反转)
- Spring:IOC控制反转
- PHP简单的IoC控制反转实现
- IoC模式(依赖、依赖倒置、依赖注入、控制反转)
- spring控制反转(IOC)的原理
- 轻松理解 Java开发中的依赖注入(DI)和控制反转(IOC)
- Spring详解(二)------IOC控制反转