[置顶] 基于springboot+mybatis的微信公众号开发第二篇-验证与消息推送的基本设置
2016-11-15 20:42
706 查看
一、根据微信公众号开发文档编写的验证方法,写在util包中。
1、首先在util包下创建SignUtil类package com.util;
import java.security.MessageDigest;
import java.security.NoSuchAlgorithmException;
import java.util.Arrays;
public class SignUtil {
// 与接口配置信息中的Token要一致
private static String token = "weixinmp";
/**
* 验证签名
*
* @param signature
* @param timestamp
* @param nonce
* @return
*/
public static boolean checkSignature(String signature, String timestamp, String nonce) {
String[] arr = new String[] { token, timestamp, nonce };
// 将token、timestamp、nonce三个参数进行字典序排序
Arrays.sort(arr);
StringBuilder content = new StringBuilder();
for (int i = 0; i < arr.length; i++) {
content.append(arr[i]);
}
MessageDigest md = null;
String tmpStr = null;
try {
md = MessageDigest.getInstance("SHA-1");
// 将三个参数字符串拼接成一个字符串进行sha1加密
byte[] digest = md.digest(content.toString().getBytes());
tmpStr = byteToStr(digest);
} catch (NoSuchAlgorithmException e) {
e.printStackTrace();
}
content = null;
// 将sha1加密后的字符串可与signature对比,标识该请求来源于微信
return tmpStr != null ? tmpStr.equals(signature.toUpperCase()) : false;
}
/**
* 将字节数组转换为十六进制字符串
*
* @param byteArray
* @return
*/
private static String byteToStr(byte[] byteArray) {
String strDigest = "";
for (int i = 0; i < byteArray.length; i++) {
strDigest += byteToHexStr(byteArray[i]);
}
return strDigest;
}
/**
* 将字节转换为十六进制字符串
*
* @param mByte
* @return
*/
private static String byteToHexStr(byte mByte) {
char[] Digit = { '0', '1', '2', '3', '4', '5', '6', '7', '8', '9', 'A', 'B', 'C', 'D', 'E', 'F' };
char[] tempArr = new char[2];
tempArr[0] = Digit[(mByte >>> 4) & 0X0F];
tempArr[1] = Digit[mByte & 0X0F];
String s = new String(tempArr);
return s;
}
}2、在controller包下创建核心控制类CoreController
package com.controller;

import com.util.SignUtil;
import org.slf4j.Logger;
import org.slf4j.LoggerFactory;
import org.springframework.web.bind.annotation.RequestMapping;
import org.springframework.web.bind.annotation.RequestMethod;
import org.springframework.web.bind.annotation.RequestParam;
import org.springframework.web.bind.annotation.RestController;

@RestController
@RequestMapping("")
public class CoreController {
//增加日志
private static Logger log = LoggerFactory.getLogger(CoreController.class);
//验证是否来自微信服务器的消息
@RequestMapping(value = "",method = RequestMethod.GET)
public String checkSignature(@RequestParam(name = "signature" ,required = false) String signature  ,
@RequestParam(name = "nonce",required = false) String  nonce ,
@RequestParam(name = "timestamp",required = false) String  timestamp ,
@RequestParam(name = "echostr",required = false) String  echostr){
// 通过检验signature对请求进行校验,若校验成功则原样返回echostr,表示接入成功,否则接入失败
if (SignUtil.checkSignature(signature, timestamp, nonce)) {
log.info("接入成功");
return echostr;
}
log.error("接入失败");
return "";
}
}
注意
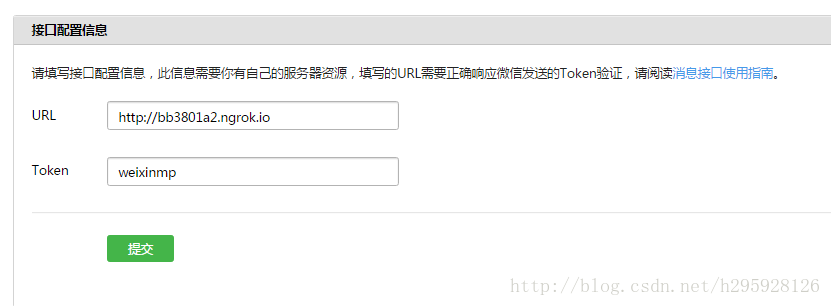
2、接下来设置微信公众号开发的url和tokenurl必须是外网地址(我是通过ngrok来创建一个外网地址映射到本地地址,可以搜索下ngrok的使用方法)。
设置完成后,run项目,然后再点击公众号的接口配置信息的提交,成功的话就显示配置成功,否则显示失败。(有时候微信大姨妈,第一次总是配置失败<不知道是ngrok的问题不>,要点击2次才配置成功。)
二、消息的处理
1、在service包中创建一个core包,在core包中创建接口类CoreService和实现类CoreServiceImpl(这里你也可以不用创建core包,直接在service包中建这两个类,我这是为了后期的维护便利而已。)CoreService.java
package com.service.core;

import javax.servlet.http.HttpServletRequest;

/**
* Created by Administrator on 2016/11/8.
*/
public interface CoreService {
public  String processRequest(HttpServletRequest request) ;
}
CoreServiceImpl.java
/**
* 核心服务类
*/
@Service("coreService")
public class CoreServiceImpl implements CoreService {

private static Logger log = LoggerFactory.getLogger(CoreServiceImpl.class);

/**
* 处理微信发来的请求(包括事件的推送)
*
* @param request
* @return
*/
public  String processRequest(HttpServletRequest request) {
//暂时对消息不作处理
return "";
}
3、再在Corecontroller类中加入、对消息的处理方法,我给出完整类
package com.controller;

import com.service.core.CoreService;
import com.util.SignUtil;
import org.slf4j.Logger;
import org.slf4j.LoggerFactory;
import org.springframework.beans.factory.annotation.Autowired;
import org.springframework.web.bind.annotation.*;

import javax.servlet.http.HttpServletRequest;

@RestController
@RequestMapping("")
public class CoreController {
@Autowired
private CoreService coreService;

//增加日志
private static Logger log = LoggerFactory.getLogger(CoreController.class);
//验证是否来自微信服务器的消息
@RequestMapping(value = "",method = RequestMethod.GET)
public String checkSignature(@RequestParam(name = "signature" ,required = false) String signature  ,
@RequestParam(name = "nonce",required = false) String  nonce ,
@RequestParam(name = "timestamp",required = false) String  timestamp ,
@RequestParam(name = "echostr",required = false) String  echostr){
// 通过检验signature对请求进行校验,若校验成功则原样返回echostr,表示接入成功,否则接入失败
if (SignUtil.checkSignature(signature, timestamp, nonce)) {
log.info("接入成功");
return echostr;
}
log.error("接入失败");
return "";
}
// 调用核心业务类接收消息、处理消息跟推送消息
@RequestMapping(value = "",method = RequestMethod.POST)
public  String post(HttpServletRequest req){
String respMessage = coreService.processRequest(req);
return respMessage;
}
}
由于时间问题,暂时写到这里,下一篇讲对消息的接收与回复。

相关文章推荐
- 基于springboot+mybatis的微信公众号开发第二篇-验证与消息推送的基本设置
- [置顶] 基于springboot+mybatis的微信公众号开发第一篇-基本架构
- [置顶] 基于springboot+mybatis的微信公众号开发第三篇-消息的接收与回复
- 基于springboot+mybatis的微信公众号开发第三篇-消息的接收与回复
- [置顶] 基于springboot+mybatis的微信公众号开发第四篇-自定义菜单的查询、创建、删除及菜单事件响应
- 基于springboot+mybatis的微信公众号开发第一篇-基本架构
- 微信公众号推送消息(基于idea+spring boot)
- [置顶] WEB开发----spring boot与mybatis整合
- [置顶] 基于SpringBoot开发一个Restful服务,实现增删改查功能
- [置顶] MyBatis基于Spring-boot集成通用Mapper以及pagehelper分页插件(含源码下载)
- [置顶] 使用IDEA基于springboot开发ssm框架(undertow代替tomcat以及其他功能)
- [置顶] 基于注解的mybatis整合spring开发流程?
- [置顶] 【一】Springboot+Shiro+Mybatis+Thymeleaf实现权限控制和gif验证
- JeeFast是一款基于SpringBoot+Mybatis-Plus+Bootstrap+Vue搭建的JAVA WEB快速开发平台
- SpringBoot集成Mybatis(基于注解式开发)
- springboot 整合mybatis 基于注解开发 传入对象
- JeeFast是一款基于SpringBoot+Mybatis-Plus+Bootstrap+Vue搭建的JAVA WEB快速开发平台
- 企业级后台接口开发。环境基于spring+springboot+springmvc+mybatis。测试 junit4
- 微信开发——基于springboot接入微信公众号(ngrok内网穿透技术)
- Spring Boot 构建应用——基于 WebSocket 的消息推送