httpd服务的简单配置
2016-11-07 17:56
218 查看
大纲:
1.httpd服务的安装
2.主配置文件/etc/httpd/conf/httpd.conf常见选项简介
3.basic认证的实现
4.基于ip,port和FQDN的虚拟主机的实现
5.实现ssl加密的http服务
6.简单的压力测试
7.关于httpd2.2和httpd2.4之间的差异会贯穿在整篇文章中
一、安装httpd服务
2.主配置文件/etc/httpd/conf/httpd.conf常见选项简介 <Directory>中“基于源地址”实现访问控制
1.options 后跟一个或多个空白字符分隔的"选项“列表; Indexes:指明的URL路径下不存在和定义的主页面资源相符的资源文件时,返回索引列表给用户FollowSymLinks:允许跟踪符号链接文件所指向的源文件None:All;2.AllowOverride 与访问控制相关的那些指令可以放在,htaccess文件(每个目录下都可以有一个)中:All;None:3.order和allow,deny order:定义生效次序;写在后面的表示默认法则; Allow from, Deny from 来源地址: IP NetAddr: 172.16172.16.0.0172.16.0.0/16172.16.0.0/255.255.0.0
访问控制关键字的改变:httpd2.2:
4.更改DocumentRoot路径
在httpd2.2中直接更改DocumentRoot的路径即可,httpd2.4中需要更改DocumentRoot后,还需加上对应的对<Didrectory /path/to >的定义才可。
5,定义站点主页面: 这里可以自定义,即使叫做haha.html
DirectoryIndex index.html
6.定义路径别名
格式:Alias /URL/ "/PATH/TO/SOMEDIR/" 前后的斜线最好都有且其有无应该保持一致。
eg;Alias /download/ "/rpm/pubs/" download是相对于DocumentRoot的;后面的目录是文件系统路径,且不在DocumentRoot下,而且在httpd2.4中必须定义/rpm/pubs的Directory
当你访问download时会调转显示/rpm/pubs下的文件内容
7.日志设定
日志类型: 访问类型 和 错误日志
错误日志;
ErrorLog logs/error_log
LogLevel warn
possible values include:debug,info,notice,warn,error,crit,alert,emerg
访问日志:
LogFormat "%h %l %u %t \"%r\" %>s %b \"%{Referer}i\" \"%{User-Agent}i\"" combined
CustomLog logs/access_log combined
日志格式中定义的宏选项表示的含义:
%h;客户端的Ip地址
%l:Remote User:通常为一个减号
%u:Remote user:非为登录访问时,其为一个减号
%t:服务器收到请求的时间
%r:即便是请求报文的首行,记录了此次请求的方法,“URL”以及协议版本
%>s:响应状态码
%b:响应报文的大小,单位是字节,不包括响应报文的http首部
%{Referer}i:请求报文中首部“referer”的值,即从哪个页面中的超链接跳转至当前页面的;
%{User-agent}:请求报文中首部“User-Agent”的值,即发出请求的应用程序;
8,status页面
1.下面的模块需加载
LoadModule status_module modules/mod_status.so
2.配置选项
httpd-2.2
<Location /server-status>
SetHandler server-status
Order allow,deny
Allow from all
</Location>
httpd-2.4:
<Location /status>
SetHandler server-status
Require all granted 注意和上面2,2中关于访问控制的区别
</Location>
3.basic认证的实现
方法:
a.配置认证的设定
b.利用htpasswd命令生成认证用户和认证用户存放的文件
c.验证
a.编辑/etc/httpd/conf/httpd.conf,添加此配置

四、虚拟主机
三种实现方案:
基于IP:
为每个虚拟主机准备至少一个IP地址
基于port:
为每个虚拟主机至少使用一个独立的port
基于FQDN:在httpdd2.2中使用时要加NameVirtualHost IP:80,httpd-2.4不用添加
为每个虚拟主机使用至少一个FQDN;
注意:一般虚拟机不要同中心主机混用,因此要使用虚拟主机,得先禁用‘main’主机;
禁用方法:注释掉配置文件中DocumentRoot 这一行即可
方法: 1.注释中心主机
2.配置虚拟主机文件
3.进行验证
httpd2.2和httpd2.4的区别:
1.httpd2.2基于域名的虚拟主机时,需要加上NameVirtualHost IP:80,httpd2.4不需要
2.httpd2.4做虚拟主机时需要加上<directory /path/to>的定义,httpd2.2不需要
注释中心主机
2.单独编辑一个vhost.conf文件

基于虚拟主机的只能有一个FQDN使用https
过程: 1.配置CA 2.配置http服务支持ssl 3.测试
1.配置ssl
2.配置http服务支持ssl
将服务器CA根证书导入到浏览器,然后访问;
测试成功了

1.httpd服务的安装
2.主配置文件/etc/httpd/conf/httpd.conf常见选项简介
3.basic认证的实现
4.基于ip,port和FQDN的虚拟主机的实现
5.实现ssl加密的http服务
6.简单的压力测试
7.关于httpd2.2和httpd2.4之间的差异会贯穿在整篇文章中
一、安装httpd服务
[root@centos7-1 ~]#yum -y install httpd
[root@centos7-1 ~]# rpm -q httpd
httpd-2.4.6-40.el7.centos.x86_64
[root@centos7-1 ~]# tree /etc/httpd/   #httpd2.4的安装后的文件结构
/etc/httpd/
├── conf
│   ├── httpd.conf
│   └── magic
├── conf.d
│   ├── autoindex.conf
│   ├── manual.conf
│   ├── php.conf
│   ├── README
│   ├── userdir.conf
│   ├── welcome.conf
├── conf.modules.d
│   ├── 00-base.conf          #不同于2.2的是,LoadModule等大部分都在此文件中
│   ├── 00-dav.conf
│   ├── 00-lua.conf
│   ├── 00-mpm.conf
│   ├── 00-proxy.conf
│   ├── 00-systemd.conf
│   ├── 01-cgi.conf
│   └── 10-php.conf
├── logs -> ../../var/log/httpd
├── modules -> ../../usr/lib64/httpd/modules
└── run -> /run/httpd

[root@Cent6 ~]# tree /etc/httpd/  #httpd2.4的安装后的文件结构
/etc/httpd/
├── conf
│   ├── httpd.conf
│   └── magic
├── conf.d
│   ├── mod_dnssd.conf
│   ├── php.conf
│   ├── README
│   └── welcome.conf
├── logs -> ../../var/log/httpd
├── modules -> ../../usr/lib64/httpd/modules
└── run -> ../../var/run/httpd
httpd的主要配置文件有几类: 应用程序的文件:/usr/sbin/httpd 配置文件:/etc/httpd/conf.d/*.conf和/etc/httpd/conf/httpd.conf 日志文件:/var/log/httpd web资源主目录:/var/www/html
2.主配置文件/etc/httpd/conf/httpd.conf常见选项简介 <Directory>中“基于源地址”实现访问控制
1.options 后跟一个或多个空白字符分隔的"选项“列表; Indexes:指明的URL路径下不存在和定义的主页面资源相符的资源文件时,返回索引列表给用户FollowSymLinks:允许跟踪符号链接文件所指向的源文件None:All;2.AllowOverride 与访问控制相关的那些指令可以放在,htaccess文件(每个目录下都可以有一个)中:All;None:3.order和allow,deny order:定义生效次序;写在后面的表示默认法则; Allow from, Deny from 来源地址: IP NetAddr: 172.16172.16.0.0172.16.0.0/16172.16.0.0/255.255.0.0
访问控制关键字的改变:httpd2.2:
<Directory "/var/www/icons">
Options Indexes MultiViews FollowSymLinks
AllowOverride None
Order allow,deny
Allow from all
</Directory>
httpd2.4:
<Directory /var/www/html/admin>
Options Indexes FollowSymLinks
AllowOverride None
Require all granted
</Directory>
4.更改DocumentRoot路径
在httpd2.2中直接更改DocumentRoot的路径即可,httpd2.4中需要更改DocumentRoot后,还需加上对应的对<Didrectory /path/to >的定义才可。
5,定义站点主页面: 这里可以自定义,即使叫做haha.html
DirectoryIndex index.html
6.定义路径别名
格式:Alias /URL/ "/PATH/TO/SOMEDIR/" 前后的斜线最好都有且其有无应该保持一致。
eg;Alias /download/ "/rpm/pubs/" download是相对于DocumentRoot的;后面的目录是文件系统路径,且不在DocumentRoot下,而且在httpd2.4中必须定义/rpm/pubs的Directory
当你访问download时会调转显示/rpm/pubs下的文件内容
7.日志设定
日志类型: 访问类型 和 错误日志
错误日志;
ErrorLog logs/error_log
LogLevel warn
possible values include:debug,info,notice,warn,error,crit,alert,emerg
访问日志:
LogFormat "%h %l %u %t \"%r\" %>s %b \"%{Referer}i\" \"%{User-Agent}i\"" combined
CustomLog logs/access_log combined
日志格式中定义的宏选项表示的含义:
%h;客户端的Ip地址
%l:Remote User:通常为一个减号
%u:Remote user:非为登录访问时,其为一个减号
%t:服务器收到请求的时间
%r:即便是请求报文的首行,记录了此次请求的方法,“URL”以及协议版本
%>s:响应状态码
%b:响应报文的大小,单位是字节,不包括响应报文的http首部
%{Referer}i:请求报文中首部“referer”的值,即从哪个页面中的超链接跳转至当前页面的;
%{User-agent}:请求报文中首部“User-Agent”的值,即发出请求的应用程序;
8,status页面
1.下面的模块需加载
LoadModule status_module modules/mod_status.so
2.配置选项
httpd-2.2
<Location /server-status>
SetHandler server-status
Order allow,deny
Allow from all
</Location>
httpd-2.4:
<Location /status>
SetHandler server-status
Require all granted 注意和上面2,2中关于访问控制的区别
</Location>
3.basic认证的实现
方法:
a.配置认证的设定
b.利用htpasswd命令生成认证用户和认证用户存放的文件
c.验证
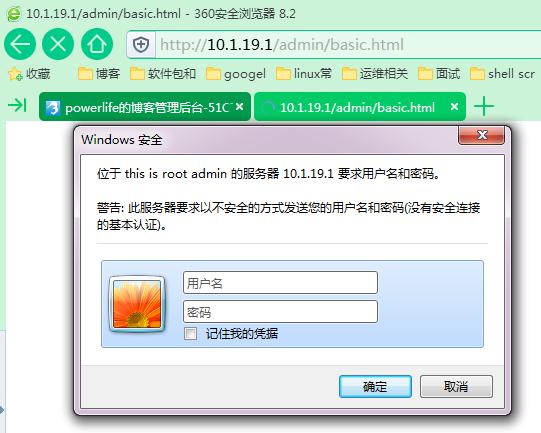
a.编辑/etc/httpd/conf/httpd.conf,添加此配置
<Directory /var/www/html/admin>
options none
allowoverride none
AuthType basic                   #认证方式
AuthName "this is root admin"    #认证提示语
AuthUserFile "/etc/httpd/conf/.htpasswd"    #认证用户的存放文件
AuthGroupFile "/etc/httpd/conf/.htgroup"   #认证用户组的文件的位置
require user jay          #如果想让文件中所有的用户都生效可使用 require valid-user
require group tom
</Directory>
b.提供认证用户
[root@centos7-1 httpd]# htpasswd -c -m /etc/httpd/conf/.htpasswd jay #c选项是创建文件,仅第一次使用,否则会覆盖之前的内容
[root@centos7-1 httpd]# htpasswd -m /etc/httpd/conf/.htpasswd tom
[root@centos7-1 httpd]# vim /etc/httpd/conf/.htgroup  # 直接编辑文件即可
tom:tom
c.认证

四、虚拟主机
三种实现方案:
基于IP:
为每个虚拟主机准备至少一个IP地址
基于port:
为每个虚拟主机至少使用一个独立的port
基于FQDN:在httpdd2.2中使用时要加NameVirtualHost IP:80,httpd-2.4不用添加
为每个虚拟主机使用至少一个FQDN;
注意:一般虚拟机不要同中心主机混用,因此要使用虚拟主机,得先禁用‘main’主机;
禁用方法:注释掉配置文件中DocumentRoot 这一行即可
方法: 1.注释中心主机
2.配置虚拟主机文件
3.进行验证
httpd2.2和httpd2.4的区别:
1.httpd2.2基于域名的虚拟主机时,需要加上NameVirtualHost IP:80,httpd2.4不需要
2.httpd2.4做虚拟主机时需要加上<directory /path/to>的定义,httpd2.2不需要
注释中心主机
[root@centos7-1 httpd]# vim /etc/httpd/conf/httpd.conf
#DocumentRoot "/var/www/html"
2.单独编辑一个vhost.conf文件
[root@centos7-1 httpd]# vim /etc/httpd/conf.d/vhost.conf
#NameVirtualHost 10.1.19.1 80  如果2.2的话基于域名的虚拟主机时需要加上此项,2.4不用
<virtualhost 10.1.19.1:80>
servername www.a.com
documentroot /www/a/
<Directory /www/a>
options none
allowoverride none
require all granted
</Directory>
</virtualhost>

<virtualhost 10.1.19.12:80>
servername www.b.com
documentroot /www/b/
<Directory /www/b>
options none
allowoverride none
require all granted
</Directory>
</virtualhost>

<virtualhost 10.1.19.1:8080>
servername www.c.com
documentroot /www/c/
<Directory /www/c>
options none
allowoverride none
require all granted
</Directory>
</virtualhost>

<virtualhost 10.1.19.12:80>
servername www.d.com
documentroot /www/d/
<Directory /www/d>
options none
allowoverride none
require all granted
</Directory>
</virtualhost>
3.编辑hosts文件,让本机可以解析域名
[root@centos7-1 conf.d]# cat /etc/hosts
127.0.0.1   localhost localhost.localdomain localhost4 localhost4.localdomain4 centos7-1
::1         localhost localhost.localdomain localhost6 localhost6.localdomain6
10.1.19.1  www.a.com
10.1.19.1 www.b.com
10.1.19.1 www.d.com
4.测试
[root@centos7-1 conf.d]# curl http://www.a.com a [root@centos7-1 conf.d]# curl http://www.a.com:8080 c [root@centos7-1 conf.d]# curl http://www.b.com/ b [root@centos7-1 conf.d]# curl http://www.d.com/ d5.实现ssl加密的http服务

基于虚拟主机的只能有一个FQDN使用https
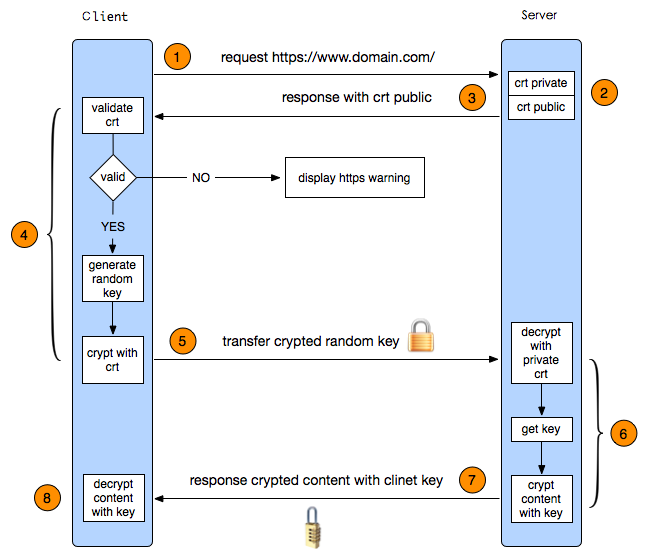
过程: 1.配置CA 2.配置http服务支持ssl 3.测试
1.配置ssl
CA服务端,本次实验都在一台机器上:

[root@centos7-1 ~]# cd /etc/pki/CA/
[root@centos7-1 CA]# touch index.txt serial
[root@centos7-1 CA]# echo 01> serial

生成私钥:

[root@centos7-1 CA]# (umask 077; openssl genrsa -out /etc/pki/CA/private/cakey.pem 1024)
Generating RSA private key, 1024 bit long modulus
..............++++++
...++++++
e is 65537 (0x10001)
[root@centos7-1 CA]# tree
.
├── certs
├── crl
├── index.txt
├── newcerts
├── private
│   └── cakey.pem
└── serial

生成自签证书:

[root@centos7-1 CA]# openssl req -new -x509 -key private/cakey.pem -out ./cacert.pem -days 365
You are about to be asked to enter information that will be incorporated
into your certificate request.
What you are about to enter is what is called a Distinguished Name or a DN.
There are quite a few fields but you can leave some blank
For some fields there will be a default value,
If you enter '.', the field will be left blank.
-----
Country Name (2 letter code) [XX]:CN
State or Province Name (full name) []:beijing
Locality Name (eg, city) [Default City]:beijing
Organization Name (eg, company) [Default Company Ltd]:magedu
Organizational Unit Name (eg, section) []:ops
Common Name (eg, your name or your server's hostname) []:magedu.com
Email Address []:

生成httpd私钥
[root@centos7-1 ~]# mkdir /etc/httpd/ssl
[root@centos7-1 httpd]# cd /etc/httpd/ssl
[root@centos7-1 httpd]# (umask 077;openssl genrsa -out http.key 1024)
Generating RSA private key, 1024 bit long modulus
......++++++
.++++++
e is 65537 (0x10001)

生成CA请求:
[root@centos7-1 httpd]# openssl req  -new -key http.key -out http.csr -days 365

Country Name (2 letter code) [XX]:CN
State or Province Name (full name) []:beijing
Locality Name (eg, city) [Default City]:beijing
Organization Name (eg, company) [Default Company Ltd]:magedu
Organizational Unit Name (eg, section) []:ops
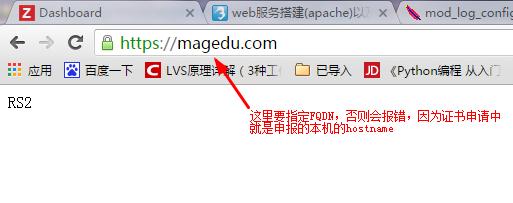
Common Name (eg, your name or your server's hostname) []:magedu.com
Email Address []:

CA认证请求:   因为是同一台机器,就不复制了
[root@centos7-1 httpd]# openssl ca -in http.csr -out http.crt -days 365
Certificate is to be certified until Nov  7 09:56:26 2017 GMT (365 days)
Sign the certificate? [y/n]:y

复制crt文件到指定位置:

[root@centos7-1 ssl]# ls
http.crt  http.key
2.配置http服务支持ssl
[root@centos7-1 ~]# rpm -q mod_ssl
package mod_ssl is not installed
[root@centos7-1 ~]# yum -y install mod_ssl
[root@centos7-1 ~]# rpm -ql mod_ssl
/etc/httpd/conf.d/ssl.conf
/etc/httpd/conf.modules.d/00-ssl.conf
/usr/lib64/httpd/modules/mod_ssl.so
/usr/libexec/httpd-ssl-pass-dialog
/var/cache/httpd/ssl
3.配置ssl.conf
[root@centos7-1 ~]# vim /etc/httpd/conf.d/ssl.conf
ServerName magedu.com:443
SSLCertificateFile /etc/httpd/ssl/http.crt
SSLCertificateKeyFile /etc/httpd/ssl/http.key
[root@centos7-1 ~]# httpd -t
Syntax OK
[root@centos7-1 ~]# service httpd restart
[root@centos7-1 conf.d]# ss -tan | grep 443
LISTEN     0      128         :::443                     :::*
4.测试
将服务器CA根证书导入到浏览器,然后访问;
测试成功了

相关文章推荐
- nginx配置httpd服务遇到问题
- 简单介绍一下linux下的ftp服务及相关配置
- 简单配置Samba服务
- 转:FTP服务及Linux下FTP服务器配置工具vfstpd的简单应用介绍
- vsftp服务简单配置!
- 简单配置Mdeamon邮件服务程序。
- linux下snmp服务简单配置
- 简单的配置smb服务,实现共享
- 安装vsftpd服务并简单配置
- 简单配置Samba服务
- 简单介绍一下linux下的ftp服务及相关配置
- 配置多个数据库服务简单命令
- 简单配置SVN服务
- Debian下简单配置SNMPD服务。
- linux下的ntp服务简单配置过程
- RHEL NFS服务的安装及简单配置 !!!
- linux系统服务总结之六:SQUID代理简单上网配置
- Linux下简单配置SAMBA服务,实现与Windows系统文件共享.
- CentOS Apache httpd cgi (CentOS上配置httpd服务运行cgi程序)
- Httpd服务的简单介绍
