在eclipse创建spring+springMVC+Mybatis的项目
2016-10-30 09:32
405 查看
现在使用maven构建的项目会让我们省去jar包的导入和每个工程都导入数量较多jar包的苦恼,特别是在团队开发中,我们应该保证我们使用的jar包的版本一致,使用maven之后,我们仅需要保证pom.xml文件一致。他会自己按<dependency>节点中配置的信息找到相应的jar包。
下面是自己学习之后构建Spring+SpringMVC+Mybatis的工程构建过程:
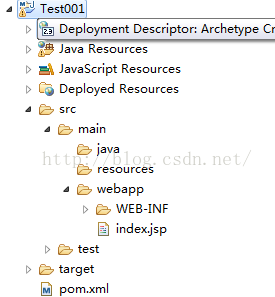
1.首先,我们应该确保eclipse中有maven插件并正常使用;创建一个maven的webapp项目:
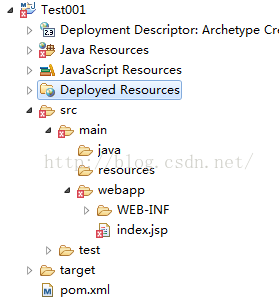
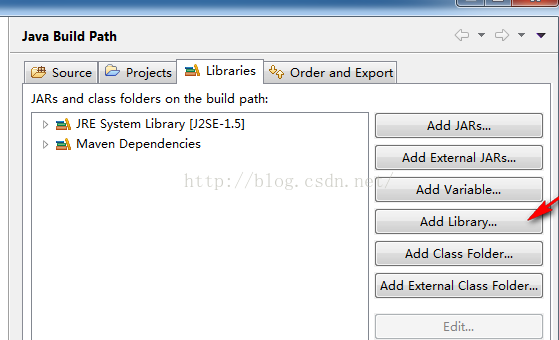
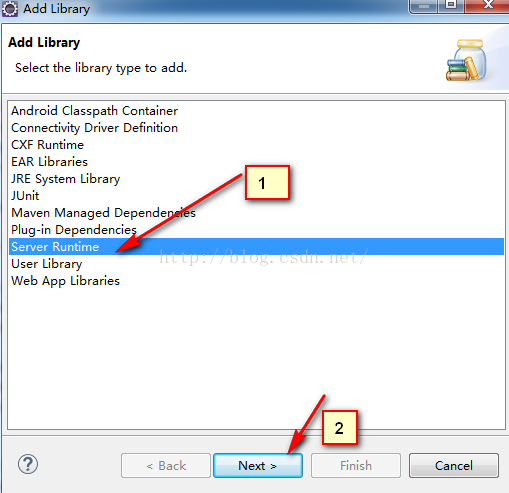
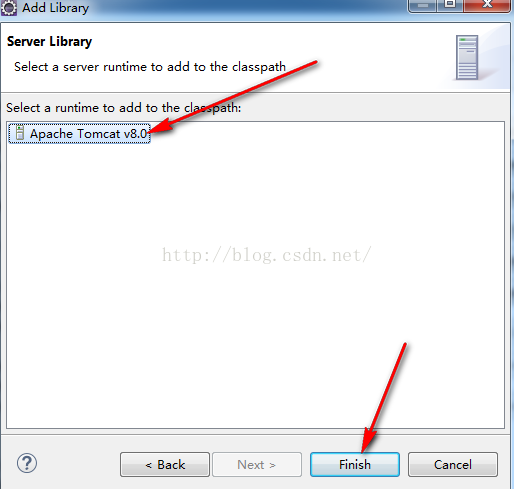
可以看见,这里的jsp文件有错误,这是因为开始时项目中没有导入javax.servlet.http.HttpServlet所在包导致的。我们build
path进包即可,在eclipse创建tomcat的服务之后步骤如下
a
b
c
d
2.现在一个maven工程创建好了,之后就是pom.xml和spring的配置文件的编写了:
pom.xml的代码:当然,需要什么包到http://mvnrepository.com/去搜索得到<dependency>放到pom.xml文件中即可;
<project xmlns="http://maven.apache.org/POM/4.0.0" xmlns:xsi="http://www.w3.org/2001/XMLSchema-instance"
xsi:schemaLocation="http://maven.apache.org/POM/4.0.0 http://maven.apache.org/maven-v4_0_0.xsd"> <modelVersion>4.0.0</modelVersion>
<groupId>com.ys.test001</groupId>
<artifactId>Test001</artifactId>
<packaging>war</packaging>
<version>0.0.1-SNAPSHOT</version>
<name>Test001 Maven Webapp</name>
<url>http://maven.apache.org</url>
<dependencies>
<dependency>
<groupId>junit</groupId>
<artifactId>junit</artifactId>
<version>4.7</version>
<scope>test</scope>
</dependency>
<!-- spring-mvc包 -->
<dependency>
<groupId>org.springframework</groupId>
<artifactId>spring-webmvc</artifactId>
<version>4.2.0.RELEASE</version>
</dependency>
<!-- jsp显示数据需要的jar包 -->
<dependency>
<groupId>jstl</groupId>
<artifactId>jstl</artifactId>
<version>1.2</version>
</dependency>
<!--日志 -->
<dependency>
<groupId>log4j</groupId>
<artifactId>log4j</artifactId>
<version>1.2.17</version>
</dependency>
<dependency>
<groupId>org.apache.logging.log4j</groupId>
<artifactId>log4j-core</artifactId>
<version>2.0</version>
</dependency>
<dependency>
<groupId>org.apache.logging.log4j</groupId>
<artifactId>log4j-api</artifactId>
<version>2.0</version>
</dependency>
<!--spring4.0以上json和java对象的转换jackson包 spring4.0以上需要jackson2.6版本 -->
<dependency>
<groupId>com.fasterxml.jackson.core</groupId>
<artifactId>jackson-core</artifactId>
<version>2.6.1</version>
</dependency>
<dependency>
<groupId>com.fasterxml.jackson.core</groupId>
<artifactId>jackson-databind</artifactId>
<version>2.6.1</version>
</dependency>
<dependency>
<groupId>com.fasterxml.jackson.core</groupId>
<artifactId>jackson-annotations</artifactId>
<version>2.6.1</version>
</dependency>
<!--mybatis的包 -->
<dependency>
<groupId>org.mybatis</groupId>
<artifactId>mybatis</artifactId>
<version>3.2.8</version>
</dependency>
<!--mybatis和spring整合包 -->
<dependency>
<groupId>org.mybatis</groupId>
<artifactId>mybatis-spring</artifactId>
<version>1.2.2</version>
</dependency>
<!-- 我使用的连接数据的jar包 -->
<dependency>
<groupId>commons-dbcp</groupId>
<artifactId>commons-dbcp</artifactId>
<version>1.4</version>
</dependency>
<dependency>
<groupId>org.springframework</groupId>
<artifactId>spring-jdbc</artifactId>
<version>4.2.0.RELEASE</version>
</dependency>
<!--spring事务tx包的引用 -->
<dependency>
<groupId>org.springframework</groupId>
<artifactId>spring-tx</artifactId>
<version>4.2.0.RELEASE</version>
</dependency>
<!--数据库jar包 -->
<dependency>
<groupId>mysql</groupId>
<artifactId>mysql-connector-java</artifactId>
<version>5.1.18</version>
</dependency>
<dependency>
<groupId>commons-io</groupId>
<artifactId>commons-io</artifactId>
<version>2.2</version>
</dependency>
</dependencies>
<build>
<finalName>Test001</finalName>
</build>
</project>
3.spring和Mybatis的配置文件:
为了方便管理,我们在resources文件加入数据库连接信息:db.properties
并创建config/spring 和 config/mybatis文件夹,存放各自的配置文件:
log4j.properties:
</pre><pre name="code" class="java"># Global logging configuration
log4j.rootLogger=DEBUG, stdout
# MyBatis logging configuration...
log4j.logger.org.mybatis.example.BlogMapper=TRACE
# Console output...
log4j.appender.stdout=org.apache.log4j.ConsoleAppender
log4j.appender.stdout.layout=org.apache.log4j.PatternLayout
log4j.appender.stdout.layout.ConversionPattern=%5p [%t] - %m%n
我的db.properties文件信息:
jdbc.driver=com.mysql.jdbc.Driver
jdbc.url=jdbc:mysql://localhost:3306/test
jdbc.username=root
jdbc.password=root
spring-dao.xml文件:
<beans xmlns="http://www.springframework.org/schema/beans"
xmlns:xsi="http://www.w3.org/2001/XMLSchema-instance" xmlns:mvc="http://www.springframework.org/schema/mvc"
xmlns:context="http://www.springframework.org/schema/context"
xmlns:aop="http://www.springframework.org/schema/aop" xmlns:tx="http://www.springframework.org/schema/tx"
xsi:schemaLocation="http://www.springframework.org/schema/beans http://www.springframework.org/schema/beans/spring-beans-3.2.xsd http://www.springframework.org/schema/mvc http://www.springframework.org/schema/mvc/spring-mvc-3.2.xsd http://www.springframework.org/schema/context http://www.springframework.org/schema/context/spring-context-3.2.xsd htt
4000
p://www.springframework.org/schema/aop http://www.springframework.org/schema/aop/spring-aop-3.2.xsd http://www.springframework.org/schema/tx http://www.springframework.org/schema/tx/spring-tx-3.2.xsd ">
<!--配置数据库连接属性-->
<!--配置数据库连接属性加载db.properties的数据库连接信息文件 这里配置有很多学问,需要我以后学习-->
<context:property-placeholder location="classpath:db.properties"></context:property-placeholder>
<bean id="dataSource" class="org.apache.commons.dbcp.BasicDataSource">
<property name="driverClassName" value="${jdbc.driver}"/>
<property name="url" value="${jdbc.url}"/>
<property name="username" value="${jdbc.username}"/>
<property name="password" value="${jdbc.password}"/>
<property name="maxActive" value="30"/>
<property name="maxIdle" value="5"/>
</bean>
<!-- 让spring管理sqlsessionfactory 使用mybatis和spring整合包中的 -->
<bean id="sqlSessionFactory" class="org.mybatis.spring.SqlSessionFactoryBean">
<!--注入数据库连接对象-->
<property name="dataSource" ref="dataSource"/>
<!--加载mybatis配置文件 这里mybatis配置文件的工作都在spring中配置了所以mybatis只是配置别名就可以-->
<property name="configLocation" value="classpath:/config/mybatis/mybatisconfig.xml"/>
</bean>
<!-- mapper扫描器 -->
<bean class="org.mybatis.spring.mapper.MapperScannerConfigurer">
<!-- 扫描的包,如果要扫描多个,中间用,隔开 -->
<property name="basePackage" value="com.ys.mybatis.mapper"></property>
<property name="sqlSessionFactoryBeanName" value="sqlSessionFactory" />
</bean>
</beans>
spring-mvc.xml:
<beans xmlns="http://www.springframework.org/schema/beans"
xmlns:xsi="http://www.w3.org/2001/XMLSchema-instance" xmlns:mvc="http://www.springframework.org/schema/mvc"
xmlns:context="http://www.springframework.org/schema/context"
xmlns:aop="http://www.springframework.org/schema/aop" xmlns:tx="http://www.springframework.org/schema/tx"
xsi:schemaLocation="http://www.springframework.org/schema/beans http://www.springframework.org/schema/beans/spring-beans-3.2.xsd http://www.springframework.org/schema/mvc http://www.springframework.org/schema/mvc/spring-mvc-3.2.xsd http://www.springframework.org/schema/context http://www.springframework.org/schema/context/spring-context-3.2.xsd http://www.springframework.org/schema/aop http://www.springframework.org/schema/aop/spring-aop-3.2.xsd http://www.springframework.org/schema/tx http://www.springframework.org/schema/tx/spring-tx-3.2.xsd ">
<!--打开注解 -->
<mvc:annotation-driven></mvc:annotation-driven>
<!--可以访问静态文件 -->
<mvc:default-servlet-handler></mvc:default-servlet-handler>
<!--配置扫描包 -->
<context:component-scan base-package="com.ys.controller"></context:component-scan>
<!-- service包 -->
<context:component-scan base-package="com.ys.serviceimpl"></context:component-scan>
<!--配置视图解析器 -->
<bean
class="org.springframework.web.servlet.view.InternalResourceViewResolver">
<property name="viewClass"
value="org.springframework.web.servlet.view.JstlView" />
<property name="prefix" value="/WEB-INF/" />
<property name="suffix" value=".jsp" />
</bean>
<span style="white-space:pre"> </span><span style="font-family: Arial, Helvetica, sans-serif;"><!--</span><span style="font-family: Arial, Helvetica, sans-serif;">以后可能需要文件上传和拦截器</span><span style="font-family: Arial, Helvetica, sans-serif;">--></span><span style="white-space:pre">
</span>
</beans>
mybatisconfig.xml:
<?xml version="1.0" encoding="UTF-8" ?>
<!DOCTYPE configuration
PUBLIC "-//mybatis.org//DTD Config 3.0//EN"
"http://mybatis.org/dtd/mybatis-3-config.dtd">
<configuration>
<typeAliases>
<!-- 扫描别名 -->
<package name="com.ys.po"/>
</typeAliases>
<!-- 加载我们的Sql语句的xml文件 -->
<!-- 使用自动扫描器时,mapper.xml文件如果和mapper.java接口在一个目录则此处不用定义mappers -->
</configuration>
4.最后是web.xml加载我们上面的配置文件:
web.xml:
<?xml version="1.0" encoding="UTF-8"?>
<web-app xmlns:xsi="http://www.w3.org/2001/XMLSchema-instance"
xmlns="http://xmlns.jcp.org/xml/ns/javaee"
xsi:schemaLocation="http://xmlns.jcp.org/xml/ns/javaee http://xmlns.jcp.org/xml/ns/javaee/web-app_3_1.xsd" id="WebApp_ID" version="3.1">
<!-- 加载spring配置文件 -->
<servlet>
<servlet-name>springmvc</servlet-name>
<servlet-class>org.springframework.web.servlet.DispatcherServlet</servlet-class>
<init-param>
<param-name>contextConfigLocation</param-name>
<param-value>classpath:config/spring/spring-*.xml</param-value>
</init-param>
<load-on-startup>1</load-on-startup>
</servlet>
<!-- 设置url匹配模式 -->
<servlet-mapping>
<servlet-name>springmvc</servlet-name>
<url-pattern>/</url-pattern>
</servlet-mapping>
<!-- 解决post乱码 -->
<filter>
<filter-name>encodingFilter</filter-name>
<filter-class>org.springframework.web.filter.CharacterEncodingFilter</filter-class>
<init-param>
<param-name>encoding</param-name>
<param-value>utf-8</param-value>
</init-param>
<init-param>
<param-name>forceEncoding</param-name>
<param-value>true</param-value>
</init-param>
</filter>
<filter-mapping>
<filter-name>encodingFilter</filter-name>
<url-pattern>/*</url-pattern>
</filter-mapping>
</web-app>
5.现在是包和mapper.xml和controller和service编写:
UserInfo.java:
public class UserInfo {
private int id;
private String username;
private String password;<span style="font-family:Arial, Helvetica, sans-serif;"> 省略了get set方法</span>UserInfoService.java:
public interface UserInfoService {
public UserInfo getInfoById(int id);
}UserInfoServiceImpl.java:
@Service
public class UserInfoServiceImpl implements UserInfoService {
@Autowired
private MyPoDaoService daoService;
public UserInfo getInfoById(int id) {
// TODO Auto-generated method stub
if(id!=0&&id<3){
return daoService.GetUserInfo(id);
}else{
return null;
}
}<span style="color:#ff0000;">
</span>MyPoDaoService.java:
package com.ys.mybatis.mapper;
import com.ys.po.UserInfo;
public interface MyPoDaoService {
public UserInfo GetUserInfo(int id);
}MyPoDaoService.xml:
<?xml version="1.0" encoding="UTF-8" ?>
<!DOCTYPE mapper
PUBLIC "-//mybatis.org//DTD Mapper 3.0//EN"
"http://mybatis.org/dtd/mybatis-3-mapper.dtd">
<mapper namespace="com.ys.mybatis.mapper.MyPoDaoService">
<select id="GetUserInfo" resultType="com.ys.po.UserInfo">
select * from userinfo where id = #{id}
</select>
</mapper>
HelloController.java:
@Controller
public class HelloController {
@Autowired
private UserInfoServiceImpl userInfoSeriverImpl;
@RequestMapping("/hello")
public String sayHello(HttpServletRequest request, HttpServletResponse response){
request.setAttribute("say", "测试sayHello");
UserInfo infoById = userInfoSeriverImpl.getInfoById(1);
if(infoById!=null){
request.setAttribute("infoById", infoById);
System.out.println(infoById.toString());
}
request.setAttribute("say", "test Say Hello");
return "Hello";
}
}
Hello.jsp:
<%@ page language="java" contentType="text/html; charset=UTF-8"
pageEncoding="UTF-8"%>
<%@ taglib uri="http://java.sun.com/jsp/jstl/core" prefix="c" %>
<!DOCTYPE html PUBLIC "-//W3C//DTD HTML 4.01 Transitional//EN" "http://www.w3.org/TR/html4/loose.dtd">
<html>
<head>
<meta http-equiv="Content-Type" content="text/html; charset=UTF-8">
<title>Insert title here</title>
</head>
<body>
<h1>say Hello</h1>
<h2>${say}</h2>
<c:if test="${infoById!=null}">
<h1>您好:${infoById.username}</h1>
</c:if>
<c:if test="${infoById==null }">
<h1>对不起,没有取得用户名</h1>
</c:if>
</body>
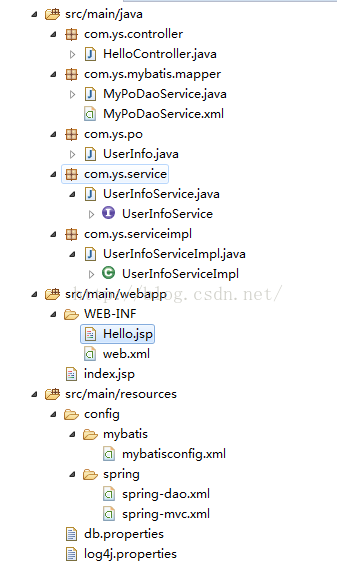
</html>最后的工程结构如下:
数据库UserInfo表内容:

运行结果:
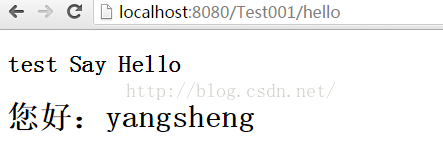
现在我们就可以在此基础上增加我们需要的功能和页面了。
下面是自己学习之后构建Spring+SpringMVC+Mybatis的工程构建过程:
1.首先,我们应该确保eclipse中有maven插件并正常使用;创建一个maven的webapp项目:
可以看见,这里的jsp文件有错误,这是因为开始时项目中没有导入javax.servlet.http.HttpServlet所在包导致的。我们build
path进包即可,在eclipse创建tomcat的服务之后步骤如下
a
b
c
d
2.现在一个maven工程创建好了,之后就是pom.xml和spring的配置文件的编写了:
pom.xml的代码:当然,需要什么包到http://mvnrepository.com/去搜索得到<dependency>放到pom.xml文件中即可;
<project xmlns="http://maven.apache.org/POM/4.0.0" xmlns:xsi="http://www.w3.org/2001/XMLSchema-instance"
xsi:schemaLocation="http://maven.apache.org/POM/4.0.0 http://maven.apache.org/maven-v4_0_0.xsd"> <modelVersion>4.0.0</modelVersion>
<groupId>com.ys.test001</groupId>
<artifactId>Test001</artifactId>
<packaging>war</packaging>
<version>0.0.1-SNAPSHOT</version>
<name>Test001 Maven Webapp</name>
<url>http://maven.apache.org</url>
<dependencies>
<dependency>
<groupId>junit</groupId>
<artifactId>junit</artifactId>
<version>4.7</version>
<scope>test</scope>
</dependency>
<!-- spring-mvc包 -->
<dependency>
<groupId>org.springframework</groupId>
<artifactId>spring-webmvc</artifactId>
<version>4.2.0.RELEASE</version>
</dependency>
<!-- jsp显示数据需要的jar包 -->
<dependency>
<groupId>jstl</groupId>
<artifactId>jstl</artifactId>
<version>1.2</version>
</dependency>
<!--日志 -->
<dependency>
<groupId>log4j</groupId>
<artifactId>log4j</artifactId>
<version>1.2.17</version>
</dependency>
<dependency>
<groupId>org.apache.logging.log4j</groupId>
<artifactId>log4j-core</artifactId>
<version>2.0</version>
</dependency>
<dependency>
<groupId>org.apache.logging.log4j</groupId>
<artifactId>log4j-api</artifactId>
<version>2.0</version>
</dependency>
<!--spring4.0以上json和java对象的转换jackson包 spring4.0以上需要jackson2.6版本 -->
<dependency>
<groupId>com.fasterxml.jackson.core</groupId>
<artifactId>jackson-core</artifactId>
<version>2.6.1</version>
</dependency>
<dependency>
<groupId>com.fasterxml.jackson.core</groupId>
<artifactId>jackson-databind</artifactId>
<version>2.6.1</version>
</dependency>
<dependency>
<groupId>com.fasterxml.jackson.core</groupId>
<artifactId>jackson-annotations</artifactId>
<version>2.6.1</version>
</dependency>
<!--mybatis的包 -->
<dependency>
<groupId>org.mybatis</groupId>
<artifactId>mybatis</artifactId>
<version>3.2.8</version>
</dependency>
<!--mybatis和spring整合包 -->
<dependency>
<groupId>org.mybatis</groupId>
<artifactId>mybatis-spring</artifactId>
<version>1.2.2</version>
</dependency>
<!-- 我使用的连接数据的jar包 -->
<dependency>
<groupId>commons-dbcp</groupId>
<artifactId>commons-dbcp</artifactId>
<version>1.4</version>
</dependency>
<dependency>
<groupId>org.springframework</groupId>
<artifactId>spring-jdbc</artifactId>
<version>4.2.0.RELEASE</version>
</dependency>
<!--spring事务tx包的引用 -->
<dependency>
<groupId>org.springframework</groupId>
<artifactId>spring-tx</artifactId>
<version>4.2.0.RELEASE</version>
</dependency>
<!--数据库jar包 -->
<dependency>
<groupId>mysql</groupId>
<artifactId>mysql-connector-java</artifactId>
<version>5.1.18</version>
</dependency>
<dependency>
<groupId>commons-io</groupId>
<artifactId>commons-io</artifactId>
<version>2.2</version>
</dependency>
</dependencies>
<build>
<finalName>Test001</finalName>
</build>
</project>
3.spring和Mybatis的配置文件:
为了方便管理,我们在resources文件加入数据库连接信息:db.properties
并创建config/spring 和 config/mybatis文件夹,存放各自的配置文件:
log4j.properties:
</pre><pre name="code" class="java"># Global logging configuration
log4j.rootLogger=DEBUG, stdout
# MyBatis logging configuration...
log4j.logger.org.mybatis.example.BlogMapper=TRACE
# Console output...
log4j.appender.stdout=org.apache.log4j.ConsoleAppender
log4j.appender.stdout.layout=org.apache.log4j.PatternLayout
log4j.appender.stdout.layout.ConversionPattern=%5p [%t] - %m%n
我的db.properties文件信息:
jdbc.driver=com.mysql.jdbc.Driver
jdbc.url=jdbc:mysql://localhost:3306/test
jdbc.username=root
jdbc.password=root
spring-dao.xml文件:
<beans xmlns="http://www.springframework.org/schema/beans"
xmlns:xsi="http://www.w3.org/2001/XMLSchema-instance" xmlns:mvc="http://www.springframework.org/schema/mvc"
xmlns:context="http://www.springframework.org/schema/context"
xmlns:aop="http://www.springframework.org/schema/aop" xmlns:tx="http://www.springframework.org/schema/tx"
xsi:schemaLocation="http://www.springframework.org/schema/beans http://www.springframework.org/schema/beans/spring-beans-3.2.xsd http://www.springframework.org/schema/mvc http://www.springframework.org/schema/mvc/spring-mvc-3.2.xsd http://www.springframework.org/schema/context http://www.springframework.org/schema/context/spring-context-3.2.xsd htt
4000
p://www.springframework.org/schema/aop http://www.springframework.org/schema/aop/spring-aop-3.2.xsd http://www.springframework.org/schema/tx http://www.springframework.org/schema/tx/spring-tx-3.2.xsd ">
<!--配置数据库连接属性-->
<!--配置数据库连接属性加载db.properties的数据库连接信息文件 这里配置有很多学问,需要我以后学习-->
<context:property-placeholder location="classpath:db.properties"></context:property-placeholder>
<bean id="dataSource" class="org.apache.commons.dbcp.BasicDataSource">
<property name="driverClassName" value="${jdbc.driver}"/>
<property name="url" value="${jdbc.url}"/>
<property name="username" value="${jdbc.username}"/>
<property name="password" value="${jdbc.password}"/>
<property name="maxActive" value="30"/>
<property name="maxIdle" value="5"/>
</bean>
<!-- 让spring管理sqlsessionfactory 使用mybatis和spring整合包中的 -->
<bean id="sqlSessionFactory" class="org.mybatis.spring.SqlSessionFactoryBean">
<!--注入数据库连接对象-->
<property name="dataSource" ref="dataSource"/>
<!--加载mybatis配置文件 这里mybatis配置文件的工作都在spring中配置了所以mybatis只是配置别名就可以-->
<property name="configLocation" value="classpath:/config/mybatis/mybatisconfig.xml"/>
</bean>
<!-- mapper扫描器 -->
<bean class="org.mybatis.spring.mapper.MapperScannerConfigurer">
<!-- 扫描的包,如果要扫描多个,中间用,隔开 -->
<property name="basePackage" value="com.ys.mybatis.mapper"></property>
<property name="sqlSessionFactoryBeanName" value="sqlSessionFactory" />
</bean>
</beans>
spring-mvc.xml:
<beans xmlns="http://www.springframework.org/schema/beans"
xmlns:xsi="http://www.w3.org/2001/XMLSchema-instance" xmlns:mvc="http://www.springframework.org/schema/mvc"
xmlns:context="http://www.springframework.org/schema/context"
xmlns:aop="http://www.springframework.org/schema/aop" xmlns:tx="http://www.springframework.org/schema/tx"
xsi:schemaLocation="http://www.springframework.org/schema/beans http://www.springframework.org/schema/beans/spring-beans-3.2.xsd http://www.springframework.org/schema/mvc http://www.springframework.org/schema/mvc/spring-mvc-3.2.xsd http://www.springframework.org/schema/context http://www.springframework.org/schema/context/spring-context-3.2.xsd http://www.springframework.org/schema/aop http://www.springframework.org/schema/aop/spring-aop-3.2.xsd http://www.springframework.org/schema/tx http://www.springframework.org/schema/tx/spring-tx-3.2.xsd ">
<!--打开注解 -->
<mvc:annotation-driven></mvc:annotation-driven>
<!--可以访问静态文件 -->
<mvc:default-servlet-handler></mvc:default-servlet-handler>
<!--配置扫描包 -->
<context:component-scan base-package="com.ys.controller"></context:component-scan>
<!-- service包 -->
<context:component-scan base-package="com.ys.serviceimpl"></context:component-scan>
<!--配置视图解析器 -->
<bean
class="org.springframework.web.servlet.view.InternalResourceViewResolver">
<property name="viewClass"
value="org.springframework.web.servlet.view.JstlView" />
<property name="prefix" value="/WEB-INF/" />
<property name="suffix" value=".jsp" />
</bean>
<span style="white-space:pre"> </span><span style="font-family: Arial, Helvetica, sans-serif;"><!--</span><span style="font-family: Arial, Helvetica, sans-serif;">以后可能需要文件上传和拦截器</span><span style="font-family: Arial, Helvetica, sans-serif;">--></span><span style="white-space:pre">
</span>
</beans>
mybatisconfig.xml:
<?xml version="1.0" encoding="UTF-8" ?>
<!DOCTYPE configuration
PUBLIC "-//mybatis.org//DTD Config 3.0//EN"
"http://mybatis.org/dtd/mybatis-3-config.dtd">
<configuration>
<typeAliases>
<!-- 扫描别名 -->
<package name="com.ys.po"/>
</typeAliases>
<!-- 加载我们的Sql语句的xml文件 -->
<!-- 使用自动扫描器时,mapper.xml文件如果和mapper.java接口在一个目录则此处不用定义mappers -->
</configuration>
4.最后是web.xml加载我们上面的配置文件:
web.xml:
<?xml version="1.0" encoding="UTF-8"?>
<web-app xmlns:xsi="http://www.w3.org/2001/XMLSchema-instance"
xmlns="http://xmlns.jcp.org/xml/ns/javaee"
xsi:schemaLocation="http://xmlns.jcp.org/xml/ns/javaee http://xmlns.jcp.org/xml/ns/javaee/web-app_3_1.xsd" id="WebApp_ID" version="3.1">
<!-- 加载spring配置文件 -->
<servlet>
<servlet-name>springmvc</servlet-name>
<servlet-class>org.springframework.web.servlet.DispatcherServlet</servlet-class>
<init-param>
<param-name>contextConfigLocation</param-name>
<param-value>classpath:config/spring/spring-*.xml</param-value>
</init-param>
<load-on-startup>1</load-on-startup>
</servlet>
<!-- 设置url匹配模式 -->
<servlet-mapping>
<servlet-name>springmvc</servlet-name>
<url-pattern>/</url-pattern>
</servlet-mapping>
<!-- 解决post乱码 -->
<filter>
<filter-name>encodingFilter</filter-name>
<filter-class>org.springframework.web.filter.CharacterEncodingFilter</filter-class>
<init-param>
<param-name>encoding</param-name>
<param-value>utf-8</param-value>
</init-param>
<init-param>
<param-name>forceEncoding</param-name>
<param-value>true</param-value>
</init-param>
</filter>
<filter-mapping>
<filter-name>encodingFilter</filter-name>
<url-pattern>/*</url-pattern>
</filter-mapping>
</web-app>
5.现在是包和mapper.xml和controller和service编写:
UserInfo.java:
public class UserInfo {
private int id;
private String username;
private String password;<span style="font-family:Arial, Helvetica, sans-serif;"> 省略了get set方法</span>UserInfoService.java:
public interface UserInfoService {
public UserInfo getInfoById(int id);
}UserInfoServiceImpl.java:
@Service
public class UserInfoServiceImpl implements UserInfoService {
@Autowired
private MyPoDaoService daoService;
public UserInfo getInfoById(int id) {
// TODO Auto-generated method stub
if(id!=0&&id<3){
return daoService.GetUserInfo(id);
}else{
return null;
}
}<span style="color:#ff0000;">
</span>MyPoDaoService.java:
package com.ys.mybatis.mapper;
import com.ys.po.UserInfo;
public interface MyPoDaoService {
public UserInfo GetUserInfo(int id);
}MyPoDaoService.xml:
<?xml version="1.0" encoding="UTF-8" ?>
<!DOCTYPE mapper
PUBLIC "-//mybatis.org//DTD Mapper 3.0//EN"
"http://mybatis.org/dtd/mybatis-3-mapper.dtd">
<mapper namespace="com.ys.mybatis.mapper.MyPoDaoService">
<select id="GetUserInfo" resultType="com.ys.po.UserInfo">
select * from userinfo where id = #{id}
</select>
</mapper>
HelloController.java:
@Controller
public class HelloController {
@Autowired
private UserInfoServiceImpl userInfoSeriverImpl;
@RequestMapping("/hello")
public String sayHello(HttpServletRequest request, HttpServletResponse response){
request.setAttribute("say", "测试sayHello");
UserInfo infoById = userInfoSeriverImpl.getInfoById(1);
if(infoById!=null){
request.setAttribute("infoById", infoById);
System.out.println(infoById.toString());
}
request.setAttribute("say", "test Say Hello");
return "Hello";
}
}
Hello.jsp:
<%@ page language="java" contentType="text/html; charset=UTF-8"
pageEncoding="UTF-8"%>
<%@ taglib uri="http://java.sun.com/jsp/jstl/core" prefix="c" %>
<!DOCTYPE html PUBLIC "-//W3C//DTD HTML 4.01 Transitional//EN" "http://www.w3.org/TR/html4/loose.dtd">
<html>
<head>
<meta http-equiv="Content-Type" content="text/html; charset=UTF-8">
<title>Insert title here</title>
</head>
<body>
<h1>say Hello</h1>
<h2>${say}</h2>
<c:if test="${infoById!=null}">
<h1>您好:${infoById.username}</h1>
</c:if>
<c:if test="${infoById==null }">
<h1>对不起,没有取得用户名</h1>
</c:if>
</body>
</html>最后的工程结构如下:
数据库UserInfo表内容:
运行结果:
现在我们就可以在此基础上增加我们需要的功能和页面了。

相关文章推荐
- 用户增删改查:在eclipse创建Spring+SpringMVC+Mybatis的项目
- Intellij IDEA使用(十二)—— 使用Intellij IDEA导入Eclipse创建的Spring+SpringMVC+Mybatis(SSM)整合项目并修改相关配置
- eclipse 中创建 整合springmvc+mybatis+maven 的java web项目步骤,以及maven仓库配置
- Eclipse Maven SSM(Spring + SpringMVC + MyBatis)创建项目
- Eclipse使用(八)—— 使用Eclipse创建Spring+SpringMVC+Mybatis(SSM)整合项目
- maven环境搭建及创建spring+springmvc+mybatis项目(eclipse)
- IDEA 创建Spring + SpringMVC + MyBatis整合maven项目
- 使用Idea创建ssm项目,SpringMVC+Spring+MyBatis+Maven整合
- 创建一个SpringBoot + springmvc + hibernateJPA + MyBatis的项目
- eclipse下SpringMVC+Maven+Mybatis+MySQL项目搭建
- 创建一个Spring+SpringMVC+MyBatis+MySql+Maven项目需要注意的地方
- Eclipse Maven建web项目 与SSM三大框架整合教程(Spring+SpringMVC+MyBatis)
- 创建springmvc+mybatis的web项目
- ssm框架-spring+springmvc+mybatis+eclipse+oracle+tomcat小项目
- 从零开始搭建maven+springmvc+mybatis web项目(1)---maven项目目录创建
- 使用Idea创建ssm项目,SpringMVC+Spring+MyBatis+Maven整合
- Spring+SpringMvc+Mybatis框架集成搭建教程一(项目创建)
- Maven创建web项目:SpringMVC+Mybatis
- 使用maven创建java web项目+SpringMVC+Mybatis
- Eclipse Maven建web项目 与SSM三大框架整合教程(Spring+SpringMVC+MyBatis)