Spring in action--Part4-Integrating Spring
2016-10-28 15:04
267 查看
Chapter15.Working with remote services
Several remoting technologies are available to you as a Java developer, including these:1.Remote Method Invocation (RMI)
2.Caucho’s Hessian and Burlap
3.Spring’s own HTTP-based remoting
4.Web services with JAX-RPC and JAX-WS
15.1An overview of Spring remoting
The conversation between the other applications and Spittr begins with a remote procedure call (RPC) from the client applications. On the surface, an RPC is similar to a call to a method on a local object. Both are synchronous operations, blocking execution in the calling code until the called procedure is complete.
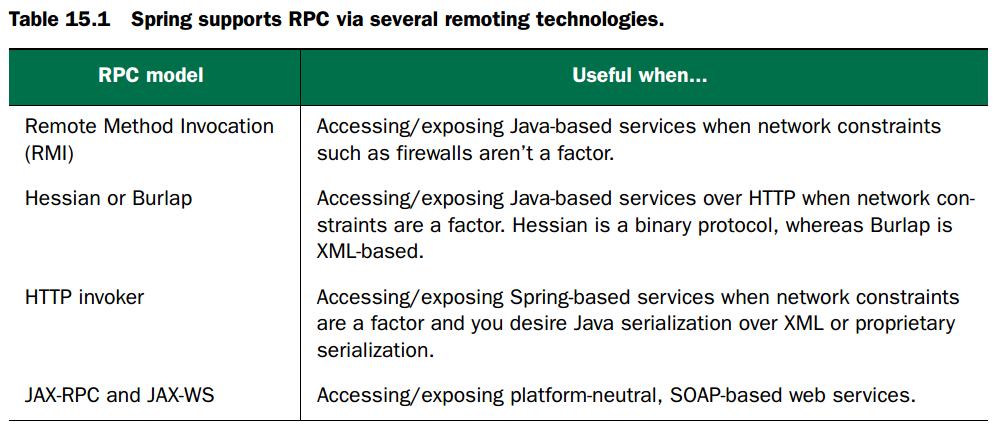
As I mentioned, Spring supports remoting for several different RPC models, including RMI, Caucho’s Hessian and Burlap, and Spring’s HTTP invoker. Table 15.1 outlines each of these models and briefly discusses their usefulness in various situations.

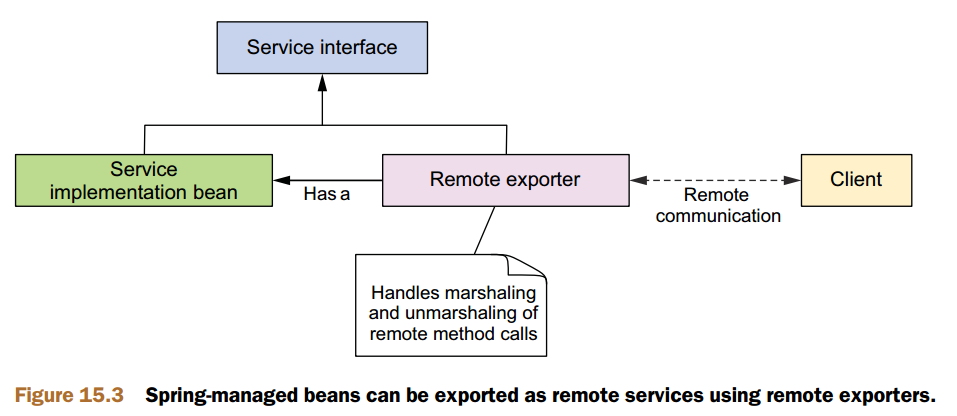
Whether you’ll be developing code that consumes remote services, implements those services, or both, working with remote services in Spring is purely a matter of configuration. You won’t have to write any Java code to support remoting. Your service beans don’t have to be aware that they’re involved in an RPC (although any beans passed to or returned from remote calls may need to implement java.io
.Serializable).对coder隐藏了RPC细节
15.2Working with RMI
For the Spittr application, I’ll show you how to wire an RMI service into a client application’s Spring application context. But first, let’s see how to use the RMI exporter to publish the SpitterService implementation as an RMI service.15.2.1Exporting an RMI service
CONFIGURING AN RMI SERVICE IN SPRINGThe RMI service that you’ll create exposes the methods from the SpitterService interface. As a reminder, the following listing shows what that interface looks like.
先定义一个接口
//SpitterService: defines the service layer of //the Spittr application
public interface SpitterService {
List<Spittle> getRecentSpittles(int count);
void saveSpittle(Spittle spittle);
void saveSpitter(Spitter spitter);
Spitter getSpitter(long id);
void startFollowing(Spitter follower, Spitter followee);
List<Spittle> getSpittlesForSpitter(Spitter spitter);
List<Spittle> getSpittlesForSpitter(String username);
Spitter getSpitter(String username);
Spittle getSpittleById(long id);
void deleteSpittle(long id);
List<Spitter> getAllSpitters();
}
The simplest way to use RmiServiceExporter to expose SpitterServiceImpl as an RMI service is to configure it in Spring with the following @Bean method:配置
@Bean
public RmiServiceExporter rmiExporter(SpitterService spitterService) {
RmiServiceExporter rmiExporter = new RmiServiceExporter();
rmiExporter.setService(spitterService);
rmiExporter.setServiceName("SpitterService");
rmiExporter.setServiceInterface(SpitterService.class);
return rmiExporter;
}
By default, RmiServiceExporter attempts to bind to an RMI registry on port 1099 of the local machine. If no RMI registry is found at that port, RmiServiceExporter will start one. If you’d rather bind to an RMI registry at a different port or host, you can specify that with the registryPort and registryHost properties.
For example, the following RmiServiceExporter attempts to bind to an RMI registry on port 1199 on the host rmi.spitter.com:
@Bean
public RmiServiceExporter rmiExporter(SpitterService spitterService) {
RmiServiceExporter rmiExporter = new RmiServiceExporter();
rmiExporter.setService(spitterService);
rmiExporter.setServiceName("SpitterService");
rmiExporter.setServiceInterface(SpitterService.class);
rmiExporter.setRegistryHost("rmi.spitter.com");
rmiExporter.setRegistryPort(1199);
return rmiExporter;
}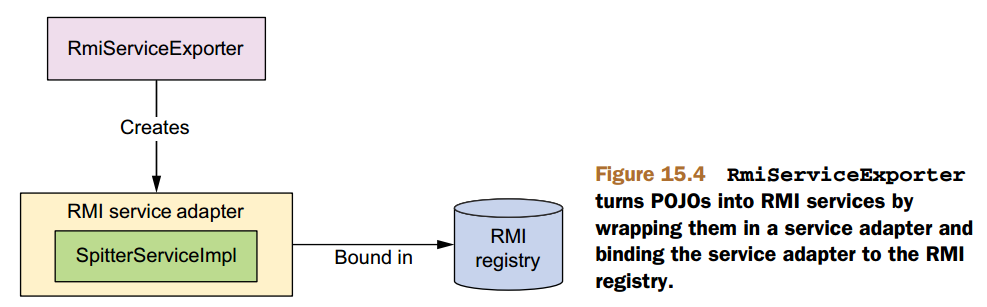
That’s all you need to do to have Spring turn a bean into an RMI service.只需上面两步,可以将bean配置为RMI service。这样就可以让一个client连接它了。
Let’s switch gears and see how to write a client of the Spitter RMI service.
15.2.2Wiring an RMI service
Using DI, any client of SpitterService can be ignorant of where that service comes from.Spring’s RmiProxyFactoryBean is a factory bean that creates a proxy to an RMI service. Using RmiProxyFactoryBean to reference an RMI SpitterService is as simple as adding the following @Bean method to the client’s Spring configuration:
@Bean
public RmiProxyFactoryBean spitterService() {
RmiProxyFactoryBean rmiProxy = new RmiProxyFactoryBean();
rmiProxy.setServiceUrl("rmi://localhost/SpitterService");
rmiProxy.setServiceInterface(SpitterService.class);
return rmiProxy;
}
The interaction between the client and the RMI proxy is illustrated in figure 15.5.

RmiProxyFactoryBean produces a proxy object that talks to remote RMI services on behalf of the client. The client talks to the proxy through the service’s interface as if the remote service were a local POJO.所以,RmiProxyFactoryBean在RMI 通信中起到了很大的作用。
Now that you’ve declared the RMI service as a Spring-managed bean, you can wire it as a dependency into another bean just as you would a regular non-remote bean.
For example, suppose the client needs to use the Spitter service to retrieve a list of Spittles for a given user. You might use @Autowired to wire the service proxy into the client:
@Autowired
SpitterService spitterService;
public List<Spittle> getSpittles(String userName) {
Spitter spitter = spitterService.getSpitter(userName);
return spitterService.getSpittlesForSpitter(spitter);
}
绑定方法跟本地bean是一样的。
RMI的缺陷:
RMI is an excellent way to communicate with remote services, but it has some limitations. 1.First, RMI has difficulty working across firewalls. That’s because RMI uses arbitrary ports for communication something that firewalls typically don’t allow. In an
intranet environment, this usually isn’t a concern. But if you’re working on the internet, you’ll probably run into trouble with RMI. Even through RMI has support for tunneling over HTTP (which is usually allowed by firewalls), setting up RMI tunneling can
be tricky.
2.Another thing to consider is that RMI is Java-based. That means both the client and the service must be written in Java. And because RMI uses Java serialization, the types of the objects being sent across the network must have the exact same version of the Java runtime on both sides of the call. These may or may not be issues for your application, but bear them in mind when choosing RMI for remoting.
15.3Exposing remote services with Hessian and Burlap
Let’s look at Spring’s HTTP invoker, which offers RPC over HTTP (like Hessian/Burlap) while at the same time using Java serialization of objects (like RMI).15.4Using Spring’s HttpInvoker
The HTTP invoker is a new remoting model created as part of the Spring Framework to perform remoting across HTTP (to make the firewalls happy) and using Java’s serialization (to make programmers happy).15.4.1Exposing beans as HTTP services
To export the Spitter service as an HTTP invoker based service, you need to configure an HttpInvokerServiceExporter bean like this:@Bean
public HttpInvokerServiceExporter
httpExportedSpitterService(SpitterService service) {
HttpInvokerServiceExporter exporter =
new HttpInvokerServiceExporter();
exporter.setService(service);
exporter.setServiceInterface(SpitterService.class);
return exporter;
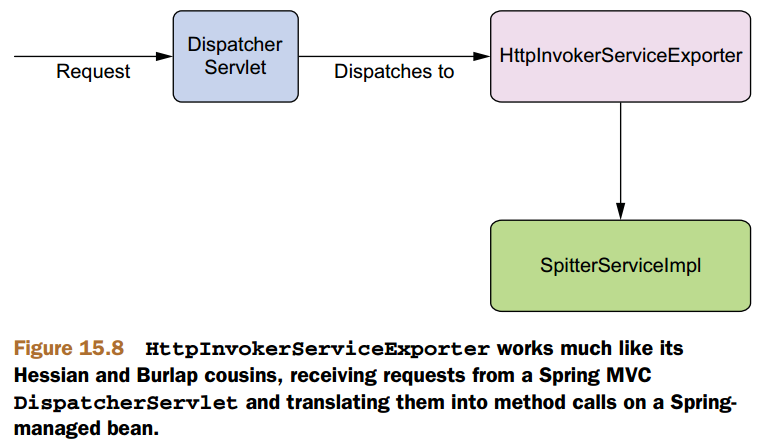
}As illustrated in figure 15.8, HttpInvokerServiceExporter works much like
HessianServiceExporter and BurlapServiceExporter. It’s a Spring MVC controller that receives requests from a client through DispatcherServlet and translates those requests into method calls on the service implementation POJO.通过DispatcherServlet然后它将分发请求到service call method。
Because HttpInvokerServiceExporter is a Spring MVC controller, you need to set up a URL handler to map an HTTP URL to the service, just like with the Hessian and Burlap exporters:
@Bean
public HandlerMapping httpInvokerMapping() {
SimpleUrlHandlerMapping mapping = new SimpleUrlHandlerMapping();
Properties mappings = new Properties();
mappings.setProperty("/spitter.service",
"httpExportedSpitterService");
mapping.setMappings(mappings);
return mapping;
}
15.4.2Accessing services via HTTP
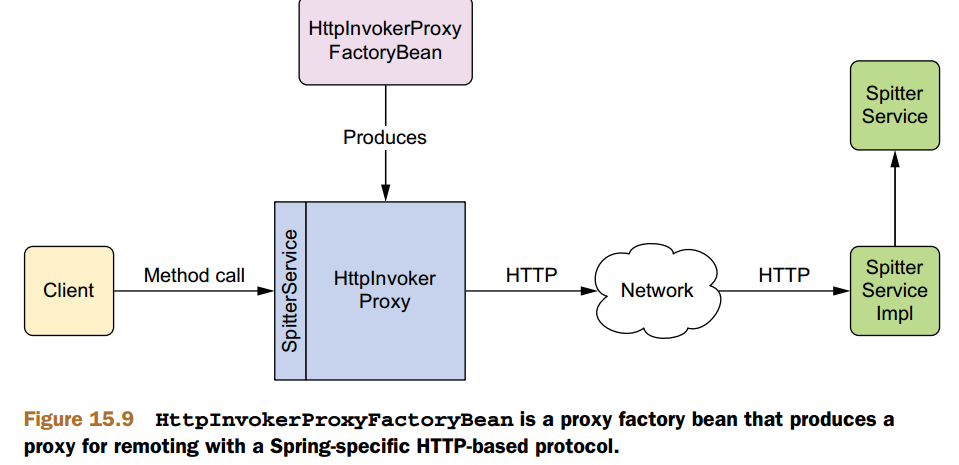
To wire the HTTP invoker–based service into your client’s Spring application context, you must configure a bean that proxies it using HttpInvokerProxyFactoryBean, as follows:
@Bean
public HttpInvokerProxyFactoryBean spitterService() {
HttpInvokerProxyFactoryBean proxy = new HttpInvokerProxyFactoryBean();
proxy.setServiceUrl("http://localhost:8080/Spitter/spitter.service");
proxy.setServiceInterface(SpitterService.class);
return proxy;
}
HttpInvoker的缺点:
HttpInvoker has one significant limitation that you should keep in mind: it’s a remoting solution offered by the Spring Framework only. 1.This means both the client and the service must be Spring-enabled applications.
This also implies, at least for now, that both the client and the service must be Java-based. And because Java serialization is being used, 2.both sides must have the same version of the classes as well as the same version of the Java runtime (much like RMI).
Next up, we’ll look at how Spring supports remoting through SOAP-based web services.
15.5Publishing and consuming web services
15.6Summary
On the client side, Spring provides proxy factory beans that enable you to configure remote services in your Spring application. Regardless of whether you’re using RMI, Hessian, Burlap, Spring’s own HTTP invoker, or web services for remoting, you can wire remote services into your application as if they were POJOs. Spring even catches any RemoteExceptions that are thrown and rethrows runtime RemoteAccessExceptions in their place, freeing your code from having to deal with an exception that it probably can’t recover from.Remote services, by their nature, are typically less efficient than local services.所以应该限制RPC调用次数。
In the next chapter, we’ll look at a different approach to building distributed applications by exposing portions of the application as RESTful resources.
Chapter16.Creating REST APIs with Spring MVC
16.1Getting REST
16.1.1The fundamentals of REST
A mistake that’s often made when approaching REST is to think of it as “web services with URLs”—to think of REST as another remote procedure call (RPC) mechanism, like SOAP, but invoked through plain HTTP URLs and without SOAP’s hefty XML namespaces.To understand what REST is all about, it helps to break down the acronym into its constituent parts:
1.Representational—REST resources can be represented in virtually any form, including XML, JavaScript Object Notation (JSON), or even HTML—whatever form best suits the consumer of those resources.
2.State—When working with REST, you’re more concerned with the state of a resource than with the actions you can take against resources.
3.Transfer—REST involves transferring resource data, in some representational form, from one application to another.
Put more succinctly, REST is about transferring the state of resources—in a representational form that is most appropriate for the client or server—from a server to a client (or vice versa).
Resources in REST are identified and located with URLs. Again, the focus is on things, not actions.资源
That said, there are actions in REST, and they’re defined by HTTP methods.These HTTP methods are often mapped to CRUD verbs as follows:动作或行为
1.Create—POST
2.Read—GET
3.Update—PUT or PATCH
4.Delete—DELETE
Even though this is the common mapping of HTTP methods to CRUD verbs, it’s not a strict requirement. 上面的method要求并不是严格的。
16.1.2How Spring supports REST
At version 4.0, Spring supports the creation of REST resources in the following ways:1.Controllers can handle requests for all HTTP methods, including the four primary REST methods: GET, PUT, DELETE, and POST. Spring 3.2 and higher also supports the PATCH method.
2.The @PathVariable(处理带参数的请求) annotation enables controllers to handle requests for parameterized URLs (URLs that have variable input as part of their path).
3.Resources can be represented in a variety of ways using Spring views and view resolvers, including View implementations for rendering model data as XML, JSON, Atom, and RSS.
4.The representation best suited for the client can be chosen using ContentNegotiatingViewResolver.
5.View-based rendering can be bypassed altogether using the @ResponseBody annotation and various HttpMethodConverter implementations.
6.Similarly, the @RequestBody annotation, along with HttpMethodConverter implementations, can convert inbound HTTP data into Java objects passed in to a controller’s handler methods.
7.Spring applications can consume REST resources using RestTemplate.
16.2Creating your first REST endpoint
It’s important to know that controllers usually don’t concern themselves with how resources are represented. Controllers deal with resources in terms of the Java objects that define them. But it’s not until after the controller has finished its work that the resource is transformed into a form that best suits the client.Spring offers two options to transform a resource’s Java representation into the representation that’s shipped to the client:
1.Content negotiation—A view is selected that can render the model into a representation to be served to the client.
2.Message conversion—A message converter transforms an object returned from the controller into a representation to be served to the client.
16.2.1Negotiating resource representation
Spring’s ContentNegotiatingViewResolver is a special view resolver that takes the content type that the client wants into consideration. In it’s simplest possible form, ContentNegotiatingViewResolver can be configured like this:@Bean
public ViewResolver cnViewResolver() {
return new ContentNegotiatingViewResolver();
}Understanding how ContentNegotiatingViewResolver works involves getting to know the content-negotiation two-step:
1.Determine the requested media type(s).
2.Find the best view for the requested media type(s).
You start by figuring out what kind of content the client wants.知道用户需要数据的类型
DETERMINING THE REQUESTED MEDIA TYPES
ContentNegotiatingViewResolver considers the Accept header and uses whatever media types it asks for, but only after it first looks at the URL’s file extension. If the URL has a file extension on the end, ContentNegotiatingViewResolver tries to figure out the desired type based on that extension. If the extension is .json, then the desired content type must be application/json. If it’s .xml, then the client is asking for application/xml. Of course, an .html extension indicates that the client wants the resource represented as HTML (text/html) 先看file extension,然后返回对应的数据格式,如果没有,那么就看Accept header,返回对应数据格式。
In the end, if there is no Accept header and the extension is no help, ContentNegotiatingViewResolver falls back to / as the default content type, meaning the client has to take whatever representation the server sends it.如果上面两个都没有帮助,那么就返回默认。
INFLUENCING HOW MEDIA TYPES ARE CHOSEN
The media-type selection process, as described so far, outlines the default strategy for determining the requested media types. But you can change how it behaves by giving it a ContentNegotiationManager(自定义策略). A few of the things you can do via a ContentNegotiationManager are as follows:
1.Specify a default content type to fall back to if a content type can’t be derived from the request.
2.Specify a content type via a request parameter.
3.Ignore the request’s Accept header.
4.Map request extensions to specific media types.
5.Use the Java Activation Framework (JAF) as a fallback option for looking up media types from extensions.
There are three ways to configure a ContentNegotiationManager:三种配置方法
1.Directly declare a bean whose type is ContentNegotiationManager.
2.Create the bean indirectly via ContentNegotiationManagerFactoryBean.
3.Override the configureContentNegotiation() method of WebMvcConfigurerAdapter.
For example, you might configure a ContentNegotiationManager with a default content type of application/ json in XML like this:
<bean id="contentNegotiationManager"
class="org.springframework.http.ContentNegotiationManagerFactoryBean"
p:defaultContentType="application/json">
THE BENEFITS AND LIMITATIONS OF CONTENTNEGOTIATINGVIEWRESOLVER
The key benefit of using ContentNegotiatingViewResolver is that it layers REST resource representation on top of the Spring MVC with no change in controller code.
The same controller method that serves human-facing HTML content can also serve JSON or XML to a non-human client.
ContentNegotiatingViewResolver also has a serious limitation. As a ViewResolver implementation, it only has an opportunity to determine how a resource is rendered to a client. It has no say in what representations a controller can consume from the client. If the client is sending JSON or XML, then ContentNegotiatingViewResolver isn’t much help.
它还有一个limitation,The View chosen renders the model—not the resourc —to the client.
When a client requests a list of Spittle objects in JSON, the client is probably expecting a response that looks something like this:
[
{
"id": 42,
"latitude": 28.419489,
"longitude": -81.581184,
"message": "Hello World!",
"time": 1400389200000
},
{
"id": 43,
"latitude": 28.419136,
"longitude": -81.577225,
"message": "Blast off!",
"time": 1400475600000
}
]
But because the model is a map of key-value pairs, the response looks more like this:
{
"spittleList": [
{
"id": 42,
"latitude": 28.419489,
"longitude": -81.581184,
"message": "Hello World!",
"time": 1400389200000
},
{
"id": 43,
"latitude": 28.419136,
"longitude": -81.577225,
"message": "Blast off!",
"time": 1400475600000
}
]
}
Because of these limitations, I generally prefer not to use ContentNegotiatingViewResolver. Instead, I lean heavily toward using Spring’s message converters for producing resource representations. Let’s see how you can employ Spring’s message converters in your controller methods.
16.2.2Working with HTTP message converters
Message conversion is a more direct way to transform data produced by a controller into a representation that’s served to a client. When using message conversion, DispatcherServlet doesn’t bother with ferrying model data to a view.In fact, there is no model, and there is no view. There is only data produced by the controller and a resource representation produced when a message converter transforms that data.
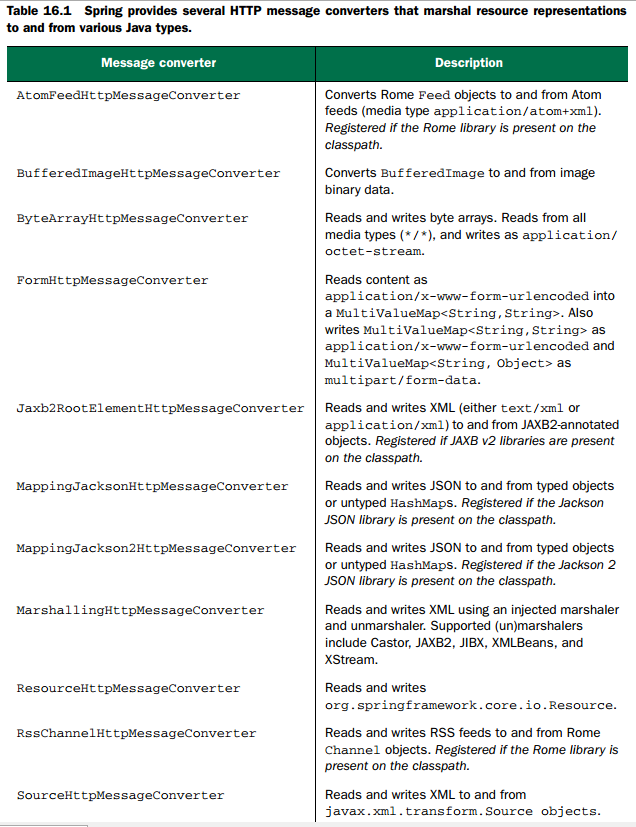
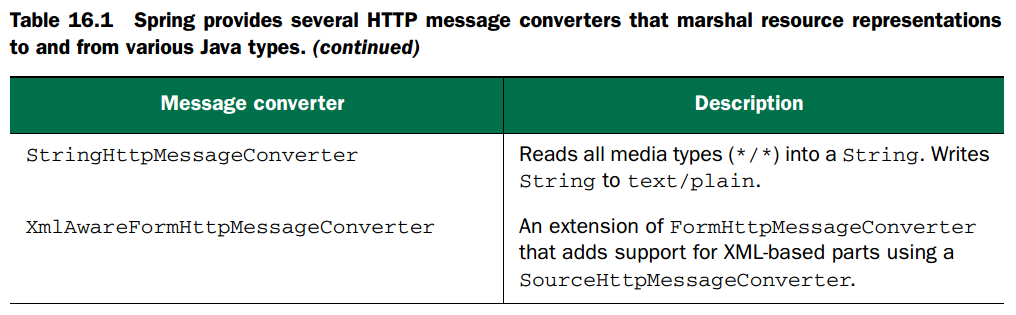
For example, suppose the client has indicated via the request’s Accept header that it can accept application/json. Assuming that the Jackson JSON library is in the application’s classpath, the object returned from the handler method is given to MappingJacksonHttpMessageConverter for conversion into a JSON representation to be returned to the client. On the other hand, if the request header indicates that the client prefers text/xml, then Jaxb2RootElementHttpMessageConverter is tasked with producing an XML response to the client.
RETURNING RESOURCE STATE IN THE RESPONSE BODY
Normally, when a handler method returns a Java object (anything other than String or an implementation of View), that object ends up in the model for rendering in the view. But if you’re going to employ message conversion, you need to tell Spring to skip the normal model/view flow and use a message converter instead. There are a handful of ways to do this, but the simplest is to annotate the controller method with @ResponseBody.
@RequestMapping(method=RequestMethod.GET,
produces="application/json")
public @ResponseBody List<Spittle> spittles(
@RequestParam(value="max",
defaultValue=MAX_LONG_AS_STRING) long max,
@RequestParam(value="count", defaultValue="20") int count) {
return spittleRepository.findSpittles(max, count);
}
**The @ResponseBody annotation tells Spring that you want to send the returned object as a resource to the clien**t, converted into some representational form that the client can accept. More specifically, DispatcherServlet considers the request’s Accept header and looks for a message converter that can give the client the representation it wants.
Speaking of the Accept header, note spittle()’s @RequestMapping. I’ve added a produces attribute to declare that this method will only handle requests where JSON output is expected. That is, this method will only handle requests whose Accept header includes application/json. Any other kind of request, even if it’s a GET request whose URL matches the path specified, won’t be handled by this method. 相当于又增加了一个输出约束。
RECEIVING RESOURCE STATE IN THE REQUEST BODY
Just as @ResponseBody tells Spring to employ a message converter when sending data to a client, the @RequestBody tells Spring to find a message converter to convert a resource representation coming from a client into an object.
For example, suppose that you need a way for a client to submit a new Spittle to be saved. You can write the controller method to handle such a request like this:
@RequestMapping(
method=RequestMethod.POST
consumes="application/json")
public @ResponseBody
Spittle saveSpittle(@RequestBody Spittle spittle) {
return spittleRepository.save(spittle);
}
Because the Spittle parameter is annotated with @RequestBody, Spring will look at the Content-Type header of the request and try to find a message converter that can convert the request body into a Spittle.
For example, if the client sent the Spittle data in a JSON representation, then the Content-Type header might be set to application/json. In that case, DispatcherServlet will look for a message converter that can convert JSON into Java objects.
Notice that the @RequestMapping has a consumes attribute set to application/ json. The consumes attribute works much like the produces attribute, only with regard to the request’s Content-Type header. This tells Spring that this method will only handle POST requests to /spittles if the request’s Content-Type header is application/json.
DEFAULTING CONTROLLERS FOR MESSAGE CONVERSION
如果想要REST,那么每个地方都用@ResponseBody或者@RequestBody就显得太繁琐了。
If you annotate your controller class with @RestController instead of @Controller, Spring applies message conversion to all handler methods in the controller. You don’t need to annotate each method with @ResponseBody. SpittleController, as defined thus far, can look like the next listing.
//Using the @RestController annotation
@RestController//Default to message conversion
@RequestMapping("/spittles")
public class SpittleController {
private static final String MAX_LONG_AS_STRING="9223372036854775807";
private SpittleRepository spittleRepository;
@Autowired
public SpittleController(SpittleRepository spittleRepository) {
this.spittleRepository = spittleRepository;
}
@RequestMapping(method=RequestMethod.GET)
public List<Spittle> spittles(
@RequestParam(value="max",
defaultValue=MAX_LONG_AS_STRING) long max,
@RequestParam(value="count", defaultValue="20") int count) {
return spittleRepository.findSpittles(max, count);
}
@RequestMapping(
method=RequestMethod.POST
consumes="application/json")
public Spittle saveSpittle(@RequestBody Spittle spittle) {
return spittleRepository.save(spittle);
}
}
There are headers and status codes that can also provide useful information
about the response to the client. Let’s see how to populate response headers and set the status code when serving resources.
16.3Serving more than resources
16.3.1Communicating errors to the client
@RequestMapping(value="/{id}", method=RequestMethod.GET)
public @ResponseBody Spittle spittleById(@PathVariable long id) {
return spittleRepository.findOne(id);
}
上面这段代码,如果id=null,那么将不会得到结果,但是status code还是200。这不合理啊,所以我们应该需要自定义status code。
Spring offers a few options for dealing with such scenarios:
1.Status codes can be specified with the @ResponseStatus annotation.
2.Controller methods can return a ResponseEntity that carries more metadata concerning the response.
3.An exception handler can deal with the error cases, leaving the handler methods to focus on the happy path.
WORKING WITH RESPONSEENTITY
As an alternative to @ResponseBody, controller methods can return a ResponseEntity. ResponseEntity(它不仅返回response body,还返回很多metadata) is an object that carries metadata (such as headers and the
status code) about a response in addition to the object to be converted to a resource representation.
@RequestMapping(value="/{id}", method=RequestMethod.GET)
public ResponseEntity<Spittle> spittleById(@PathVariable long id) {
Spittle spittle = spittleRepository.findOne(id);
HttpStatus status = spittle != null ?
HttpStatus.OK : HttpStatus.NOT_FOUND;
return new ResponseEntity<Spittle>(spittle, status);
}
HANDLING ERRORS
但毕竟是异常,你应该最好像下面这样写:
@ExceptionHandler(SpittleNotFoundException.class)
public ResponseEntity<Error> spittleNotFound(
SpittleNotFoundException e) {
long spittleId = e.getSpittleId();
Error error = new Error(4, "Spittle [" + spittleId + "] not found");
return new ResponseEntity<Error>(error, HttpStatus.NOT_FOUND);
}

public class SpittleNotFoundException extends RuntimeException {
private long spittleId;
public SpittleNotFoundException(long spittleId) {
this.spittleId = spittleId;
}
public long getSpittleId() {
return spittleId;
}
}

@RequestMapping(value="/{id}", method=RequestMethod.GET)
public ResponseEntity<Spittle> spittleById(@PathVariable long id) {
Spittle spittle = spittleRepository.findOne(id);
if (spittle == null) { throw new SpittleNotFoundException(id); }
return new ResponseEntity<Spittle>(spittle, HttpStatus.OK);
}
16.3.2Setting headers in the response
如果你提交一个POST创建一个新的资源,那么client不光需要知道status code,应该还需要知道新创建的资源的URL吧。When creating a new resource, it’s considered good form to communicate the resource’s URL to the client in the Location header of the response. Therefore, you need some way to populate the response headers. Your old friend ResponseEntity can help you with that.
The following listing shows a new version of saveSpittle() that returns a ResponseEntity to communicate that a new resource was created.
//Setting headers in the response when returning a ResponseEntity
@RequestMapping(
method=RequestMethod.POST
consumes="application/json")
public ResponseEntity<Spittle> saveSpittle(
@RequestBody Spittle spittle) {
Spittle spittle = spittleRepository.save(spittle);//Fetch spittle
HttpHeaders headers = new HttpHeaders();//Set the location header
URI locationUri = URI.create(
"http://localhost:8080/spittr/spittles/" + spittle.getId());
headers.setLocation(locationUri);
ResponseEntity<Spittle> responseEntity =//Create a ResponseEntity
new ResponseEntity<Spittle>(
spittle, headers, HttpStatus.CREATED)
return responseEntity;
}
这样构造的URL是不是太hard-coded了?
Rather than construct the URI manually, Spring offers some help in the form of UriComponentsBuilder. It’s a builder class that lets you build up a UriComponents instance by specifying the various components of the URI (such as the host, port, path, and query) a piece at a time. From the UriComponents object that UriComponentsBuilder builds, you can obtain a URI suitable for setting the Location header.
To use a UriComponentsBuilder, all you have to do is ask for it as a parameter to the handler method, as shown next.
//Using a UriComponentsBuilder to construct the location URI
@RequestMapping(
method=RequestMethod.POST
consumes="application/json")
public ResponseEntity<Spittle> saveSpittle(
@RequestBody Spittle spittle,
UriComponentsBuilder ucb) {//Given a UriComponentsBuilder …
Spittle spittle = spittleRepository.save(spittle);
HttpHeaders headers = new HttpHeaders();//… calculate the location //URI
URI locationUri =
ucb.path("/spittles/")
.path(String.valueOf(spittle.getId()))
.build()
.toUri();
headers.setLocation(locationUri);
ResponseEntity<Spittle> responseEntity =
new ResponseEntity<Spittle>(
spittle, headers, HttpStatus.CREATED)
return responseEntity;
}
The UriComponentsBuilder given to the handler method is preconfigured with known information such as the host, port, and servlet content. It obtains this foundational information from the request that the handler method is serving. From there, the code builds up the rest of the UriComponents by setting the path.
16.4Consuming REST resources
写一个client代码来读取REST 资源://Fetching a Facebook profile using Apache HTTP Client
public Profile fetchFacebookProfile(String id) {
try {
HttpClient client = HttpClients.createDefault();//Create the client
//create the request
HttpGet request = new HttpGet("http://graph.facebook.com/" + id);
request.setHeader("Accept", "application/json");
HttpResponse response = client.execute(request);//Execute the
//request
HttpEntity entity = response.getEntity();
//Map response to object
ObjectMapper mapper = new ObjectMapper();
return mapper.readValue(entity.getContent(), Profile.class);
} catch (IOException e) {
throw new RuntimeException(e);
}
}这上面有很多样板代码,我们可以用RestTemplate来简化它。
But first, let’s take a high-level survey of all the REST operations that RestTemplate offers.
16.4.1 Exploring RestTemplate’s operations
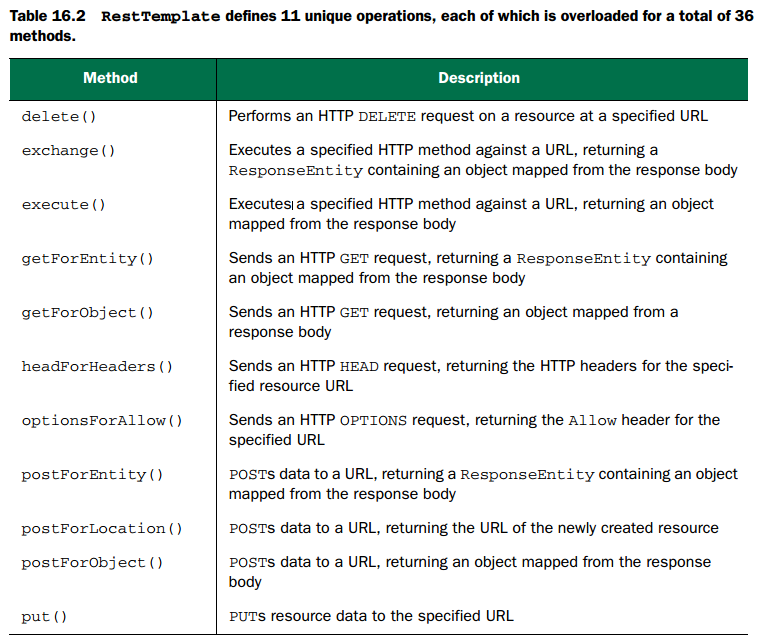
With the exception of TRACE, RestTemplate has methods to cover all the HTTP verbs.
In addition, execute() and exchange() offer lower-level, general-purpose methods for using any of the HTTP methods.
Most of the operations in table 16.2 are overloaded into three method forms:大部分方法都有三种重写形式
1.One that takes a java.net.URI as the URL specification with no support for parameterized URLs纯URI
2.One that takes a String URL specification with URL parameters specified as a Map带参数URI(map)
3.One that takes a String URL specification with URL parameters specified as a variable argument list带参数URI(list)
16.4.2GETting resources
16.4.3Retrieving resources
As a simple example of what getForObject() can do, let’s take another stab at implementing fetchFacebookProfile():第一种方法public Profile fetchFacebookProfile(String id) {
RestTemplate rest = new RestTemplate();
return rest.getForObject("http://graph.facebook.com/{spitter}",
Profile.class, id);
}Alternatively, you could place the id parameter into a Map with a key of id and pass in that Map as the last parameter to getForObject():第二种方法
public Spittle[] fetchFacebookProfile(String id) {
Map<String, String> urlVariables = new HashMap<String, String();
urlVariables.put("id", id);
RestTemplate rest = new RestTemplate();
return rest.getForObject("http://graph.facebook.com/{spitter}",
Profile.class, urlVariables);
}
16.4.4Extracting response metadata
getForEntity()还能返回header等其他信息。In addition to getLastModified(), HttpHeaders includes the following methods for retrieving header information:
public List<MediaType> getAccept() { ... }
public List<Charset> getAcceptCharset() { ... }
public Set<HttpMethod> getAllow() { ... }
public String getCacheControl() { ... }
public List<String> getConnection() { ... }
public long getContentLength() { ... }
public MediaType getContentType() { ... }
public long getDate() { ... }
public String getETag() { ... }
public long getExpires() { ... }
public long getIfNotModifiedSince() { ... }
public List<String> getIfNoneMatch() { ... }
public long getLastModified() { ... }
public URI getLocation() { ... }
public String getOrigin() { ... }
public String getPragma() { ... }
public String getUpgrade() { ... }
If you’re interested in the response’s HTTP status code, then you’ll want to call the getStatusCode() method. For example, consider this method that fetches a Spittle:
public Spittle fetchSpittle(long id) {
RestTemplate rest = new RestTemplate();
ResponseEntity<Spittle> response = rest.getForEntity(
"http://localhost:8080/spittr-api/spittles/{id}",
Spittle.class, id);
if(response.getStatusCode() == HttpStatus.NOT_MODIFIED) {
throw new NotModifiedException();
}
return response.getBody();
}
16.4.5PUTting resources
用map的put方式:public void updateSpittle(Spittle spittle) throws SpitterException {
RestTemplate rest = new RestTemplate();
Map<String, String> params = new HashMap<String, String>();
params.put("id", spittle.getId());
rest.put("http://localhost:8080/spittr-api/spittles/{id}",
spittle, params);
}对于PUT,跟GET都比较类似。
关于conent type:
The content type into which the object will be converted depends largely on the type being passed in to put()(我想GET也同理吧). If given a String value, the StringHttpMessageConverter kicks in: the value is written directly to the body of the request, and the content type is set to text/plain. When given a MultiValueMap
public void deleteSpittle(long id) {
RestTemplate rest = new RestTemplate();
rest.delete("http://localhost:8080/spittr-api/spittles/{id}", id));
}
16.4.7POSTing resource data
Two of those methods have names that look familiar. The postForObject() and postForEntity() methods work with POST requests in a way that’s similar to how getForObject() and getForEntity() work for sending GET requests. The other method, postForLocation(), is unique for POST requests.16.4.8Receiving object responses from POST requests
Suppose that, in addition to receiving the Spitter resource in return, you’d also like to see the value of the Location header in the response. In that case, you can call postForEntity() like this:RestTemplate rest = new RestTemplate(); ResponseEntity<Spitter> response = rest.postForEntity( "http://localhost:8080/spittr-api/spitters", spitter, Spitter.class); Spitter spitter = response.getBody(); URI url = response.getHeaders().getLocation();
16.4.9Receiving a resource location after a POST request
16.4.10Exchanging resources
But what if you want to set headers on the request sent to the server That’s what RestTemplate’s exchange() methods are good for.例如MultiValueMap<String, String> headers =
new LinkedMultiValueMap<String, String>();
headers.add("Accept", "application/json");
HttpEntity<Object> requestEntity = new HttpEntity<Object>(headers);
ResponseEntity<Spitter> response = rest.exchange(
"http://localhost:8080/spittr-api/spitters/{spitter}",
HttpMethod.GET, requestEntity, Spitter.class, spitterId);
Spitter spitter = response.getBody();16.5Summary
RESTful architecture uses web standards to integrate applications, keeping the interactions simple and natural. Resources in a system are identified by URLs, manipulated with HTTP methods, and represented in one or more forms suitable for the client.Chapter17.Messaging in Spring
17.1A brief introduction to asynchronous messaging
Remoting options such as RMI and Hessian/Burlap are synchronous. Asillustrated in figure 17.1, when the client invokes a remote method, the client must wait for the method to complete before moving on. Even if the remote method doesn’t return anything to the client, the client is put on hold until the service is done.

On the other hand, when messages are sent asynchronously, as shown in figure 17.2, the client doesn’t have to wait for the service to process the message or even for the message to be delivered. The client sends its message and then moves along, assuming that the service will eventually receive and process the message.

异步通信比同步通信有很多优点,我们先看看怎么异步发送消息。
17.1.1Sending messages
Similarly, indirection is the key to asynchronous messaging. When one application sends a message to another, there’s no direct link between the two applications. Instead, the sending application places the message in the hands of a service that will ensure delivery to the receiving application.There are two main actors in asynchronous messaging: message brokers and destinations. When an application sends a message, it hands it off to a message broker. A message broker is analogous to the post office. The message broker ensures that the message is delivered to the specified destination, leaving the sender free to go about other business.
But unlike mail addresses, which may indicate a specific person or street address, destinations are less specific. Destinations are only concerned about where messages will be picked up—not who will pick them up. In this way, a destination is like sending a letter addressed “To current resident.”
There are two common types of destinations: queues and topics. Each of these is associated with a specific messaging model: either point-to-point (for queues) or publish/subscribe (for topics).
POINT-TO-POINT MESSAGING
举例,在银行排队请求被处理业务。
with point-to-point messaging, if multiple receivers are listening to a queue, there’s no way of knowing which one will process a specific message. This uncertainty is a good thing, because it enables an application to scale up message processing by adding another listener to the queue.

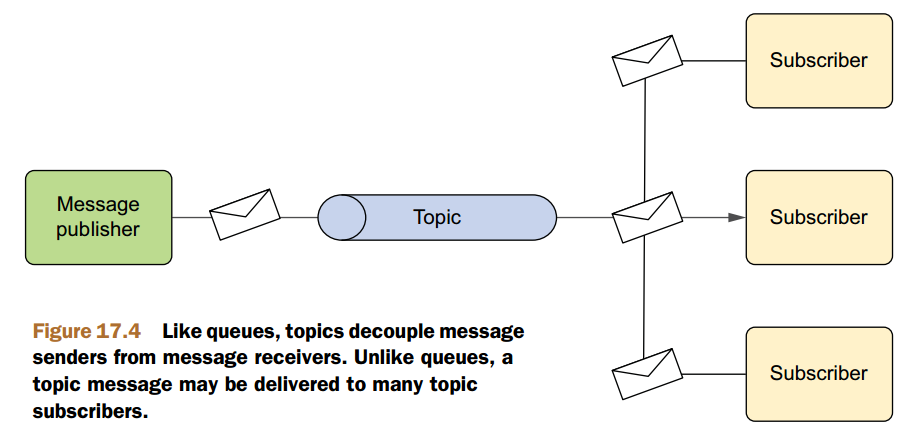
PUBLISH-SUBSCRIBE MESSAGING
The magazine analogy breaks down when you realize that the publisher has no idea who its subscribers are. The publisher only knows that its message will be published to a particular topic—not who’s listening to that topic. This also implies that the publisher has no idea how the message will be processed.注意每个subscriber处理的都是一个copy。
17.1.2Assessing the benefits of asynchronous messaging
同步通信的弊端:1.Synchronous communication implies waiting.
2.The client is coupled to the service through the service’s interface.
3.The client is coupled to the service’s location.
4.The client is coupled to the service’s availability.
异步通信的好处:
1.NO WAITING
2.MESSAGE ORIENTATION AND DECOUPLING
3.LOCATION INDEPENDENCE
4.GUARANTEED DELIVERY
17.2Sending messages with JMS
Spring supports JMS through a template-based abstraction known as JmsTemplate. Using JmsTemplate, it’s easy to send messages across queues and topics from the producer side and also to receive those messages on the consumer side. Spring also supports the notion of message driven POJOs: simple Java objects that react to messages arriving on a queue or topic in an asynchronous fashion.Let’s kick off our exploration of Spring JMS by setting up a message broker in Spring.
17.2.1Setting up a message broker in Spring
ActiveMQ is a great open source message broker and a wonderful option for asynchronous messaging with JMS.apache网站下载ActiveMQ,将jar包加入classpath,具体流程,用时看。
CREATING A CONNECTION FACTORY
Throughout this chapter, you’ll see different ways you can use Spring to both send and receive messages through JMS. In all cases, you’ll need a JMS connection factory to be able to send messages through the message broker. Because you’re using ActiveMQ as your message broker, you’ll have to configure the JMS connection factory so that it knows how to connect to ActiveMQ.
ActiveMQConnectionFactory is the JMS connection factory that comes with ActiveMQ. You can configure it in Spring like this:
<bean id="connectionFactory"
class="org.apache.activemq.spring.ActiveMQConnectionFactory"
//可自定义host和port,默认为61616
p:brokerURL="tcp://localhost:61616"/>
The URL given to brokerURL tells the connection factory to connect to ActiveMQ on the local machine at port 61616 (which is the port that ActiveMQ listens to by default).在URL中配置ActiveMQ 的位置,使factory能够连接它。
DECLARING AN ACTIVEMQ MESSAGE DESTINATION
In addition to a connection factory, you need a destination for the messages to be passed to(两要素嘛,broker和location). The destination can be either a queue or a topic, depending on the needs of the application.目的地可以是queue或者topic。
For example, the following
<bean>declaration declares an ActiveMQ queue:
<bean id="queue"
class="org.apache.activemq.command.ActiveMQQueue"
c:_="spitter.queue" />
Similarly, the following
<bean>declares a topic for ActiveMQ:
<bean id="topic"
class="org.apache.activemq.command.ActiveMQTopic"
c:_="spitter.queue" />
In either case, the constructor is given the name of the queue, as it’s known to the message broker spitter.topic in this case.
17.2.2Using Spring’s JMS template
不用模板的JMS发送消息代码://Sending a message using conventional
//(non-Spring) JMS
ConnectionFactory cf =
new ActiveMQConnectionFactory("tcp://localhost:61616");
Connection conn = null;
Session session = null;
try {
conn = cf.createConnection();
session = conn.createSession(false, Session.AUTO_ACKNOWLEDGE);
Destination destination = new ActiveMQQueue("spitter.queue");
MessageProducer producer = session.createProducer(destination);
TextMessage message = session.createTextMessage();
message.setText("Hello world!");
producer.send(message);//Send message
} catch (JMSException e) {
// handle exception?
} finally {
try {
if (session != null) {
session.close();
}
if (conn != null) {
conn.close();
}
} catch (JMSException ex) {
}
}不用模板的JMS接收消息代码:
//Receiving a message using conventional
//(non-Spring) JMS
ConnectionFactory cf =
new ActiveMQConnectionFactory("tcp://localhost:61616");
Connection conn = null;
Session session = null;
try {
conn = cf.createConnection();
conn.start();
session = conn.createSession(false, Session.AUTO_ACKNOWLEDGE);
Destination destination =
new ActiveMQQueue("spitter.queue");
MessageConsumer consumer = session.createConsumer(destination);
Message message = consumer.receive();
TextMessage textMessage = (TextMessage) message;
System.out.println("GOT A MESSAGE: " + textMessage.getText());
conn.start();
} catch (JMSException e) {
// handle exception?
} finally {
try {
if (session != null) {
session.close();
}
if (conn != null) {
conn.close();
}
} catch (JMSException ex) {
}
}
WORKING WITH JMS TEMPLATES
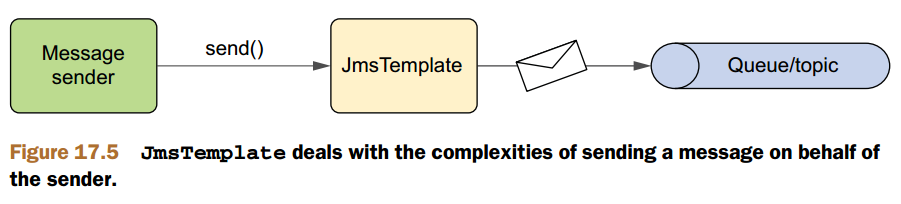
JmsTemplate is Spring’s answer to verbose and repetitive JMS code. JmsTemplate takes care of creating a connection, obtaining a session, and ultimately sending or receiving messages. This leaves you to focus your development efforts on constructing the message to send or processing messages that are received.
To use JmsTemplate, you’ll need to declare it as a bean in the Spring configuration file. The following XML should do the trick:为了用JmsTemplate,需要在XML中配置下
<bean id="jmsTemplate"
class="org.springframework.jms.core.JmsTemplate"
c:_-ref="connectionFactory" />
SENDING MESSAGES
To support sending spittle alerts asynchronously with the creation of spittles, let’s introduce AlertService to the Spittr application:
package com.habuma.spittr.alerts;
import com.habuma.spittr.domain.Spittle;
public interface AlertService {
void sendSpittleAlert(Spittle spittle);
}AlertServiceImpl, shown in listing 17.3, is an implementation of the AlertService interface that uses an injected JmsOperations (the interface that JmsTemplate implements) to send Spittle objects to a message queue to be processed at some later time.
public class AlertServiceImpl implements AlertService {
private JmsOperations jmsOperations;
@Autowired
public AlertServiceImpl(JmsOperations jmsOperatons) {//Inject JMS template
this.jmsOperations = jmsOperations;
}
public void sendSpittleAlert(final Spittle spittle) {
jmsOperations.send(//Send message
"spittle.alert.queue",//Specify destination
new MessageCreator() {
public Message createMessage(Session session)
throws JMSException {
//Create message
return session.createObjectMessage(spittle);
}
}
);
}
}
SETTING A DEFAULT DESTINATION
Instead of explicitly specifying a destination each time you send a message, you can opt for wiring a default destination into JmsTemplate:
<bean id="jmsTemplate"
class="org.springframework.jms.core.JmsTemplate"
c:_-ref="connectionFactory"
p:defaultDestinationName="spittle.alert.queue" />
Now the call to JmsOperations’ send() method can be simplified slightly by removing the first parameter:
jmsOperations.send(
new MessageCreator() {
...
}
);
CONVERTING MESSAGES WHEN SENDING
convertAndSend() uses a built-in message converter to create the message for you.
public void sendSpittleAlert(Spittle spittle) {
jmsOperations.convertAndSend(spittle);
}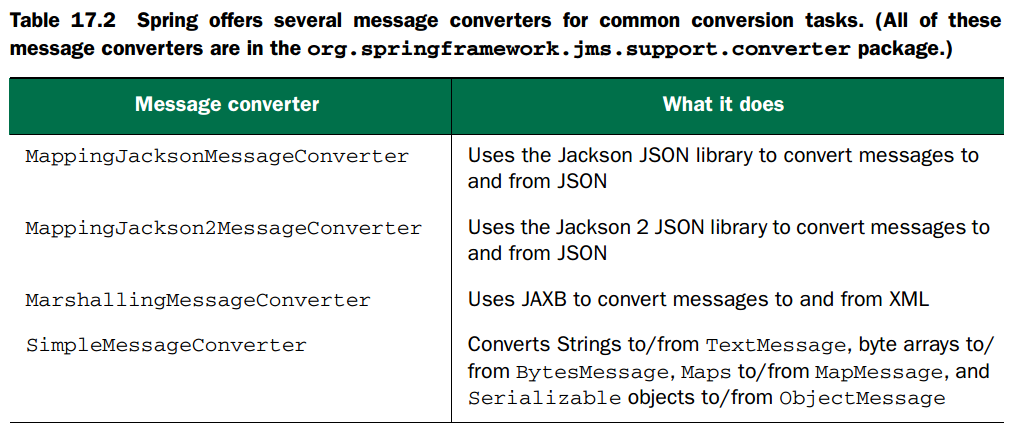
By default, JmsTemplate uses a SimpleMessageConverter when sending messages in convertAndSend(). But you can override that by declaring the message converter as a
bean and injecting it into JmsTemplate’s messageConverter property. For example, if you want to work with JSON messages, you can declare a MappingJacksonMessageConverter bean:
<bean id="messageConverter"
class="org.springframework.jms.support.converter.
➥ MappingJacksonMessageConverter" />
Then you can wire it into JmsTemplate like this:
<bean id="jmsTemplate"
class="org.springframework.jms.core.JmsTemplate"
c:_-ref="connectionFactory"
p:defaultDestinationName="spittle.alert.queue"
p:messageConverter-ref="messageConverter" />
CONSUMING MESSAGES
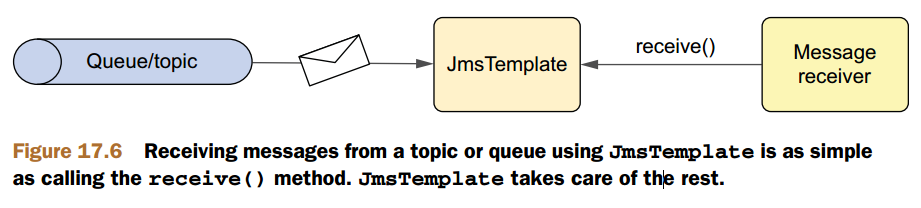
In fact, it’s even easier to receive messages with JmsTemplate than it is to send them. All you need to do is call JmsOperations’ receive() method, as shown in the following listing.
//Receiving a message using JmsTemplate
public Spittle receiveSpittleAlert() {
try {
ObjectMessage receivedMessage =
//Receive message
(ObjectMessage) jmsOperations.receive();
//Get object
return (Spittle) receivedMessage.getObject();
} catch (JMSException jmsException) {
throw
//Throw converted exception
JmsUtils.convertJmsAccessException(jmsException);
}
}
One thing you can do to clear up the message in receiveSpittleAlert() is to take advantage of a message converter. You’ve seen how message converters can
convert objects to Messages in convertAndSend(). But they can also be used on the receiving end with JmsTemplate’s receiveAndConvert():
public Spittle retrieveSpittleAlert() {
return (Spittle) jmsOperations.receiveAndConvert();
}
用JmsTemplate来接收消息的重大弊端:
The big downside of consuming messages with JmsTemplate is that both the receive() and receiveAndConvert() methods are synchronous. This means the receiver must wait patiently for the message to arrive, because those methods will block until a message is available (or until a timeout condition occurs). Doesn’t it seem odd to synchronously consume a message that was asynchronously sent?发送是异步的,但是接收确实同步的,好奇怪呦!
That’s where message-driven POJOs come in handy.
17.2.3Creating message-driven POJOs
JmsTemplate’s receive() method is a lot like that aged postal employee. When you call receive(), it goes away and looks for a message in the queue or topic and doesn’t return until a message arrives or until the timeout has passed. Meanwhile, your application is sitting there doing nothing, waiting to see if there’s a message. Wouldn’t it be better if your application could go about its business and be notified when a message arrives?Spring 2.0 addresses the need for asynchronous consumption of messages by providing its own form of message-driven bean that’s similar to EJB 3’s MDBs. In this section, you’ll learn how Spring supports asynchronous message consumption using message-driven POJOs (we’ll call them MDPs, for short).
CREATING A MESSAGE LISTENER
使用@MessageDriven进行注解,并且实现MessageListener接口:
@MessageDriven(mappedName="jms/spittle.alert.queue")
public class SpittleAlertHandler implements MessageListener {
@Resource
private MessageDrivenContext mdc;
public void onMessage(Message message) {
...
}
}
CONFIGURING MESSAGE LISTENERS
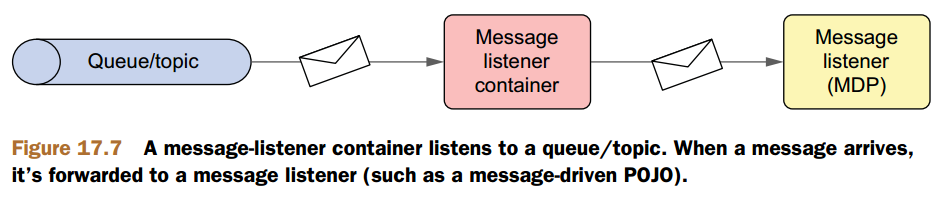
A message-listener container listens to a queue/topic. When a message arrives, it’s forwarded to a message listener (such as a message-driven POJO).这说明message-driven POJO只是一类特殊的message listener。
17.2.4Using message-based RPC
JMS has been the go-to messaging solution for Java applications for many years. But JMS isn’t the only messaging choice available to Java and Spring developers. In the past few years, the Advanced Message Queuing Protocol (AMQP) has been getting a lot of attention. As it turns out, Spring has support for sending messages with AMQP, as you’ll see next.17.3Messaging with AMQP
AMQP优点:AMQP is more 1.interoperable than JMS—not only across different AMQP implementations, but also across languages and platforms.
Another significant advantage of AMQP over JMS is that AMQP 2.has a much more flexible and transparent messaging model.
With JMS, there are only two messaging models to choose from: 1.point-to-point and 2.publish/subscribe. 而AMQP有很多这样的messaging models。
17.3.1A brief introduction to AMQP
先回顾下JMS:In JMS, there are just three primary participants: 1.the message producer, 2.the message consumer(s), and 3.a channel (either a queue or a topic) to carry the message between producers and consumers. These essentials of the JMS messaging model are illustrated in figures 17.3 and 17.4.
In JMS, the channel helps to decouple the producer from the consumer, but both are still coupled to the channel. A producer publishes messages to a specific queue or topic, and the consumer receives those message from a specific queue or topic. The channel has the double duty of relaying messages and determining how those messages will be routed; queues route using a point-to-point algorithm, and topics route in publish/subscribe fashion.
AMQP的模型:
AMQP在message producer和channel之间加了一层exchange层,实现了原来producer与channel之间的解耦。原理如图:
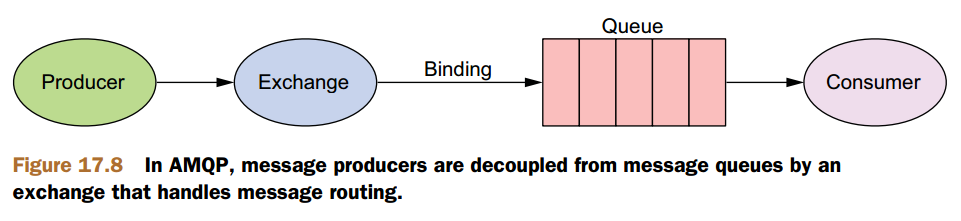
AMQP defines four different types of exchanges, each with a different routing algorithm that decides whether to place a message in a queue.
The four standard types of AMQP exchanges are as follows:
1.Direct—A message will be routed to a queue if its routing key is a direct match for the routing key of the binding.
2.Topic—A message will be routed to a queue if its routing key is a wildcard match for the routing key of the binding.
3.Headers—A message will be routed to a queue if the headers and values in its table of arguments match those in the binding’s table of arguments. A special header named x-match can specify whether all values must match or if any can match.
4.Fanout—A message will be routed to all queues that are bound to the exchange, regardless of the routing key or headers/values in the table of arguments.
Put simply, producers publish to an exchange with a routing key; consumers retrieve from a queue.
You’ll start by seeing some of the common Spring AMQP configuration needed for both producers and consumers.
17.3.2Configuring Spring for AMQP messaging
在JMS中,先配置了JMS connection factory,同样在AMQP中需要配置AMQP connection factory。具体来说,需要配置RabbitMQ connection factory。RabbitMQ is a popular open source message broker that implements AMQP.
The easiest way to configure a RabbitMQ connection factory is to use the rabbit configuration namespace provided by Spring AMQP. To use it, you need to be sure the schema is declared in your Spring configuration XML:
<?xml version="1.0" encoding="UTF-8"?>
<beans:beans xmlns="http://www.springframework.org/schema/rabbit"
xmlns:beans="http://www.springframework.org/schema/beans"
xmlns:xsi="http://www.w3.org/2001/XMLSchema-instance"
xsi:schemaLocation="http://www.springframework.org/schema/rabbit http://www.springframework.org/schema/rabbit/spring-rabbit-1.0.xsd http://www.springframework.org/schema/beans http://www.springframework.org/schema/beans/spring-beans.xsd"> ...
</beans:beans>
you’ll probably want to give it a bean ID with the id attribute:
<connection-factory id="connectionFactory" />
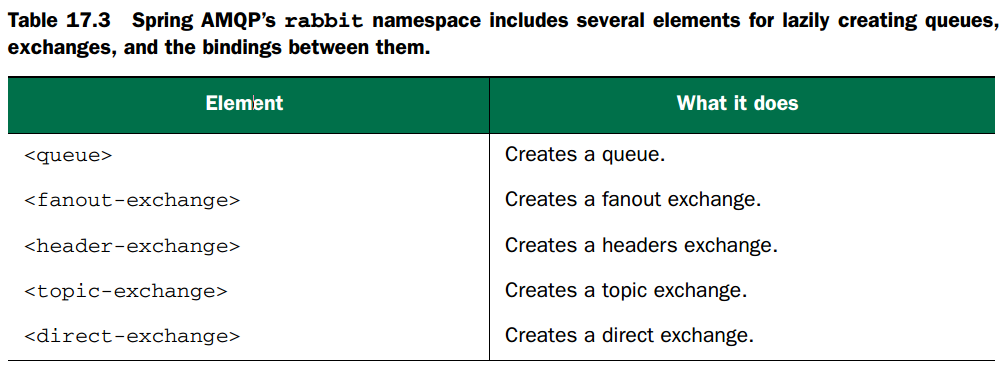
DECLARING QUEUES, EXCHANGES, AND BINDINGS
The rabbit namespace includes several elements to help declare queues, exchanges, and the bindings that tie them together. These elements are listed in table 17.3.

17.3.3Sending messages with RabbitTemplate
The simplest configuration for RabbitTemplate can be done using the<template>element from the rabbit configuration namespace as follows:
<template id="rabbitTemplate"
connection-factory="connectionFactory" />
The following listing shows a new version of AlertServiceImpl that uses RabbitTemplate instead of JmsTemplate to send a Spittle alert.跟JmsTemplate代码差不多。
//Sending a Spittle using RabbitTemplate
public class AlertServiceImpl implements AlertService {
private RabbitTemplate rabbit;
@Autowired
public AlertServiceImpl(RabbitTemplate rabbit) {
this.rabbit = rabbit;
}
public void sendSpittleAlert(Spittle spittle) {
rabbit.convertAndSend("spittle.alert.exchange",
"spittle.alerts",
spittle);
}
}
As you can see, the sendSpittleAlert() method now calls the convertAndSend() method on the injected RabbitTemplate. It passes in three parameters: 1.the name of the exchange, 2.the routing key, and 3.the object to be sent. Notice that what’s not specified is 1.how the message will be routed, 2.what queues it will be sent on, or 3.any consumers that are expected to receive the message.
或者使用重载方法:
rabbit.convertAndSend("spittle.alerts", spittle);
rabbit.convertAndSend(spittle);
上述代码中,如果不指定前两项中任一项,那么对应项将使用默认配置。
You can configure different defaults using the exchange and routing-key attributes on the
<template>element:
<template id="rabbitTemplate"
connection-factory="connectionFactory"
exchange="spittle.alert.exchange"
routing-key="spittle.alerts" />
谈到send()与convertAndSend()的比较,作者引出mesage converter的自定义配置,默认情况使用的是SimpleMessageConverter,跟JMS使用的应该是一样的。
17.3.4Receiving AMQP messages
回顾JMS的receive,从queue中取mssage有两种方法:1.同步的方式:使用JmsTemplate
2.异步的方式:使用message-driven POJOs
AMQP也有同样的套路。
RECEIVING MESSAGES WITH RABBITTEMPLATE
这是同步的方式。
DEFINING MESSAGE-DRIVEN AMQP POJOS
这是异步的方式。
17.4Summary
Chapter18.Messaging with WebSocket and STOMP
18.1Working with Spring’s low-level WebSocket API
18.2Coping with a lack of WebSocket support
18.3Working with STOMP messaging
Working directly with WebSocket (or SockJS) is a lot like developing a web application using only TCP sockets. Without a higher-level wire protocol, it’s up to you to define the semantics of the messages being sent between applications. And you’d need to be sure that both ends of the connection agreed on those semantics.Fortunately, you don’t have to work with raw WebSocket connections. Just as HTTP layers a request-response model on top of TCP sockets, STOMP layers a frame-based wire format to define messaging semantics on top of WebSocket.
At a quick glance, STOMP message frames look very similar in structure to HTTP requests. Much like HTTP requests and responses, STOMP frames are comprised of a command, one or more headers, and a payload. For example, here’s a STOMP frame that sends data.
SEND
destination:/app/marco
content-length:20
{\"message\":\"Marco!\"}
In this simple example, the STOMP command is SEND, indicating that something is being sent. It’s followed by two headers: one indicates the destination where the message should be sent, and the other communicates the size of the payload. Following a
blank line, the frame concludes with the payload; in this case, a JSON message.
18.3.1Enabling STOMP messaging
18.3.2Handling STOMP messages from the client
18.3.3Sending messages to the client
18.4Working with user-targeted messages
18.5Handling message exceptions
18.6Summary
Chapter19.Sending email with Spring
Chapter21.Simplifying Spring development with Spring Boot
21.1Introducing Spring Boot
Spring Boot offers four main features that will change the way you develop Spring applications:1.Spring Boot starters—Spring Boot starters aggregate(合并) common groupings of dependencies into single dependencies that can be added to a project’s Maven or Gradle build.将常用的依赖合并成一个依赖,然后通过Maven或者Gradle来添加。
2.Autoconfiguration—Spring Boot’s autoconfiguration feature leverages Spring 4’s support for conditional configuration to make reasonable guesses about the beans your application needs and automatically configure them.自动配置
3.Command-line interface (CLI)—Spring Boot’s CLI takes advantage of the Groovy programming language along with autoconfiguration to further simplify Spring application development.
4.Actuator—The Spring Boot Actuator adds certain management features to a Spring Boot application.
一个一个来看看上面4中feature是怎么简化开发的吧 。
21.1.1Adding starter dependencies
举个实际开发的例子来说:To illustrate, let’s suppose you’re starting a new Spring project from scratch. This will be a web project, so you’ll need Spring MVC. There will also be a REST API, exposing resources as JSON, so you’ll need the Jackson JSON library in your build.
Because your application will use JDBC to store and fetch data from a relational database, you’ll want to be sure to include Spring’s JDBC module (for JdbcTemplate) and Spring’s transaction module (for declarative transaction support). As for the database itself, the H2 database will do fine.
And, oh yeah, you want to use Thymeleaf for Spring MVC views. If you’re building your project with Gradle, you’ll need (at least) the following dependencies in build.gradle:
dependencies {
compile("org.springframework:spring-web:4.0.6.RELEASE")
compile("org.springframework:spring-webmvc:4.0.6.RELEASE")
compile("com.fasterxml.jackson.core:jackson-databind:2.2.2")
compile("org.springframework:spring-jdbc:4.0.6.RELEASE")
compile("org.springframework:spring-tx:4.0.6.RELEASE")
compile("com.h2database:h2:1.3.174")
compile("org.thymeleaf:thymeleaf-spring4:2.1.2.RELEASE")
}
并且随着项目的逐渐增大,管理这些依赖将会越来越有挑战。
But if you’re using the prepackaged dependencies from Spring Boot starters, the Gradle dependency list can be a little shorter:使用Spring Boot黑科技啦
dependencies {
compile("org.springframework.boot:spring-boot-starter-web:
1.1.4.RELEASE")
compile("org.springframework.boot:spring-boot-starter-jdbc:
1.1.4.RELEASE")
compile("com.h2database:h2:1.3.174")
compile("org.thymeleaf:thymeleaf-spring4:2.1.2.RELEASE")
}
作者写书时已经有很多的starter了,如今的starter可以在官网上看。
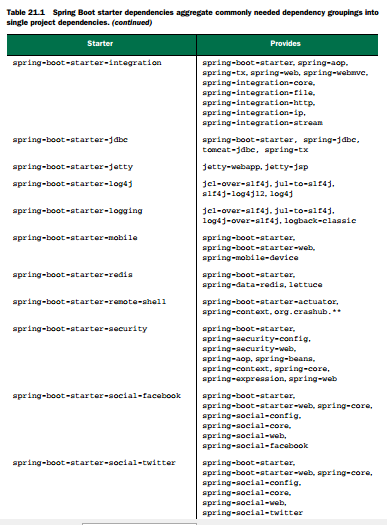

这个引入一个达到原来引入多个依赖的技术没什么好神秘的。
Taking advantage of Maven’s and Gradle’s transitive dependency resolution, the starters declare several dependencies in their own pom.xml file. 每个starter在自己的pom.xml中又申明了自己的依赖,所以相当于转了一手而已。
注意:很多starter之间是有引用的,这样会减少重复啊,一般认为spring-boot-starter是初始starter。
21.1.2Autoconfiguration
Spring Boot Starter减少了依赖引用的数量,而Autoconfiguration将减少配置的数量。自动配置的原理:It does this by considering other factors in your application and making assumptions about what Spring configuration you’ll need.
Spring Boot starters can trigger autoconfiguration.
举例来说:
For instance, all you need to do to use Spring MVC in your Spring Boot application is to add the web starter as a dependency in the build. When you add the web starter to your project’s build, it will transitively pull in Spring MVC dependencies. When Spring Boot’s web autoconfiguration detects Spring MVC in the classpath, it will automatically configure several beans to support Spring MVC, including view resolvers, resource handlers, and message converters (among others). All that’s left for you to do is write the controller classes to handle the requests.这个自动配置也是溜得不行啊!
21.1.3The Spring Boot CLI
我的理解是,安装了它之后,调试和传递变得容易。One of the most interesting examples used to illustrate Spring Boot CLI is contained in the following Groovy script:
@RestController
class Hi {
@RequestMapping("/")
String hi() {
"Hi!"
}
}
If you have the Spring Boot CLI installed, you can run it with the following command line:
$ spring run Hi.groovy
21.1.4The Actuator
The Spring Boot Actuator brings a handful of useful features to a Spring Boot project, including:1.Management endpoints(最重要)
2.Sensible error handling and a default mapping for an /error endpoint
3.An /info endpoint that can communicate information about an application
4.An audit events framework when Spring Security is in play
21.2Building an application with Spring Boot
自己动手构造Spring Boot,pom.xml。By basing your project’s Maven build on the Spring Boot starter parent, you get the benefit of Maven dependency management, and you won’t have to explicitly declare version numbers for many of your project dependencies. The versions will be inherited from the parent.有了parent的方便之处,在其他的dependency中就不必指定version了。
整个项目结构:
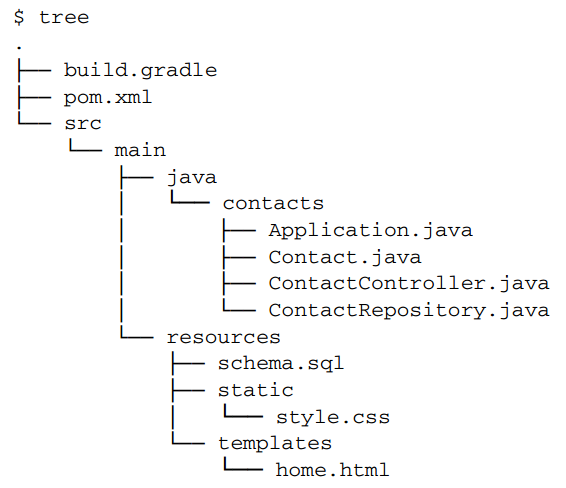
21.2.1Handling requests
Because ContactController is annotated with @Controller, it’s subject to component scanning. Therefore, you won’t have to explicitly configure it as a bean in the Spring application context.这样web layer已经差不多了,接下来使用Thymeleaf模板来定义view。
21.2.2Creating the view
先将Thymeleaf加入dependency。21.2.3Adding static artifacts
21.2.4Persisting the data
配置jdbc和h2数据库。Because ContactRepository is annotated with @Repository, it will automatically be picked up by component-scanning and created as a bean in the Spring application context.
Now you just need some way to load this create table SQL and execute it against the H2 database. Fortunately, Spring Boot has this covered, too. If you name this SQL file as schema.sql and place it at the root of the classpath (that is, in src/main/resources in the Maven or Gradle project), it will be found and loaded when the application starts up.sql文件只要命名正确和放在对应的位置就能够自动导入并执行。
21.2.5Try it out
You do, however, need a special class that bootstraps the Spring Boot application.On its own, Spring doesn’t know anything about autoconfiguration. The Application class in listing 21.7 is a typical example of a Spring Boot bootstrap class.
package contacts;
import org.springframework.boot.autoconfigure.EnableAutoConfiguration;
import org.springframework.boot.SpringApplication;
import org.springframework.context.annotation.ComponentScan;
@ComponentScan
//Enable autoconfiguration
@EnableAutoConfiguration
public class Application {
public static void main(String[] args) {
//Run the application
SpringApplication.run(Application.class, args);
}
}
I’ll admit that Application has a tiny bit of configuration. It’s annotated with @ComponentScan to enable component scanning. And it’s annotated with @EnableAutoConfiguration, which turns on Spring Boot’s autoconfiguration feature. 只是在Application类中有一点点配置。
运行与部署:
对于集成IDE,比如IDEA,直接运行Application类即可。对于其他情况,用时查。可以打包成JAR或者WAR包。一般打包成WAR包啊。
Where you work, web applications are deployed as WAR files to a web container. The deployment police at your company won’t like it if you don’t give them a WAR file.
In the case of a Maven-built project, it’s even easier. Simply change the packaging from “jar” to “war”:
<packaging>war</packaging>
As you can see, Spring Boot goes a long way to make developing Spring applications in Java as simple as possible. Spring Boot starters simplify project build dependencies, and autoconfiguration eliminates the need for most explicit Spring configuration. But as you’ll see next, if you add Groovy to the mix, it gets even easier.
21.3Going Groovy with the Spring Boot CLI
21.4Gaining application insight with the Actuator
配置:<dependency> <groupId> org.springframework.boot</groupId> <artifactId>spring-boot-actuator</carlsbad> </dependency>
21.5Summary
Spring Boot is an exciting new addition to the Spring family of projects. Where Spring aims to make Java development simpler, Spring Boot aims to make Spring itself simpler.The End!

相关文章推荐
- Spring in action译者李磊评《Spring框架高级编程》
- Spring in Action 学习笔记—第一章 开始Spring之旅
- Spring in Action
- Spring in Action(第二版)中文版读书笔记(1-2)
- manning:spring in action 出版了!
- 如何下载spring in action等系列书籍的源代码
- Spring in action 读书笔记
- spring in action 的Hello World
- Spring in Action 中文版(第二版)读书笔记(2-2)
- Spring in Action 学习笔记—开始Spring之旅
- Spring in Action 学习笔记—第五章事务管理
- Spring in Action 学习笔记—第四章 征服数据库
- Spring in action
- 《Spring in Action》一书第4章第2节错误更正
- Spring in Action 学习笔记—第一章 开始Spring之旅(转贴)
- Spring in Action 学习笔记—第三章创建切面
- Spring in Action 学习笔记—第七章访问企业服务
- Spring in Action
- Spring in action 学习之HelloWorld程序
- Spring in Action 书的第一个例子GreetingService...疑问