How To Install Nginx, MariaDB 10, PHP 7 (LEMP Stack) in 16.10/16.04
2016-10-25 14:51
513 查看
The LEMP stack is an acronym which represents is
a group of packages (Linux OS, Nginx web server, MySQL\MariaDB database and PHP server-side dynamic programming language) which are used to deploy dynamic web applications and web pages.
This tutorial will guide you on how to install a LEMP stack with MariaDB
10, PHP 7 and HTTP
2.0 Support forNginx on Ubuntu
16.10 and Ubuntu 16.04 server/desktop editions.
Installation
of Ubuntu 16.04 Server Edition [instructions also works on Ubuntu
16.10]
1. Nginx is a modern and resources efficient web
server used to display web pages to visitors on the internet. We’ll start by installing Nginx web server from Ubuntu official repositories by using the apt
command line.
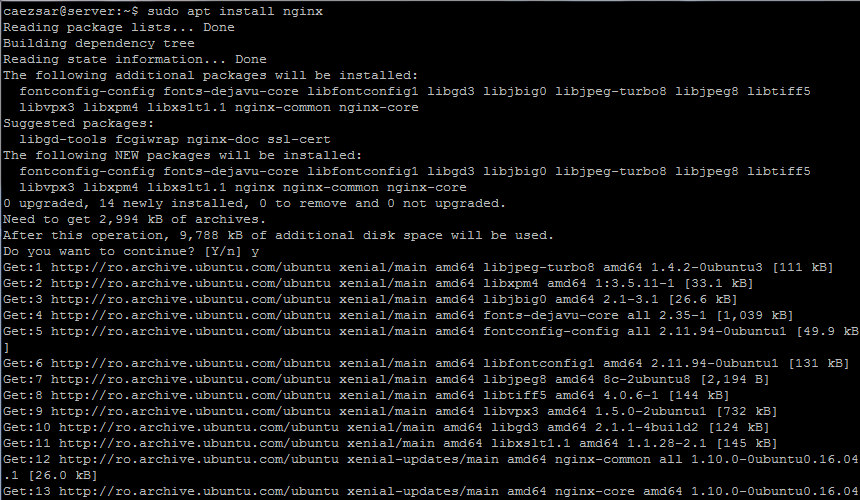
Install Nginx on Ubuntu 16.04
2. Next, issue the netstat and systemctl commands
in order to confirm if Nginx is started and binds
on port 80.

Check Nginx Network Port Connection
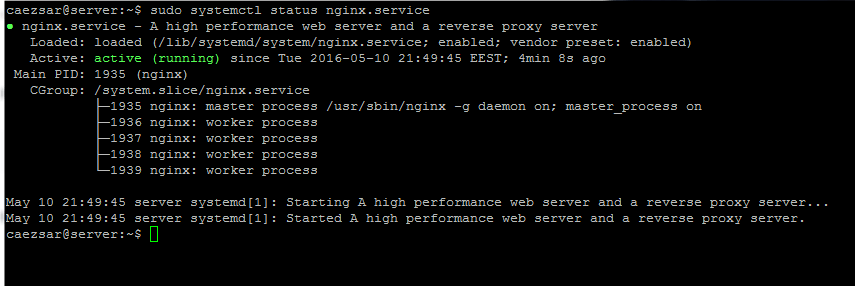
Check Nginx Service Status
Once you have the confirmation that the server is started you can open a browser and navigate to your server IP address or DNS record using HTTP protocol in order to visit Nginx default web page.
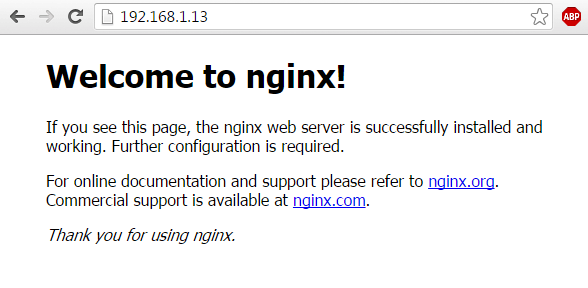
Verify Nginx Webpage
3. The HTTP/2.0 protocol
which is build by default in the latest release of Nginx binaries on Ubuntu
16.04works only in conjunction with SSL and promises a huge speed improvement in loading web SSL web pages.
To enable the protocol in Nginx on Ubuntu 16.04,
first navigate to Nginx available sites configuration files and backup the default configuration file by issuing the below command.

Backup Nginx Sites Configuration File
4. Then, using a text editor create a new default
page with the below instructions:
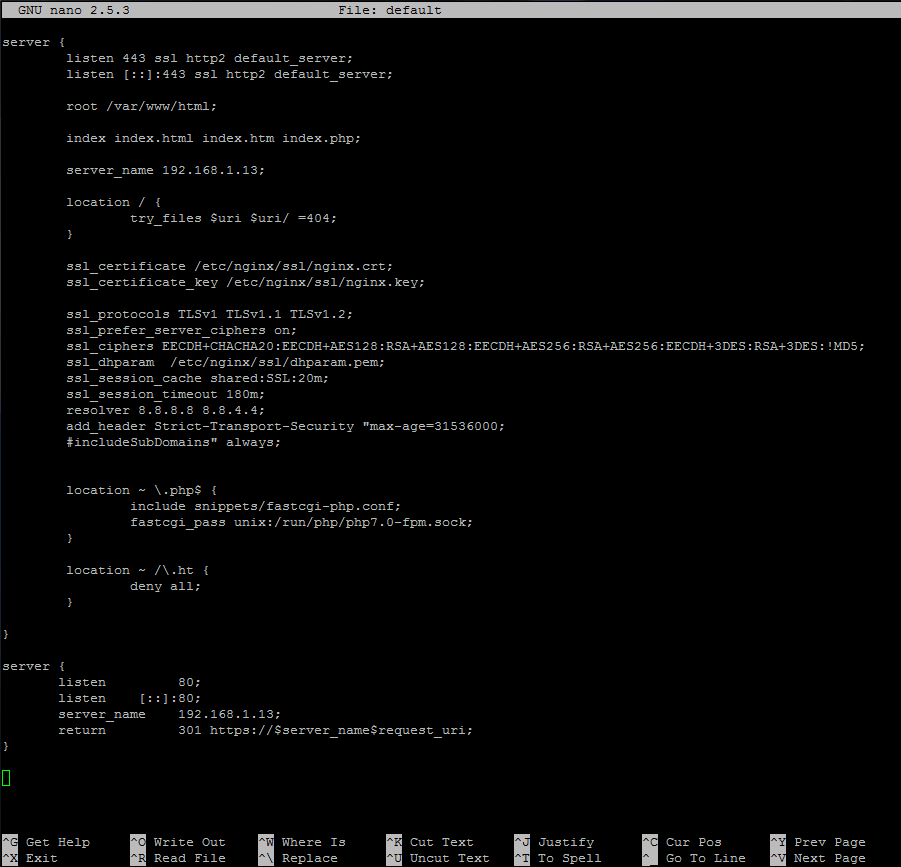
Enable Nginx HTTP 2 Protocol
The above configuration snippet enables the use of HTTP/2.0 by
adding the
to all SSL listen directives.
Also, the last part of the excerpt enclosed in server directive is used to redirect all non-SSL traffic to SSL/TLS default host. Also, replace the
to match your own IP address or DNS record (FQDN preferably).
5. Once you finished editing Nginx default configuration
file with the above settings, generate and list the SSL certificate file and key by executing the below commands.
Fill the certificate with your own custom settings and pay attention to Common
Name setting to match your DNS FQDN record or your server IP address that will be used to access the web page.
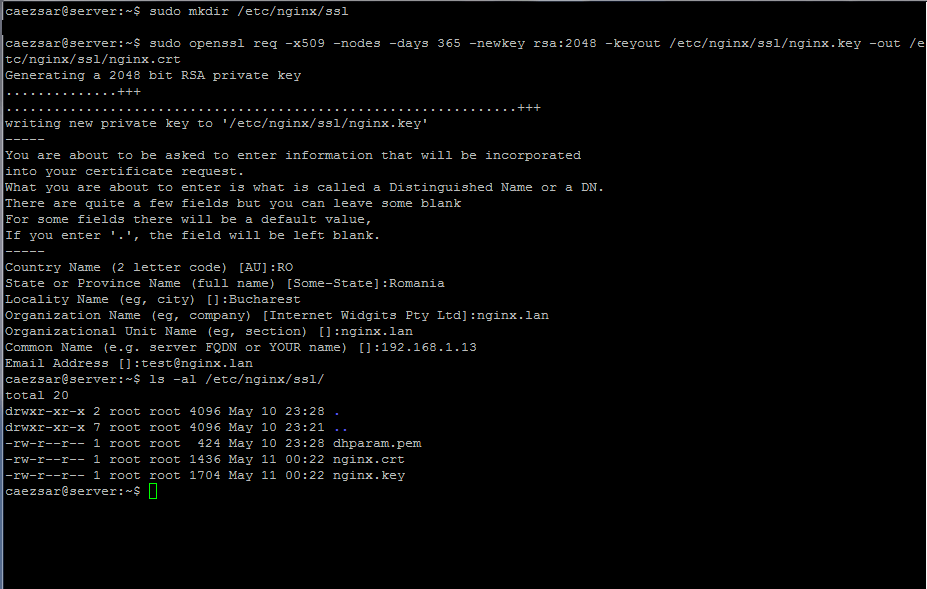
Generate SSL Certificate and Key for Nginx
6. Also, create a strong DH
cypher, which was changed on the above configuration file on
line, by issuing the below command:
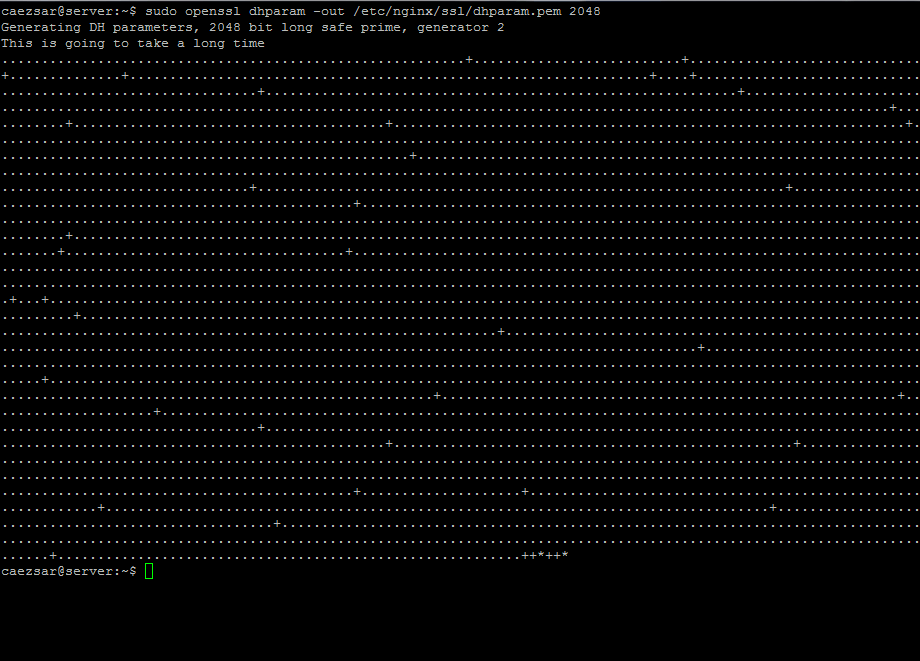
Create Diffie-Hellman Key
7. Once the Diffie-Hellman key
has been created, verify if Nginx configuration file is correctly written and can be applied by Nginx web server and restart the daemon to reflect changes by running the below commands.
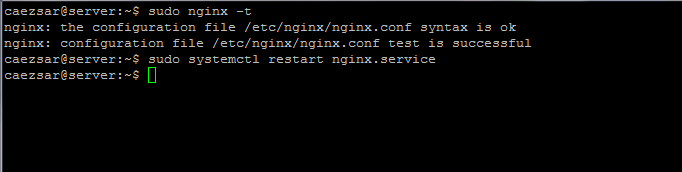
Check Nginx Configuration
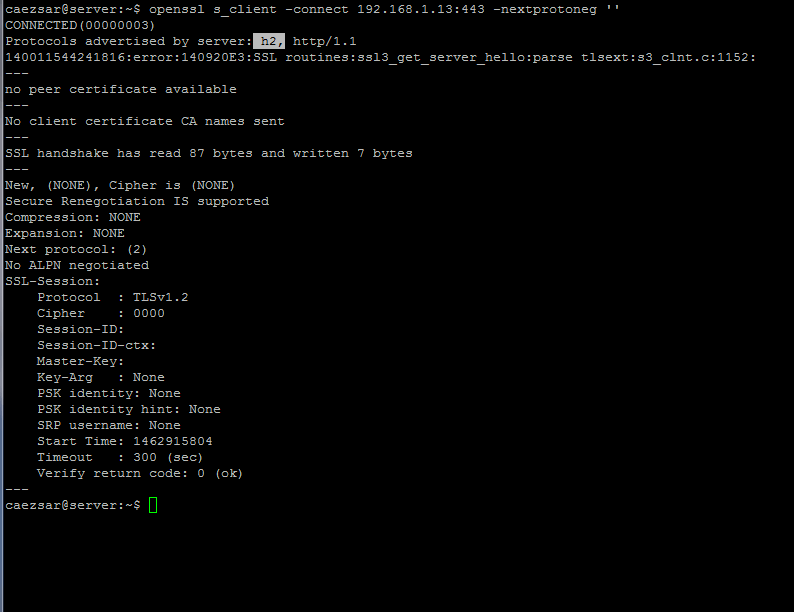
8. In order to test if Nginx uses HTTP/2.0 protocol
issue the below command. The presence of
protocol confirms that Nginx has been successfully configured to use HTTP/2.0 protocol. All modern up-to-date browsers should support this protocol by default.
Test Nginx HTTP 2.0 Protocol
Nginx can be used with PHP dynamic processing language interpreter to generate dynamic web content with the help of FastCGI process manager obtained by installing the php-fpm binary
package from Ubuntu official repositories.
9. In order to grab PHP7.0 and
the additional packages that will allow PHP to communicate with Nginx web server issue the below command on your server console:
Install PHP 7 and PHP-FPM for Ngin
10. Once the PHP7.0 interpreter
has been successfully installed on your machine, start and check php7.0-fpmdaemon
by issuing the below command:
Start and Verify php-fpm Service
11. The current configuration file of Nginx is already
configured to use PHP FastCGI process manager in
order to server dynamic content.
The server block that enables Nginx to use PHP interpreter is presented on the below excerpt, so no further modifications of default Nginx configuration file are required.
Below is a screenshot of what instructions you need to uncomment and modify is case of an original Nginx default configuration file.
Enable PHP FastCGI for Nginx
12. To test Nginx web server relation with PHP FastCGI
process manager create a PHP
configuration file by issuing the below command and verify the settings by visiting this configuration file using the below address:

Create PHP Info File

Verify PHP FastCGI Info
Also check if HTTP/2.0 protocol is advertised by
the server by locating the line
PHP Variables block as illustrated on the below screenshot.
Check HTTP 2.0 Protocol Info
13. In order to install extra PHP7.0 modules
use the
Also, try to install the following PHP modules which can come in handy in case you are planning to install
WordPress or other CMS.
Install PHP 7 Modules
14. To register the PHP extra modules just restart PHP-FPM daemon
by issuing the below command.
15. Finally, in order to complete our LEMP stack
we need the MariaDB database component to store and manage website data.
Install MariaDB database management system by running
the below command and restart PHP-FPM service in
order to use MySQL module to access the database.
Install MariaDB for Nginx
16. To secure the MariaDB installation, run the security
script provided by the binary package from Ubuntu repositories which will ask you set a root password, remove anonymous users, disable root login remotely and remove test database.
Run the script by issuing the below command and answer all questions with
Use the below screenshot as a guide.
Secure MariaDB Installation for Nginx
17. To configure MariaDB so that ordinary users can
access the database without system sudo privileges,
go to MySQL command line interface with root privileges and run the below commands on MySQL interpreter:
MariaDB User Permissions
Finally, login to MariaDB database and run an arbitrary command without root privileges by executing the below command:
Check MariaDB Databases
That’ all! Now you have a LEMP stack configured on Ubuntu
16.10 and Ubuntu 16.04 server that allows
you to deploy complex dynamic web applications that can interact with databases.
a group of packages (Linux OS, Nginx web server, MySQL\MariaDB database and PHP server-side dynamic programming language) which are used to deploy dynamic web applications and web pages.
This tutorial will guide you on how to install a LEMP stack with MariaDB
10, PHP 7 and HTTP
2.0 Support forNginx on Ubuntu
16.10 and Ubuntu 16.04 server/desktop editions.
Requirements
Installationof Ubuntu 16.04 Server Edition [instructions also works on Ubuntu
16.10]
Step 1: Install the Nginx Web Server
1. Nginx is a modern and resources efficient webserver used to display web pages to visitors on the internet. We’ll start by installing Nginx web server from Ubuntu official repositories by using the apt
command line.
$ sudo apt-get install nginx
Install Nginx on Ubuntu 16.04
2. Next, issue the netstat and systemctl commands
in order to confirm if Nginx is started and binds
on port 80.
$ netstat -tlpn
Check Nginx Network Port Connection
$ sudo systemctl status nginx.service
Check Nginx Service Status
Once you have the confirmation that the server is started you can open a browser and navigate to your server IP address or DNS record using HTTP protocol in order to visit Nginx default web page.
http://IP-Address
Verify Nginx Webpage
Step 2: Enable Nginx HTTP/2.0 Protocol
3. The HTTP/2.0 protocolwhich is build by default in the latest release of Nginx binaries on Ubuntu
16.04works only in conjunction with SSL and promises a huge speed improvement in loading web SSL web pages.
To enable the protocol in Nginx on Ubuntu 16.04,
first navigate to Nginx available sites configuration files and backup the default configuration file by issuing the below command.
$ cd /etc/nginx/sites-available/
$ sudo mv default default.backup
Backup Nginx Sites Configuration File
4. Then, using a text editor create a new default
page with the below instructions:
server {
listen 443 ssl http2 default_server;
listen [::]:443 ssl http2 default_server;
root /var/www/html;
index index.html index.htm index.php;
server_name 192.168.1.13;
location / {
try_files $uri $uri/ =404;
}
ssl_certificate /etc/nginx/ssl/nginx.crt;
ssl_certificate_key /etc/nginx/ssl/nginx.key;
ssl_protocols TLSv1 TLSv1.1 TLSv1.2;
ssl_prefer_server_ciphers on;
ssl_ciphers EECDH+CHACHA20:EECDH+AES128:RSA+AES128:EECDH+AES256:RSA+AES256:EECDH+3DES:RSA+3DES:!MD5;
ssl_dhparam  /etc/nginx/ssl/dhparam.pem;
ssl_session_cache shared:SSL:20m;
ssl_session_timeout 180m;
resolver 8.8.8.8 8.8.4.4;
add_header Strict-Transport-Security "max-age=31536000;
#includeSubDomains" always;
location ~ \.php$ {
include snippets/fastcgi-php.conf;
fastcgi_pass unix:/run/php/php7.0-fpm.sock;
}
location ~ /\.ht {
deny all;
}
}
server {
listen         80;
listen    [::]:80;
server_name    192.168.1.13;
return         301 https://$server_name$request_uri; }
Enable Nginx HTTP 2 Protocol
The above configuration snippet enables the use of HTTP/2.0 by
adding the
http2parameter
to all SSL listen directives.
Also, the last part of the excerpt enclosed in server directive is used to redirect all non-SSL traffic to SSL/TLS default host. Also, replace the
server_namedirective
to match your own IP address or DNS record (FQDN preferably).
5. Once you finished editing Nginx default configuration
file with the above settings, generate and list the SSL certificate file and key by executing the below commands.
Fill the certificate with your own custom settings and pay attention to Common
Name setting to match your DNS FQDN record or your server IP address that will be used to access the web page.
$ sudo mkdir /etc/nginx/ssl
$ sudo openssl req -x509 -nodes -days 365 -newkey rsa:2048 -keyout /etc/nginx/ssl/nginx.key -out /etc/nginx/ssl/nginx.crt
$ ls /etc/nginx/ssl/
Generate SSL Certificate and Key for Nginx
6. Also, create a strong DH
cypher, which was changed on the above configuration file on
ssl_dhparaminstruction
line, by issuing the below command:
$ sudo openssl dhparam -out /etc/nginx/ssl/dhparam.pem 2048
Create Diffie-Hellman Key
7. Once the Diffie-Hellman key
has been created, verify if Nginx configuration file is correctly written and can be applied by Nginx web server and restart the daemon to reflect changes by running the below commands.
$ sudo nginx -t
$ sudo systemctl restart nginx.service
Check Nginx Configuration
8. In order to test if Nginx uses HTTP/2.0 protocol
issue the below command. The presence of
h2advertised
protocol confirms that Nginx has been successfully configured to use HTTP/2.0 protocol. All modern up-to-date browsers should support this protocol by default.
$ openssl s_client -connect localhost:443 -nextprotoneg ''
Test Nginx HTTP 2.0 Protocol
Step 3: Install PHP 7 Interpreter
Nginx can be used with PHP dynamic processing language interpreter to generate dynamic web content with the help of FastCGI process manager obtained by installing the php-fpm binarypackage from Ubuntu official repositories.
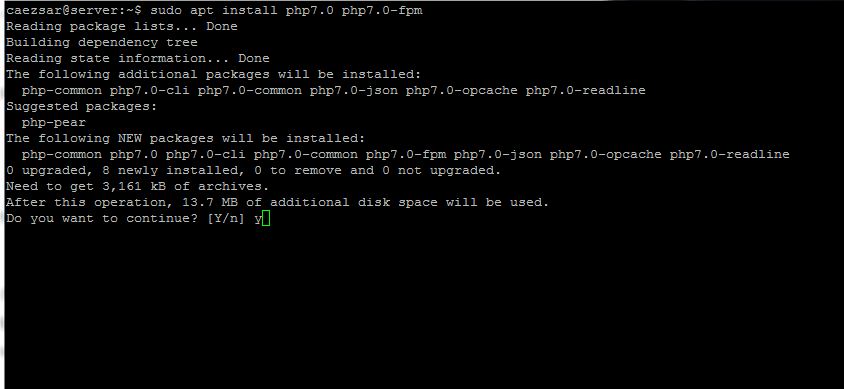
9. In order to grab PHP7.0 and
the additional packages that will allow PHP to communicate with Nginx web server issue the below command on your server console:
$ sudo apt install php7.0 php7.0-fpm
Install PHP 7 and PHP-FPM for Ngin
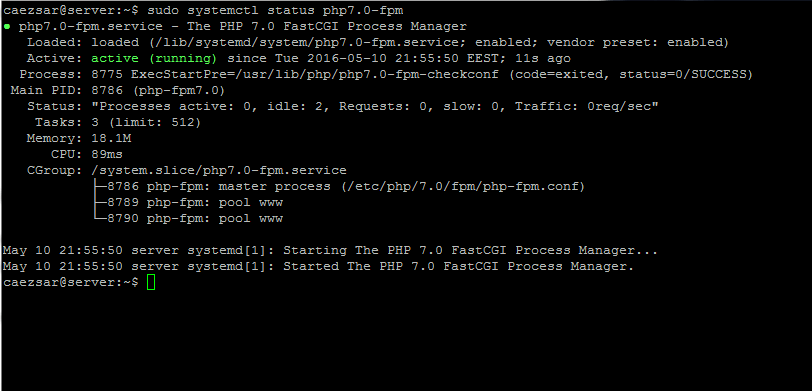
10. Once the PHP7.0 interpreter
has been successfully installed on your machine, start and check php7.0-fpmdaemon
by issuing the below command:
$ sudo systemctl start php7.0-fpm
$ sudo systemctl status php7.0-fpm
Start and Verify php-fpm Service
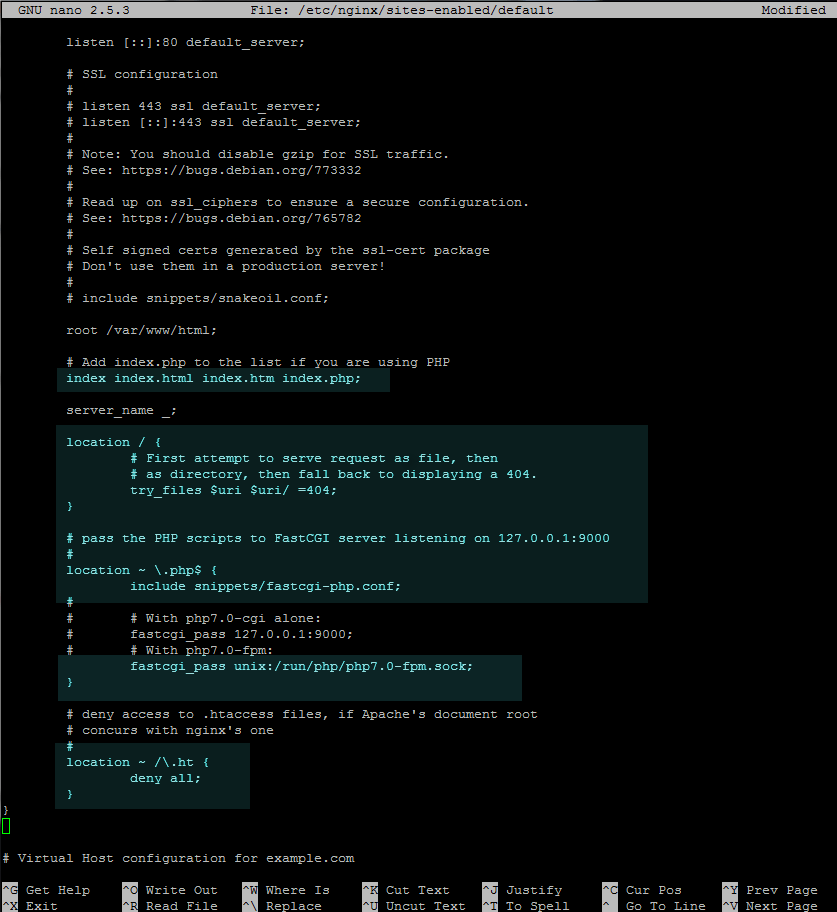
11. The current configuration file of Nginx is already
configured to use PHP FastCGI process manager in
order to server dynamic content.
The server block that enables Nginx to use PHP interpreter is presented on the below excerpt, so no further modifications of default Nginx configuration file are required.
location ~ \.php$ {
include snippets/fastcgi-php.conf;
fastcgi_pass unix:/run/php/php7.0-fpm.sock;
}
Below is a screenshot of what instructions you need to uncomment and modify is case of an original Nginx default configuration file.
Enable PHP FastCGI for Nginx
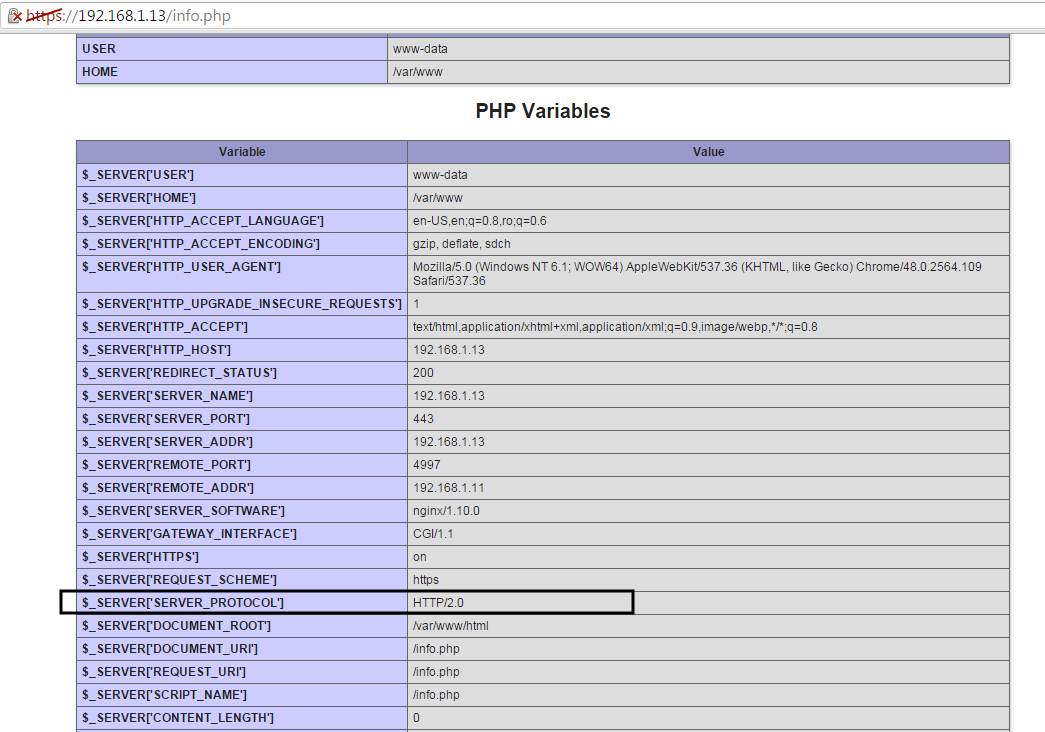
12. To test Nginx web server relation with PHP FastCGI
process manager create a PHP
info.phptest
configuration file by issuing the below command and verify the settings by visiting this configuration file using the below address:
http://IP_or
domain/info.php
.
$ sudo su -c 'echo "<?php phpinfo(); ?>" |tee /var/www/html/info.php'
Create PHP Info File
Verify PHP FastCGI Info
Also check if HTTP/2.0 protocol is advertised by
the server by locating the line
$_SERVER[‘SERVER_PROTOCOL’]on
PHP Variables block as illustrated on the below screenshot.
Check HTTP 2.0 Protocol Info
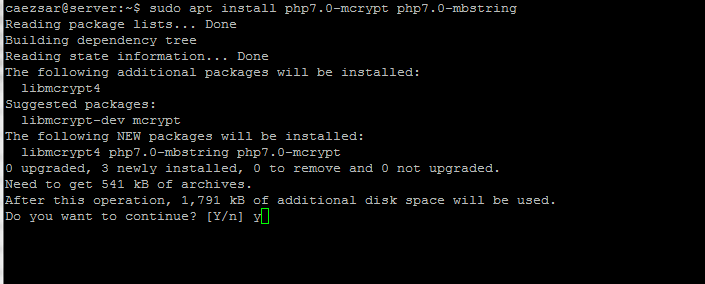
13. In order to install extra PHP7.0 modules
use the
apt
search php7.0
command to find a PHP module and install it.
Also, try to install the following PHP modules which can come in handy in case you are planning to install
WordPress or other CMS.
$ sudo apt install php7.0-mcrypt php7.0-mbstring
Install PHP 7 Modules
14. To register the PHP extra modules just restart PHP-FPM daemon
by issuing the below command.
$ sudo systemctl restart php7.0-fpm.service
Step 4: Install MariaDB Database
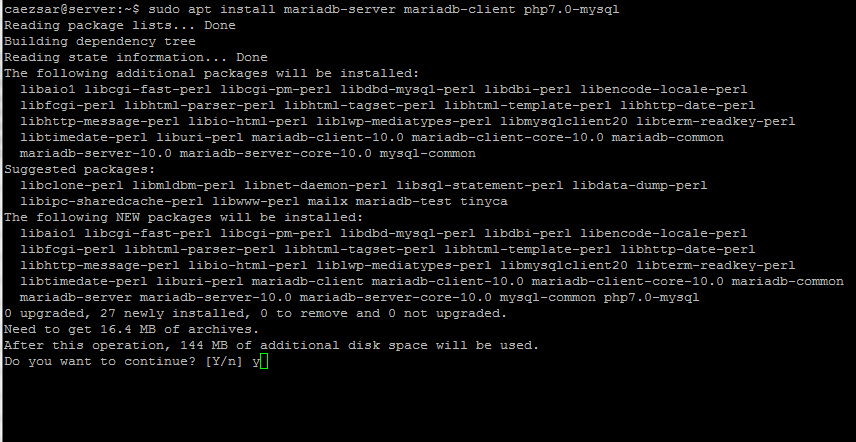
15. Finally, in order to complete our LEMP stackwe need the MariaDB database component to store and manage website data.
Install MariaDB database management system by running
the below command and restart PHP-FPM service in
order to use MySQL module to access the database.
$ sudo apt install mariadb-server mariadb-client php7.0-mysql
$ sudo systemctl restart php7.0-fpm.service
Install MariaDB for Nginx
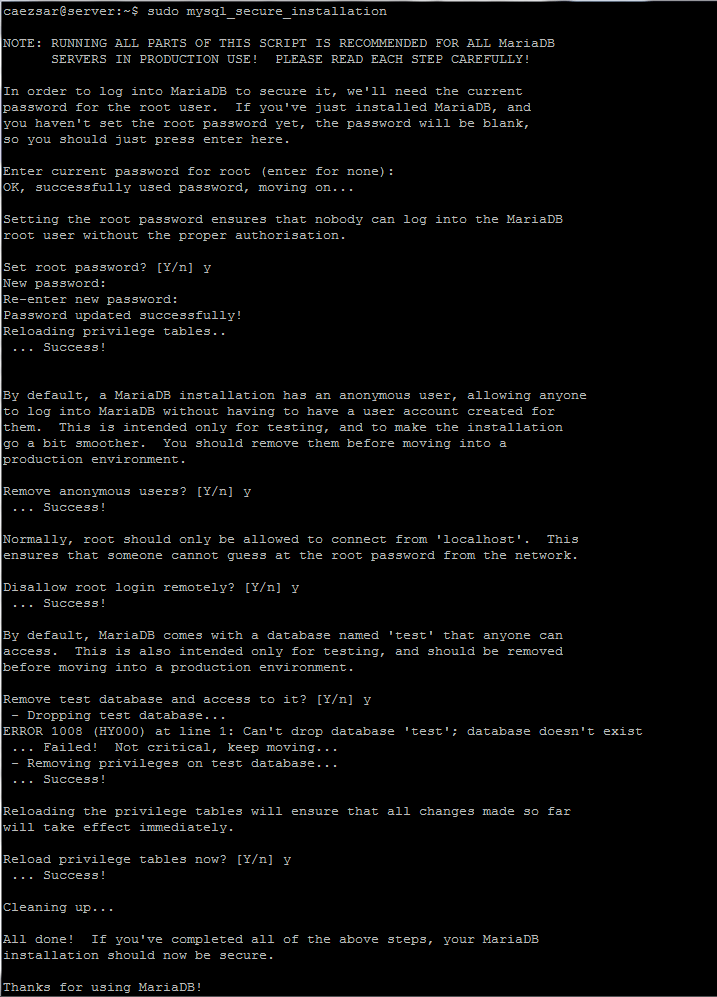
16. To secure the MariaDB installation, run the security
script provided by the binary package from Ubuntu repositories which will ask you set a root password, remove anonymous users, disable root login remotely and remove test database.
Run the script by issuing the below command and answer all questions with
yes.
Use the below screenshot as a guide.
$ sudo mysql_secure_installation
Secure MariaDB Installation for Nginx
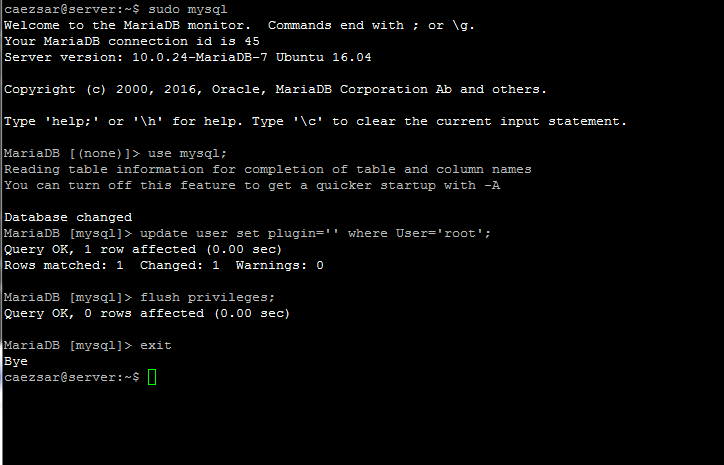
17. To configure MariaDB so that ordinary users can
access the database without system sudo privileges,
go to MySQL command line interface with root privileges and run the below commands on MySQL interpreter:
$ sudo mysql
MariaDB> use mysql;
MariaDB> update user set plugin=’‘ where User=’root’;
MariaDB> flush privileges;
MariaDB> exit
MariaDB User Permissions
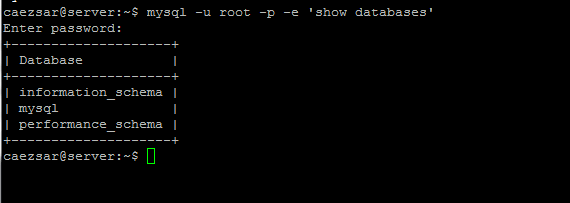
Finally, login to MariaDB database and run an arbitrary command without root privileges by executing the below command:
$ mysql -u root -p -e 'show databases'
Check MariaDB Databases
That’ all! Now you have a LEMP stack configured on Ubuntu
16.10 and Ubuntu 16.04 server that allows
you to deploy complex dynamic web applications that can interact with databases.

相关文章推荐
- How to add / install JSON support to PHP on CentOS in 10 Steps
- How to Install MS Visual Studio Code in Ubuntu 16.04/16.10
- How To Install Linux, nginx, MySQL, PHP (LEMP) stack on CentOS 6
- How To Install Linux, nginx, MySQL, PHP (LEMP) stack on CentOS 6
- How to Install Grub Customizer in Ubuntu 16.04 LTS
- How to install LAMP (Apache, PHP and MySQL in Linux) using Yum
- How to Install PHP 7 with Apache and MariaDB on CentOS 7/Debian 8
- How to install Nginx, PHP, PHP-FPM and MySQL under Windows with Cygwin
- How to Install CURL library for PHP in Ubuntu box
- HOWTO INSTALL OWNCLOUD WITH NGINX IN UBUNTU LTS
- (LNMP) How To Install Linux, nginx, MySQL, PHP
- [php-composer] how to install composer in windows
- How to Install HTTP Git Server With Nginx on Ubuntu 16.04
- How To Install Linux, Nginx, MySQL, PHP (LEMP) Stack on Debian 7
- windows 10中的ubuntu子系统安装桌面环境的方法(How to install Ubuntu-desktop in windows 10 Subsystem for Linux)
- How To Install Linux, Apache, MySQL, PHP (LAMP) stack on Ubuntu 16.04
- How To Install Linux, Nginx, MySQL, PHP (LEMP) Stack on Debian 7
- How To Install Linux, nginx, MySQL, PHP (LEMP) stack on Ubuntu 12.04
- How to install LAMP (Apache, PHP and MySQL in Linux) using Yum
- How to Install Nginx, PHP, PHP Extensions, MySQL, and Zend Optimizer on FreeBSD 7