Spring Security and Angular JS
2016-10-20 11:15
232 查看
A Secure Single Page Application
In this section we show some nice features of Spring Security, Spring Boot and Angular JS working together to provide a pleasant and secure user experience. It should be accessible to beginners with Spring and Angular JS, but there also is plenty of detailthat will be of use to experts in either. This is actually the first in a series of sections on Spring Security and Angular JS, with new features exposed in each one successively. We’ll improve on the application in the
second and subsequent installments, but the main changes after this are architectural rather than functional.
Spring and the Single Page Application
HTML5, rich browser-based features, and the "single page application" are extremely valuable tools for modern developers, but any meaningful interactions will involve a backend server, so as well as static content (HTML, CSS and JavaScript) we are goingto need a backend server. The backend server can play any or all of a number of roles: serving static content, sometimes (but not so often these days) rendering dynamic HTML, authenticating users, securing access to protected resources, and (last but not least)
interacting with JavaScript in the browser through HTTP and JSON (sometimes referred to as a REST API).
Spring has always been a popular technology for building the backend features (especially in the enterprise), and with the advent of
Spring Boot things have never been easier. Let’s have a look at how to build a new single page application from nothing using Spring Boot, Angular JS and Twitter Bootstrap. There’s no particular
reason to choose that specific stack, but it is quite popular, especially with the core Spring constituency in enterprise Java shops, so it’s a worthwhile starting point.
Create a New Project
We are going to step through creating this application in some detail, so that anyone who isn’t completely au fait with Spring and Angular can follow what is happening. If you prefer to cut to the chase, you canskip to the end where the application is working, and see how it all fits together. There are various options for creating a new project:
Using curl on the command line
Using Spring Boot CLI
Using the Spring Initializr website
Using Spring Tool Suite
The source code for the complete project we are going to build is in
Github here, so you can just clone the project and work directly from there if you want. Then jump to the
next section.
Using Curl
The easiest way to create a new project to get started is via theSpring Boot Initializr. E.g. using curl on a UN*X like system:
$ mkdir ui && cd ui
$ curl https://start.spring.io/starter.tgz -d style=web \
-d style=security -d name=ui | tar -xzvf -
You can then import that project (it’s a normal Maven Java project by default) into your favourite IDE, or just work with the files and "mvn" on the command line. Then jump to the
next section.
Using Spring Boot CLI
You can create the same project using theSpring Boot CLI, like this:
$ spring init --dependencies web,security ui/ && cd ui
Then jump to the
next section.
Using the Initializr Website
If you prefer you can also get the same code directly as a .zip file from theSpring Boot Initializr. Just open it up in your browser and select dependencies "Web" and "Security", then click on "Generate Project". The .zip file contains a standard Maven or Gradle project in the root directory, so you might want to create an empty
directory before you unpack it. Then jump to the
next section.
Using Spring Tool Suite
In Spring Tool Suite (a set of Eclipse plugins) you can also create and import a project using a wizard atFile->New->Spring Starter Project. Then jump to the
next section.
Add a Home Page
The core of a single page application is a static "index.html", so let’s go ahead and create one (in "src/main/resources/static" or "src/main/resources/public"):index.html
<!doctype html>
<html>
<head>
<title>Hello AngularJS</title>
<link href="css/angular-bootstrap.css" rel="stylesheet">
<style type="text/css">
[ng\:cloak], [ng-cloak], .ng-cloak {
display: none !important;
}
</style>
</head>

<body ng-app="hello">
<div class="container">
<h1>Greeting</h1>
<div ng-controller="home" ng-cloak class="ng-cloak">
<p>The ID is {{greeting.id}}</p>
<p>The content is {{greeting.content}}</p>
</div>
</div>
<script src="js/angular-bootstrap.js" type="text/javascript"></script>
<script src="js/hello.js"></script>
</body>
</html>
It’s pretty short and sweet because it is just going to say "Hello World".
Features of the Home Page
Salient features include:Some CSS imported in the
<head>, one placeholder for a file that doesn’t yet exist, but is named suggestively ("angular-bootstrap.css") and one inline stylesheet defining the
"ng-cloak" class.
The "ng-cloak" class is applied to the content
<div>so that dynamic content is hidden until Angular JS has had a chance to process it (this prevents "flickering" during the initial page load).
The
<body>is marked as
ng-app="hello"which means we need to define a JavaScript module that Angular will recognise as an application called "hello".
All the CSS classes (apart from "ng-cloak") are from
Twitter Bootstrap. They will make things look pretty once we get the right stylesheets set up.
The content in the greeting is marked up using handlebars, e.g.
{{greeting.content}} and this will be filled in later by Angular (using a "controller" called "home" according to theng-controllerdirective on the surrounding
<div>).
Angular JS (and Twitter Bootstrap) are included at the bottom of the
<body>so that the browser can process all the HTML before it gets processed.
We also include a separate "hello.js" which is where we are going to define the application behaviour.
We are going to create the script and stylesheet assets in a minute, but for now we can ignore the fact that they don’t exist.
Running the Application
Once the home page file is added, your application will be loadable in a browser (even though it doesn’t do much yet). On the command line you can do this$ mvn spring-boot:run
and go to a browser at http://localhost:8080. When you load the home page you should get a browser dialog asking for username and password (the username is "user" and the password is printed in the console
logs on startup). There’s actually no content yet, so you should get a blank page with a "Greeting" header once you successfully authenticate.
If you don’t like scraping the console log for the password just add this to the "application.properties" (in "src/main/resources"):security.user.password=password(and choose your own password). We did this in the sample code using "application.yml". |
main()method in the application class (there is only one class, and it is called
UiApplicationif you used the "curl" command above).
To package and run as a standalone JAR, you can do this:
$ mvn package
$ java -jar target/*.jar
Front End Assets
Entry-level tutorials on Angular and other front end technologies often just include the library assets directly from the internet (e.g.the Angular JS website itself recommends downloading from
Google CDN). Instead of doing that we are going to generate the "angular-bootstrap.js" asset by concatenating several files from such libraries. This is not strictly necessary to get the application working, but it
is best practice for a production application to consolidate scripts to avoid chatter between the browser and the server (or content delivery network). Since we aren’t modifying or customizing the CSS stylesheets it is also unecessary to generate the
"angular-bootstrap.css", and we could just use static assets from Google CDN for that as well. However, in a real application we almost certainly would want to modify the stylesheets and we wouldn’t want to edit the CSS sources by hand, so we would use a higher
level tool (e.g. Less or
Sass), so we are going to use one too.
There are many different ways of doing this, but for the purposes of this section, we are going to use
wro4j, which is a Java-based toolchain for preprocessing and packaging front end assets. It can be used as a JIT (Just in Time)
Filterin any Servlet application, but it also has good support for build tools like Maven and Eclipse, and that is how we are going to use it. So we are going to build static resource files and bundle them in our application JAR.
Aside: Wro4j is probably not the tool of choice for hard-core front end developers - they would probably be using a node-based toolchain, with
bower and/or
grunt. These are definitely excellent tools, and covered in great detail all over the internet, so please feel free to use them if you prefer. If you just put the outputs from those toolchains in "src/main/resources/static" then it will all work. I find
wro4j comfortable because I am not a hard-core front end developer and I know how to use Java-based tooling.
To create static resources at build time we add some magic to the Maven
pom.xml(it’s quite verbose, but boilerplate, so it could be extracted into a parent pom in Maven, or a shared task or plugin for Gradle):
pom.xml
<build>
<plugins>
<plugin>
<groupId>org.springframework.boot</groupId>
<artifactId>spring-boot-maven-plugin</artifactId>
</plugin>
<plugin>
<artifactId>maven-resources-plugin</artifactId>
<executions>
<execution>
<!-- Serves *only* to filter the wro.xml so it can get an absolute
path for the project -->
<id>copy-resources</id>
<phase>validate</phase>
<goals>
<goal>copy-resources</goal>
</goals>
<configuration>
<outputDirectory>${basedir}/target/wro</outputDirectory>
<resources>
<resource>
<directory>src/main/wro</directory>
<filtering>true</filtering>
</resource>
</resources>
</configuration>
</execution>
</executions>
</plugin>
<plugin>
<groupId>ro.isdc.wro4j</groupId>
<artifactId>wro4j-maven-plugin</artifactId>
<version>1.7.6</version>
<executions>
<execution>
<phase>generate-resources</phase>
<goals>
<goal>run</goal>
</goals>
</execution>
</executions>
<configuration>
<wroManagerFactory>ro.isdc.wro.maven.plugin.manager.factory.ConfigurableWroManagerFactory</wroManagerFactory>
<cssDestinationFolder>${project.build.directory}/classes/static/css</cssDestinationFolder>
<jsDestinationFolder>${project.build.directory}/classes/static/js</jsDestinationFolder>
<wroFile>${project.build.directory}/wro/wro.xml</wroFile>
<extraConfigFile>${basedir}/src/main/wro/wro.properties</extraConfigFile>
<contextFolder>${basedir}/src/main/wro</contextFolder>
</configuration>
<dependencies>
<dependency>
<groupId>org.webjars</groupId>
<artifactId>jquery</artifactId>
<version>2.1.1</version>
</dependency>
<dependency>
<groupId>org.webjars</groupId>
<artifactId>angularjs</artifactId>
<version>1.3.8</version>
</dependency>
<dependency>
<groupId>org.webjars</groupId>
<artifactId>bootstrap</artifactId>
<version>3.2.0</version>
</dependency>
</dependencies>
</plugin>
</plugins>
</build>
You can copy that verbatim into your POM, or just scan it if you are following along from the
source in Github. The main points are:
We are including some webjars libraries as dependencies (jquery and bootstrap for CSS and styling, and Angular JS for business logic). Some of the static resources in those jar files will be included in our generated "angular-bootstrap.*" files, but the
jars themselves don’t need to be packaged with the application.
Twitter Bootstrap has a dependency on jQuery, so we include that as well. An Angular JS application that didn’t use Bootstrap wouldn’t need that since Angular has its own version of the features it needs from jQuery.
The generated resources will go in "target/classes", so they will be packaged in the output JAR from the project, and also available on the classpath in the IDE (as long as we are using Maven tooling, e.g. m2e in Eclipse).
The wro4j-maven-plugin has some Eclipse integration features and you can install it from the Eclipse Marketplace (try it later if this is your first time - it’s not needed to complete the application). If you do that then Eclipse will watch the source files
and re-generate the outputs if they change. If you run in debug mode then changes are immediately re-loadable in a browser.
Wro4j is controlled from an XML configuration file that doesn’t know about your build classpath, and only understand absolute file paths, so we have to create an absolute file location and insert it in
wro.xml. For that purpose we use Maven resource filtering and that is why there is an explicit "maven-resources-plugin" declaration.
That’s all of the changes we are going to need to the POM. It remains to add the wro4j build files, which we have specified are going to live in "src/main/wro".
Wro4j Source Files
If you look in thesource code in Github you will see there are only 3 files (and one of those is empty, ready for later customization):
wro.propertiesis a configuration file for the preprocessing and rendering engine in wro4j. You can use it to switch on and off various parts of the toolchain. In this case we use it to compile CSS from
Less and to minify JavaScript, ultimately combining the sources from all the libraries we need in two files.
wro.properties
preProcessors=lessCssImport
postProcessors=less4j,jsMin
wro.xmldeclares a single "group" of resources called "angular-bootstrap", and this ends up being the base name of the static resources that are generated. It includes references to
<css>and
<js>elements in the webjars we added, and also to a local source file
main.less.
wro.xml
<groups xmlns="http://www.isdc.ro/wro">
<group name="angular-bootstrap">
<css>webjar:bootstrap/3.2.0/less/bootstrap.less</css>
<css>file:${project.basedir}/src/main/wro/main.less</css>
<js>webjar:jquery/2.1.1/jquery.min.js</js>
<js>webjar:angularjs/1.3.8/angular.min.js</js>
</group>
</groups>main.lessis empty in the sample code, but could be used to customise the look and feel, changing the default settings in Twitter Bootstrap. E.g. to change the colours from default blue to light pink you could add a single line:
main.less
@brand-primary: #de8579;
Copy those files to your project and run "mvn package" and you should see the "bootstrap-angular.*" resources show up in your JAR file. If you run the app now, you should see the CSS take effect, but the business logic and navigation is still missing.
Create the Angular Application
Let’s create the "hello" application (in "src/main/resources/static/js/hello.js" so that the<script/>at the bottom of our "index.html" finds it in the right place).
A minimal Angular JS application looks like this:
hello.js
angular.module('hello', [])
.controller('home', function($scope) {
$scope.greeting = {id: 'xxx', content: 'Hello World!'}
})
The name of the application is "hello" and it has an empty (and redundant) "config" and an empty "controller" called "home". The "home" controller will be called when we load the "index.html" because we have decorated the content
<div>with
ng-controller="home".
Notice that we injected a magic
$scopeinto the controller function (Angular does
dependency injection by naming convention, and recognises the names of your function parameters). The
$scopeis then used inside the function to set up content and behaviour for the UI elements that this controller is responsible for.
If you added that file under "src/main/resources/static/js" your app should now be secure and functional, and it will say "Hello World!". The
greetingis rendered by Angular in the HTML using the handlebar placeholders,
{{greeting.id}} and {{greeting.content}}.Using Controller As
Binding directly to$scopeis a little bit too magic for us - in fact it is sort of a smell, and we want to flush it out now before we make any more changes. Angular provides us with a simple idiom to explicitly declare a namespace for the controller,
and use the controller instance itself, not the implicit
$scopewhen we bind in the UI. We need to make 2 simple changes, one to the HTML where we add the "as" keyword to the
ng-controllerand then refer back to it when we bind to the model:
index.html
<div ng-controller="home as home" ng-cloak class="ng-cloak">
<p>The ID is {{home.greeting.id}}</p>
<p>The content is {{home.greeting.content}}</p>
</div>
and in the client we also need to bind the greeting to the controller instead of to
$scope:
hello.js
angular.module('hello', [])
.controller('home', function() {
this.greeting = {id: 'xxx', content: 'Hello World!'}
})
Adding Dynamic Content
So far we have an application with a greeting that is hard coded. That’s useful for learning how things fit together, but really we expect content to come from a backend server, so let’s create an HTTP endpoint that we can use to grab a greeting. In yourapplication class (in "src/main/java/demo"), add the
@RestControllerannotation and define a new
@RequestMapping:
UiApplication.java
@SpringBootApplication
@RestController
public class UiApplication {

@RequestMapping("/resource")
public Map<String,Object> home() {
Map<String,Object> model = new HashMap<String,Object>();
model.put("id", UUID.randomUUID().toString());
model.put("content", "Hello World");
return model;
}

public static void main(String[] args) {
SpringApplication.run(UiApplication.class, args);
}

}
Depending on the way you created your new project it might not be calledUiApplication, and it might have @EnableAutoConfiguration @ComponentScan @Configurationinstead of @SpringBootApplication. |
$ curl localhost:8080/resource
{"timestamp":1420442772928,"status":401,"error":"Unauthorized","message":"Full authentication is required to access this resource","path":"/resource"}
Loading a Dynamic Resource from Angular
So let’s grab that message in the browser. Modify the "home" controller to load the protected resource using XHR:hello.js
angular.module('hello', [])
.controller('home', function($http) {
var self = this;
$http.get('/resource/').then(function(response) {
self.greeting = response.data;
})
});
We injected an
$httpservice, which is provided by Angular as a core feature, and used it to GET our resource. Angular passes us the JSON from the response body back to a callback function on success.
| following a common convention, we introduced a "self" variable as an alias for "this" to refer back to the controller inside a callback. |
a secure single page application in less than a hundred lines of code!
| You might need to force your browser to reload the static resources after you change them. In Chrome (and Firefox with a plugin) you can use "developer tools" (F12), and that might be enough. Or you might have to use CTRL+F5. |
How Does it Work?
The interactions between the browser and the backend can be seen in your browser if you use some developer tools (usually F12 opens this up, works in Chrome by default, may require a plugin in Firefox). Here’s a summary:| Verb | Path | Status | Response |
|---|---|---|---|
| GET | / | 401 | Browser prompts for authentication |
| GET | / | 200 | index.html |
| GET | /css/angular-bootstrap.css | 200 | Twitter bootstrap CSS |
| GET | /js/angular-bootstrap.js | 200 | Bootstrap and Angular JS |
| GET | /js/hello.js | 200 | Application logic |
| GET | /resource | 200 | JSON greeting |
CORS negotiation.
Look more closely at the requests and you will see that all of them have an "Authorization" header, something like this:
Authorization: Basic dXNlcjpwYXNzd29yZA==
The browser is sending the username and password with every request (so remember to use HTTPS exclusively in production). There’s nothing "Angular" about that, so it works with your JavaScript framework or non-framework of choice.
What’s Wrong with That?
On the face of it, it seems like we did a pretty good job, it’s concise, easy to implement, all our data are secured by a secret password, and it would still work if we changed the front end or backend technologies. But there are some issues.Basic authentication is restricted to username and password authentication.
The authentication UI is ubiquitous but ugly (browser dialog).
There is no protection from
Cross Site Request Forgery (CSRF).
CSRF isn’t really an issue with our application as it stands since it only needs to GET the backend resources (i.e. no state is changed in the server). As soon as you have a POST, PUT or DELETE in your application it simply isn’t secure any more by any reasonable
modern measure.
In the
next section in this series we will extend the application to use form-based authentication, which is a lot more flexible than HTTP Basic. Once we have a form we will need CSRF protection, and both Spring Security and Angular have some nice out-of-the box
features to help with this. Spoiler: we are going to need to use the
HttpSession.
Thanks: I would like to thank everyone who helped me develop this series, and in particular
Rob Winch and
Thorsten Spaeth for their careful reviews of the text and source code, and for teaching me a few tricks I didn’t know even about the parts I thought I was most familar with.
The Login Page
In this section we continueour discussion of how to use
Spring Security with Angular JS in a "single page application". Here we show how to use Angular JS to authenticate a user via a form and fetch a secure resource to render in the UI. This is the second in
a series of sections, and you can catch up on the basic building blocks of the application or build it from scratch by reading the
first section, or you can just go straight to the
source code in Github. In the first section we built a simple application that used HTTP Basic authentication to protect the backend resources. In this one we add a login form, give the user some control over whether to authenticate or not, and fix the
issues with the first iteration (principally lack of CSRF protection).
Reminder: if you are working through this section with the sample application, be sure to clear your browser cache of cookies and HTTP Basic credentials. In Chrome the best way to do that for a single server is to open a new incognito window.
Add Navigation to the Home Page
The core of a single page application is a static "index.html". We already had a really basic one, but for this application we need to offer some navigation features (login, logout, home), so let’s modify it (in "src/main/resources/static"):index.html
<!doctype html>
<html>
<head>
<title>Hello AngularJS</title>
<link
href="css/angular-bootstrap.css"
rel="stylesheet">
<style type="text/css">
[ng\:cloak], [ng-cloak], .ng-cloak {
display: none !important;
}
</style>
</head>

<body ng-app="hello" ng-cloak class="ng-cloak">
<div ng-controller="navigation as nav" class="container">
<ul class="nav nav-pills" role="tablist">
<li class="active"><a href="#/">home</a></li>
<li><a href="#/login">login</a></li>
<li ng-show="authenticated"><a href="" ng-click="nav.logout()">logout</a></li>
</ul>
</div>
<div ng-view class="container"></div>
<script src="js/angular-bootstrap.js" type="text/javascript"></script>
<script src="js/hello.js"></script>
</body>
</html>
It’s not much different than the original in fact. Salient features:
There is a
<ul>for the navigation bar. All the links come straight back to the home page, but in a way that Angular will recognize once we get it set up with "routes".
All the content is going to be added as "partials" in the
<div>labelled "ng-view".
The "ng-cloak" has been moved up to the body because we want to hide the whole page until Angular can work out which bits to render. Otherwise the menus and content can "flicker" as they are moved around when the page loads.
As in the
first section, the front end assets "angular-bootstrap.css" and "angular-bootstrap.js" are generated from JAR libraries at build time.
Add Navigation to the Angular Application
Let’s modify the "hello" application (in "src/main/resources/public/js/hello.js") to add some navigation features. We can start by adding some configuration for routes, so that the links in the home page actually do something. E.g.hello.js
angular.module('hello', [ 'ngRoute' ])
.config(function($routeProvider, $httpProvider) {

$routeProvider.when('/', {
templateUrl : 'home.html',
controller : 'home',
controllerAs: 'controller'
}).when('/login', {
templateUrl : 'login.html',
controller : 'navigation',
controllerAs: 'controller'
}).otherwise('/');

$httpProvider.defaults.headers.common["X-Requested-With"] = 'XMLHttpRequest';

})
.controller('home', function($http) {
var self = this;
$http.get('/resource/').then(function(response) {
self.greeting = response.data;
})
})
.controller('navigation', function() {});
We added a dependency on an Angular module called
"ngRoute" and this allowed us to inject a magic
$routeProviderinto the config function (Angular does dependency injection by naming convention, and recognizes the names of your function parameters). The
$routeProvideris then used inside the function to set up links to "/" (the "home" controller) and "/login" (the "login" controller). The "templateUrls" are relative paths from the root of the routes (i.e. "/") to "partial" views that will be used
to render the model created by each controller.
The custom "X-Requested-With" is a conventional header sent by browser clients, and it used to be the default in Angular but they
took it out in 1.3.0. Spring Security responds to it by not sending a "WWW-Authenticate" header in a 401 response, and thus the browser will not pop up an authentication dialog
(which is desirable in our app since we want to control the authentication).
In order to use the "ngRoute" module, we need to add a line to the "wro.xml" configuration that builds the static assets (in "src/main/wro"):
wro.xml
<groups xmlns="http://www.isdc.ro/wro">
<group name="angular-bootstrap">
...
<js>webjar:angularjs/1.3.8/angular-route.min.js</js>
</group>
</groups>
The Greeting
The greeting content from the old home page can go in "home.html" (right next to the "index.html" in "src/main/resources/static"):home.html
<h1>Greeting</h1>
<div ng-show="authenticated">
<p>The ID is {{controller.greeting.id}}</p>
<p>The content is {{controller.greeting.content}}</p>
</div>
<div  ng-show="!authenticated">
<p>Login to see your greeting</p>
</div>
Note that we are binding to the controller as "controller" because that is how it was declared in the route provider configuration.
Since the user now has the choice whether to login or not (before it was all controlled by the browser), we need to distinguish in the UI between content that is secure and that which is not. We have anticipated this by adding references to an (as yet non-existent)
authenticatedvariable.
The Login Form
The login form goes in "login.html":login.html
<div class="alert alert-danger" ng-show="controller.error">
There was a problem logging in. Please try again.
</div>
<form role="form" ng-submit="controller.login()">
<div class="form-group">
<label for="username">Username:</label> <input type="text"
class="form-control" id="username" name="username" ng-model="controller.credentials.username"/>
</div>
<div class="form-group">
<label for="password">Password:</label> <input type="password"
class="form-control" id="password" name="password" ng-model="controller.credentials.password"/>
</div>
<button type="submit" class="btn btn-primary">Submit</button>
</form>
This is a very standard login form, with 2 inputs for username and password and a button for submitting the form via
ng-submit. You don’t need an action on the form tag, so it’s probably better not to put one in at all. There is also an error message, shown only if the angular
model contains an
error. The form controls use
ng-modelto pass data between the HTML and the Angular controller, and in this case we are using a
credentialsobject to hold the username and pasword. According to the routes we defined the login form is linked with the "navigation" controller, which is so far empty, so let’s head over to that to fill in some gaps.
The Authentication Process
To support the login form we just added we need to add some more features. On the client side these will be implemented in the "navigation" controller, and on the server it will be Spring Security configuration.Submitting the Login Form
To submit the form we need to define thelogin()function that we referenced already in the form via
ng-submit, and the
credentialsobject that we referenced via
ng-model. Let’s flesh out the "navigation" controller in "hello.js" (omitting the routes config and the "home" controller):
hello.js
angular.module('hello', [ 'ngRoute' ]) // ... omitted code
.controller('navigation',

function($rootScope, $http, $location) {

var self = this

var authenticate = function(credentials, callback) {

var headers = credentials ? {authorization : "Basic "
+ btoa(credentials.username + ":" + credentials.password)
} : {};

$http.get('user', {headers : headers}).then(function(response) {
if (response.data.name) {
$rootScope.authenticated = true;
} else {
$rootScope.authenticated = false;
}
callback && callback();
}, function() {
$rootScope.authenticated = false;
callback && callback();
});

}

authenticate();
self.credentials = {};
self.login = function() {
authenticate(self.credentials, function() {
if ($rootScope.authenticated) {
$location.path("/");
self.error = false;
} else {
$location.path("/login");
self.error = true;
}
});
};
});
All of the code in the "navigation" controller will be executed when the page loads because the
<div>containing the menu bar is visible and is decorated with
ng-controller="navigation". In addition to initializing the
credentialsobject, it defines 2 functions, the
login()that we need in the form, and a local helper function
authenticate()which tries to load a "user" resource from the backend. The
authenticate()function is called when the controller is loaded to see if the user is actually already authenticated (e.g. if he had refreshed the browser in the middle of a session). We need the
authenticate()function to make a remote call because the actual authentication is done by the server, and we don’t want to trust the browser to keep track of it.
The
authenticate()function sets an application-wide flag called
authenticatedwhich we have already used in our "home.html" to control which parts of the page are rendered. We do this using
$rootScopebecause it’s convenient and easy to follow, and we need to share the
authenticatedflag between the "navigation" and the "home" controllers. Angular experts might prefer to share data through a shared user-defined service (but it ends up being the same mechanism).
The
authenticate()makes a GET to a relative resource (relative to the deployment root of your application) "/user". When called from the
login()function it adds the Base64-encoded credentials in the headers so on the server it does an authentication and accepts a cookie in return. The
login()function also sets a local
$scope.errorflag accordingly when we get the result of the authentication, which is used to control the display of the error message above the login form.
The Currently Authenticated User
To service theauthenticate()function we need to add a new endpoint to the backend:
UiApplication.java
@SpringBootApplication
@RestController
public class UiApplication {

@RequestMapping("/user")
public Principal user(Principal user) {
return user;
}

...

}
This is a useful trick in a Spring Security application. If the "/user" resource is reachable then it will return the currently authenticated user (an
Authentication), and otherwise Spring Security will intercept the request and send a 401 response through an
AuthenticationEntryPoint.
Handling the Login Request on the Server
Spring Security makes it easy to handle the login request. We just need to add some configuration to ourmain application class (e.g. as an inner class):
UiApplication.java
@SpringBootApplication
@RestController
public class UiApplication {

...

@Configuration
@Order(SecurityProperties.ACCESS_OVERRIDE_ORDER)
protected static class SecurityConfiguration extends WebSecurityConfigurerAdapter {
@Override
protected void configure(HttpSecurity http) throws Exception {
http
.httpBasic()
.and()
.authorizeRequests()
.antMatchers("/index.html", "/home.html", "/login.html", "/").permitAll()
.anyRequest().authenticated();
}
}

}
This is a standard Spring Boot application with Spring Security customization, just allowing anonymous access to the static (HTML) resources (the CSS and JS resources are already accessible by default). The HTML resources need to be available to anonymous
users, not just ignored by Spring Security, for reasons that will become clear.
Logout
The application is almost finished functionally. The last thing we need to do is implement the logout feature that we sketched in the home page. Here’s a reminder what the navigation bar looks like:index.html
<div ng-controller="navigation as nav" class="container">
<ul class="nav nav-pills" role="tablist">
<li class="active"><a href="#/">home</a></li>
<li><a href="#/login">login</a></li>
<li ng-show="authenticated"><a href="" ng-click="nav.logout()">logout</a></li>
</ul>
</div>
If the user is authenticated then we show a "logout" link and hook it to a
logout()function in the "navigation" controller. The implementation of the function is relatively simple:
hello.js
angular.module('hello', [ 'ngRoute' ]).
// ...
.controller('navigation', function(...) {

...

self.logout = function() {
$http.post('logout', {}).finally(function() {
$rootScope.authenticated = false;
$location.path("/");
});
}

...

});
It sends an HTTP POST to "/logout" which we now need to implement on the server. This is straightforward because it is added for us already by Spring Security (i.e. we don’t need to do anything for this simple use case). For more control over the behaviour
of logout you could use the
HttpSecuritycallbacks in your
WebSecurityAdapterto, for instance execute some business logic after logout.
CSRF Protection
The application is almost ready to use, and in fact if you run it you will find that everything we built so far actually works except the logout link. Try using it and look at the responses in the browser and you will see why:POST /logout HTTP/1.1
...
Content-Type: application/x-www-form-urlencoded
username=user&password=password
HTTP/1.1 403 Forbidden
Set-Cookie: JSESSIONID=3941352C51ABB941781E1DF312DA474E; Path=/; HttpOnly
Content-Type: application/json;charset=UTF-8
Transfer-Encoding: chunked
...
{"timestamp":1420467113764,"status":403,"error":"Forbidden","message":"Expected CSRF token not found. Has your session expired?","path":"/login"}That’s good because it means that Spring Security’s built-in CSRF protection has kicked in to prevent us from shooting ourselves in the foot. All it wants is a token sent to it in a header called "X-CSRF". The value of the CSRF token was available server
side in the
HttpRequestattributes from the initial request that loaded the home page. To get it to the client we could render it using a dynamic HTML page on the server, or expose it via a custom endpoint, or else we could send it as a cookie.
The last choice is the best because Angular has
built in support for CSRF (which it calls "XSRF") based on cookies.
So on the server we need a custom filter that will send the cookie. Angular wants the cookie name to be "XSRF-TOKEN" and Spring Security provides it as a request attribute by default, so we just need to transfer the value from a request attribute to a cookie.
Fortunately, Spring Security (since 4.1.0) provides a special
CsrfTokenRepositorythat does precisely this:
UiApplication.java
@Configuration
@Order(SecurityProperties.ACCESS_OVERRIDE_ORDER)
protected static class SecurityConfiguration extends WebSecurityConfigurerAdapter {
@Override
protected void configure(HttpSecurity http) throws Exception {
http
.httpBasic().and()
.authorizeRequests()
.antMatchers("/index.html", "/home.html", "/login.html", "/").permitAll().anyRequest()
.authenticated().and()
.csrf()
.csrfTokenRepository(CookieCsrfTokenRepository.withHttpOnlyFalse());
}
}
With those changes in place we don’t need to do anything on the client side and the login form is now working.
How Does it Work?
The interactions between the browser and the backend can be seen in your browser if you use some developer tools (usually F12 opens this up, works in Chrome by default, may require a plugin in Firefox). Here’s a summary:| Verb | Path | Status | Response |
|---|---|---|---|
| GET | / | 200 | index.html |
| GET | /css/angular-bootstrap.css | 200 | Twitter bootstrap CSS |
| GET | /js/angular-bootstrap.js | 200 | Bootstrap and Angular JS |
| GET | /js/hello.js | 200 | Application logic |
| GET | /user | 401 | Unauthorized |
| GET | /home.html | 200 | Home page |
| GET | /resource | 401 | Unauthorized |
| GET | /login.html | 200 | Angular login form partial |
| GET | /user | 401 | Unauthorized |
| GET | /user | 200 | Send credentials and get JSON |
| GET | /resource | 200 | JSON greeting |
since it isn’t there in the first call, that response is dropped.
Look more closely at the requests and you will see that they all have cookies. If you start with a clean browser (e.g. incognito in Chrome), the very first request has no cookies going off to the server, but the server sends back "Set-Cookie" for "JSESSIONID"
(the regular
HttpSession) and "X-XSRF-TOKEN" (the CRSF cookie that we set up above). Subsequent requests all have those cookies, and they are important: the application doesn’t work without them, and they are providing some really basic security
features (authentication and CSRF protection). The values of the cookies change when the user authenticates (after the POST) and this is another important security feature (preventing
session fixation attacks).
| It is not adequate for CSRF protection to rely on a cookie being sent back to the server because the browser will automatically send it even if you are not in a page loaded from your application (a Cross Site Scripting attack, otherwise known as XSS). The header is not automatically sent, so the origin is under control. You might see that in our application the CSRF token is sent to the client as a cookie, so we will see it being sent back automatically by the browser, but it is the header that provides the protection. |
Help, How is My Application Going to Scale?
"But wait…" you are saying, "isn’t it Really Bad to use session state in a single-page application?" The answer to that question is going to have to be "mostly", because it very definitely is a Good Thing to use the session for authentication and CSRF protection.That state has to be stored somewhere, and if you take it out of the session, you are going to have to put it somewhere else and manage it manually yourself, on both the server and the client. That’s just more code and probably more maintenance, and generally
re-inventing a perfectly good wheel.
"But, but…" you are going to respond, "how do I scale my application horizontally now?" This is the "real" question you were asking above, but it tends to get shortened to "session state is bad, I must be stateless". Don’t panic. The main point to take on
board here is that security is stateful. You can’t have a secure, stateless application. So where are you going to store the state? That’s all there is to it.
Rob Winch gave a very useful and insightful talk at
Spring Exchange 2014 explaining the need for state (and the ubiquity of it - TCP and SSL are stateful, so your system is stateful whether you knew it or not), which is probably worth a look if you want to look into this topic in more depth.
The good news is you have a choice. The easiest choice is to store the session data in-memory, and rely on sticky sessions in your load balancer to route requests from the same session back to the same JVM (they all support that somehow). That’s good enough
to get you off the ground and will work for a really large number of use cases. The other choice is to share the session data between instances of your application. As long as you are strict and only store the security data, it is small and changes
infrequently (only when users log in and out, or their session times out), so there shouldn’t be any major infrastructure problems. It’s also really easy to do with
Spring Session. We’ll be using Spring Session in the next section in this series, so there’s no need to go into any detail about how to set it up here, but it is literally a few
lines of code and a Redis server, which is super fast.
| Another easy way to set up shared session state is to deploy your application as a WAR file to Cloud Foundry Pivotal Web Services and bind it to a Redis service. |
But, What about My Custom Token Implementation (it’s Stateless, Look)?
If that was your response to the last section, then read it again because maybe you didn’t get it the first time. It’s probably not stateless if you stored the token somewhere, but even if you didn’t (e.g. you use JWT encoded tokens), how are you going toprovide CSRF protection? It’s important. Here’s a rule of thumb (attributed to Rob Winch): if your application or API is going to be accessed by a browser, you need CSRF protection. It’s not that you can’t do it without sessions, it’s just that you’d have
to write all that code yourself, and what would be the point because it’s already implemented and works perfectly well on top of
HttpSession(which in turn is part of the container you are using and baked into specs since the very beginning)? Even if you decide you don’t need CSRF, and have a perfectly "stateless" (non-session based) token implementation, you still had to
write extra code in the client to consume and use it, where you could have just delegated to the browser and server’s own built-in features: the browser always sends cookies, and the server always has a session (unless you switch it off). That code is not
business logic, and it isn’t making you any money, it’s just an overhead, so even worse, it costs you money.
Conclusion
The application we have now is close to what a user might expect in a "real" application in a live environment, and it probably could be used as a template for building out into a more feature rich application with that architecture (single server with staticcontent and JSON resources). We are using the
HttpSessionfor storing security data, relying on our clients to respect and use the cookies we send them, and we are comfortable with that because it lets us concentrate on our own business domain.
In the
next section we expand the architecture to a separate authentication and UI server, plus a standalone resource server for the JSON. This is obviously easily generalised to multiple resource servers. We are also going to introduce Spring Session into the
stack and show how that can be used to share authentication data.
The Resource Server
In this section we continueour discussion of how to use
Spring Security with Angular JS in a "single page application". Here we start by breaking out the "greeting" resource that we are using as the dynamic content in our application into a separate server,
first as an unprotected resource, and then protected by an opaque token. This is the third in a series of sections, and you can catch up on the basic building blocks of the application or build it from scratch by reading the
first section, or you can just go straight to the source code in Github, which is in two parts: one where the
resource is unprotected, and one where it is
protected by a token.
| if you are working through this section with the sample application, be sure to clear your browser cache of cookies and HTTP Basic credentials. In Chrome the best way to do that for a single server is to open a new incognito window. |
A Separate Resource Server
Client Side Changes
On the client side there isn’t very much to do to move the resource to a different backend. Here’s the "home" controller in thelast section:
hello.js
angular.module('hello', [ 'ngRoute' ])
...
.controller('home', function($http) {
var self = this;
$http.get('/resource/').then(function(response) {
self.greeting = response.data;
})
})
...
All we need to do to this is change the URL. For example, if we are going to run the new resource on localhost, it could look like this:
hello.js
angular.module('hello', [ 'ngRoute' ])
...
.controller('home', function($http) {
var self = this;
$http.get('http://localhost:9000/').then(function(response) {
self.greeting = response.data;
})
})
...
Server Side Changes
TheUI server is trivial to change: we just need to remove the
@RequestMappingfor the greeting resource (it was "/resource"). Then we need to create a new resource server, which we can do like we did in the
first section using the Spring Boot Initializr. E.g. using curl on a UN*X like system:
$ mkdir resource && cd resource
$ curl https://start.spring.io/starter.tgz -d style=web \
-d name=resource | tar -xzvf -
You can then import that project (it’s a normal Maven Java project by default) into your favourite IDE, or just work with the files and "mvn" on the command line.
Just add a
@RequestMappingto the
main application class, copying the implementation from the
old UI:
ResourceApplication.java
@SpringBootApplication
@RestController
class ResourceApplication {

@RequestMapping("/")
public Message home() {
return new Message("Hello World");
}

public static void main(String[] args) {
SpringApplication.run(ResourceApplication.class, args);
}

}
Once that is done your application will be loadable in a browser. On the command line you can do this
$ mvn spring-boot:run -Dserver.port=9000
and go to a browser at http://localhost:9000 and you should see JSON with a greeting. You can bake in the port change in
application.properties(in"src/main/resources"):
application.properties
server.port: 9000
If you try loading that resource from the UI (on port 8080) in a browser, you will find that it doesn’t work because the browser won’t allow the XHR request.
CORS Negotiation
The browser tries to negotiate with our resource server to find out if it is allowed to access it according to theCross Origin Resource Sharing protocol. It’s not an Angular JS responsibility, so just like the cookie contract it will work like this with all JavaScript in the browser. The two servers do not declare that they have a common origin, so the browser declines
to send the request and the UI is broken.
To fix that we need to support the CORS protocol which involves a "pre-flight" OPTIONS request and some headers to list the allowed behaviour of the caller. Spring 4.2 has some nice
fine-grained CORS support, so we can just add an annotation to our controller mapping, for example:
ResourceApplication.java
@RequestMapping("/")
@CrossOrigin(origins="*", maxAge=3600)
public Message home() {
return new Message("Hello World");
}
Blithely using origins=*is quick and dirty, and it works, but it is not not secure and is not in any way recommended. |
Securing the Resource Server
Great! We have a working application with a new architecture. The only problem is that the resource server has no security.Adding Spring Security
We can also look at how to add security to the resource server as a filter layer, like in the UI server. The first step is really easy: just add Spring Security to the classpath in the Maven POM:pom.xml
<dependencies>
<dependency>
<groupId>org.springframework.boot</groupId>
<artifactId>spring-boot-starter-security</artifactId>
</dependency>
...
</dependencies>
Re-launch the resource server and, hey presto! It’s secure:
$ curl -v localhost:9000
< HTTP/1.1 302 Found
< Location: http://localhost:9000/login ...
We are getting a redirect to a (whitelabel) login page because curl is not sending the same headers that our Angular client will. Modifying the command to send more similar headers:
$ curl -v -H "Accept: application/json" \
-H "X-Requested-With: XMLHttpRequest" localhost:9000
< HTTP/1.1 401 Unauthorized
...
So all we need to do is teach the client to send credentials with every request.
Token Authentication
The internet, and people’s Spring backend projects, are littered with custom token-based authentication solutions. Spring Security provides a barebonesFilterimplementation to get you started on your own (see for example
AbstractPreAuthenticatedProcessingFilterand
TokenService). There is no canonical implementation in Spring Security though, and one of the reasons why is probably that there’s an easier way.
Remember from
Part II of this series that Spring Security uses the
HttpSessionto store authentication data by default. It doesn’t interact directly with the session though: there’s an abstraction layer (
SecurityContextRepository)
in between that you can use to change the storage backend. If we can point that repository, in our resource server, to a store with an authentication verified by our UI, then we have a way to share authentication between the two servers. The UI server already
has such a store (the
HttpSession), so if we can distribute that store and open it up to the resource server, we have most of a solution.
Spring Session
That part of the solution is pretty easy withSpring Session. All we need is a shared data store (Redis is supported out of the box), and a few lines of configuration in the servers to set up a
Filter.
In the UI application we need to add some dependencies to our
POM:
pom.xml
<dependency>
<groupId>org.springframework.session</groupId>
<artifactId>spring-session</artifactId>
</dependency>
<dependency>
<groupId>org.springframework.boot</groupId>
<artifactId>spring-boot-starter-redis</artifactId>
</dependency>
Spring Boot and Spring Session work together to connect to Redis and store session data centrally.
With that 1 line of code in place and a Redis server running on localhost you can run the UI application, login with some valid user credentials, and the session data (the authentication and CSRF token) will be stored in redis.
| if you don’t have a redis server running locally you can easily spin one up with Docker (on Windows or MacOS this requires a VM). There is a docker-compose.ymlfile in the source code in Github which you can run really easily on the command line with docker-compose up. If you do this in a VM the Redis server will be running on a different host than localhost, so you either need to tunnel it onto localhost, or configure the app to point at the correct spring.redis.hostin your application.properties. |
Sending a Custom Token from the UI
The only missing piece is the transport mechanism for the key to the data in the store. The key is theHttpSessionID, so if we can get hold of that key in the UI client, we can send it as a custom header to the resource server. So the "home" controller would need to change so that it sends the header as part of the HTTP request for the greeting
resource. For example:
hello.js
angular.module('hello', [ 'ngRoute' ])
...
.controller('home', function($http) {
var self = this;
$http.get('token').then(function(response) {
$http({
url : 'http://localhost:9000',
method : 'GET',
headers : {
'X-Auth-Token' : response.data.token
}
}).then(function(response) {
self.greeting = response.data;
});
})
});
(A more elegant solution might be to grab the token as needed, and use an Angular
interceptor to add the header to every request to the resource server. The interceptor definition could then be abstracted instead of doing it all in one place and cluttering up the
business logic.)
Instead of going directly to "http://localhost:9000[http://localhost:9000]" we have wrapped that call in the success callback of a call to a new custom endpoint on the UI server at "/token".
The implementation of that is trivial:
UiApplication.java
@SpringBootApplication
@RestController
public class UiApplication {

public static void main(String[] args) {
SpringApplication.run(UiApplication.class, args);
}

...

@RequestMapping("/token")
@ResponseBody
public Map<String,String> token(HttpSession session) {
return Collections.singletonMap("token", session.getId());
}

}
So the UI application is ready and will include the session ID in a header called "X-Auth-Token" for all calls to the backend.
Authentication in the Resource Server
There is one tiny change to the resource server for it to be able to accept the custom header. The CORS configuration has to nominate that header as an allowed one from remote clients, e.g.ResourceApplication.java
@RequestMapping("/")
@CrossOrigin(origins = "*", maxAge = 3600,
allowedHeaders={"x-auth-token", "x-requested-with"})
public Message home() {
return new Message("Hello World");
}
The pre-flight check from the browser will now be handled by Spring MVC, but we need to tell Spring Security that it is allowed to let it through:
ResourceApplication.java
public class ResourceApplication extends WebSecurityConfigurerAdapter {

@Override
protected void configure(HttpSecurity http) throws Exception {
http.cors().and().authorizeRequests()
.anyRequest().authenticated();
}

...
There is no need to permitAll()access to all resources, and there might be a handler that inadvertently sends sensitive data because it is not aware that the request is pre-flight. The cors()configuration utility mitigates this by handling all pre-flight requests in the filter layer. |
the token (session ID) in an incoming request. First we need to add the Spring Session and Redis dependencies, and then we can set up the
Filter:
ResourceApplication.java
@SpringBootApplication
@RestController
class ResourceApplication {

...

@Bean
HeaderHttpSessionStrategy sessionStrategy() {
return new HeaderHttpSessionStrategy();
}

}
This
Filtercreated is the mirror image of the one in the UI server, so it establishes Redis as the session store. The only difference is that it uses a custom
HttpSessionStrategythat looks in the header ("X-Auth-Token" by default) instead of the default (cookie named "JSESSIONID"). We also need to prevent the browser from popping up a dialog in an unauthenticated client - the app is secure but sends
a 401 with
WWW-Authenticate: Basicby default, so the browser responds with a dialog for username and password. There is more than one way to achieve this, but we already made Angular send an "X-Requested-With" header, so Spring Security handles
it for us by default.
There is one final change to the resource server to make it work with our new authentication scheme. Spring Boot default security is stateless, and we want this to store authentication in the session, so we need to be explicit in
application.yml(or
application.properties):
application.yml
security:
sessions: NEVER
This says to Spring Security "never create a session, but use one if it is there" (it will already be there because of the authentication in the UI).
Re-launch the resource server and open the UI up in a new browser window.
Why Doesn’t it All Work With Cookies?
We had to use a custom header and write code in the client to populate the header, which isn’t terribly complicated, but it seems to contradict the advice inPart II to use cookies and sessions wherever possible. The argument there was that not to do so introduces additional unecessary complexity, and for sure the implementation we have now is the most complex we have seen so far: the technical part of the solution
far outweighs the business logic (which is admittedly tiny). This is definitely a fair criticism (and one we plan to address in the next section in this series), but let’s just briefly look at why it’s not as simple as just using cookies and sessions for everything.
At least we are still using the session, which makes sense because Spring Security and the Servlet container know how to do that with no effort on our part. But couldn’t we have continued to use cookies to transport the authentication token? It would have
been nice, but there is a reason it wouldn’t work, and that is that the browser wouldn’t let us. You can just go poking around in the browser’s cookie store from a JavaScript client, but there are some restrictions, and for good reason. In particular you don’t
have access to the cookies that were sent by the server as "HttpOnly" (which you will see is the case by default for session cookies). You also can’t set cookies in outgoing requests, so we couldn’t set a "SESSION" cookie (which is the Spring Session default
cookie name), we had to use a custom "X-Session" header. Both these restrictions are for your own protection so malicious scripts cannot access your resources without proper authorization.
TL;DR the UI and resource servers do not have a common origin, so they cannot share cookies (even though we can use Spring Session to force them to share sessions).
Conclusion
We have duplicated the features of the application inPart II of this series: a home page with a greeting fetched from a remote backend, with login and logout links in a navigation bar. The difference is that the greeting comes from a resource server that is a standalone, instead of being embedded in the UI
server. This added significant complexity to the implementation, but the good news is that we have a mostly configuration-based (and practically 100% declarative) solution. We could even make the solution 100% declarative by extracting all the new code into
libraries (Spring configuration and Angular custom directives). We are going to defer that interesting task for after the next couple of installments. In the
next section we are going to look at a different really great way to reduce all the complexity in the current implementation: the API Gateway Pattern (the client sends all its requests to one place and authentication is handled there).
| we used Spring Session here to share sessions between 2 servers that are not logically the same application. It’s a neat trick, and it isn’t possible with "regular" JEE distributed sessions. |
The API Gateway
In this section we continueour discussion of how to use
Spring Security with Angular JS in a "single page application". Here we show how to build an API Gateway to control the authentication and access to the backend resources using
Spring Cloud. This is the fourth in a series of sections, and you can catch up on the basic building blocks of the application or build it from scratch by reading the
first section, or you can just go straight to the
source code in Github. In the
last section we built a simple distributed application that used
Spring Session to authenticate the backend resources. In this one we make the UI server into a reverse proxy to the backend resource server, fixing the issues with the last implementation (technical complexity introduced by custom token authentication),
and giving us a lot of new options for controlling access from the browser client.
Reminder: if you are working through this section with the sample application, be sure to clear your browser cache of cookies and HTTP Basic credentials. In Chrome the best way to do that for a single server is to open a new incognito window.
Creating an API Gateway
An API Gateway is a single point of entry (and control) for front end clients, which could be browser based (like the examples in this section) or mobile. The client only has to know the URL of one server, and the backend can be refactored at will with nochange, which is a significant advantage. There are other advantages in terms of centralization and control: rate limiting, authentication, auditing and logging. And implementing a simple reverse proxy is really simple with
Spring Cloud.
If you were following along in the code, you will know that the application implementation at the end of the
last section was a bit complicated, so it’s not a great place to iterate away from. There was, however, a halfway point which we could start from more easily, where the backend resource wasn’t yet secured with Spring Security. The source code for this is
a separate project
in Github so we are going to start from there. It has a UI server and a resource server and they are talking to each other. The resource server doesn’t have Spring Security yet so we can get the system working first and then add that layer.
Declarative Reverse Proxy in One Line
To turn it into an API Gateway, the UI server needs one small tweak. Somewhere in the Spring configuration we need to add an@EnableZuulProxyannotation, e.g. in the main (only)
application class:
UiApplication.java
@SpringBootApplication
@RestController
@EnableZuulProxy
public class UiApplication {
...
}
and in an external configuration file we need to map a local resource in the UI server to a remote one in the
external configuration ("application.yml"):
application.yml
security: ... zuul: routes: resource: path: /resource/** url: http://localhost:9000[/code]
This says "map paths with the pattern /resource/** in this server to the same paths in the remote server at localhost:9000". Simple and yet effective (OK so it’s 6 lines including the YAML, but you don’t always need that)!
All we need to make this work is the right stuff on the classpath. For that purpose we have a few new lines in our Maven POM:
pom.xml<dependencyManagement> <dependencies> <dependency> <groupId>org.springframework.cloud</groupId> <artifactId>spring-cloud-dependencies</artifactId> <version>Brixton.RELEASE</version> <type>pom</type> <scope>import</scope> </dependency> </dependencies> </dependencyManagement> <dependencies> <dependency> <groupId>org.springframework.cloud</groupId> <artifactId>spring-cloud-starter-zuul</artifactId> </dependency> ... </dependencies>
Note the use of the "spring-cloud-starter-zuul" - it’s a starter POM just like the Spring Boot ones, but it governs the dependencies we need for this Zuul proxy. We are also using<dependencyManagement>because we want to be able to depend on all the versions of transitive dependencies being correct.Consuming the Proxy in the Client
With those changes in place our application still works, but we haven’t actually used the new proxy yet until we modify the client. Fortunately that’s trivial. We just need to go from this implementation of the "home" controller:
hello.jsangular.module('hello', [ 'ngRoute' ]) ... .controller('home', function($http) { var self = this; $http.get('http://localhost:9000/').then(function(response) { self.greeting = response.data; }) });
to a local resource:
hello.jsangular.module('hello', [ 'ngRoute' ]) ... .controller('home', function($http) { var self = this; $http.get('resource/').then(function(response) { self.greeting = response.data; }) });
Now when we fire up the servers everything is working and the requests are being proxied through the UI (API Gateway) to the resource server.Further Simplifications
Even better: we don’t need the CORS filter any more in the resource server. We threw that one together pretty quickly anyway, and it should have been a red light that we had to do anything as technically focused by hand (especially where it concerns security).
Fortunately it is now redundant, so we can just throw it away, and go back to sleeping at night!Securing the Resource Server
You might remember in the intermediate state that we started from there is no security in place for the resource server.
Aside: Lack of software security might not even be a problem if your network architecture mirrors the application architecture (you can just make the resource server physically inaccessible to anyone but the UI server). As a simple demonstration of that
we can make the resource server only accessible on localhost. Just add this toapplication.propertiesin the resource server:
application.propertiesserver.address: 127.0.0.1
Wow, that was easy! Do that with a network address that’s only visible in your data center and you have a security solution that works for all resource servers and all user desktops.
Suppose that we decide we do need security at the software level (quite likely for a number of reasons). That’s not going to be a problem, because all we need to do is add Spring Security as a dependency (in the
resource server POM):
pom.xml<dependency> <groupId>org.springframework.boot</groupId> <artifactId>spring-boot-starter-security</artifactId> </dependency>
That’s enough to get us a secure resource server, but it won’t get us a working application yet, for the same reason that it didn’t in
Part III: there is no shared authentication state between the two servers.Sharing Authentication State
We can use the same mechanism to share authentication (and CSRF) state as we did in the last, i.e.
Spring Session. We add the dependency to both servers as before:
pom.xml<dependency> <groupId>org.springframework.session</groupId> <artifactId>spring-session</artifactId> </dependency> <dependency> <groupId>org.springframework.boot</groupId> <artifactId>spring-boot-starter-redis</artifactId> </dependency>
but this time the configuration is much simpler because we can just add the sameFilterdeclaration to both. First the UI server, declaring explicitly that we want all headers to be forwarded (i.e. none are "sensitive"):
application.ymlzuul: routes: resource: sensitive-headers:
Then we can move on to the resource server. There are two small changes to make: one is to explicitly disable HTTP Basic in the resource server (to prevent the browser from popping up authentication dialogs):
ResourceApplication.java@SpringBootApplication @RestController class ResourceApplication extends WebSecurityConfigurerAdapter { ... @Override protected void configure(HttpSecurity http) throws Exception { http.httpBasic().disable(); http.authorizeRequests().anyRequest().authenticated(); } }
Aside: an alternative, which would also prevent the authentication dialog, would be to keep HTTP Basic but change the 401 challenge to something other than "Basic". You can do that with a one-line implementation ofAuthenticationEntryPointin theHttpSecurityconfiguration callback.
and the other is to explicitly ask for a non-stateless session creation policy inapplication.properties:
application.propertiessecurity.sessions: NEVER
As long as redis is still running in the background (use thedocker-compose.ymlif you like to start it) then the system will work. Load the homepage for the UI at
http://localhost:8080 and login and you will see the message from the backend rendered on the homepage.How Does it Work?
What is going on behind the scenes now? First we can look at the HTTP requests in the UI server (and API Gateway):
| Verb | Path | Status | Response |
|---|---|---|---|
| GET | / | 200 | index.html |
| GET | /css/angular-bootstrap.css | 200 | Twitter bootstrap CSS |
| GET | /js/angular-bootstrap.js | 200 | Bootstrap and Angular JS |
| GET | /js/hello.js | 200 | Application logic |
| GET | /user | 302 | Redirect to login page |
| GET | /login | 200 | Whitelabel login page (ignored) |
| GET | /resource | 302 | Redirect to login page |
| GET | /login | 200 | Whitelabel login page (ignored) |
| GET | /login.html | 200 | Angular login form partial |
| POST | /login | 302 | Redirect to home page (ignored) |
| GET | /user | 200 | JSON authenticated user |
| GET | /resource | 200 | (Proxied) JSON greeting |
Part II except for the fact that the cookie names are slightly different ("SESSION" instead of "JSESSIONID") because we are using Spring Session. But the architecture is different and that last request to "/resource" is special because it was proxied to
the resource server.
We can see the reverse proxy in action by looking at the "/trace" endpoint in the UI server (from Spring Boot Actuator, which we added with the Spring Cloud dependencies). Go to
http://localhost:8080/trace in a new browser (if you don’t have one already get a JSON plugin for your browser to make it nice and readable). You will need to authenticate with HTTP Basic (browser popup),
but the same credentials are valid as for your login form. At or near the start you should see a pair of requests something like this:
| Try to use a different browser so that there is no chance of authentication crossover (e.g. use Firefox if yoused Chrome for testing the UI) - it won’t stop the app from working, but it will make the traces harder to read if they contain a mixture of authentication from the same browser. |
{
"timestamp": 1420558194546,
"info": {
"method": "GET",
"path": "/",
"query": ""
"remote": true,
"proxy": "resource",
"headers": {
"request": {
"accept": "application/json, text/plain, */*",
"x-xsrf-token": "542c7005-309c-4f50-8a1d-d6c74afe8260",
"cookie": "SESSION=c18846b5-f805-4679-9820-cd13bd83be67; XSRF-TOKEN=542c7005-309c-4f50-8a1d-d6c74afe8260",
"x-forwarded-prefix": "/resource",
"x-forwarded-host": "localhost:8080"
},
"response": {
"Content-Type": "application/json;charset=UTF-8",
"status": "200"
}
},
}
},
{
"timestamp": 1420558200232,
"info": {
"method": "GET",
"path": "/resource/",
"headers": {
"request": {
"host": "localhost:8080",
"accept": "application/json, text/plain, */*",
"x-xsrf-token": "542c7005-309c-4f50-8a1d-d6c74afe8260",
"cookie": "SESSION=c18846b5-f805-4679-9820-cd13bd83be67; XSRF-TOKEN=542c7005-309c-4f50-8a1d-d6c74afe8260"
},
"response": {
"Content-Type": "application/json;charset=UTF-8",
"status": "200"
}
}
}
},
The second entry there is the request from the client to the gateway on "/resource" and you can see the cookies (added by the browser) and the CSRF header (added by Angular as discussed in
Part II). The first entry has
remote: trueand that means it’s tracing the call to the resource server. You can see it went out to a uri path "/" and you can see that (crucially) the cookies and CSRF headers have been sent too. Without Spring
Session these headers would be meaningless to the resource server, but the way we have set it up it can now use those headers to re-constitute a session with authentication and CSRF token data. So the request is permitted and we are in business!
Conclusion
We covered quite a lot in this section but we got to a really nice place where there is a minimal amount of boilerplate code in our two servers, they are both nicely secure and the user experience isn’t compromised. That alone would be a reason to use theAPI Gateway pattern, but really we have only scratched the surface of what that might be used for (Netflix uses it for
a lot of things). Read up on
Spring Cloud to find out more on how to make it easy to add more features to the gateway. The
next section in this series will extend the application architecture a bit by extracting the authentication responsibilities to a separate server (the Single Sign On pattern).
Single Sign On with OAuth2
In this section we continueour discussion of how to use
Spring Security with Angular JS in a "single page application". Here we show how to use
Spring Security OAuth together with
Spring Cloud to extend our API Gateway to do Single Sign On and OAuth2 token authentication to backend resources. This is the fifth in a series of sections, and you can catch up on the basic
building blocks of the application or build it from scratch by reading the
first section, or you can just go straight to the
source code in Github. In the
last section we built a small distributed application that used
Spring Session to authenticate the backend resources and
Spring Cloud to implement an embedded API Gateway in the UI server. In this section we extract the authentication responsibilities to a separate server to make our UI server the first of potentially many Single Sign On applications to the authorization
server. This is a common pattern in many applications these days, both in the enterprise and in social startups. We will use an OAuth2 server as the authenticator, so that we can also use it to grant tokens for the backend resource server. Spring Cloud will
automatically relay the access token to our backend, and enable us to further simplify the implementation of both the UI and resource servers.
Reminder: if you are working through this section with the sample application, be sure to clear your browser cache of cookies and HTTP Basic credentials. In Chrome the best way to do that for a single server is to open a new incognito window.
Creating an OAuth2 Authorization Server
Our first step is to create a new server to handle authentication and token management. Following the steps inPart I we can begin with Spring Boot Initializr. E.g. using curl on a UN*X like system:
$ curl https://start.spring.io/starter.tgz -d style=web \
-d style=security -d name=authserver | tar -xzvf -
You can then import that project (it’s a normal Maven Java project by default) into your favourite IDE, or just work with the files and "mvn" on the command line.
Adding the OAuth2 Dependencies
We need to add theSpring OAuth dependencies, so in our
POM we add:
pom.xml
<dependency>
<groupId>org.springframework.security.oauth</groupId>
<artifactId>spring-security-oauth2</artifactId>
<version>2.0.5.RELEASE</version>
</dependency>
The authorization server is pretty easy to implement. A minimal version looks like this:
AuthserverApplication.java
@SpringBootApplication
@EnableAuthorizationServer
public class AuthserverApplication extends WebMvcConfigurerAdapter {

public static void main(String[] args) {
SpringApplication.run(AuthserverApplication.class, args);
}

}
We only have to do 1 more thing (after adding
@EnableAuthorizationServer):
application.properties
---
...
security.oauth2.client.clientId: acme
security.oauth2.client.clientSecret: acmesecret
security.oauth2.client.authorized-grant-types: authorization_code,refresh_token,password
security.oauth2.client.scope: openid
---
This registers a client "acme" with a secret and some authorized grant types including "authorization_code".
Now let’s get it running on port 9999, with a predictable password for testing:
application.properties
server.port=9999
security.user.password=password
server.contextPath=/uaa
...
We also set the context path so that it doesn’t use the default ("/") because otherwise you can get cookies for other servers on localhost being sent to the wrong server. So get the server running and we can make sure it is working:
$ mvn spring-boot:run
or start the
main()method in your IDE.
Testing the Authorization Server
Our server is using the Spring Boot default security settings, so like the server inPart I it will be protected by HTTP Basic authentication. To initiate an
authorization code token grant you visit the authorization endpoint, e.g. at http://localhost:9999/uaa/oauth/authorize?response_type=code&client_id=acme&redirect_uri=http://example.com once you have authenticated you will get a redirect to example.com with an authorization code attached, e.g.
http://example.com/?code=jYWioI.
| for the purposes of this sample application we have created a client "acme" with no registered redirect, which is what enables us to get a redirect the example.com. In a production application you should always register a redirect (and use HTTPS). |
$ curl acme:acmesecret@localhost:9999/uaa/oauth/token  \
-d grant_type=authorization_code -d client_id=acme     \
-d redirect_uri=http://example.com -d code=jYWioI
{"access_token":"2219199c-966e-4466-8b7e-12bb9038c9bb","token_type":"bearer","refresh_token":"d193caf4-5643-4988-9a4a-1c03c9d657aa","expires_in":43199,"scope":"openid"}
The access token is a UUID ("2219199c…"), backed by an in-memory token store in the server. We also got a refresh token that we can use to get a new access token when the current one expires.
| since we allowed "password" grants for the "acme" client we can also get a token directly from the token endpoint using curl and user credentials instead of an authorization code. This is not suitable for a browser based client, but it’s useful for testing. |
Part II for the self-contained server.
Changing the Resource Server
If we follow on fromPart IV, our resource server is using
Spring Session for authentication, so we can take that out and replace it with Spring OAuth. We also need to remove the Spring Session and Redis dependencies, so replace this:
pom.xml
<dependency>
<groupId>org.springframework.session</groupId>
<artifactId>spring-session</artifactId>
</dependency>
<dependency>
<groupId>org.springframework.boot</groupId>
<artifactId>spring-boot-starter-redis</artifactId>
</dependency>
with this:
pom.xml
<dependency>
<groupId>org.springframework.security.oauth</groupId>
<artifactId>spring-security-oauth2</artifactId>
</dependency>
and then remove the session
Filterfrom the
main application class, replacing it with the convenient
@EnableResourceServerannotation (from Spring Security OAuth2):
ResourceApplication.java
@SpringBootApplication
@RestController
@EnableResourceServer
class ResourceApplication {

@RequestMapping("/")
public Message home() {
return new Message("Hello World");
}

public static void main(String[] args) {
SpringApplication.run(ResourceApplication.class, args);
}
}
With that one change the app is ready to challenge for an access token instead of HTTP Basic, but we need a config change to actually finish the process. We are going to add a small amount of external configuration (in "application.properties") to allow
the resource server to decode the tokens it is given and authenticate a user:
application.properties
... security.oauth2.resource.userInfoUri: http://localhost:9999/uaa/user[/code]
This tells the server that it can use the token to access a "/user" endpoint and use that to derive authentication information (it’s a bit like the
"/me" endpoint in the Facebook API). Effectively it provides a way for the resource server to decode the token, as expressed by theResourceServerTokenServicesinterface in Spring OAuth2.
Run the application and hit the home page with a command line client:$ curl -v localhost:9000 > GET / HTTP/1.1 > User-Agent: curl/7.35.0 > Host: localhost:9000 > Accept: */* > < HTTP/1.1 401 Unauthorized ... < WWW-Authenticate: Bearer realm="null", error="unauthorized", error_description="An Authentication object was not found in the SecurityContext" < Content-Type: application/json;charset=UTF-8 {"error":"unauthorized","error_description":"An Authentication object was not found in the SecurityContext"}
and you will see a 401 with a "WWW-Authenticate" header indicating that it wants a bearer token.
the userInfoUriis by far not the only way of hooking a resource server up with a way to decode tokens. In fact it’s sort of a lowest common denominator (and not part of the spec), but quite often available from OAuth2 providers (like Facebook, Cloud Foundry, Github), and other choices are available. For instance you can encode the user authentication in the token itself (e.g. with JWT), or use a shared backend store. There is also a /token_infoendpoint in CloudFoundry, which provides more detailed information than the user info endpoint, but which requires more thorough authentication. Different options (naturally) provide different benefits and trade-offs, but a full discussion of those is outside the scope of this section. |
Implementing the User Endpoint
On the authorization server we can easily add that endpointAuthserverApplication.java
@SpringBootApplication
@RestController
@EnableAuthorizationServer
@EnableResourceServer
public class AuthserverApplication {

@RequestMapping("/user")
public Principal user(Principal user) {
return user;
}

...

}
We added a
@RequestMappingthe same as the UI server in
Part II, and also the
@EnableResourceServerannotation from Spring OAuth, which by default secures everything in an authorization server except the "/oauth/*" endpoints.
With that endpoint in place we can test it and the greeting resource, since they both now accept bearer tokens that were created by the authorization server:
$ TOKEN=2219199c-966e-4466-8b7e-12bb9038c9bb
$ curl -H "Authorization: Bearer $TOKEN" localhost:9000
{"id":"03af8be3-2fc3-4d75-acf7-c484d9cf32b1","content":"Hello World"}
$ curl -H "Authorization: Bearer $TOKEN" localhost:9999/uaa/user
{"details":...,"principal":{"username":"user",...},"name":"user"}
(substitute the value of the access token that you obtain from your own authorization server to get that working yourself).
The UI Server
The final piece of this application we need to complete is the UI server, extracting the authentication part and delegating to the authorization server. So, as withthe resource server, we first need to remove the Spring Session and Redis dependencies and replace them with Spring OAuth2.
Once that is done we can remove the session filter and the "/user" endpoint as well, and set up the application to redirect to the authorization server (using the
@EnableOAuth2Ssoannotation):
UiApplication.java
@SpringBootApplication
@EnableZuulProxy
@EnableOAuth2Sso
public class UiApplication {

public static void main(String[] args) {
SpringApplication.run(UiApplication.class, args);
}

...

}
Recall from
Part IV that the UI server, by virtue of the
@EnableZuulProxy, acts an API Gateway and we can declare the route mappings in YAML. So the "/user" endpoint can be proxied to the authorization server:
application.yml
zuul: routes: resource: path: /resource/** url: http://localhost:9000 user: path: /user/** url: http://localhost:9999/uaa/user[/code]
Lastly, we need to change the application to aWebSecurityConfigurerAdaptersince now it is going to be used to modify the defaults in the SSO filter chain set up by@EnableOAuth2Sso:
SecurityConfiguration.java@SpringBootApplication @EnableZuulProxy @EnableOAuth2Sso public class UiApplication extends WebSecurityConfigurerAdapter { @Override public void configure(HttpSecurity http) throws Exception { http.authorizeRequests().antMatchers("/index.html", "/home.html", "/") .permitAll().anyRequest().authenticated().and() .csrf() .csrfTokenRepository(CookieCsrfTokenRepository.withHttpOnlyFalse()); } }
The main changes (apart from the base class name) are that the matchers go into their own method, and there is no need forformLogin()any more.
There are also some mandatory external configuration properties for the@EnableOAuth2Ssoannotation to be able to contact and authenticate with thr right authorization server. So we need this inapplication.yml:
application.ymlsecurity: ... oauth2: client: accessTokenUri: http://localhost:9999/uaa/oauth/token userAuthorizationUri: http://localhost:9999/uaa/oauth/authorize clientId: acme clientSecret: acmesecret resource: userInfoUri: http://localhost:9999/uaa/user[/code]
The bulk of that is about the OAuth2 client ("acme") and the authorization server locations. There is also auserInfoUri(just like in the resource server) so that the user can be authenticated in the UI app itself.In the Client
There are some minor tweaks to the UI application on the front end that we still need to make to trigger the redirect to the authorization server. The first is in the navigation bar in "index.html" where the "login" link changes from an Angular route:
index.html<div ng-controller="navigation as nav" class="container"> <ul class="nav nav-pills" role="tablist"> ... <li><a href="#/login">login</a></li> ... </ul> </div>
to a plain HTML link
index.html<div ng-controller="navigation as nav" class="container"> <ul class="nav nav-pills" role="tablist"> ... <li><a href="login">login</a></li> ... </ul> </div>
The "/login" endpoint that this goes to is handled by Spring Security and if the user is not authenticated it will result in a redirect to the authorization server.
We can also remove the definition of thelogin()function in the "navigation" controller, and the "/login" route from the Angular configuration, which simplifies the implementation a bit:
hello.jsangular.module('hello', [ 'ngRoute' ]).config(function($routeProvider) { $routeProvider.when('/', { templateUrl : 'home.html', controller : 'home' }).otherwise('/'); }). // ... .controller('navigation', function($rootScope, $http, $location, $route) { var self = this; $http.get('user').then(function(response) { if (response.data.name) { $rootScope.authenticated = true; } else { $rootScope.authenticated = false; } }, function() { $rootScope.authenticated = false; }); self.credentials = {}; self.logout = function() { $http.post('logout', {}).finally(function() { $rootScope.authenticated = false; $location.path("/"); }); } });How Does it Work?
Run all the servers together now, and visit the UI in a browser at http://localhost:8080. Click on the "login" link and you will be redirected to the authorization server to authenticate (HTTP Basic popup) and approve the token grant (whitelabel HTML), before being redirected to the home page in the UI with the greeting
fetched from the OAuth2 resource server using the same token as we authenticated the UI with.
The interactions between the browser and the backend can be seen in your browser if you use some developer tools (usually F12 opens this up, works in Chrome by default, may require a plugin in Firefox). Here’s a summary:
| Verb | Path | Status | Response |
|---|---|---|---|
| GET | / | 200 | index.html |
| GET | /css/angular-bootstrap.css | 200 | Twitter bootstrap CSS |
| GET | /js/angular-bootstrap.js | 200 | Bootstrap and Angular JS |
| GET | /js/hello.js | 200 | Application logic |
| GET | /home.html | 200 | HTML partial for home page |
| GET | /user | 302 | Redirect to login page |
| GET | /login | 302 | Redirect to auth server |
| GET | (uaa)/oauth/authorize | 401 | (ignored) |
| GET | /resource | 302 | Redirect to login page |
| GET | /login | 302 | Redirect to auth server |
| GET | (uaa)/oauth/authorize | 401 | (ignored) |
| GET | /login | 302 | Redirect to auth server |
| GET | (uaa)/oauth/authorize | 200 | HTTP Basic auth happens here |
| POST | (uaa)/oauth/authorize | 302 | User approves grant, redirect to /login |
| GET | /login | 302 | Redirect to home page |
| GET | /user | 200 | (Proxied) JSON authenticated user |
| GET | /home.html | 200 | HTML partial for home page |
| GET | /resource | 200 | (Proxied) JSON greeting |
user in the case of the "/user" resource, but since it isn’t there in the first call, that response is dropped.
In the "/trace" endpoint of the UI (scroll down to the bottom) you will see the proxied backend requests to "/user" and "/resource", with
remote:trueand the bearer token instead of the cookie (as it would have been in
Part IV) being used for authentication. Spring Cloud Security has taken care of this for us: by recognising that we has
@EnableOAuth2Ssoand
@EnableZuulProxyit has figured out that (by default) we want to relay the token to the proxied backends.
| As in previous sections, try to use a different browser for "/trace" so that there is no chance of authentication crossover (e.g. use Firefox if you used Chrome for testing the UI). |
The Logout Experience
If you click on the "logout" link you will see that the home page changes (the greeting is no longer displayed) so the user is no longer authenticated with the UI server. Click back on "login" though and you actuallydon’t need to go back through the authentication and approval cycle in the authorization server (because you haven’t logged out of that). Opinions will be divided as to whether that is a desirable user experience, and it’s a notoriously tricky problem
(Single Sign Out:
Science Direct article and
Shibboleth docs). The ideal user experience might not be technically feasible, and you also have to be suspicious sometimes that users really want what they say they want. "I want 'logout' to log me out" sounds simple enough, but the obvious response is,
"Logged out of what? Do you want to be logged out of all the systems controlled by this SSO server, or just the one that you clicked the 'logout' link in?" We don’t have room to discuss this topic more broadly here but it does deserve more attention.
If you are interested then there is some discussion of the principles and some (fairly unappetising) ideas about implementations in the
Open ID Connect specification.
Conclusion
This is almost the end of our shallow tour through the Spring Security and Angular JS stack. We have a nice architecture now with clear responsibilities in three separate components, UI/API Gateway, resource server and authorization server/token granter.The amount of non-business code in all layers is now minimal, and it’s easy to see where to extend and improve the implementation with more business logic. The next steps will be to tidy up the UI in our authorization server, and probably add some more tests,
including tests on the JavaScript client. Another interesting task is to extract all the boiler plate code and put it in a library (e.g. "spring-security-angular") containing Spring Security and Spring Session autoconfiguration and some webjars resources for
the navigation controller in the Angular piece. Having read the sections in thir series, anyone who was hoping to learn the inner workings of either Angular JS or Spring Security will probably be disappointed, but if you wanted to see how they can work well
together and how a little bit of configuration can go a long way, then hopefully you will have had a good experience.
Spring Cloud is new and these samples required snapshots when they were written, but there are release candidates available and a GA release coming soon, so check it out and send some feedback
via Github or
gitter.im.
The
next section in the series is about access decisions (beyond authentication) and employs multiple UI applications behind the same proxy.
Addendum: Bootstrap UI and JWT Tokens for the Authorization Server
You will find another version of this application in thesource code in Github which has a pretty login page and user approval page implemented similarly to the way we did the login page in
Part II. It also uses JWT to encode the tokens, so instead of using the "/user" endpoint, the resource server can pull enough information out of the token itself to do a simple authentication. The browser client
still uses it, proxied through the UI server, so that it can determine if a user is authenticated (it doesn’t need to do that very often, compared to the likely number of calls to a resource server in a real application).
Multiple UI Applications and a Gateway
In this section we continueour discussion of how to use
Spring Security with Angular JS in a "single page application". Here we show how to use
Spring Session together with
Spring Cloud to combine the features of the systems we built in parts II and IV, and actually end up building 3 single page applications with quite different responsibilities. The aim is
to build a Gateway (like in
part IV) that is used not only for API resources but also to load the UI from a backend server. We simplify the token-wrangling bits of
part II by using the Gateway to pass through the authentication to the backends. Then we extend the system to show how we can make local, granular access decisions in the backends, while still controlling identity and authentication at the Gateway. This
is a very powerful model for building distributed systems in general, and has a number of benefits that we can explore as we introduce the features in the code we build.
Reminder: if you are working through this section with the sample application, be sure to clear your browser cache of cookies and HTTP Basic credentials. In Chrome the best way to do that is to open a new incognito window.
Target Architecture
Here’s a picture of the basic system we are going to build to start with: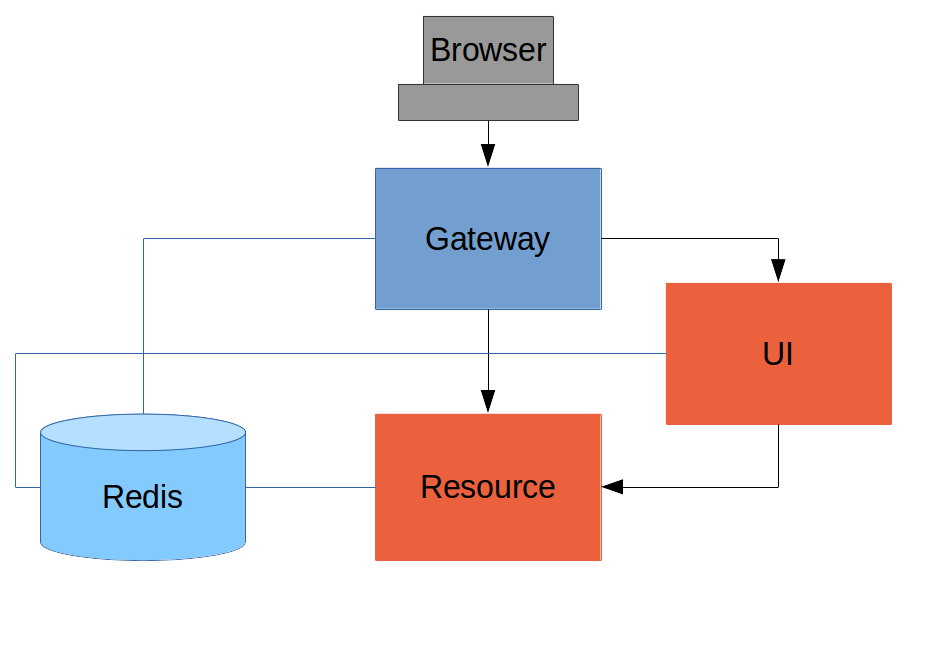
Like the other sample applications in this series it has a UI (HTML and JavaScript) and a Resource server. Like the sample in
Part IV it has a Gateway, but here it is separate, not part of the UI. The UI effectively becomes part of the backend, giving us even more choice to re-configure and re-implement features, and also bringing other benefits as we will see.
The browser goes to the Gateway for everything and it doesn’t have to know about the architecture of the backend (fundamentally, it has no idea that there is a back end). One of the things the browser does in this Gateway is authentication, e.g. it sends
a username and password like in
Part II, and it gets a cookie in return. On subsequent requests it presents the cookie automatically and the Gateway passes it through to the backends. No code needs to be written on the client to enable the cookie passing. The backends use the cookie to
authenticate and because all components share a session they share the same information about the user. Contrast this with
Part V where the cookie had to be converted to an access token in the Gateway, and the access token then had to be independently decoded by all the backend components.
As in
Part IV the Gateway simplifies the interaction between clients and servers, and it presents a small, well-defined surface on which to deal with security. For example, we don’t need to worry about
Cross Origin Resource Sharing, which is a welcome relief since it is easy to get wrong.
The source code for the complete project we are going to build is in
Github here, so you can just clone the project and work directly from there if you want. There is an extra component in the end state of this system ("double-admin") so ignore that for now.
Building the Backend
In this architecture the backend is very similar to the"spring-session" sample we built in
Part III, with the exception that it doesn’t actually need a login page. The easiest way to get to what we want here is probably to copy the "resource" server from Part III and take the UI from the
"basic" sample in
Part I. To get from the "basic" UI to the one we want here, we need only to add a couple of dependencies (like when we first used
Spring Session in Part III):
pom.xml
<dependency>
<groupId>org.springframework.session</groupId>
<artifactId>spring-session</artifactId>
</dependency>
<dependency>
<groupId>org.springframework.boot</groupId>
<artifactId>spring-boot-starter-redis</artifactId>
</dependency>
Since this is now a UI there is no need for the "/resource" endpoint. When you have done that you will have a very simple Angular application (the same as in the "basic" sample), which simplifies testing and reasoning about its behaviour greatly.
Lastly, we want this server to run as a backend, so we’ll give it a non-default port to listen on (in
application.properties):
application.properties
server.port: 8081
security.sessions: NEVER
If that’s the whole content
application.propertiesthen the application will be secure and accessible to a user called "user" with a password that is random, but printed on the console (at log level INFO) on startup. The "security.sessions"
setting means that Spring Security will accept cookies as authentication tokens but won’t create them unless they already exist.
The Resource Server
The Resource server is easy to generate from one of our existing samples. It is the same as the "spring-session" Resource server inPart III: just a "/resource" endpoint Spring Session to get the distributed session data. We want this server to have a non-default port to listen on, and we want to be able to look up authentication in the session so we need this (in
application.properties):
application.properties
server.port: 9000
security.sessions: NEVER
We are going to be POSTing changes to our message resource, which is a new feature in this tutorial. It means that we are going to need CSRF protection in the backend, and we need to do the usual trick to make Spring Security play nicely with Angular:
@Override
protected void configure(HttpSecurity http) throws Exception {
http.csrf()
.csrfTokenRepository(CookieCsrfTokenRepository.withHttpOnlyFalse());
}
The completed sample is
here in github if you want to take a peek.
The Gateway
For an initial implementation of a Gateway (the simplest thing that could possibly work) we can just take an empty Spring Boot web application and add the@EnableZuulProxyannotation. As we saw in
Part I there are several ways to do that, and one is to use the
Spring Initializr to generate a skeleton project. Even easier, is to use the
Spring Cloud Initializr which is the same thing, but for
Spring Cloud applications. Using the same sequence of command line operations as in Part I:
$ mkdir gateway && cd gateway
$ curl https://cloud-start.spring.io/starter.tgz -d style=web \
-d style=security -d style=cloud-zuul -d name=gateway \
-d style=redis | tar -xzvf -
You can then import that project (it’s a normal Maven Java project by default) into your favourite IDE, or just work with the files and "mvn" on the command line. There is a version
in github if you want to go from there, but it has a few extra features that we don’t need yet.
Starting from the blank Initializr application, we add the Spring Session dependency (like in the UI above). The Gateway is ready to run, but it doesn’t yet know about our backend services, so let’s just set that up in its
application.yml(renaming from
application.propertiesif you did the curl thing above):
application.yml
zuul:
routes:
ui:
url: http://localhost:8081 resource:
url: http://localhost:9000 security:
user:
password:
password
sessions: ALWAYS
There are 2 routes in the proxy, one each for the UI and resource server, and we have set up a default password and a session persistence strategy (telling Spring Security to always create a session on authentication). This last bit is important because
we want authentication and therefore sessions to be managed in the Gateway.
Up and Running
We now have three components, running on 3 ports. If you point the browser at http://localhost:8080/ui/ you should get an HTTP Basic challenge, and you can authenticate as "user/password" (your credentials in the Gateway), and once you do that you should see a greeting in the UI, via a backend call through the proxy to the Resourceserver.
The interactions between the browser and the backend can be seen in your browser if you use some developer tools (usually F12 opens this up, works in Chrome by default, may require a plugin in Firefox). Here’s a summary:
| Verb | Path | Status | Response |
|---|---|---|---|
| GET | /ui/ | 401 | Browser prompts for authentication |
| GET | /ui/ | 200 | index.html |
| GET | /ui/css/angular-bootstrap.css | 200 | Twitter bootstrap CSS |
| GET | /ui/js/angular-bootstrap.js | 200 | Bootstrap and Angular JS |
| GET | /ui/js/hello.js | 200 | Application logic |
| GET | /ui/user | 200 | authentication |
| GET | /resource/ | 200 | JSON greeting |
Hurrah, it works! You have two backend servers, one of which is a UI, each with independent capabilities and able to be tested in isolation, and they are connected together with a secure Gateway that you control and for which you have configured the authentication.
If the backends are not accessible to the browser it doesn’t matter (in fact it’s probably an advantage because it gives you yet more control over physical security).
Adding a Login Form
Just as in the "basic" sample inPart I we can now add a login form to the Gateway, e.g. by copying the code from
Part II. When we do that we can also add some basic navigation elements in the Gateway, so the user doesn’t have to know the path to the UI backend in the proxy. So let’s first copy the static assets from the "single" UI into the Gateway, delete the message
rendering and insert a login form into our home page (in the
<body/>somewhere):
index.html
<body ng-app="hello" ng-controller="navigation as nav" ng-cloak
class="ng-cloak">
...
<div class="container" ng-show="!nav.authenticated">
<form role="form" ng-submit="nav.login()">
<div class="form-group">
<label for="username">Username:</label> <input type="text"
class="form-control" id="username" name="username"
ng-model="nav.credentials.username" />
</div>
<div class="form-group">
<label for="password">Password:</label> <input type="password"
class="form-control" id="password" name="password"
ng-model="nav.credentials.password" />
</div>
<button type="submit" class="btn btn-primary">Submit</button>
</form>
</div>
</body>
Instead of the message rendering we will have a nice big navigation button:
index.html
<div class="container" ng-show="nav.authenticated">
<a class="btn btn-primary" href="/ui/">Go To User Interface</a>
</div>
If you are looking at the sample in github, it also has a minimal navigation bar with a "Logout" button. Here’s the login form in a screenshot:
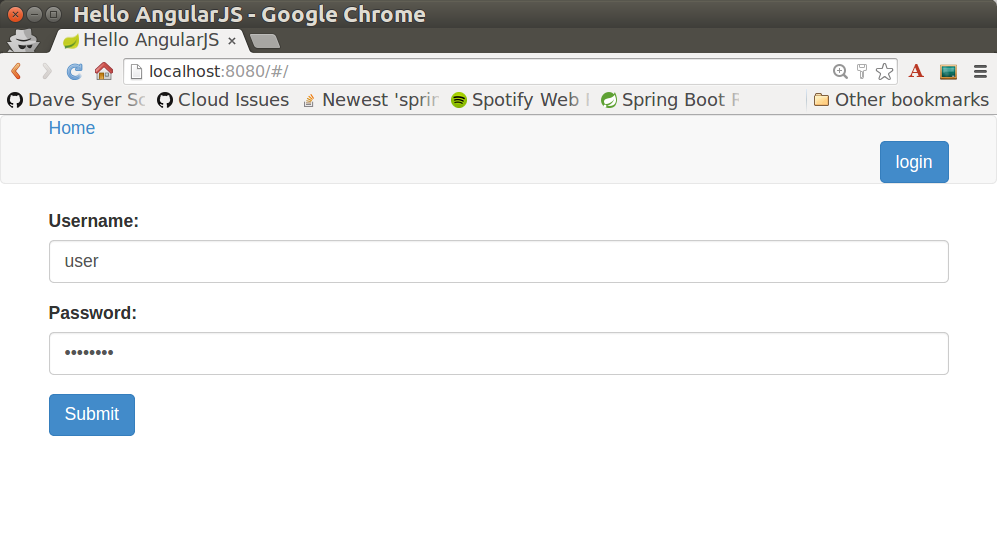
To support the login form we need some JavaScript with a "navigation" controller implementing the
login()function we declared in the
<form/>, and we need to set the
authenticatedflag so that the home page will render differently depending on whether or not the user is authenticated. For example:
gateway.js
angular.module('gateway', []).controller('navigation',
function($http) {

...
authenticate();

self.credentials = {};

self.login = function() {
authenticate(self.credentials, function() {
if (self.authenticated) {
console.log("Login succeeded")
self.error = false;
self.authenticated = true;
} else {
console.log("Login failed")
self.error = true;
self.authenticated = false;
}
})
};

}
where the implementation of the
authenticate()function is similar to that in
Part II:
gateway.js
var authenticate = function(credentials, callback) {

var headers = credentials ? {
authorization : "Basic "
+ btoa(credentials.username + ":"
+ credentials.password)
} : {};

$http.get('user', {
headers : headers
}).then(function(response) {
if (response.data.name) {
self.authenticated = true;
} else {
self.authenticated = false;
}
callback && callback();
}, function() {
self.authenticated = false;
callback && callback();
});

}
We can use the
selfto store the
authenticatedflag because there is only one controller in this simple application.
If we run this enhanced Gateway, instead of having to remember the URL for the UI we can just load the home page and follow links. Here’s the home page for an authenticated user:
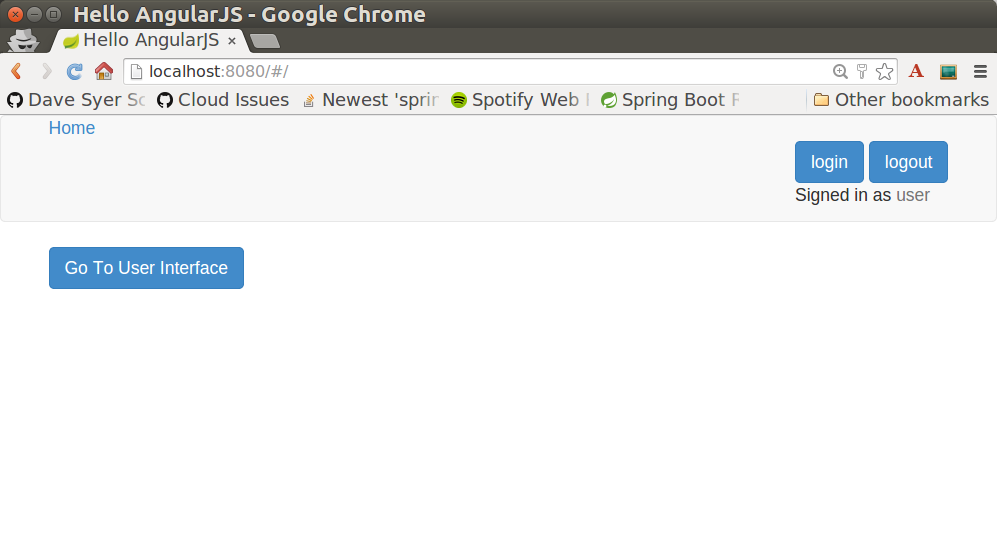
Granular Access Decisions in the Backend
Up to now our application is functionally very similar to the one inPart III or
Part IV, but with an additional dedicated Gateway. The advantage of the extra layer may not be yet apparent, but we can emphasise it by expanding the system a bit. Suppose we want to use that Gateway to expose another backend UI, for users to "administrate"
the content in the main UI, and that we want to restrict access to this feature to users with special roles. So we will add an "Admin" application behind the proxy, and the system will look like this:
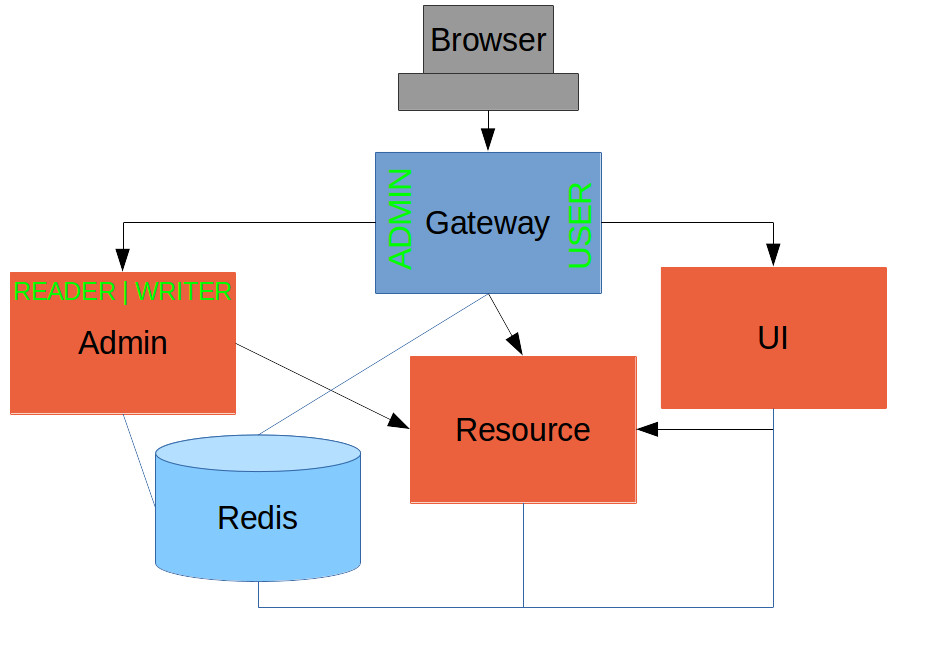
There is a new component (Admin) and a new route in the Gateway in
application.yml:
application.yml
zuul: routes: ui: url: http://localhost:8081 admin: url: http://localhost:8082 resource: url: http://localhost:9000[/code]
The fact that the existing UI is available to users in the "USER" role is indicated on the block diagram above in the Gateway box (green lettering), as is the fact that the "ADMIN" role is needed to go to the Admin application. The access decision for the
"ADMIN" role could be applied in the Gateway, in which case it would appear in aWebSecurityConfigurerAdapter, or it could be applied in the Admin application itself (and we will see how to do that below).
In addition, suppose that within the Admin application we want to distinguish between "READER" and "WRITER" roles, so that we can permit (let’s say) users who are auditors to view the changes made by the main admin users. This is a granular access decision,
where the rule is only known, and should only be known, in the backend application. In the Gateway we only need to ensure that our user accounts have the roles needed, and this information is available, but the Gateway doesn’t need to know how to interpret
it. In the Gateway we create user accounts to keep the sample application self-contained:
SecurityConfiguration.class@Configuration public class SecurityConfiguration extends WebSecurityConfigurerAdapter { @Autowired public void globalUserDetails(AuthenticationManagerBuilder auth) throws Exception { auth.inMemoryAuthentication() .withUser("user").password("password").roles("USER") .and() .withUser("admin").password("admin").roles("USER", "ADMIN", "READER", "WRITER") .and() .withUser("audit").password("audit").roles("USER", "ADMIN", "READER"); } }
where the "admin" user has been enhanced with 3 new roles ("ADMIN", "READER" and "WRITER") and we have also added an "audit" user with "ADMIN" access, but not "WRITER".
| In a production system the user account data would be managed in a backend database (most likely a directory service), not hard coded in the Spring Configuration. Sample applications connecting to such a database are easy to find on the internet, for example in the Spring Security Samples. |
SecurityConfiguration.java
@Configuration
public class SecurityConfiguration extends WebSecurityConfigurerAdapter {

@Override
protected void configure(HttpSecurity http) throws Exception {
http
...
.authorizeRequests()
.antMatchers("/index.html", "/login", "/").permitAll()
.antMatchers("/admin/**").hasRole("ADMIN")
.anyRequest().authenticated()
...
}

}
For the "READER" and "WRITER" roles the application itself is split, and since the application is implemented in JavaScript, that is where we need to make the access decision. One way to do this is to have a home page with a computed view embedded in it:
index.html
<div class="container">
<h1>Admin</h1>
<div ng-show="home.authenticated" ng-include="home.template"></div>
<div ng-show="!home.authenticated" ng-include="'unauthenticated.html'"></div>
</div>
Angular JS evaluates the "ng-include" attribute value as an expression, and then uses the result to load a template.
A more complex application might use other mechanisms to modularize itself, e.g. the$routeProviderservice that we used in nearly all the other applications in this series. |
templatevariable is initialized in our controller, first by defining a utility function:
admin.js
var computeDefaultTemplate = function(user) {
self.template = user && user.roles
&& user.roles.indexOf("ROLE_WRITER")>0 ? "write.html" : "read.html";
}
then by using the utility function when the controller loads:
admin.js
angular.module('admin', []).controller('home',

function($http) {

$http.get('user').then(function(response) {
var data = response.data;
if (data.name) {
self.authenticated = true;
self.user = data;
computeDefaultTemplate(data);
} else {
self.authenticated = false;
}
self.error = null
})
...

})
the first thing the application does is look at the usual (for this series) "/user" endpoint, then it extracts some data, sets the authenticated flag, and if the user is authenticated, computes the template by looking at the user data.
To support this function on the backend we need an endpoint, e.g. in our main application class:
AdminApplication.java
@SpringBootApplication
@RestController
public class AdminApplication {

@RequestMapping("/user")
public Map<String, Object> user(Principal user) {
Map<String, Object> map = new LinkedHashMap<String, Object>();
map.put("name", user.getName());
map.put("roles", AuthorityUtils.authorityListToSet(((Authentication) user)
.getAuthorities()));
return map;
}

public static void main(String[] args) {
SpringApplication.run(AdminApplication.class, args);
}

}| the role names come back from the "/user" endpoint with the "ROLE_" prefix so we can distinguish them from other kinds of authorities (it’s a Spring Security thing). Thus the "ROLE_" prefix is needed in the JavaScript, but not in the Spring Security configuration, where it is clear from the method names that "roles" are the focus of the operations. |
Changes in the Gateway to Support Admin UI
We are going to use the roles to make access decisions in the Gateway as well (so we can conditionally display a link to the admin UI), so we should add the "roles" to the "/user" endpoint in the Gateway as well. Once that is in place we can add some JavaScriptto set up a flag to indicate that the current user is an "ADMIN". In the
authenticated()function:
gateway.js
$http.get('user', {
headers : headers
}).then(function(response) {
var data = response.data;
if (data.name) {
self.authenticated = true;
self.user = data.name
self.admin = data && data.roles && data.roles.indexOf("ROLE_ADMIN")>-1;
} else {
self.authenticated = false;
self.admin = false;
}
callback && callback(true);
}, function() {
self.authenticated = false;
callback && callback(false);
});
and we also need to reset the
adminflag to
falsewhen a user logs out:
gateway.js
self.logout = function() {
$http.post('logout', {}).finally(function() {
self.authenticated = false;
self.admin = false;
});
}
and then in the HTML we can conditionally show a new link:
index.html
<div class="container" ng-show="nav.authenticated">
<a class="btn btn-primary" href="/ui/">Go To User Interface</a>
</div>
<br/>
<div class="container" ng-show="nav.authenticated && admin">
<a class="btn btn-primary" href="/admin/">Go To Admin Interface</a>
</div>
Run all the apps and go to http://localhost:8080 to see the result. Everything should be working fine, and the UI should change depending on the currently authenticated user.
Why are we Here?
Now we have a nice little system with 2 independent user interfaces and a backend Resource server, all protected by the same authentication in a Gateway. The fact that the Gateway acts as a micro-proxy makes the implementation of the backend security concernsextremely simple, and they are free to concentrate on their own business concerns. The use of Spring Session has (again) avoided a huge amount of hassle and potential errors.
A powerful feature is that the backends can independently have any kind of authentication they like (e.g. you can go directly to the UI if you know its physical address and a set of local credentials). The Gateway imposes a completely unrelated set of constraints,
as long as it can authenticate users and assign metadata to them that satisfy the access rules in the backends. This is an excellent design for being able to independently develop and test the backend components. If we wanted to, we could go back to an external
OAuth2 server (like in
Part V, or even something completely different) for the authentication at the Gateway, and the backends would not need to be touched.
A bonus feature of this architecture (single Gateway controlling authentication, and shared session token across all components) is that "Single Logout", a feature we identified as difficult to implement in
Part V, comes for free. To be more precise, one particular approach to the user experience of single logout is automatically available in our finished system: if a user logs out of any of the UIs (Gateway, UI backend or Admin backend), he is logged out
of all the others, assuming that each individual UI implemented a "logout" feature the same way (invalidating the session).
Thanks: I would like to thank again everyone who helped me develop this series, and in particular
Rob Winch and
Thorsten Späth for their careful reviews of the sections and sources code. Since
Part I was published it hasn’t changed much but all the other parts have evolved in response to comments and insights from readers, so thank you also to anyone who read the sections and took the trouble to join in the discussion.
Modular AngularJS Application
In this section we continueour discussion of how to use
Spring Security with Angular JS in a "single page application". Here we show how to modularize the client-side code, and how to use "nice" URL paths without the fragment notation (e.g. "/#/login") which
Angular uses by default, but most users dislike. This is the seventh section of a tutorial, and you can catch up on the basic building blocks of the application or build it from scratch by reading the
first section, or you can just go straight to the
source code in Github. We will be able to tidy up a lot of loose ends from the JavaScript code of the rest of this series, and at the same time show how it can fit very snugly against a backend server built from Spring Security and Spring Boot.
Breaking up the Application
The sample application that we worked with so far in this series was trivial enough that we could get away with a single JavaScript source file for the whole thing. No larger application will ever end up that way, even if it starts out life like this one,so to mimic real life in a sample we are going to break things up. A good starting point would be to take the "single" application from the
second section and have a look at its structure in the source code. Here’s a directory listing for the static content (excluding the "application.yml" that belongs on the server):
static/
js/
hello.js
home.html
login.html
index.html
There are a few problems with this. One is obvious: all the JavaScript is in a single file (
hello.js). Another is more subtle: we have HTML "partials" for views inside our application ("login.html" and "home.html") but they are all in a flat
structure and not associated with the controller code that uses them.
Let’s take a closer look at the JavaScript and we will see that Angular makes it easy for us to break it up into more manageable pieces:
hello.js
angular.module('hello', [ 'ngRoute' ]).config(

function($routeProvider, $httpProvider) {

$routeProvider.when('/', {
templateUrl : 'home.html',
controller : 'home'
}).when('/login', {
templateUrl : 'login.html',
controller : 'navigation'
}).otherwise('/');

...

}).controller('navigation',
function($rootScope, $http, $location, $route) {
...
}).controller('home', function($http) {
...
})
});
There is some "config" and there are 2 controllers ("home" and "navigation"), and the controllers seem to map nicely to the partials ("home.html" and "login.html" respectively). So let’s break them out into those pieces (and using the more consistent name
"login" instead of "navigation" for the controller that manages the menu bar):
static/
js/
home/
home.js
home.html
navigation/
navigation.js
login.html
hello.js
index.html
The controller definitions have moved into their own modules, alongside the HTML that they need to operate - nice and modular. If we had needed images or custom stylesheets we would have done the same with those.
all the client-side code is under a single directory, "js" (exceptindex.htmlbecause that is a "welcome" page and loads automatically from the "static" directory). This is intentional because it makes it easy to apply a single Spring Security access rule to all the static resources. These ones are all unsecured (because /js/**is unsecure by default in a Spring Boot application), but you might need other rules for other applications, in which case you would pick a different path. |
home.js:
angular.module('home', []).controller('home', function($http) {
var self = this;
$http.get('/user/').then(function(response) {
self.user = response.data.name;
});
});
and here’s the new
hello.js:
code,javascript
angular
.module('hello', [ 'ngRoute', 'home', 'navigation' ])
.config(

function($routeProvider, $httpProvider) {

$routeProvider.when('/', {
templateUrl : 'js/home/home.html',
controller : 'home'
}).when('/login', {
templateUrl : 'js/navigation/login.html',
controller : 'navigation'
}).otherwise('/');

$httpProvider.defaults.headers.common['X-Requested-With'] = 'XMLHttpRequest';

});
Notice how the "hello" module depends on the other two by listing them in the initial declaration along with
ngRoute. To make that work you just need to load the module definitions in the right order in
index.html:
...
<script src="js/angular-bootstrap.js" type="text/javascript"></script>
<script src="js/home/home.js" type="text/javascript"></script>
<script src="js/navigation/navigation.js" type="text/javascript"></script>
<script src="js/hello.js" type="text/javascript"></script>
...
This is the Angular JS dependency management system in action. Other frameworks have similar (and arguably superior) features. Also, in a larger application, you might use a build time step to bundle all the JavaScript together so it can be loaded efficiently
by the browser, but that’s almost a matter of taste.
Using "Natural" Routes
The Angular$routeProviderby default works with fragment locators in the URL path, e.g. the login page is specified as a route in
hello.jsas "/login" and this translates into "/#/login" in the actual URL (the one you see in the browser window). This is so that the JavaScript in the
index.html, loaded via the root path "/", stays active on all routes. The fragment naming is a bit unfamiliar to users and it is sometimes more convenient to use "natural" routes, where the URL path is the same as the Angular route declarations,
e.g. "/login" for "/login". You can’t do that if you have only static resources, because
index.htmlcan only be loaded one way, but if you have some active components in the stack (a proxy or some server-side logic) then you can arrange for it to work by loading
index.htmlfrom all the Angular routes.
In this series you have Spring Boot, so of course you have server-side logic, and using a simple Spring MVC controller you can naturalize the routes in your application. All you need is a a way to enumerate the Angular routes in the server. Here we choose
to do it by a naming convention: all paths that do not contain a period (and are not explicitly mapped already) are Angular routes, and should forward to the home page:
@RequestMapping(value = "/{[path:[^\\.]*}")
public String redirect() {
return "forward:/";
}
This method just needs to be in a
@Controller(not a
@RestController) somewhere in the Spring application. We use a "forward" (not a "redirect") so that the browser remembers the "real" route, and that’s what the user sees in the
URL. It also means that any saved-request mechanisms around authentication in Spring Security would work out of the box, although we won’t be taking advantage of that in this application.
| the application in the sample code in github has an extra route, so you can see a slightly more fully featured, and therefore hopefully realistic, application ("/home" and "/message" are different modules with slightly different views). |
hello.jsyou add a line to the
configfunction setting the "HTML5 mode" in the
$locationProvider:
angular.module('hello', [ 'ngRoute', 'home', 'navigation' ]).config(

function($locationProvider, $routeProvider, $httpProvider) {

$locationProvider.html5Mode(true);
...
});
Coupled with that you need an extra
<base/>element in the header of the HTML in
index.html, and you need to change the links in the menu bar to remove the fragments ("#"):
<html>
<head>
<base href="/" />
...
</head>
<body ng-app="hello" ng-cloak class="ng-cloak">
<div ng-controller="navigation as nav" class="container">
<ul class="nav nav-pills" role="tablist">
<li><a href="/">home</a></li>
<li><a href="/login">login</a></li>
<li ng-show="nav.authenticated"><a href="" ng-click="nav.logout()">logout</a></li>
</ul>
</div>
...
</html>
Angular uses the
<base/>element to anchor the routes and write the URLs that show up in the browser. You are running in a Spring Boot application so the default setting is to serve from root path "/" (on port 8080). If you need to be able to
serve from different root paths with the same application then you will need to render that path into the HTML using a server-side template (many people prefer to stick with static resources for a Single Page Application, so they are stuck with a static root
path).
Extracting the Authentication Concerns
When you modularized the application above you should have found that the code worked just by splitting it into modules, but there is a small niggle there that we are still using$rootScopeto share state between the controllers. There’s nothing horribly wrong with that for such a small application and it got us a decent prototype to play with quite quickly, so let’s not be too sad about it, but now we can take the opportunity
to extract all the authentication concerns into a separate module. In Angular terms what you need is a "service", so create a new module ("auth") next to your "home" and "navigation" modules:
static/
js/
auth/
auth.js
home/
home.js
home.html
navigation/
navigation.js
login.html
hello.js
index.html
Before writing the
auth.jscode we can anticipate the changes in the other modules. First in
navigation.jsyou should make the "navigation" module depend on the new "auth" module, and inject the "auth" service into the controller (and of course
$rootScopeis no longer needed):
angular.module('navigation', ['auth']).controller(
'navigation',

function(auth) {

var self = this;

self.credentials = {};

self.authenticated = function() {
return auth.authenticated;
}

self.login = function() {
auth.authenticate(self.credentials, function(authenticated) {
if (authenticated) {
console.log("Login succeeded")
self.error = false;
} else {
console.log("Login failed")
self.error = true;
}
})
};

self.logout = function() {
auth.clear();
}

});
It isn’t very different from the old controller (it still needs functions for user actions, login and logout, and an object to hold the credentials for login), but it has abstracted the implementation to the new "auth" service. The "auth" service will need
an
authenticate()function to support the
login(), and a
clear()function to support
logout(). It also has a flag
authenticatedthat replaces the
$rootScope.authenticatedfrom the old controller. We use the
authenticatedflag in a function with the same name attached the controller, so that Angular will keep checking its value and update the UI when the user logs in.
Suppose you want to make the "auth" module re-usable, so you don’t want any hard-coded paths in it. That’s not a problem, but you will need to initialize or configure the paths in the
hello.jsmodule. To do that you can add a
run()function:
angular
.module('hello', [ 'ngRoute', 'auth', 'home', 'navigation' ])
.config(
...
}).run(function(auth) {

auth.init('/', '/login', '/logout');

});
The
run()function can call into any of the modules that "hello" depends on, in this case injecting an
authservice and initializing it with the paths of the home page, login and logout endpoints respectively.
Now you need to load the "auth" module in
index.htmlin addition to the other modules (and before the "login" module since it depends on "auth"):
...
<script src="js/auth/auth.js" type="text/javascript"></script>
...
<script src="js/hello.js" type="text/javascript"></script>
...
Then finally you can write the code for the three functions you pencilled in above (
authenticate(),
clear()and
init()). Here’s most of the code:
angular.module('auth', []).factory(
'auth',

function($http, $location) {

var auth = {
authenticated : false,

loginPath : '/login',
logoutPath : '/logout',
homePath : '/',

authenticate : function(credentials, callback) {

var headers = credentials && credentials.username ? {
authorization : "Basic "
+ btoa(credentials.username + ":"
+ credentials.password)
} : {};

$http.get('user', {
headers : headers
}).then(function(response) {
if (response.data.name) {
auth.authenticated = true;
} else {
auth.authenticated = false;
}
$location.path(auth.homePath);
callback && callback(auth.authenticated);
}, function() {
auth.authenticated = false;
callback && callback(false);
});

},

clear : function() { ... },

init : function(homePath, loginPath, logoutPath) { ... }

};

return auth;

});
The "auth" module creates a factory for an
authservice (which you already injected into the "navigation" controller for instance). The factory is just a function that returns an object (
auth), and the object has to have the three
functions and the flag that we anticipated above. Above, we have shown an implementation of the
authenticate()function, which is substantially the same as the old one in the "navigation" controller, it calls out to a backend resource at "/user", sets a flag
authenticatedand calls an optional callback with the value of the flag. If successful, it also sends the user to the
homePathusing the
$locationservice (we will improve on this in a minute).
Here is a bare-bones implementation of the
init()function that just sets up the various paths you didn’t want to hard code in the "auth" module:
init : function(homePath, loginPath, logoutPath) {
auth.homePath = homePath;
auth.loginPath = loginPath;
auth.logoutPath = logoutPath;
}
The
clear()function implementation comes next, but it’s rather simple:
clear : function() {
auth.authenticated = false;
$location.path(auth.loginPath);
$http.post(auth.logoutPath, {});
}
It unsets the
authenticatedflag, sends the user back to the login page, and then sends an HTTP POST to the logout path. The POST succeeds because we still have the CSRF protection features from the original "single" application in place. If
you see a 403, look at the error message and server logs, then check that you have that filter in place and the XSRF cookie is being sent.
The very last change is to the
index.htmlso that the "logout" link is hidden when the user is not authenticated:
<html>
...
<body ng-app="hello" ng-cloak class="ng-cloak">
<div ng-controller="navigation as nav" class="container">
<ul class="nav nav-pills" role="tablist">
...
<li ng-show="nav.authenticated()"><a href="" ng-click="nav.logout()">logout</a></li>
</ul>
</div>
...
</html>
You simply need to convert the flag
authenticatedto a function call
authenticated(), so that the "navigation" controller can reach into the "auth" service and find the value of the flag, now that it is not in
$rootScope.
Redirecting to the Login Page
The way we have implemented our home page up to now it has some content it can display when the user is anauthenticated (it just invites them to log in). Some applications work that way, and some don’t. Some provide a different user experience where theuser never sees anything apart from the login page until he is authenticated, so let’s see how we might convert our application to this pattern.
Hiding all content with a login page is a classic cross-cutting concern: you don’t want all the logic for showing the login page stuck in all the UI modules (it would be duplicated everywhere, making the code harder to read and harder to maintain). Spring
Security is all about cross-cutting concerns in the server, since it builds on top of
Filtersand AOP interceptors. Unfortunately that won’t help us much in a Single Page Application, but fortunately Angular also has some features that make it easy to implement the pattern we want. The feature that helps us here is that you can
install a listener for "route changes", so every time the user moves to a new route (i.e. clicks on a menu bar or whatever) or when the page loads for the first time, you get to inspect the route and if you need to you can change it.
To install the listener you can write a small piece of extra code in your
auth.init()function (since that is already arranged to run when the main "hello" module loads):
angular.module('auth', []).factory(
'auth',

function($rootScope, $http, $location) {

var auth = {

...

init : function(homePath, loginPath, logoutPath) {
...
$rootScope.$on('$routeChangeStart', function() {
enter();
});
}

};

return auth;

});
We registered a simple listener which just delegates to a new
enter()function, so now you need to implement that as well in the "auth" module factory function (where it has access to the factory object itself):
enter = function() {
if ($location.path() != auth.loginPath) {
auth.path = $location.path();
if (!auth.authenticated) {
$location.path(auth.loginPath);
}
}
}
The logic is simple: if the path just changed to something other than the login page, then make a record of the path value, and then if the user is not authenticated, go to the login page. The reason we save the path value is so we can go back to it after
a successful authentication (Spring Security has this feature server side and it’s quite nice for users). You do that in the
authenticate()function by adding some code to the success handler:
authenticate : function(credentials, callback) {
...
$http.get('user', {
headers : headers
}).then(function(response) {
...
$location.path(auth.path==auth.loginPath ? auth.homePath : auth.path);
}, function() { ... });

},
On successful authentication we just set the location to either the home page or the most recently selected path (as long as it’s not the login page).
There is one final change to make the user experience more uniform: we would like to show the login page instead of the home page when the application first starts up. You already have that logic (redirect to login page) in the
authenticate()function, so all you need to do is add some code in the
init()function to authenticate with empty credentials (which fails unless the user has a cookie already):
init : function(homePath, loginPath, logoutPath) {
...
auth.authenticate({}, function(authenticated) {
if (authenticated) {
$location.path(auth.path);
}
});
...
}
As long as
auth.pathis initialized with
$location.path(), this will even work if the user types in a route explicitly into the browser (i.e. doesn’t want to load the home page first).
Fire up the application (using your IDE and the
main()method, or on the command line with
mvn spring-boot:run) and visit it at http://localhost:8080 to see the result.
Reminder: be sure to clear your browser cache of cookies and HTTP Basic credentials. In Chrome the best way to do that is to open a new incognito window.
Conclusion
In this section we have seen how to modularize an Angular application (taking as a starting point the application fromsection two of the tutorial), how to make it redirect to a login page, and how to use "natural" routes that can be typed or bookmarked easily by users. We took a step back from the last couple of sections in the tutorial, concentrating on the client-side
code a bit more, and temporarily ditching the distributed architecture that we were building in Sections III-VI. That doesn’t mean that the changes here can’t be applied to those other applications (actually it’s fairly trivial) - it was just to simplify the
server-side code while we were learning how to do things on the client. There
were a couple of server-side features that we used or discussed briefly though (for instance the use of a "forward" view in Spring MVC to enable "natural" routes), so we have continued the theme of Angular and Spring working together, and shown that they
do so quite well with small tweaks here and there.
Testing an AngularJS Application
In this section we continueour discussion of how to use
Spring Security with Angular JS in a "single page application". Here we show how to write and run unit tests for the client-side code using the Javascript test framework
Jasmine. You can catch up on the basic building blocks of the application or build it from scratch by reading the
first section, or you can just go straight to the
source code in Github (the same source code as Part I, but with tests now added). This section actually has very little code using Spring or Spring Security, but it covers the client-side testing in a way that might not be so easy to find in the usual Javascript
community resources, and one which we feel will be comfortable for the majority of Spring users.
As with the rest of this series, the build tools are typical for Spring users, and not so much for experienced front-end developers. Thus we look for solutions that can be used from a Java IDE, and on the command line with familiar Java build tools. If you
already know about Jasmine and Javascript testing, and you are happy using a Node.js based toolchain (e.g.
npm,
gruntetc.), then you probably can skip this section completely. If you are more comfortable in Eclipse or IntelliJ, and would prefer to use the same tools for your front end as for the back end, then this section will be of interest.
When we need a command line (e.g. for continuous integration), we use Maven in the examples here, but Gradle users will probably find the same code easy to integrate.
Reminder: if you are working through this section with the sample application, be sure to clear your browser cache of cookies and HTTP Basic credentials. In Chrome the best way to do that for a single server is to open a new incognito window.
Writing a Specification in Jasmine
Our "home" controller in the "basic" application is very simple, so it won’t take a lot to test it thoroughly. Here’s a reminder of the code (hello.js):
angular.module('hello', []).controller('home', function($scope, $http) {
$http.get('resource/').then(function(response) {
$scope.greeting = response.data;
})
});
The main challenge we face is to provide the
$scopeand
$httpobjects in the test, so we can make assertions about how they are used in the controller. Actually, even before we face that challenge we need to be able to create a
controller instance, so we can test what happens when it loads. Here’s how you can do that.
Create a new file
spec.jsand put it in "src/test/resources/static/js":
describe("App", function() {

beforeEach(module('hello'));

var $controller;
beforeEach(inject(function($injector) {
$controller = $injector.get('$controller');
}));

it("loads a controller", function() {
var controller = $controller('home')
});

}
In this very basic test suite we have 3 important elements:
We
describe()the thing that is being tested (the "App" in this case) with a function.
Inside that function we provide a couple of
beforeEach()callbacks, one of which loads the Angular module "hello", and the other of which creates a factory for controllers, which we call
$controller.
Behaviour is expressed through a call to
it(), where we state in words what the expectation is, and then provide a function that makes assertions.
The test function here is so trivial it actually doesn’t even make assertions, but it does create an instance of the "home" controller, so if that fails then the test will fail.
| "src/test/resources/static/js" is a logical place for test code in a Java application, although a case could be made for "src/test/javascript". We will see later why it makes sense to put it in the test classpath, though (indeed if you are used to Spring Boot conventions you may already see why). |
<!doctype html>
<html>
<head>

<title>Jasmine Spec Runner</title>
<link rel="stylesheet" type="text/css"
href="/webjars/jasmine/2.0.0/jasmine.css">
<script type="text/javascript" src="/webjars/jasmine/2.0.0/jasmine.js"></script>
<script type="text/javascript"
src="/webjars/jasmine/2.0.0/jasmine-html.js"></script>
<script type="text/javascript" src="/webjars/jasmine/2.0.0/boot.js"></script>

<!-- include source files here... -->
<script type="text/javascript" src="/js/angular-bootstrap.js"></script>
<script type="text/javascript" src="/js/hello.js"></script>

<!-- include spec files here... -->
<script type="text/javascript"
src="/webjars/angularjs/1.3.8/angular-mocks.js"></script>
<script type="text/javascript" src="/js/spec.js"></script>

</head>

<body>
</body>
</html>
The HTML is content free, but it loads some Javascript, and it will have a UI once the scripts all run.
First we load the required Jasmine components from
/webjars/**. The 4 files that we load are just boilerplate - you can do the same thing for any application. To make those available at runtime in a test we will need to add the Jasmine dependency
to our "pom.xml":
<dependency>
<groupId>org.webjars</groupId>
<artifactId>jasmine</artifactId>
<version>2.0.0</version>
<scope>test</scope>
</dependency>
Then we come to the application-specific code. The main source code for our front end is "hello.js" so we have to load that, and also its dependencies in the form of "angular-bootstrap.js" (the latter is created by the wro4j maven plugin, so you need to
run
mvn packageonce successfully before it is loadable).
Finally we need the "spec.js" that we jsut wrote, and its dependencies (any that are not already included the the other scripts), which for an Angular application will nearly always include the "angular-mocks.js". We load it from webjars, so you will also
need to add that dependency to "pom.xml":
<dependency>
<groupId>org.webjars</groupId>
<artifactId>angularjs</artifactId>
<version>1.3.8</version>
<scope>test</scope>
</dependency>
| The angularjs webjar was already included as a dependency of the wro4j plugin, so that it could build the "angular-bootstrap.js". This is going to be used in a different build step, so we need it again. |
Running the Specs
To run our "test.html" code we need a tiny application (e.g. in "src/test/java/test"):@SpringBootApplication
@Controller
public class TestApplication {
@RequestMapping("/")
public String home() {
return "forward:/test.html";
}
public static void main(String[] args) {
new SpringApplicationBuilder(TestApplication.class).properties(
"server.port=9999", "security.basic.enabled=false").run(args);
}
}The
TestApplicationis pure boilerplate: all applications could run tests the same way. You can run it in your IDE and visit
http://localhost:9999 to see the Javascript running. The one
@RequestMappingwe provided just makes the home page display out test HTML. All (one) tests should be green.
Your developer workflow from here would be to make a change to Javascript code and reload the test application in your browser to run the tests. So simple!
Improving the Unit Test: Mocking HTTP Backend
To improve the spec to production grade we need to actually assert something about what happens when the controller loads. Since it makes a call to$http.get()we need to mock that call to avoid having to run the whole application just for a unit test. To do that we use the Angular
$httpBackend(in "spec.js"):
describe("App", function() {

beforeEach(module('hello'));

var $httpBackend, $controller;
beforeEach(inject(function($injector) {
$httpBackend = $injector.get('$httpBackend');
$controller = $injector.get('$controller');
}));

afterEach(function() {
$httpBackend.verifyNoOutstandingExpectation();
$httpBackend.verifyNoOutstandingRequest();
});

it("says Hello Test when controller loads", function() {
var $scope = {};
$httpBackend.expectGET('resource/').respond(200, {
id : 4321,
content : 'Hello Test'
});
var controller = $controller('home', {
$scope : $scope
});
$httpBackend.flush();
expect($scope.greeting.content).toEqual('Hello Test');
});

})
The new pieces here are:
The creation of the
$httpBackendin a
beforeEach().
Adding a new
afterEach()that verifies the state of the backend.
In the test function we set expectations for the backend before we create the controller, telling it to expect a call to 'resource/',and what the response should be.
We also add a call to jasmine
expect()to assert the outcome.
Without having to start and stop the test application, this test should now be green in the browser.
Running Specs on the Command Line
It’s great to be able to run specs in a browser, because there are excellent developer tools built into modern browsers (e.g. F12 in Chrome). You can set breakpoints and inspect variables, and well as being able to refresh the view to re-run your tests ina live server. But this won’t help you with continuous integration: for that you need a way to run the tests from a command line. There is tooling available for whatever build tools you prefer to use, but since we are using Maven here, we will add a plugin
to the "pom.xml":
<plugin>
<groupId>com.github.searls</groupId>
<artifactId>jasmine-maven-plugin</artifactId>
<version>2.0-alpha-01</version>
<executions>
<execution>
<goals>
<goal>test</goal>
</goals>
</execution>
</executions>
</plugin>
The default settings for this plugin won’t work with the static resource layout that we already made, so we need a bit of configuration for that:
<plugin>
...
<configuration>
<additionalContexts>
<context>
<contextRoot>/lib</contextRoot>
<directory>${project.build.directory}/classes/static/js</directory>
</context>
</additionalContexts>
<preloadSources>
<source>/lib/angular-bootstrap.js</source>
<source>/webjars/angularjs/1.3.8/angular-mocks.js</source>
</preloadSources>
<jsSrcDir>${project.basedir}/src/main/resources/static/js</jsSrcDir>
<jsTestSrcDir>${project.basedir}/src/test/resources/static/js</jsTestSrcDir>
<phantomjs>
<version>2.1.1</version>
</phantomjs>
</configuration>
</plugin>
The default Selenium web driver is
phantomjs, which will be downloaded for you if you are on a supported platform, or else it needs to be on your
PATHat runtime. This works out of the box in
Travis CI, for instance. In principle, any driver can be used here, but PhantomJS is probably the best one to use for an Angular application.
That’s it. All boilerplate again (so it can go in a parent pom if you want to share the code between multiple projects). Just run it on the command line:
$ mvn jasmine:test
The tests also run as part of the Maven "test" lifecycle, so you can just run
mvn testto run all the Java tests as well as the Javascript ones, slotting very smoothly into your existing build and deployment cycle. Here’s the log:
$ mvn test
...
[INFO]
-------------------------------------------------------
J A S M I N E   S P E C S
-------------------------------------------------------
[INFO]
App
says Hello Test when controller loads

Results: 1 specs, 0 failures

[INFO] ------------------------------------------------------------------------
[INFO] BUILD SUCCESS
[INFO] ------------------------------------------------------------------------
[INFO] Total time: 21.064s
[INFO] Finished at: Sun Apr 26 14:46:14 BST 2015
[INFO] Final Memory: 47M/385M
[INFO] ------------------------------------------------------------------------
The Jasmine Maven plugin also comes with a goal
mvn jasmine:bddthat runs a server that you can load in your browser to run the tests (as an alternative to the
TestApplicationabove).
Conclusion
Being able to run unit tests for Javascript is important in a modern web application and it’s a topic that we’ve ignored (or dodged) up to now in this series. With this installment we have presented the basic ingredients of how to write the tests, how torun them at development time and also, importantly, in a continuous integration setting. The approach we have taken is not going to suit everyone, so please don’t feel bad about doing it in a different way, but make sure you have all those ingredients. The
way we did it here will probably feel comfortable to traditional Java enterprise developers, and integrates well with their existing tools and processes, so if you are in that category I hope you will find it useful as a starting point. More examples of testing
with Angular and Jasmine can be found in plenty of places on the internet, but the first point of call might be the
"single" sample from this series, which now has some up to date test code which is a bit less trivial than the code we needed to write for the "basic" sample in this tutorial.
Want to write a new guide or contribute to an existing one? Check out our
contribution guidelines.
| All guides are released with an ASLv2 license for the code, and an Attribution, NoDerivatives creative commons license for the writing. |

相关文章推荐
- The Login Page: Angular JS and Spring Security Part II
- Spring Security and Angular JS
- Spring Security and AngularJS
- The Resource Server: Angular JS and Spring Security Part III
- Modularizing the Client: Angular JS and Spring Security Part VII
- SSO with OAuth2: Angular JS and Spring Security Part V
- The API Gateway Pattern: Angular JS and Spring Security Part IV
- Testing an Angular Application: Angular JS and Spring Security Part VIII
- CRUD using Spring MVC 4.0 RESTful Web Services and AngularJS
- Service and controller in angularJs
- angularjs directive and component 指令与组件 ( 1.5.0 以后 )
- [转载]AngularJS and scope.$apply
- Spring Data REST + GemFire + AngularJS Integration
- SpringMvc+AngularJS通过CORS实现跨域方案
- Embedded Jetty and Apache CXF: secure REST services with Spring Security
- angularJS articles and resources
- AngularJS Service vs Factory - Once and for all
- [React] React Fundamentals: Integrating Components with D3 and AngularJS
- SpringMvc+AngularJS通过CORS实现跨域方案
- AngularJS and scope.$apply