WPF教程(十九)单选框
2016-10-19 22:33
351 查看
单选框用于给用户提供一个选项表,但是只能选择其中的一项。用复选框也可以实现这样的功能,但是单选框更好的展示了他们能做的选择。

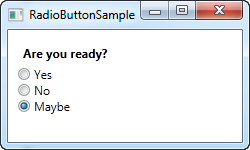
上面的例子我们添加了一个问题标签,三个单选框,每个就是一个答案。我们使用IsChecked属性来默认选中最后一个单选框,用户点击另外两个中的一个就可以改变这个属性。这个属性也用在后台代码中,来检查一个单选框是否被选中。
单选框组
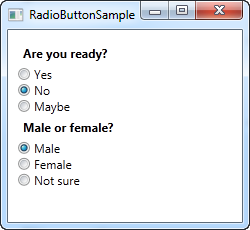
运行上面的例子,你会发现只能有一个单选框被选中。那么,如果你同时有好几组单选框,每组都有其自己的选项,如何来选呢?GroupName属性正是用在这种情况下,蕴蓄你哪几个单选框是一起的。<span style="font-size:14px;"><Window x:Class="WpfTutorialSamples.Basic_controls.RadioButtonSample"
xmlns="http://schemas.microsoft.com/winfx/2006/xaml/presentation"
xmlns:x="http://schemas.microsoft.com/winfx/2006/xaml"
Title="RadioButtonSample" Height="230" Width="250">
<StackPanel Margin="10">
<Label FontWeight="Bold">Are you ready?</Label>
<RadioButton GroupName="ready">Yes</RadioButton>
<RadioButton GroupName="ready">No</RadioButton>
<RadioButton GroupName="ready" IsChecked="True">Maybe</RadioButton>
<Label FontWeight="Bold">Male or female?</Label>
<RadioButton GroupName="sex">Male</RadioButton>
<RadioButton GroupName="sex">Female</RadioButton>
<RadioButton GroupName="sex" IsChecked="True">Not sure</RadioButton>
</StackPanel>
</Window></span>

使用GroupName属性来设置单选框类别,分成了两组。如果没有这个属性,那么这六个单选框只能选中一个。
用户内容
和复选框一样,单选框也是继承于ContentControl基类,能够放置用户内容并在旁边显示。如果你只是定义了一串文字,那么WPF会自动生成一个文本块来显示它们。除了文字,你还可以放置各种控件到里面,如下面的例子:
<span style="font-size:14px;"><Window x:Class="WpfTutorialSamples.Basic_controls.RadioButtonCustomContentSample"
xmlns="http://schemas.microsoft.com/winfx/2006/xaml/presentation"
xmlns:x="http://schemas.microsoft.com/winfx/2006/xaml"
Title="RadioButtonCustomContentSample" Height="150" Width="250">
<StackPanel Margin="10">
<Label FontWeight="Bold">Are you ready?</Label>
<RadioButton>
<WrapPanel>
<Image Source="/WpfTutorialSamples;component/Images/accept.png" Width="16" Height="16" Margin="0,0,5,0" />
<TextBlock Text="Yes" Foreground="Green" />
</WrapPanel>
</RadioButton>
<RadioButton Margin="0,5">
<WrapPanel>
<Image Source="/WpfTutorialSamples;component/Images/cancel.png" Width="16" Height="16" Margin="0,0,5,0" />
<TextBlock Text="No" Foreground="Red" />
</WrapPanel>
</RadioButton>
<RadioButton IsChecked="True">
<WrapPanel>
<Image Source="/WpfTutorialSamples;component/Images/question.png" Width="16" Height="16" Margin="0,0,5,0" />
<TextBlock Text="Maybe" Foreground="Gray" />
</WrapPanel>
</RadioButton>
</StackPanel>
</Window></span>

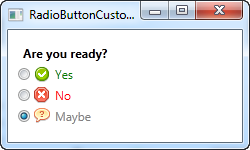
标记很好用,上面的例子看起来很繁琐,但是要表达的概念很简单。每个单选框我们都使用一个WrapPanel来放置一张图片和一段文字。这里我们用了文本块控件来控制文字的显示,还可以用其他任何形式来展示。在这里我改变了文字的颜色来匹配选择。图片通过图片控件来显示。
注意你只要点击单选框的任何地方,不管是图片还是文字,都可以选中它。这是因为图片和文字都是单选框的内容。如果你在单选框旁边放置一个单独的容器,用户就必须去点击单选框中的小圆圈才能生效,这是非常不切实际。
<span style="font-size:14px;"><Window x:Class="WpfTutorialSamples.Basic_controls.RadioButtonSample"
xmlns="http://schemas.microsoft.com/winfx/2006/xaml/presentation"
xmlns:x="http://schemas.microsoft.com/winfx/2006/xaml"
Title="RadioButtonSample" Height="150" Width="250">
<StackPanel Margin="10">
<Label FontWeight="Bold">Are you ready?</Label>
<RadioButton>Yes</RadioButton>
<RadioButton>No</RadioButton>
<RadioButton IsChecked="True">Maybe</RadioButton>
</StackPanel>
</Window></span>

上面的例子我们添加了一个问题标签,三个单选框,每个就是一个答案。我们使用IsChecked属性来默认选中最后一个单选框,用户点击另外两个中的一个就可以改变这个属性。这个属性也用在后台代码中,来检查一个单选框是否被选中。
单选框组
运行上面的例子,你会发现只能有一个单选框被选中。那么,如果你同时有好几组单选框,每组都有其自己的选项,如何来选呢?GroupName属性正是用在这种情况下,蕴蓄你哪几个单选框是一起的。<span style="font-size:14px;"><Window x:Class="WpfTutorialSamples.Basic_controls.RadioButtonSample"
xmlns="http://schemas.microsoft.com/winfx/2006/xaml/presentation"
xmlns:x="http://schemas.microsoft.com/winfx/2006/xaml"
Title="RadioButtonSample" Height="230" Width="250">
<StackPanel Margin="10">
<Label FontWeight="Bold">Are you ready?</Label>
<RadioButton GroupName="ready">Yes</RadioButton>
<RadioButton GroupName="ready">No</RadioButton>
<RadioButton GroupName="ready" IsChecked="True">Maybe</RadioButton>
<Label FontWeight="Bold">Male or female?</Label>
<RadioButton GroupName="sex">Male</RadioButton>
<RadioButton GroupName="sex">Female</RadioButton>
<RadioButton GroupName="sex" IsChecked="True">Not sure</RadioButton>
</StackPanel>
</Window></span>

使用GroupName属性来设置单选框类别,分成了两组。如果没有这个属性,那么这六个单选框只能选中一个。
用户内容
和复选框一样,单选框也是继承于ContentControl基类,能够放置用户内容并在旁边显示。如果你只是定义了一串文字,那么WPF会自动生成一个文本块来显示它们。除了文字,你还可以放置各种控件到里面,如下面的例子:
<span style="font-size:14px;"><Window x:Class="WpfTutorialSamples.Basic_controls.RadioButtonCustomContentSample"
xmlns="http://schemas.microsoft.com/winfx/2006/xaml/presentation"
xmlns:x="http://schemas.microsoft.com/winfx/2006/xaml"
Title="RadioButtonCustomContentSample" Height="150" Width="250">
<StackPanel Margin="10">
<Label FontWeight="Bold">Are you ready?</Label>
<RadioButton>
<WrapPanel>
<Image Source="/WpfTutorialSamples;component/Images/accept.png" Width="16" Height="16" Margin="0,0,5,0" />
<TextBlock Text="Yes" Foreground="Green" />
</WrapPanel>
</RadioButton>
<RadioButton Margin="0,5">
<WrapPanel>
<Image Source="/WpfTutorialSamples;component/Images/cancel.png" Width="16" Height="16" Margin="0,0,5,0" />
<TextBlock Text="No" Foreground="Red" />
</WrapPanel>
</RadioButton>
<RadioButton IsChecked="True">
<WrapPanel>
<Image Source="/WpfTutorialSamples;component/Images/question.png" Width="16" Height="16" Margin="0,0,5,0" />
<TextBlock Text="Maybe" Foreground="Gray" />
</WrapPanel>
</RadioButton>
</StackPanel>
</Window></span>

标记很好用,上面的例子看起来很繁琐,但是要表达的概念很简单。每个单选框我们都使用一个WrapPanel来放置一张图片和一段文字。这里我们用了文本块控件来控制文字的显示,还可以用其他任何形式来展示。在这里我改变了文字的颜色来匹配选择。图片通过图片控件来显示。
注意你只要点击单选框的任何地方,不管是图片还是文字,都可以选中它。这是因为图片和文字都是单选框的内容。如果你在单选框旁边放置一个单独的容器,用户就必须去点击单选框中的小圆圈才能生效,这是非常不切实际。
相关文章推荐
- WPF入门教程系列十九——ListView示例(一)
- WPF入门教程系列十九——ListView示例(一)
- C#开发WPF/Silverlight动画及游戏系列教程(Game Tutorial):(十九) 完美精灵之八面玲珑(WPF Only)③
- C#开发WPF/Silverlight动画及游戏系列教程(Game Tutorial):(十九) 完美精灵之八面玲珑(WPF Only)③
- C#开发WPF/Silverlight动画及游戏系列教程(Game Tutorial):(十九) 完美精灵之八面玲珑(WPF Only)③
- C#开发WPF/Silverlight动画及游戏系列教程(Game Tutorial):目录
- WPF教程(十一)WPF中的命令行参数
- Scott Mitchell 的ASP.NET 2.0数据教程之十九:给新增、编辑界面增加验证控件
- C#开发WPF/Silverlight动画及游戏系列教程(Game Tutorial):(四十七)远距离单体攻击与单体魔法
- C#开发WPF/Silverlight动画及游戏系列教程(Game Tutorial):(四十九) 落雷!治疗!陷阱!连锁闪电!多段群伤!魔法之终极五重奏②
- WPF入门教程系列十八——WPF中的数据绑定(四)
- Golang教程:(十九)接口 - II
- 一个计算机爱好者的不完整回忆(十九)菜鸟教程
- WPF教程(十八)复选框
- C#开发WPF/Silverlight动画及游戏系列教程(Game Tutorial):(九) 2D游戏角色在地图上的移动
- [转]VS2010 教程:创建一个 WPF 应用程序 (第一节)
- C#开发WPF/Silverlight动画及游戏系列教程(Game Tutorial):(十三)牵引式地图移动模式①
- WPF教程(二十七)DockPanel
- C#开发WPF/Silverlight动画及游戏系列教程(Game Tutorial):(二十) 第一部分拓展小结篇
- WPF教程
