Spring如何装配各种集合类型的属性
2016-10-19 12:59
579 查看
在前面我们已经会注入基本类型对象和其他bean,现在我们就来学习如何注入各种集合类型。
接着在src目录下新建一个cn.itcast.service包,并在该包下创建PersonService接口,其代码为:
再接下来仍在src目录下新建一个cn.itcast.service.impl包,并在该包下创建PersonService接口的实现类——PersonServiceBean.java,其代码为:
然后将Spring的配置文件——beans.xml的内容置为:
最后,在src目录下新建一个junit.test包,并在该包下新建一个单元测试类——SpringTest.java,其代码为:
测试instanceSpring()方法,会发现Eclipse的控制台打印:
如要查看源码,可点击Spring如何装配各种集合类型的属性进行下载。
使用构造器注入。
使用属性setter方法注入。
我们已经详解过使用属性setter方法注入这种方式,接下来自然就到了使用构造器注入属性了。
首先将PersonService接口的代码改为:
接着将PersonServiceBean实现类的代码修改为:
然后将Spring的配置文件修改为:
最后,将单元测试类——SpringTest.java的代码改为:
测试instanceSpring()方法,可看到Eclipse控制台打印:

Spring如何装配各种集合类型的属性
首先新建一个普通的Java Project,名称为spring_collection,并迅速搭建好Spring的开发环境。接着在src目录下新建一个cn.itcast.service包,并在该包下创建PersonService接口,其代码为:
public interface PersonService {
Set<String> getSets();

List<String> getLists();

Properties getProperties();

Map<String, String> getMaps();

void save();

}
再接下来仍在src目录下新建一个cn.itcast.service.impl包,并在该包下创建PersonService接口的实现类——PersonServiceBean.java,其代码为:
public class PersonServiceBean implements PersonService {
private Set<String> sets = new HashSet<String>();
private List<String> lists = new ArrayList<String>();
private Properties properties = new Properties();
private Map<String, String> maps = new HashMap<String, String>();

public Map<String, String> getMaps() {
return maps;
}

public void setMaps(Map<String, String> maps) {
this.maps = maps;
}

public Properties getProperties() {
return properties;
}

public void setProperties(Properties properties) {
this.properties = properties;
}

public List<String> getLists() {
return lists;
}

public void setLists(List<String> lists) {
this.lists = lists;
}

public Set<String> getSets() {
return sets;
}

public void setSets(Set<String> sets) {
this.sets = sets;
}

@Override
public void save() {

}
}
然后将Spring的配置文件——beans.xml的内容置为:
<?xml version="1.0" encoding="UTF-8"?>
<beans xmlns="http://www.springframework.org/schema/beans"
xmlns:xsi="http://www.w3.org/2001/XMLSchema-instance"
xsi:schemaLocation="http://www.springframework.org/schema/beans http://www.springframework.org/schema/beans/spring-beans.xsd">
<bean id="personService" class="cn.itcast.service.impl.PersonServiceBean">
<property name="sets">
<set>
<value>第一个</value>
<value>第二个</value>
<value>第三个</value>
</set>
</property>
<property name="lists">
<list>
<value>第一个list元素</value>
<value>第二个list元素</value>
<value>第三个list元素</value>
</list>
</property>
<property name="properties">
<props>
<prop key="key1">value1</prop>
<prop key="key2">value2</prop>
<prop key="key3">value3</prop>
</props>
</property>
<property name="maps">
<map>
<entry key="key-1" value="value-1"></entry>
<entry key="key-2" value="value-2"></entry>
<entry key="key-3" value="value-3"></entry>
</map>
</property>
</bean>

</beans>
最后,在src目录下新建一个junit.test包,并在该包下新建一个单元测试类——SpringTest.java,其代码为:
public class SpringTest {
@Test
public void instanceSpring() {
AbstractApplicationContext ctx = new ClassPathXmlApplicationContext("beans.xml");
PersonService personService = (PersonService) ctx.getBean("personService");
System.out.println("===================set===================");
for (String value : personService.getSets()) {
System.out.println(value);
}
System.out.println("===================list===================");
for (String value : personService.getLists()) {
System.out.println(value);
}
System.out.println("===================properties===================");
for (Object key : personService.getProperties().keySet()) {
System.out.println(key + "=" + personService.getProperties().getProperty((String) key));
}
System.out.println("===================maps===================");
for (Object key : personService.getMaps().keySet()) {
System.out.println(key + "=" + personService.getMaps().get(key));
}
ctx.close();
}
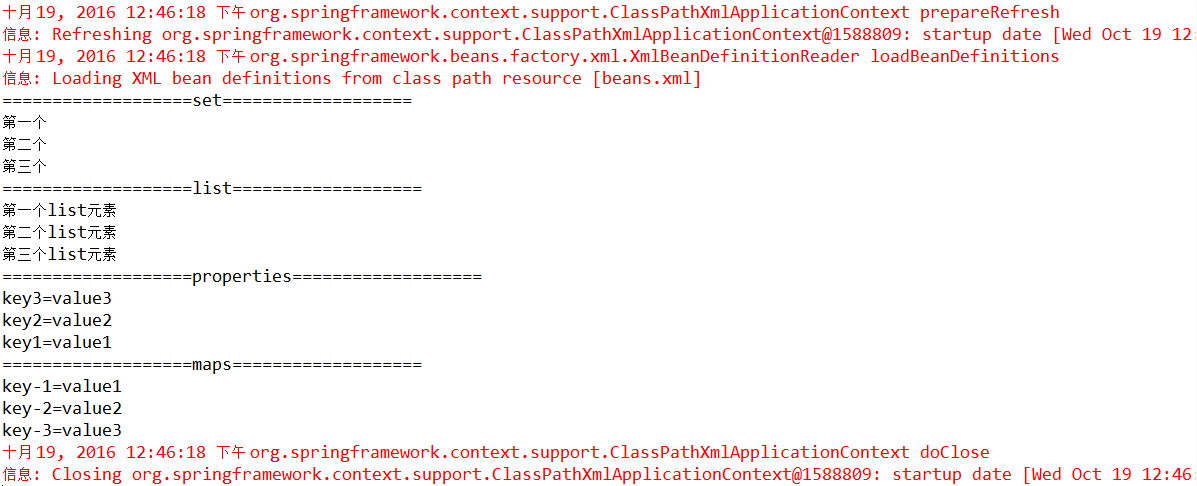
}测试instanceSpring()方法,会发现Eclipse的控制台打印:
如要查看源码,可点击Spring如何装配各种集合类型的属性进行下载。
使用构造器装配属性
前面我们就已讲过spring的依赖注入有两种方式:使用构造器注入。
使用属性setter方法注入。
我们已经详解过使用属性setter方法注入这种方式,接下来自然就到了使用构造器注入属性了。
首先将PersonService接口的代码改为:
public interface PersonService {

void save();

}
接着将PersonServiceBean实现类的代码修改为:
public class PersonServiceBean implements PersonService {
private PersonDao personDao;
private String name;

public PersonServiceBean(PersonDao personDao, String name) {
this.personDao = personDao;
this.name = name;
}

@Override
public void save() {
System.out.println(name);
personDao.add();
}
}
然后将Spring的配置文件修改为:
<?xml version="1.0" encoding="UTF-8"?>
<beans xmlns="http://www.springframework.org/schema/beans"
xmlns:xsi="http://www.w3.org/2001/XMLSchema-instance"
xsi:schemaLocation="http://www.springframework.org/schema/beans http://www.springframework.org/schema/beans/spring-beans.xsd">
<bean id="personDao" class="cn.itcast.dao.impl.PersonDaoBean" />
<bean id="personService" class="cn.itcast.service.impl.PersonServiceBean">
<constructor-arg index="0" type="cn.itcast.dao.PersonDao" ref="personDao" />
<constructor-arg index="1" value="李阿昀" />
<!--
<property name="sets">
<set>
<value>第一个</value>
<value>第二个</value>
<value>第三个</value>
</set>
</property>
<property name="lists">
<list>
<value>第一个list元素</value>
<value>第二个list元素</value>
<value>第三个list元素</value>
</list>
</property>
<property name="properties">
<props>
<prop key="key1">value1</prop>
<prop key="key2">value2</prop>
<prop key="key3">value3</prop>
</props>
</property>
<property name="maps">
<map>
<entry key="key-1" value="value-1"></entry>
<entry key="key-2" value="value-2"></entry>
<entry key="key-3" value="value-3"></entry>
</map>
</property>
-->
</bean>

</beans>
最后,将单元测试类——SpringTest.java的代码改为:
public class SpringTest {

@Test
public void instanceSpring() {
AbstractApplicationContext ctx = new ClassPathXmlApplicationContext("beans.xml");
PersonService personService = (PersonService) ctx.getBean("personService");
personService.save();
ctx.close();
}

}
测试instanceSpring()方法,可看到Eclipse控制台打印:

相关文章推荐
- ITCAST视频-Spring学习笔记(Spring如何装配各种集合类型的属性)
- Spring如何装配各种集合类型的属性
- (转)Spring如何装配各种集合类型的属性
- 09_传智播客Spring2.5视频教程_Spring如何装配各种集合类型的属性
- Spring学习笔记(7)----装配各种集合类型的属性
- Spring学习笔记(7)----装配各种集合类型的属性
- Spring学习笔记——Spring如何装配各种类型的属性以及实际应用
- Spring学习笔记04--spring如何装配集合类型的属性
- Spring2.5学习2.4_Spring如何装配各种集合类的属性
- [Spring学习笔记 2 ]装配各种类型的属性 map,list,array,null,properties
- Spring如何装配各种集合类属性
- spring如何装配各种集合范例
- [Spring学习笔记 2 ]装配各种类型的属性 map,list,array,null,properties
- spring装配基本属性和集合类型
- Spring装配各种集合类型的配置文件
- 如何使用反射确定一个属性是否实现了IList接口,如何确定元素量为空的集合的元素类型。
- Spring4-自动装配Beans-按属性的数据类型自动装配Bean
- spring如何注入Date类型的属性
- Spring装配各种类型bean
- Spring对集合类型的属性注入