iOS毛玻璃效果
2016-10-18 23:42
141 查看
App设计时往往会用到一些模糊效果或者毛玻璃效果,iOS目前已提供一些模糊API可以让我们方便是使用。
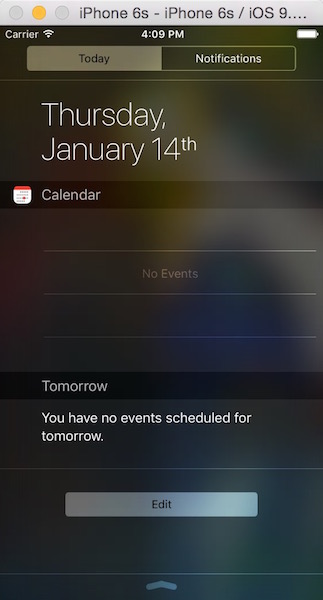
话说苹果在iOS7.0之后,很多系统界面都使用了毛玻璃效果,增加了界面的美观性,比如下图的通知中心界面;
但是其iOS7.0的SDK并没有提供给开发者实现毛玻璃效果的API,所以很多人都是通过一些别人封装的框架来实现,后面我也会讲到一个;
其实在iOS7.0(包括)之前还是有系统的类可以实现毛玻璃效果的, 就是 UIToolbar这个类,并且使用相当简单,几行代码就可以搞定.
下面是代码实现:
创建一个UIToolbar实例,设置它的frame或者也可以通过添加约束
然后UIToolbar有一个属性:barStyle,设置对应的枚举值来呈现毛玻璃的样式,最后再添加到需要进行毛玻璃效果的view上即可.
效果图:

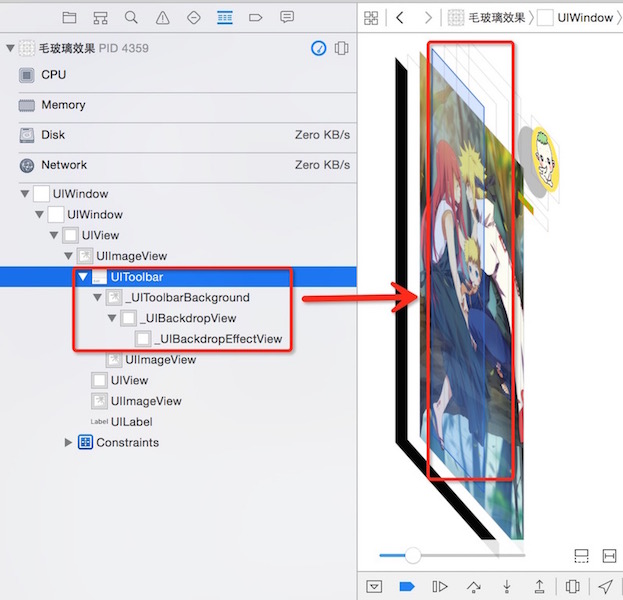
我们再来看看视图结构:
通过视图结构可以看到UIToolbar包含了三个子视图
一个背景图片和1个背景view,还有1个背景特效view,正是这几个视图结合在一起实现了毛玻璃的效果
在iOS8.0之后,苹果新增了一个类UIVisualEffectView,通过这个类来实现毛玻璃效果与上面的UIToolbar一样,而且效率也非常之高,使用也是非常简单,几行代码搞定. UIVisualEffectView是一个抽象类,不能直接使用,需通过它下面的三个子类来实现(UIBlurEffect, UIVisualEffevt, UIVisualEffectView);
子类UIBlurEffect只有一个类方法,用来快速创建一个毛玻璃效果,参数是一个枚举,用来设置毛玻璃的样式,而UIVisualEffectView则多了两个属性和两个构造方法,用来快速将创建的毛玻璃添加到这个UIVisualEffectView上.
特别注意: 这个类是iOS8.0之后才适用, 所以如果项目要兼容iOS7.0的话, 还是要考虑其它的两种方法了.
下面来看看实现代码:
同样是先快速的实例化UIBlurEffect并设置毛玻璃的样式,然后再通过UIVisualEffectView的构造方法将UIBlurEffect的实例添加上去最后设置frame或者是通过添加约束, 将effectView添加到要实现了毛玻璃的效果的view控件上,效果图和上面的一样.
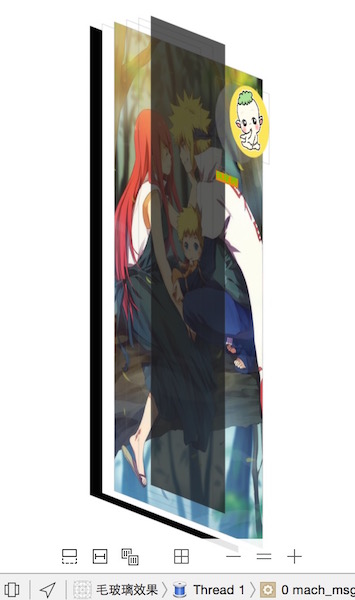
但是我们来看看视图结构,大家会发现和Toolbar不一样哦!
其实是因为UIVisualEffectView这个类,构造方法帮我们创建了一个view,而这个view我们给它做了毛玻璃处理,再将其覆盖到了背景图之上
嗯! 最后再来给大家介绍一个国外大神封装的UIImageView的分类,里面不管是怎么实现的,反正使用非常简单,只要一句代码就搞定.
下面先看代码:
效果图:

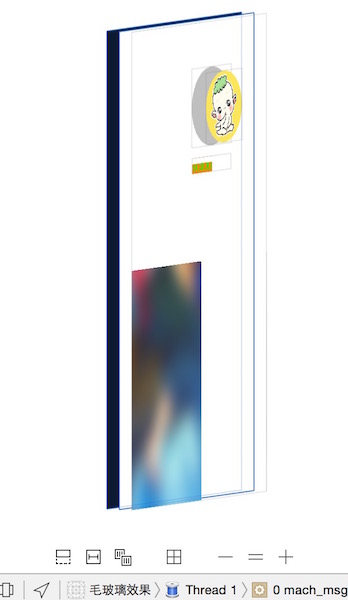
再来看看添加毛玻璃效果后的视图结构:
哈哈哈, 大家应该看懂了, 这是直接对背景图片进行了高斯模糊处理了,其它就不解释了.
好啦, 反正iOS中要进行毛玻璃效果处理就这几种方式,看大家的需求,喜欢用哪种就用哪种吧.
上面的demo,包括大神封装的分类,如果需要详细的源代码的话,可以到我的gitHub上Clone啦!有问题欢迎留言一起探讨学习.
下面给大家介绍图片模糊效果的三种方法
第一种使用Core Image进行模糊
第二种使用vImage API进行模糊
第三种方法是网上找到的(毛玻璃效果)
话说苹果在iOS7.0之后,很多系统界面都使用了毛玻璃效果,增加了界面的美观性,比如下图的通知中心界面;
但是其iOS7.0的SDK并没有提供给开发者实现毛玻璃效果的API,所以很多人都是通过一些别人封装的框架来实现,后面我也会讲到一个;
其实在iOS7.0(包括)之前还是有系统的类可以实现毛玻璃效果的, 就是 UIToolbar这个类,并且使用相当简单,几行代码就可以搞定.
下面是代码实现:
创建一个UIToolbar实例,设置它的frame或者也可以通过添加约束
然后UIToolbar有一个属性:barStyle,设置对应的枚举值来呈现毛玻璃的样式,最后再添加到需要进行毛玻璃效果的view上即可.
/*
毛玻璃的样式(枚举)
UIBarStyleDefault = ,
UIBarStyleBlack = ,
UIBarStyleBlackOpaque = , // Deprecated. Use UIBarStyleBlack
UIBarStyleBlackTranslucent = , // Deprecated. Use UIBarStyleBlack and set the translucent property to YES
*/
UIImageView *bgImgView = [[UIImageView alloc] initWithFrame:self.view.bounds];
bgImgView.image = [UIImage imageNamed:@"huoying.jpg"];
[self.view addSubview:bgImgView];
UIToolbar *toolbar = [[UIToolbar alloc] initWithFrame:CGRectMake(, , bgImgView.frame.size.width*., bgImgView.frame.size.height)];
toolbar.barStyle = UIBarStyleBlackTranslucent;
[bgImgView addSubview:toolbar];
效果图:
我们再来看看视图结构:
通过视图结构可以看到UIToolbar包含了三个子视图
一个背景图片和1个背景view,还有1个背景特效view,正是这几个视图结合在一起实现了毛玻璃的效果
在iOS8.0之后,苹果新增了一个类UIVisualEffectView,通过这个类来实现毛玻璃效果与上面的UIToolbar一样,而且效率也非常之高,使用也是非常简单,几行代码搞定. UIVisualEffectView是一个抽象类,不能直接使用,需通过它下面的三个子类来实现(UIBlurEffect, UIVisualEffevt, UIVisualEffectView);
子类UIBlurEffect只有一个类方法,用来快速创建一个毛玻璃效果,参数是一个枚举,用来设置毛玻璃的样式,而UIVisualEffectView则多了两个属性和两个构造方法,用来快速将创建的毛玻璃添加到这个UIVisualEffectView上.
特别注意: 这个类是iOS8.0之后才适用, 所以如果项目要兼容iOS7.0的话, 还是要考虑其它的两种方法了.
下面来看看实现代码:
同样是先快速的实例化UIBlurEffect并设置毛玻璃的样式,然后再通过UIVisualEffectView的构造方法将UIBlurEffect的实例添加上去最后设置frame或者是通过添加约束, 将effectView添加到要实现了毛玻璃的效果的view控件上,效果图和上面的一样.
UIImageView *bgImgView = [[UIImageView alloc] initWithFrame:self.view.bounds];
bgImgView.image = [UIImage imageNamed:@"huoying.jpg"];
bgImgView.contentMode = UIViewContentModeScaleAspectFill;
//[bgImgView setImageToBlur: [UIImage imageNamed:@"huoying.jpg"] blurRadius: completionBlock:nil];
bgImgView.userInteractionEnabled = YES;
[self.view addSubview:bgImgView];
/*
毛玻璃的样式(枚举)
UIBlurEffectStyleExtraLight,
UIBlurEffectStyleLight,
UIBlurEffectStyleDark
*/
UIBlurEffect *effect = [UIBlurEffect effectWithStyle:UIBlurEffectStyleDark];
UIVisualEffectView *effectView = [[UIVisualEffectView alloc] initWithEffect:effect];
effectView.frame = CGRectMake(, , bgImgView.frame.size.width*., bgImgView.frame.size.height);
[bgImgView addSubview:effectView];
但是我们来看看视图结构,大家会发现和Toolbar不一样哦!
其实是因为UIVisualEffectView这个类,构造方法帮我们创建了一个view,而这个view我们给它做了毛玻璃处理,再将其覆盖到了背景图之上
嗯! 最后再来给大家介绍一个国外大神封装的UIImageView的分类,里面不管是怎么实现的,反正使用非常简单,只要一句代码就搞定.
下面先看代码:
UIImageView *bgImgView = [[UIImageView alloc] initWithFrame:self.view.bounds];
//bgImgView.image = [UIImage imageNamed:@"huoying.jpg"];
bgImgView.contentMode = UIViewContentModeScaleAspectFill;
// 对背景图片进行毛玻璃效果处理 参数blurRadius默认是,可指定,最后一个参数block回调可以为nil
[bgImgView setImageToBlur: [UIImage imageNamed:@"huoying.jpg"] blurRadius: completionBlock:nil];
bgImgView.userInteractionEnabled = YES;
[self.view addSubview:bgImgView];
效果图:
再来看看添加毛玻璃效果后的视图结构:
哈哈哈, 大家应该看懂了, 这是直接对背景图片进行了高斯模糊处理了,其它就不解释了.
好啦, 反正iOS中要进行毛玻璃效果处理就这几种方式,看大家的需求,喜欢用哪种就用哪种吧.
上面的demo,包括大神封装的分类,如果需要详细的源代码的话,可以到我的gitHub上Clone啦!有问题欢迎留言一起探讨学习.
下面给大家介绍图片模糊效果的三种方法
第一种使用Core Image进行模糊
- (UIImage *)blurryImage:(UIImage *)image
withBlurLevel:(CGFloat)blur {
CIImage *inputImage = [CIImage imageWithCGImage:image.CGImage];
CIFilter *filter = [CIFilter filterWithName:@"CIGaussianBlur"
keysAndValues:kCIInputImageKey, inputImage,
@"inputRadius", @(blur),
]; CIImage *outputImage = filter.outputImage;
CGImageRef outImage = [self.context createCGImage:outputImage
fromRect:[outputImage extent]];
return [UIImage imageWithCGImage:outImage]; }
第二种使用vImage API进行模糊
- (UIImage *)blurryImage:(UIImage *)image withBlurLevel:(CGFloat)blur {
if (blur < 0.f || blur > 1.f) {
blur = 0.5f;
}
int boxSize = (int)(blur * 100);
boxSize = boxSize - (boxSize % 2) + 1;
CGImageRef img = image.CGImage;
vImage_Buffer inBuffer, outBuffer;
vImage_Error error;
void *pixelBuffer;
CGDataProviderRef inProvider = CGImageGetDataProvider(img);
CFDataRef inBitmapData = http://www.open-open.com/code/view/CGDataProviderCopyData(inProvider); inBuffer.width = CGImageGetWidth(img);
inBuffer.height = CGImageGetHeight(img);
inBuffer.rowBytes = CGImageGetBytesPerRow(img);
inBuffer.data = (void*)CFDataGetBytePtr(inBitmapData);
pixelBuffer = malloc(CGImageGetBytesPerRow(img) *
CGImageGetHeight(img));
if(pixelBuffer == NULL)
NSLog(@"No pixelbuffer");
outBuffer.data = pixelBuffer;
outBuffer.width = CGImageGetWidth(img);
outBuffer.height = CGImageGetHeight(img);
outBuffer.rowBytes = CGImageGetBytesPerRow(img);
error = vImageBoxConvolve_ARGB8888(&inBuffer,
&outBuffer,
NULL,
0,
0,
boxSize,
boxSize,
NULL,
kvImageEdgeExtend);
if (error) {
NSLog(@"error from convolution %ld", error);
}
CGColorSpaceRef colorSpace = CGColorSpaceCreateDeviceRGB();
CGContextRef ctx = CGBitmapContextCreate(
outBuffer.data,
outBuffer.width,
outBuffer.height,
8,
outBuffer.rowBytes,
colorSpace,
kCGImageAlphaNoneSkipLast);
CGImageRef imageRef = CGBitmapContextCreateImage (ctx);
UIImage *returnImage = [UIImage imageWithCGImage:imageRef];
//clean up
CGContextRelease(ctx);
CGColorSpaceRelease(colorSpace);
free(pixelBuffer);
CFRelease(inBitmapData);
CGColorSpaceRelease(colorSpace);
CGImageRelease(imageRef);
return returnImage; }
第三种方法是网上找到的(毛玻璃效果)
// 内部方法,核心代码,封装了毛玻璃效果 参数:半径,颜色,色彩饱和度- (UIImage *)imageBluredWithRadius:(CGFloat)blurRadius tintColor:(UIColor *)tintColor saturationDeltaFactor:(CGFloat)saturationDeltaFactor maskImage:(UIImage *)maskImage {
CGRect imageRect = { CGPointZero, self.size };
UIImage *effectImage = self; BOOL hasBlur = blurRadius > __FLT_EPSILON__;
BOOL hasSaturationChange = fabs(saturationDeltaFactor - 1.) > __FLT_EPSILON__; if (hasBlur || hasSaturationChange) { UIGraphicsBeginImageContextWithOptions(self.size, NO, [[UIScreen mainScreen] scale]);
CGContextRef effectInContext = UIGraphicsGetCurrentContext();
CGContextScaleCTM(effectInContext, 1.0, -1.0);
CGContextTranslateCTM(effectInContext, 0, -self.size.height);
CGContextDrawImage(effectInContext, imageRect, self.CGImage);
vImage_Buffer effectInBuffer; effectInBuffer.data = http://www.open-open.com/code/view/CGBitmapContextGetData(effectInContext); effectInBuffer.width = CGBitmapContextGetWidth(effectInContext);
effectInBuffer.height = CGBitmapContextGetHeight(effectInContext);
effectInBuffer.rowBytes = CGBitmapContextGetBytesPerRow(effectInContext);
UIGraphicsBeginImageContextWithOptions(self.size, NO, [[UIScreen mainScreen] scale]);
CGContextRef effectOutContext = UIGraphicsGetCurrentContext();
vImage_Buffer effectOutBuffer;
effectOutBuffer.data = CGBitmapContextGetData(effectOutContext);
effectOutBuffer.width = CGBitmapContextGetWidth(effectOutContext);
effectOutBuffer.height = CGBitmapContextGetHeight(effectOutContext);
effectOutBuffer.rowBytes = CGBitmapContextGetBytesPerRow(effectOutContext); if (hasBlur) { CGFloat inputRadius = blurRadius * [[UIScreen mainScreen] scale];
NSUInteger radius = floor(inputRadius * 3. * sqrt(2 * M_PI) / 4 + 0.5);
if (radius % 2 != 1) {
radius += 1; // force radius to be odd so that the three box-blur methodology works.
}
vImageBoxConvolve_ARGB8888(&effectInBuffer, &effectOutBuffer, NULL, 0, 0, (short)radius, (short)radius, 0, kvImageEdgeExtend); vImageBoxConvolve_ARGB8888(&effectOutBuffer, &effectInBuffer, NULL, 0, 0, (short)radius, (short)radius, 0, kvImageEdgeExtend); vImageBoxConvolve_ARGB8888(&effectInBuffer, &effectOutBuffer, NULL, 0, 0, (short)radius, (short)radius, 0, kvImageEdgeExtend);
}
BOOL effectImageBuffersAreSwapped = NO;
if (hasSaturationChange) {
CGFloat s = saturationDeltaFactor;
CGFloat floatingPointSaturationMatrix[] = {
0.0722 + 0.9278 * s, 0.0722 - 0.0722 * s, 0.0722 - 0.0722 * s,
0,
0.7152 - 0.7152 * s, 0.7152 + 0.2848 * s, 0.7152 - 0.7152 * s,
0,
0.2126 - 0.2126 * s, 0.2126 - 0.2126 * s, 0.2126 + 0.7873 * s,
0,
0,
0,
0,
1,
};
const int32_t divisor = 256;
NSUInteger matrixSize = sizeof(floatingPointSaturationMatrix)/sizeof(floatingPointSaturationMatrix[0]); int16_t saturationMatrix[matrixSize]; for (NSUInteger i = 0; i < matrixSize; ++i) {
saturationMatrix[i] = (int16_t)roundf(floatingPointSaturationMatrix[i] * divisor);
}
if (hasBlur) {
vImageMatrixMultiply_ARGB8888(&effectOutBuffer, &effectInBuffer, saturationMatrix, divisor, NULL, NULL, kvImageNoFlags);
effectImageBuffersAreSwapped = YES;
}
else {
vImageMatrixMultiply_ARGB8888(&effectInBuffer, &effectOutBuffer, saturationMatrix, divisor, NULL, NULL, kvImageNoFlags);
}
}
if (!effectImageBuffersAreSwapped)
effectImage = UIGraphicsGetImageFromCurrentImageContext();
UIGraphicsEndImageContext();
if (effectImageBuffersAreSwapped)
effectImage = UIGraphicsGetImageFromCurrentImageContext();
UIGraphicsEndImageContext();
}
// 开启上下文 用于输出图像
UIGraphicsBeginImageContextWithOptions(self.size, NO, [[UIScreen mainScreen] scale]);
CGContextRef outputContext = UIGraphicsGetCurrentContext();
CGContextScaleCTM(outputContext, 1.0, -1.0);
CGContextTranslateCTM(outputContext, 0, -self.size.height);
// 开始画底图 CGContextDrawImage(outputContext, imageRect, self.CGImage);
// 开始画模糊效果
if (hasBlur)
{
CGContextSaveGState(outputContext);
if (maskImage)
{
CGContextClipToMask(outputContext, imageRect, maskImage.CGImage);
} CGContextDrawImage(outputContext, imageRect, effectImage.CGImage);
CGContextRestoreGState(outputContext);
}
// 添加颜色渲染
if (tintColor)
{
CGContextSaveGState(outputContext);
CGContextSetFillColorWithColor(outputContext, tintColor.CGColor);
CGContextFillRect(outputContext, imageRect);
CGContextRestoreGState(outputContext);
}
// 输出成品,并关闭上下文
UIImage *outputImage = UIGraphicsGetImageFromCurrentImageContext();
UIGraphicsEndImageContext();
return outputImage;}

相关文章推荐
- 模仿iOS 7图片毛玻璃效果
- IOS毛玻璃效果
- ios毛玻璃效果
- iOS毛玻璃效果
- 去除iOS 6程序图标的玻璃质感效果
- IOS-应用图标去玻璃质感效果
- 源码推荐(8.26):毛玻璃效果,学习iOS开发技巧及第三方包的DEMO汇总
- ios-day16-01(ios应用的Deployment Info设置、如何去除AppIcon的玻璃质感效果)
- iOS毛玻璃效果
- iOS 8 毛玻璃效果(模糊)
- 实现毛玻璃效果 - iOS开发
- iOS毛玻璃效果(不需要任何第三方的东东)
- iOS 8.0 毛玻璃效果利用UIVisualEffectView快速实现
- 【深入浅出IOS开发】彩票-去除图标的玻璃质感效果
- IOS的app图标去掉玻璃效果
- iOS 图片毛玻璃效果
- iOS 8 模糊视图(毛玻璃效果)的简单实现UIVisualEffectView
- ios毛玻璃效果
- iOS 图片处理模糊_毛玻璃效果(董鑫)
- iOS_8_API:UIVisualEffectView (毛玻璃效果)