Spring in Action : MVC 配置(JAVA方式)
2016-09-28 07:17
423 查看
Spring 4 学习笔记7:MVC 配置(JAVA方式)
标签:springspring mvc
2016-09-28 07:17
2996人阅读 评论(0)收藏举报
分类:
Spring(7)
作者同类文章X
版权声明:本文为博主原创文章,未经博主允许不得转载。
目录(?)[+]
请求生命周期
配置 Spring MVC
DispatcherServlet VS ContextLoaderListener
自定义 DispatcherServlet 配置
配置额外的 servlets 和 filters
开启 Spring MVC 支持
静态文件处理
默认 Servlet 处理
Spring ResourceHandler
Spring 控制器
传递 Modal 数据给视图
获取请求输入
查询参数Query parameters
路径变量Path variables
表单参数
表单验证
理解视图解析
异常处理
异常映射 HTTP 状态码
使用 exception-handling 方法
Advising controllers
面向资源的控制器
使用 HTTP message converters
自定义 Message converters
ResponseBody 返回资源
RequestBody 接收 client 的资源
错误状态返回
《Spring in Action》4th Edition 学习笔记
Spring MVC 能处理从 请求 - 处理 - 返回 的所有流程,来看看它是如何工作的。
请求生命周期
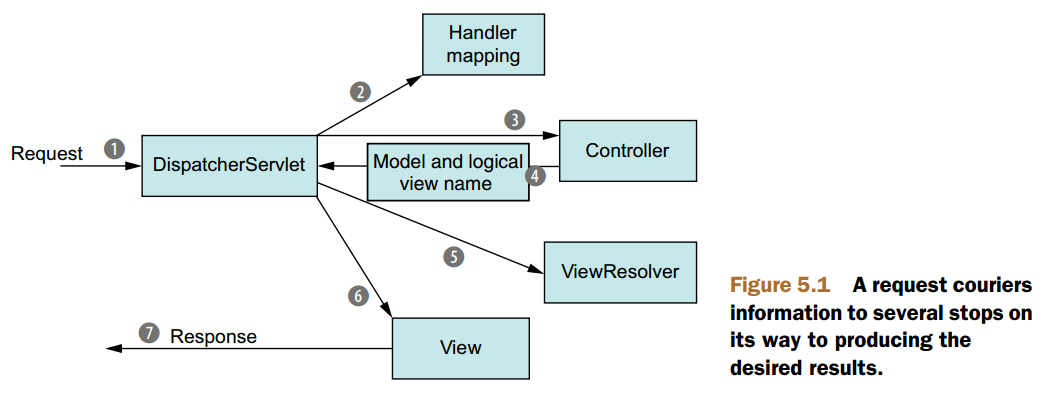
front controller也就是
DispatcherServlet接受到请求
DispatcherServlet根据请求url映射到对应的 controller
DispatcherServlet发送请求到对应的 controller
controller 处理请求,把需要返回的数据放入 model 中,然后指定 view name,把包含这些数据的 request 发送回
DispatcherServlet
DispatcherServlet生成一个 view resolver 处理逻辑视图名称
request 到达 view implementation
现在,view implementation 将使用 request 传入的 modal data 去渲染视图(request 的工作完成了),然后将视图写入 response object,返回给 client 端
配置 Spring MVC
使用 Servlet 3 规范,可以使用java来配置 servlet,而不仅仅是 xml 文件。这里主要介绍如何使用
java配置 web 应用和 spring MVC。
package spittr.config;

import org.springframework.web.servlet.support.AbstractAnnotationConfigDispatcherServletInitializer;

import spittr.web.WebConfig;

public class SpitterWebInitializer extends AbstractAnnotationConfigDispatcherServletInitializer {

@Override
protected Class<?>[] getRootConfigClasses() {
return new Class<?>[] { RootConfig.class };
}

@Override
protected Class<?>[] getServletConfigClasses() {
return new Class<?>[] { WebConfig.class };
}

@Override
protected String[] getServletMappings() {
return new String[] { "/" };
}

}12
3
4
5
6
7
8
9
10
11
12
13
14
15
16
17
18
19
20
21
22
23
24

Servlet 3.0 规范和 Spring DispatcherServlet 配置
在 Servlet 3.0 的环境中,容器会在 classpath 中寻找继承了
javax.servlet.ServletContainerInitializer接口的类,用它来配置 servlet 容器。
Spring 提供了一个继承这个接口的类
SpringServletContainerInitializer,在这个类中,它会寻找任何继承了
WebApplicationInitializer接口的类并用其来配置 servlet 容器。Spring 3.2 提供了一个继承了
WebApplicationInitializer接口的基类
AbstractAnnotationConfigDispatcherServletInitializer。所以,你的 servlet 配置类只需要继承
AbstractAnnotation-ConfigDispatcherServletInitializer,就会被发现而用于 servlet 容器的配置。
DispatcherServlet
VSContextLoaderListener
在 Spring MVC 中存在两种应用上下文:DispatcherServlet创建的和拦截器
ContextLoaderListener创建的上下文:
DispatcherServlet:加载包含 web 组件的 bean,比如 controllers,view resolvers 和 hanlder mappings。
ContextLoaderListener:加载其他 bean,通常是一些中间层和数据层的组件(比如数据库配置 bean 等)。
在
AbstractAnnotationConfigDispatcherServletInitializer中
DispatcherServlet和
ContextLoaderListener都会被创建,而基类中的方法就可用来创建不同的应用上下文:
getServletConfigClasses():定义
DispatcherServlet应用上下文中的 beans
getRootConfigClasses():定义拦截器
ContextLoaderListener应用上下文中的 beans
Note:为了使用
AbstractAnnotationConfigDispatcherServletInitializer必须保证 web 服务器支持 Servlet 3.0 标准(如 tomcat 7 或更高版本) 。
自定义 DispatcherServlet 配置
因为我们使用AbstractAnnotationConfigDispatcherServletInitializer来配置
DispatcherServlet,所以可以通过
customizeRegistration()方法来自定义
DispatcherServlet。原文如下:
One such method is
customizeRegistration(). After
AbstractAnnotationConfigDispatcherServletInitializerregisters
DispatcherServletwith the servlet
container, it calls the
customizeRegistration()method, passing in the
ServletRegistration.Dynamicthat resulted from the servlet registration. By overriding
customizeRegistration(), you can apply additional configuration to DispatcherServlet.
通过
ServletRegistration.Dynamic参数配置
DispatcherServlet的 load-on-startup 优先级
setLoadOnStartup(int loadOnStartup),设置初始化参数
setInitParameters()等。具体查看文档ServletRegistration.Dynamic。
配置额外的 servlets 和 filters
使用 java 配置 servlet 的一个好处(不同于 web.xml)就是:可以定义任意数量的初始化类。所以,如果需要定义额外的 servlets 或 filters,只需要创建额外的初始化类。在 Spring MVC 中可以通过继承WebApplicationInitializer
接口来实现。
接下来,我们定义一个新的 servlet:
package com.myapp.config;

import javax.servlet.ServletContext;
import javax.servlet.ServletException;
import javax.servlet.ServletRegistration.Dynamic;
import org.springframework.web.WebApplicationInitializer;
import com.myapp.MyServlet;

public class MyServletInitializer implements WebApplicationInitializer {

@Override
public void onStartup(ServletContext throws ServletException {
Dynamic myServlet = servletContext.addServlet("myServlet", MyServlet.class);
myServlet.addMapping("/custom/**");
}

}12
3
4
5
6
7
8
9
10
11
12
13
14
15
16
17
当然,你也可以用来定义 filters 和 listeners:
@Override1
public void onStartup(ServletContext servletContext)
throws ServletException {
// 定义filterjavax.servlet.FilterRegistration.Dynamic filter =
servletContext.addFilter("myFilter", MyFilter.class);//注意:我转发的原文中作者是通过这种方式添加Filter的,但是servletContext根本没有addFilter这个方法
filter.addMappingForUrlPatterns(null, false, "/custom/*");//要添加Filter请参考我的博文《用java Config代替xml 搭建SpringMVC项目》 第二个代码块
}
2
3
4
5
6
7
8
9
如果你需要为
DispatcherServlet添加 filter 的话,就不用这么麻烦了,你只要重写
AbstractAnnotationConfigDispatcherServletInitializer类的
getServletFilters()方法就行了:
@Override
protected Filter[] getServletFilters() {
return new Filter[] { new MyFilter() };
}
不需要 mapping,因为会自动 mapping 到
DispatcherServlet上,通过返回多个 filter,可以添加多个 filter。
开启 Spring MVC 支持
Spring 使用如下方法开启 MVC 的支持:@EnableWebMvc注解(JavaConfig):和
@Configuration注解一起使用
<mvc:annotation-driven />元素(XML 配置)
开启 MVC 支持,它会从
WebMvcConfigurationSupport导入 Spring MVC 的配置,会在处理请求时加入注解的支持(比如
@RequestMapping,
@ExceptionHandler等注解)。
如果需要自定义配置,从
@EnableWebMvc的文档上来看,需要继承
@WebMvcConfigurer接口或者继承基类
WebMvcConfigurerAdapter(它继承了
@WebMvcConfigurer接口,但是用空方法实现)。所以,覆盖相应的方法就能实现 mvc 配置的自定义。
那么,我们需要在 web mvc 配置中做哪些事情呢:
开启 ComponentScan
View Resolver(视图解析)
静态文件处理
View Resolver 将在后面介绍,这里先讨论如何处理静态文件(html, css, js)
静态文件处理
Spring 可以有两种方式处理静态文件:转发到默认的 web 服务器的 servlet 处理(比如 tomcat 来处理)
使用 Spring ResourceHandler 处理
使用这两种办法都需要继承
WebMvcConfigurerAdapter基类,覆盖其中相应的方法实现。
默认 Servlet 处理
@Override
public void configureDefaultServletHandling(DefaultServletHandlerConfigurer configurer) {
configurer.enable();
}12
3
4
如此配置后,如果 Sping 遇到没有 mapping 的 url 地址,就会转发到默认的 Servlet 处理(如 tomcat)。这其中就包括静态文件(前提是你没有为静态文件设置 RequestMapping)。
Spring ResourceHandler
使用 Spring ResourceHandler 可以使用 Spring 来处理静态文件:@Override
public void addResourceHandlers(ResourceHandlerRegistry registry) {
registry
.addResourceHandler("/resources/**")
.addResourceLocations("/resources/", "classpath:/resources/");
}12
3
4
5
6
我们为 url 地址符合
/resource/**的文件设置了指定的文件路径,spring 会按照配置的先后顺序在指定的路径中查找文件是否存在并返回。
Spring 4.1 提供了新的静态资源的特性
ResourceResolvers和
ResourceTransformers,具体用法请参考Spring Framework 4.1 - handling
static web resources。
如下为完整的
WebConfig配置:
package spittr.web;

import org.springframework.context.annotation.Bean;
import org.springframework.context.annotation.ComponentScan;
import org.springframework.context.annotation.Configuration;
import org.springframework.web.servlet.ViewResolver;
import org.springframework.web.servlet.config.annotation.DefaultServletHandlerConfigurer;
import org.springframework.web.servlet.config.annotation.EnableWebMvc;
import org.springframework.web.servlet.config.annotation.ResourceHandlerRegistry;
import org.springframework.web.servlet.config.annotation.WebMvcConfigurerAdapter;
import org.springframework.web.servlet.view.InternalResourceViewResolver;

@Configuration
@EnableWebMvc
@ComponentScan("spittr.web")
public class WebConfig extends WebMvcConfigurerAdapter {

@Bean
public ViewResolver viewResolver() {
InternalResourceViewResolver resolver = new InternalResourceViewResolver();
resolver.setPrefix("/WEB-INF/views/");
resolver.setSuffix(".jsp");
return resolver;
}

@Override
public void configureDefaultServletHandling(DefaultServletHandlerConfigurer configurer) {
// 开启默认转发
configurer.enable();
}

}12
3
4
5
6
7
8
9
10
11
12
13
14
15
16
17
18
19
20
21
22
23
24
25
26
27
28
29
30
31
32
RootConfig配置:
package spittr.config;

import java.util.regex.Pattern;

import org.springframework.context.annotation.ComponentScan;
import org.springframework.context.annotation.ComponentScan.Filter;
import org.springframework.context.annotation.Configuration;

174a4
import org.springframework.context.annotation.FilterType;
import org.springframework.context.annotation.Import;
import org.springframework.core.type.filter.RegexPatternTypeFilter;

import spittr.config.RootConfig.WebPackage;

@Configuration
@ComponentScan(basePackages={"spittr"},
excludeFilters={
@Filter(type=FilterType.ANNOTATION, value=EnableWebMvc.class)
})
public class RootConfig {
}12
3
4
5
6
7
8
9
10
11
12
13
14
15
16
17
18
19
20
配置很简单,因为还没有配置数据库等,所以只是开启了 ComponentScan,通过注解排除了
WebConfig文件。
Spring 控制器
在 Spring MVC 中,控制器就是一个类,其中有很多被@RequestMapping注解的方法,标明它处理的请求类型。
package spittr.web;

import static org.springframework.web.bind.annotation.RequestMethod.*;

import org.springframework.stereotype.Controller;
import org.springframework.ui.Model;
import org.springframework.web.bind.annotation.RequestMapping;

@Controller
public class HomeController {

@RequestMapping(value = "/", method = GET)
public String home(Model model) {
return "home";
}

}12
3
4
5
6
7
8
9
10
11
12
13
14
15
16
17
@Controller注解基于
@Component注解,标明这是一个控制器,但是完全可以使用
@Component注解,只是
@Controller更明确。
@RequestMapping的 value 值表示这个控制器处理的请求路径,而
methos属性标明它能够处理的 HTTP 方法是
GET方法。
在
home方法中,参数
model可用于给 ViewResolver 传递数据。
Model也可用
Map代替。
home方法返回的是一个字符串
home,标明用于处理该视图的视图名称为
home。可能是 jsp,也可能是 velocity 模板,取决于你使用的视图。前面我们说过,Spring MVC 最后都会有一个视图解析的过程,它始终需要解析到一个视图上,然后返回 html 页面给 client。所以,视图解析就可能给这个
home视图名称加上前缀和后缀,然后找到他的位置,然后处理数据(也就是控制器传入的
Model),然后把处理过后得到的页面返回给 client。
如果使用前面配置的
InternalResourceViewResolver,那么
home视图就会被解析到 /WEB-INF/views/home.jsp。然后在 jsp 中就可以访问
Model中的数据。如果返回的不是字符串指定视图名,那么 Spring 会使用方法名称作为视图名称。
不过,你也可以把
@RequestMapping注解加在类上,它会应用在所有的方法的
@RequestMapping之上。
package spittr.web;1
import static org.springframework.web.bind.annotation.RequestMethod.*;
import org.springframework.stereotype.Controller;
import org.springframework.ui.Model;
import org.springframework.web.bind.annotation.RequestMapping;
@Controller@RequestMapping("/home")
public class HomeController {
// 这会处理 /home/page 的GET请求@RequestMapping(value="/page", method = GET)
public String home(Model model) {
return "home";
}
}
2
3
4
5
6
7
8
9
10
11
12
13
14
15
16
17
18
19
传递 Modal 数据给视图
通过给参数Model添加属性,可以给视图传递 key-value 组合的数据。所以容器既可以是
Model类型,也可以是
Map类型。
@RequestMapping(method=RequestMethod.GET)
public String spittles(Model model) {
model.addAttribute("spittleList",
spittleRepository.findSpittles(Long.MAX_VALUE, 20));
return "spittles";
}12
3
4
5
6
获取请求输入
Spring MVC 提供三种方式来获取 client 传输的数据:查询参数(Query parameters)
表单参数(Form parameters)
路径变量(Path variables)
查询参数(Query parameters)
Spring MVC 中可以通过@RequestParam注解获取请求中的参数,还可以通过
defaultValue属性设置默认值(只能使用
String类型)。
@RequestMapping(method=RequestMethod.GET)
public List<Spittle> spittles(
@RequestParam(value="max", defaultValue=MAX_LONG_AS_STRING) long max,
@RequestParam(value="count", defaultValue="20") int count) {
return spittleRepository.findSpittles(max, count);
}12
3
4
5
6
路径变量(Path variables)
如果需要通过 ID 查询一个资源,我们可以把 ID 放在请求参数的位置上(/spittles/show?spittle_id=12345),也可以放在路径变量的位置上(/spittles/12345)。对于一个资源来说,后一种方式要更好,前一种方式表明一个动作带有请求参数,后一种就代表我是请求一个 ID 为 12345 的资源,更明确也更简单。为了写一个面向资源的控制器,需要使用
{ 和 }把路径变量括起来,这样 Spring 才能解析。然后,使用
@PathVariable注解将路径变量的值赋值给一个变量,以便在控制器中使用。
@RequestMapping(value="/{spittleId}", method=RequestMethod.GET)
public String spittle(
@PathVariable("spittleId") long spittleId,
Model model) {
model.addAttribute(spittleRepository.findOne(spittleId));
return "spittle";
}12
3
4
5
6
7
在本例中,使用了
spittleId作为 url 上的占位符,然后赋值给
spittleId。如果省略
@PathVariable注解的
value属性,那么必须保证占位符和变量名称匹配,这样才能正确解析。
表单参数
如果请求参数包含一个 bean(比如整个表单的提交),那么可以使用 Spring 自动将请求参数组合成一个 Bean。@RequestMapping(method=RequestMethod.POST)
public String saveSpittle(SpittleForm form, Model model) throws Exception {
spittleRepository.save(new Spittle(null, form.getMessage(), new Date(),
form.getLongitude(), form.getLatitude()));
return "redirect:/spittles";
}12
3
4
5
6
在
saveSpittle方法的参数上,有个
SpittleForm类型的参数。Spring 会用请求参数中和
SpittleForm中成员变量相同名称的参数的值来填充
from变量。
本例中,返回了一个
redirect:作为前缀的字符串,当
InternalResourceViewResolver看到这个前缀是,将会执行
redirect动作,而不是渲染视图。当然,如果要执行
forward只需要把前缀修改为
forward:就行了。
表单验证
Spring 支持 Java Validation API(又叫做 JSR-303),从 Spring 3.0 开始,Spring MVC 就支持 Java Validation API。不需要任何额外的配置,需要保证项目 classpath 有 Java Validation API 的实现(比如 Hibernate Validator)就行了。Java Validation API 定义了一些注解,可用来限制 JavaBean 中属性的值,只需要将需要的注解放在属性上就行了。这些注解所在的包为
javax.validation.constraints,如下列出常用的:
| 注解 | 描述 |
|---|---|
@AssertFalse | 必须为 Boolean 类型且为 false |
@AssertTure | 必须为 Boolean 类型且为 true |
@DecimalMax | 数值必须小于或等于一个给定的 BigDecimalString值 |
@DecimalMin | 必须为数字且小于或等于一个给定的 BigDecimalString的值 |
@Digits | 必须为数字,且值必须为给定的数值 |
@Future | 值必须为一个未来的日期 |
@Max | 必须为数字,且值小于或等于给定的值 |
@Min | 必须为数字,且值大于或等于给定的值 |
@NotNull | 不能为 null |
@Null | 必须为 null |
@Past | 值必须为一个过去的日期 |
@Pattern | 值必须满足给定的正则表达式 |
@Size | 必须为 String,集合或数组的一种,且长度需满足给定的范围 |
@Valid注解。
package spittr.web;

import javax.validation.constraints.Max;
import javax.validation.constraints.Min;
import javax.validation.constraints.NotNull;
import javax.validation.constraints.Size;

public class SpittleForm {

@NotNull
@Size(min=1, max=140)
private String message;

@Min(-180)
@Max(180)
private Double longitude;

@Min(-90)
@Max(90)
private Double latitude;

public String getMessage() {
return message;
}

public void setMessage(String message) {
this.message = message;
}

public Double getLongitude() {
return longitude;
}

public void setLongitude(Double longitude) {
this.longitude = longitude;
}

public Double getLatitude() {
return latitude;
}

public void setLatitude(Double latitude) {
this.latitude = latitude;
}
}12
3
4
5
6
7
8
9
10
11
12
13
14
15
16
17
18
19
20
21
22
23
24
25
26
27
28
29
30
31
32
33
34
35
36
37
38
39
40
41
42
43
44
45
46
控制器上在方法参数的 bean 上使用
@Valid注解,Spring MVC 就会根据 bean 属性上的注解去验证 bean:
@RequestMapping(value="/register", method=POST)
public String processRegistration(@Valid Spitter spitter, Errors errors) {
if (errors.hasErrors()) {
return "registerForm";
}
spitterRepository.save(spitter);
return "redirect:/spitter/" + spitter.getUsername();
}12
3
4
5
6
7
8
其中,方法参数中的
Errors标明验证的结果(注意:
Errors必须紧跟在
@Valid注解的需验证的 bean 后面)。
理解视图解析
在前面的例子中,我们看到控制器返回的都是一个逻辑视图的名称,然后把这个逻辑视图名称交给view resolver,然后返回渲染后的 html 页面给 client。把请求处理逻辑和视图渲染解耦是 Spring MVC 重要的特性之一。通过在控制器和视图之间传递
model数据,可以使代码分离,逻辑清晰,更利于维护等优点。
Spring MVC 定义了一个
ViewResolver的接口:
public interface ViewResolver {
View resolveViewName(String viewName, Locale locale) throws Exception;
}12
3

ViewResolver方法,当提供一个
viewName和
locale以后,返回一个
View实体。
View是另外一个接口:
public interface View {
String getContentType();
void render(Map<String, ?> model, HttpServletRequest request,
HttpServletResponse response) throws Exception;
}12
3
4
5
View接口的作用就是利用 model 数据,还有 request 和 response 对象渲染视图内容,然后返回给 response。
当然你在实际使用的过程中不会接触到这些内部的接口,因为 Spring 提供了很多视图技术的支持:
FreeMarkerViewResolver,
InternalResourceViewResolver,
VelocityViewResolver等。具体使用时请参考具体的视图使用教程。
异常处理
在应用中抛出异常,最后还是需要写入到 response 中,Spring 提供如下方式将异常转化为 response:特定的 Spring 异常自动映射为 HTTP 状态码
异常可映射为 HTTP 状态码通过在异常上使用
@ResponseStatus注解
一个方法可用来处理异常通过在其上使用
@ExceptionHandler注解
异常映射 HTTP 状态码
通过@ResponseStatus注解将异常和 HTTP 状态码对应:
package spittr.web;

import org.springframework.http.HttpStatus;
import org.springframework.web.bind.annotation.ResponseStatus;

@ResponseStatus(value=HttpStatus.NOT_FOUND,
reason="Spittle Not Found")
public class SpittleNotFoundException extends RuntimeException {
}12
3
4
5
6
7
8
9
现在只需要在控制器中抛出异常,就会被映射为指定的 HTTP 状态码:
@RequestMapping(value="/{spittleId}", method=RequestMethod.GET)
public String spittle(@PathVariable("spittleId") long spittleId,
Model model) {
Spittle spittle = spittleRepository.findOne(spittleId);
if (spittle == null) {
throw new SpittleNotFoundException();
}
model.addAttribute(spittle);
return "spittle";
}12
3
4
5
6
7
8
9
10
使用 exception-handling 方法
映射异常到 HTTP 状态码的方式简单、高效,但是如果需要返回更多的信息就不行了(比如返回一个 view 视图)。所以,Spring 提供了@ExceptionHandler注解,可像处理请求那样处理异常。
@RequestMapping(method=RequestMethod.POST)
public String saveSpittle(SpittleForm form, Model model) {
try {
spittleRepository.save(new Spittle(null, form.getMessage(), new Date(),
form.getLongitude(), form.getLatitude()));
return "redirect:/spittles";
} catch (DuplicateSpittleException e) {
return "error/duplicate";
}
}12
3
4
5
6
7
8
9
10
如上,我们在控制器中既包含了业务处理代码,也包含了异常处理代码。使用
@ExceptionHandler就可以让你专注于业务逻辑代码,而在另外的方法中专门处理异常。
@ExceptionHandler(DuplicateSpittleException.class)
public String handleDuplicateSpittle() {
return "error/duplicate";
}12
3
4
注意,异常处理的方法必须放在会抛出该异常的控制器类中才行,也就是说只能捕获当前控制器类抛出的指定的异常。该异常处理返回了一个逻辑视图的名称,Spring 会根据这个名称返回相应的 html 页面。通过
@ExceptionHandler注解,我们可以定义一个方法处理所有该控制器中任意 handler 抛出的
DuplicateSpittleException异常,简化了代码。
// 新的业务逻辑 handler@RequestMapping(method=RequestMethod.POST)1
public String saveSpittle(SpittleForm form, Model model) {
spittleRepository.save(
new Spittle(null, form.getMessage(), new Date(),
form.getLongitude(), form.getLatitude()));
return "redirect:/spittles";
}
2
3
4
5
6
7
8
但是,需要为每个控制器都定义一个
@ExceptionHandler方法是不是有点重复。所以,一般情况下会把 exception-handler 方法放在 BaseController,或者使用
@ControllerAdvice。
Advising controllers
为了使某些方法(如 exception-handler 方法)在全部的控制器中都能够发挥作用,Spring 3.2 引入了 controller advice。Controller advice 是一个被@ControllerAdvice注解的类,它包含一个或多个如下类型的方法:
被
@ExceptionHandler注解的方法
被
@InitBinder注解的方法
被
@ModelAttribute注解的方法
在被
@ControllerAdvice注解的类中的这些方法能够应用到所有被
@RequestMapping注解的方法。
因为,
@ControllerAdvice本身被
@Component注解,所以能够被 component-scan 扫描被注入,就像
@Controller注解一样。
如下,就是使用
@ControllerAdvice为所有的控制器定义
@ExceptionHandler异常处理方法。
package spitter.web;
import org.springframework.web.bind.annotation.ControllerAdvice;
import org.springframework.web.bind.annotation.ExceptionHandler;

@ControllerAdvice
public class AppWideExceptionHandler {

@ExceptionHandler(DuplicateSpittleException.class)
public String duplicateSpittleHandler() {
return "error/duplicate";
}

}12
3
4
5
6
7
8
9
10
11
12
13
现在,然后被
@RequestMapping注解的控制器方法如果抛出
DuplicateSpittleException异常,都可以被该方法捕获到,从而进行处理。
面向资源的控制器
因为 Javascript 在客户端的大量使用,现在服务器端很多时候需要传回 XML 或 JSON 格式的数据,那么 Spring MVC 如何返回不同类型的数据,而不是返回 html 页面呢?Content negotiation:一种把 model 数据渲染成客户端需要的格式的视图
Message conversion:能够把控制器返回的对象转换为 client 需要的格式的转换器,没有了视图渲染的环节
因为,Content negotiation 只能转换 model 数据,而 model 本质上来说是 map 类型的数据格式。所以,转换后的数据可能并不是理想的 client 需要的格式。出于这个原因,我们倾向于使用 Message conversion。
使用 HTTP message converters
Spring MVC 自带多种 message converters:Jaxb2RootElementHttpMessageConverter,
MappingJacksonHttpMessageConverter,
MappingJackson2HttpMessageConverter,
ResourceHttpMessageConverter, 其他的 converters 请参考官方文档
HTTP Message Conversion。
那么如何使用这些 converters:
向 client 发送数据:根据 request’s
Acceptheader 确定
从 client 接收数据:根据
Content-Typeheader 确定
很多 converter 都是默认注册的,所以你不需要格外的配置,但是可能需要添加额外的依赖到项目的 classpath 中以便使用这些 converters。比如,如果需要使用
MappingJacksonHttpMessageConverter在 JSON messages 和 Java 对象之间相互转换,你需要添加 Jackson JSON Processor 依赖到 classpath 中。自定义 Jackson converter 参考Latest
Jackson integration improvements in Spring。
自定义 Message converters
除了使用 Spring MVC 默认提供的 message converters 外,我们还可以自定义 converter。比如自定义MappingJackson2HttpMessageConverter,让其可以处理其他的 media types。
@Configuration1
@EnableWebMvc@ComponentScan("org.acherie.demo.web")
public class WebConfig extends WebMvcConfigurerAdapter {
...
@Override
public void configureMessageConverters(List<HttpMessageConverter<?>> converters) {
converters.add(jacksonConverter());
}
@Bean
public MappingJackson2HttpMessageConverter jacksonConverter() {
List<MediaType> mediaTypes = new ArrayList<>();
mediaTypes.add(MediaType.APPLICATION_XML);
MappingJackson2HttpMessageConverter converter =
new MappingJackson2HttpMessageConverter();
converter.setSupportedMediaTypes(mediaTypes);
return converter;
}
}
2
3
4
5
6
7
8
9
10
11
12
13
14
15
16
17
18
19
20
21
22
23
@ResponseBody
返回资源
如果你需要返回 JSON 或 XML 到 client,你需要告诉 Spring 略过通常的 model/view 流程,并且使用 message converter。而这个东西就是@ResponseBody注解:
@RequestMapping(method=RequestMethod.GET, produces="application/json")
public @ResponseBody List<Spittle> spittles(
@RequestParam(value="max", defaultValue=MAX_LONG_AS_STRING) long max,
@RequestParam(value="count", defaultValue="20") int count) {
return spittleRepository.findSpittles(max, count);
}12
3
4
5
6
@ResponseBody告诉 Spring 你想将控制器返回的 Java object 转换(使用 converter)为资源返回 client。更近一步,
DispatcherServlet会通过请求的
Acceptheader 确定 client 想要的格式(比如 JSON),然后寻找合适的 message converter 去做转换。
@RequestBody
接收 client 的资源
使用 @RequestBody告诉 Spring 根据
Content-Typeheader 确定合适的 message converter 转换资源(比如 JSON,XML)为 Java Objects。
@RequestMapping(method=RequestMethod.POST, consumes="application/json")
@ResponseStatus(HttpStatus.CREATED)
public ResponseEntity<Spittle> saveSpittle(@RequestBody Spittle spittle, UriComponentsBuilder ucb) {
Spittle saved = spittleRepository.save(spittle);

HttpHeaders headers = new HttpHeaders();
URI locationUri = ucb.path("/spittles/")
.path(String.valueOf(saved.getId()))
.build()
.toUri();
headers.setLocation(locationUri);

ResponseEntity<Spittle> responseEntity = new ResponseEntity<Spittle>(saved, headers, HttpStatus.CREATED);
return responseEntity;
}12
3
4
5
6
7
8
9
10
11
12
13
14
15
错误状态返回
当控制器出现错误时,我们可能需要返回不同的 HTTP 状态码。在 Spring MVC 中有如下两种方式可以选择:ResponseEntity
@ResponseStatus
使用
ResponseEntity可以不用使用
@ResponseBody,Spring MVC 知道会使用 message converter 去转换。
我们首先定义
Errorclass:
public class Error {
private int code;
private String message;

public Error(int code, String message) {
this.code = code;
this.message = message;
}
public int getCode() {
return code;
}
public String getMessage() {
return message;
}
}12
3
4
5
6
7
8
9
10
11
12
13
14
15
然后使用
ResponseEntity返回对于信息:
@RequestMapping(value="/{id}", method=RequestMethod.GET)
public ResponseEntity<?> spittleById(@PathVariable long id) {
Spittle spittle = spittleRepository.findOne(id);
if (spittle == null) {
Error error = new Error(4, "Spittle [" + id + "] not found");
return new ResponseEntity<Error>(error, HttpStatus.NOT_FOUND);
}
return new ResponseEntity<Spittle>(spittle, HttpStatus.OK);
}12
3
4
5
6
7
8
9
而如果要使用
@ResponseStatus的话,我们需要使用把错误处理 的代码提出来放在其他地方,因为一个方法只能有一个
@ResponseStatus注解。我们使用
@ExceptionHandler注解来统一处理控制器中抛出的异常,
@ExceptionHandler需使用在控制器方法上:
@ExceptionHandler(SpittleNotFoundException.class)
public ResponseEntity<Error> spittleNotFound(SpittleNotFoundException e) {
long spittleId = e.getSpittleId();
Error error = new Error(4, "Spittle [" + spittleId + "] not found");
return new ResponseEntity<Error>(error, HttpStatus.NOT_FOUND);
}12
3
4
5
6
// SpittleNotFoundException类
public class SpittleNotFoundException extends RuntimeException {
private long spittleId;

public SpittleNotFoundException(long spittleId) {
this.spittleId = spittleId;
}
public long getSpittleId() {
return spittleId;
}
}12
3
4
5
6
7
8
9
10
11
这样所有控制器抛出的
SpittleNotFoundException异常都会被该处理器处理,看到我们还是使用的
ResponseEntity返回的 404 状态码。现在原来的控制器就变得简单了:
@RequestMapping(value="/{id}", method=RequestMethod.GET)
public ResponseEntity<Spittle> spittleById(@PathVariable long id) {
Spittle spittle = spittleRepository.findOne(id);
if (spittle == null) { throw new SpittleNotFoundException(id); }
return new ResponseEntity<Spittle>(spittle, HttpStatus.OK);
}12
3
4
5
6
接下来,我们使用
@ResponseStatus注解:
@RequestMapping(value="/{id}", method=RequestMethod.GET)
@ResponseStatus(HttpStatus.OK)
public @ResponseBody Spittle spittleById(@PathVariable long id) {
Spittle spittle = spittleRepository.findOne(id);
if (spittle == null) { throw new SpittleNotFoundException(id); }
return spittle;
}12
3
4
5
6
7
其中,因为控制器默认会返回 200(OK),所以这里的
@ResponseStatus注解是可以省略的。
我们也可以对异常处理方法做同样的简化:
@ExceptionHandler(SpittleNotFoundException.class)
@ResponseStatus(HttpStatus.NOT_FOUND)
public @ResponseBody Error spittleNotFound(SpittleNotFoundException e) {
long spittleId = e.getSpittleId();
return new Error(4, "Spittle [" + spittleId + "] not found");
}12
3
4
5
6
这样就能够返回 404(NOT_FOUND)状态码,而不需要使用
@ResponseEntity了。
顶 0 踩 1
上一篇Spring 4 学习笔记6:依赖注入(配置)
下一篇Spring Mybatis Maven 项目搭建(Java配置)
相关文章推荐
•
Spring -- 三种配置方式
•
携程机票大数据基础平台架构演进-- 许鹏
•
Spring4 javaConfig配置方式并集成JUnit
•
Python可以这样学--董付国
•
2、Spring4之Bean的两种配置方式
•
一步一步学Spring Boot
•
如何使用纯java config来配置spring mvc
•
深入浅出C++程序设计
•
搭建SpringMVC (Java配置)
•
Android Material Design 新控件
•
【Spring】Spring MVC原理及配置详解
•
机器学习需要用到的数学知识
•
Spring 4 MVC hello world 教程-完全基于XML(带项目源码)【超赞】
•
搭建Spring4+Spring MVC web工程的最佳实践
•
xml零配置之WebMvcConfigurationSupport
•
springmvc基于java config的实现

相关文章推荐
- Spring in Action : MVC 配置(JAVA方式)
- Spring in Action : MVC 配置(JAVA方式)
- Spring in Action : MVC 配置(JAVA方式)
- SPRING IN ACTION 第4版笔记-第七章Advanced Spring MVC-002- 在xml中引用Java配置文件,声明DispatcherServlet、ContextLoaderListener
- java 基于springboot使用ssh(spring + springmvc + hibernate)分库配置多数据源方式
- 【Spring in action】SpringMVC基于xml及java配置的简单运用
- SPRING IN ACTION 第4版笔记-第二章WIRING BEANS-008-在XML配置文件中引入JAVA配置文件 <import> 、<bean>
- SPRING IN ACTION 第4版笔记-第二章WIRING BEANS-008-在Java配置文件中引入xml配置文件@Import、@ImportResource
- 【Spring in action】基于Java配置SpringMVC中使用Spring及SpringMVC各种请求详解
- SPRING IN ACTION 第4版笔记-第七章Advanced Spring MVC-003- 上传文件multipart,配置StandardServletMultipartResolver、CommonsMultipartResolver
- java注解方式(不用xml)配置web框架spring+SpringMVC
- Spring 4 学习笔记7:MVC 配置(JAVA方式)
- SPRING IN ACTION 第4版笔记-第八章Advanced Spring MVC-001- 配置SpringFlow(flow-executor、flow-registry、FlowHandlerMapping、FlowHandlerAdapter)
- SPRING IN ACTION 第4版笔记-第七章Advanced Spring MVC-001- DispatcherServlet的高级配置(ServletRegistration.Dynamic、WebApplicationInitializer)
- 用java 配置方式 搭建springmvc + spring data jpg + mysql
- Spring 3.0.5 MVC 基于注解ehcache.xml 配置方式
- Java Spring AOP的两种配置方式
- .嵌入式jetty启动spring(java配置方式),junit测试用.标准spring 配置(java config) 嵌入式jetty9启动
- Java Spring AOP的两种配置方式
- java框架篇---spring aop两种配置方式