Hibernate中JPA的简单使用,实现简单的对表的增删改查操作
2016-09-26 08:52
776 查看
Hibernate中可以通过.hbm.xml配置来完成表的创建,啰嗦麻烦。但是之后出现JPA注解。使用JPA注解,开发人员可以不用编写.hbm.xml文件,只需在持久化类中加JPA注解。相关的JPA注解如下:
1、@Entity //标识这个pojo是一个jpa实体
2、@Table(name = "users") //设置表名,指定表名为users
3、@Id //设置主键
4、@Column //设置字段,与表中字段duiying
.unique:是否唯一 || .nullable:是否可以为空 || .inserttable:是否可以插入 || .updateable:是否可以更新 || .columnDefinition: 定义建表时创建此列的DDL
例:@Column(name = "user_code", nullable = false, length=32)//设置属性userCode对应的字段为user_code,长度为32,非空
5、@GeneratedValue(strategy=GenerationType.IDENTITY) //主键自增
6、@OrderBy //字段排序
以上就是常见的JPA注解,下面使用一个基本的程序来实际介绍一下JPA注解
第一步、建立一个Java项目,名为Hibernate_one
第二步、导入jar包,加载jar包,在src下创建了lib文件夹,用来存放jar包(jar包必须一个都不能少)。如图
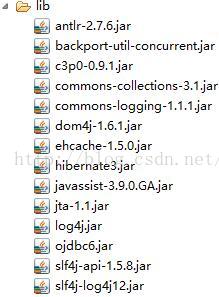
我连接的数据库是Oracle,所以得加载Oracle的驱动包ojdbc6,如果用mysql数据库,可从网上下载mysql的驱动包。并将包buildpath
第三步、配置hibernate(作用是连接数据库,必不可少!!!)
在src目录下建立xml文件,命名为:hibernate.cfg.xml
配置内容如下:
以上就是Hibernate配置的详细,不同数据库配置语句不同,自己搜索即可
第四步、创建持久化类,并实现set/get方法及toString。使用JPA注解,则在持久类中编写
创建一个包,名为com.aisino.hibernate.JPA,下面创建持久化类Class_01
第五步、编写Hibernate的工具类,如下代码
第七步、写一个类ClassTest,进行单元测试,创建表以及实现增删改查
以上增删改查操作,利用单元测试永兴,并在数据库中查看。
本篇博客介绍的是JPA注解,上一篇博客介绍的是利用.hbm.xml配置文件实习基本的增删改查。初学者可以查看,但建议使用JPA注解
1、@Entity //标识这个pojo是一个jpa实体
2、@Table(name = "users") //设置表名,指定表名为users
3、@Id //设置主键
4、@Column //设置字段,与表中字段duiying
.unique:是否唯一 || .nullable:是否可以为空 || .inserttable:是否可以插入 || .updateable:是否可以更新 || .columnDefinition: 定义建表时创建此列的DDL
例:@Column(name = "user_code", nullable = false, length=32)//设置属性userCode对应的字段为user_code,长度为32,非空
5、@GeneratedValue(strategy=GenerationType.IDENTITY) //主键自增
6、@OrderBy //字段排序
以上就是常见的JPA注解,下面使用一个基本的程序来实际介绍一下JPA注解
第一步、建立一个Java项目,名为Hibernate_one
第二步、导入jar包,加载jar包,在src下创建了lib文件夹,用来存放jar包(jar包必须一个都不能少)。如图
我连接的数据库是Oracle,所以得加载Oracle的驱动包ojdbc6,如果用mysql数据库,可从网上下载mysql的驱动包。并将包buildpath
第三步、配置hibernate(作用是连接数据库,必不可少!!!)
在src目录下建立xml文件,命名为:hibernate.cfg.xml
配置内容如下:
<!--
~ Hibernate, Relational Persistence for Idiomatic Java
~
~ License: GNU Lesser General Public License (LGPL), version 2.1 or later.
~ See the lgpl.txt file in the root directory or <http://www.gnu.org/licenses/lgpl-2.1.html>.
-->
<!DOCTYPE hibernate-configuration PUBLIC
"-//Hibernate/Hibernate Configuration DTD 3.0//EN"
"http://www.hibernate.org/dtd/hibernate-configuration-3.0.dtd">

<hibernate-configuration>
<session-factory>
<property name="connection.driver_class">oracle.jdbc.driver.OracleDriver</property>
<!-- 数据库连接地址 --><pre name="code" class="html"><span style="white-space:pre">      </span><!-- 数据库不同,连接地址不同,可从网上百度 --            >
<property name="connection.url">jdbc:oracle:thin:@localhost:1521:xe</property>
[html] view plain copy
<span style="white-space:pre">        </span><!-- 数据库的用户名及密码 -->
<property name="connection.username">scott</property><property name="connection.password">scott</property><!-- 方言 --><property name="dialect">org.hibernate.dialect.Oracle9Dialect</property>
[html] view plain copy
<span style="white-space:pre">        </span><!-- 是否显示sql语句,默认为sql -->
<property name="show_sql">true</property><!-- 格式化语句,避免出现乱码 --><property name="format_sql">true</property><!--
[html] view plain copy
<span style="white-space:pre">        </span>validate 加载hibernate时,验证数据库的结构  默认值
update  加载hibernate时,检查数据库,如果表不存在,则创建,如果存在,则更新
create  每次加载hiberante,都会创建表
create-drop  每次加载hiberante,创建,卸载hiberante时,销毁
-->
<property name="hbm2ddl.auto">update</property>
<!--看你的.hbm文件放在哪里,如果用的JPA注解,则该项存放的是持久类的路径 -->
<mapping resource="com.aisino.hibernate.JPA.Class_01"/>

</session-factory>
</hibernate-configuration>
以上就是Hibernate配置的详细,不同数据库配置语句不同,自己搜索即可
第四步、创建持久化类,并实现set/get方法及toString。使用JPA注解,则在持久类中编写
创建一个包,名为com.aisino.hibernate.JPA,下面创建持久化类Class_01
package com.aisino.hibernate.JPA;

import javax.persistence.Column;
import javax.persistence.Entity;
import javax.persistence.GeneratedValue;
import javax.persistence.GenerationType;
import javax.persistence.Id;
import javax.persistence.Table;

//持久化类
//映射实体类
@Entity(name="Class0924")
@Table
public class Class_01 {

//注意查看JPA注解
//主键
@Id
@GeneratedValue(strategy=GenerationType.AUTO)//表示主键自增
private int classId;

@Column(name="className")
private String className;

@Column(name="classCount")
private String classCount;

//构造方法
public Class_01(){
}

public int getClassId() {
return classId;
}

public void setClassId(int classId) {
this.classId = classId;
}

public String getClassName() {
return className;
}

public void setClassName(String className) {
this.className = className;
}

public String getClassCount() {
return classCount;
}

public void setClassCount(String classCount) {
this.classCount = classCount;
}

@Override
public String toString() {
return "Class [classCount=" + classCount + ", classId=" + classId
+ ", className=" + className + "]";
}

}
第五步、编写Hibernate的工具类,如下代码
package com.aisino.hibernate.source;

import org.hibernate.HibernateException;
import org.hibernate.Session;
import org.hibernate.SessionFactory;
import org.hibernate.cfg.Configuration;

public class HibernateUtil {

public static final SessionFactory sessionFactory;
public static final ThreadLocal session = new ThreadLocal();

static{
try{
Configuration configuration=new Configuration().configure();
sessionFactory = configuration.buildSessionFactory();
}catch (Throwable ex){
System.err.println("Initial SessionFactory creation failed." + ex);
throw new ExceptionInInitializerError(ex);
}
}
public static Session currentSession() throws HibernateException{
Session s = (Session) session.get();
if (s == null)
{
s = sessionFactory.openSession();
session.set(s);
}
return s;
}

public static void closeSession() throws HibernateException {
Session s = (Session) session.get();
if (s != null)
s.close();
session.set(null);
}
}
第七步、写一个类ClassTest,进行单元测试,创建表以及实现增删改查
package com.aisino.hibernate.JPA;

import org.hibernate.Session;
import org.hibernate.SessionFactory;
import org.hibernate.Transaction;
import org.hibernate.cfg.Configuration;
import org.junit.Test;

//测试类
public class TestClass {

//建表
@Test
public void CreateTable(){
//配置Hibernate
Configuration cfg=new Configuration();
cfg.configure();

cfg.buildSessionFactory();
}

//添加数据
@Test
public void AddUser(){
//配置Hibernate
Configuration cfg=new Configuration();
cfg.configure();
//产生SessionFacorty
SessionFactory sessionFactory=cfg.buildSessionFactory();
//打开Session
Session session=sessionFactory.openSession();
//开启事物
Transaction transaction=session.beginTransaction();
//实例化持久化类
Class_01 cl=new Class_01();
//添加数据
cl.setClassId(3);
cl.setClassName("土木工程");
cl.setClassCount("5个班");
//执行添加操作
session.save(cl);

//事物提交
transaction.commit();
//关闭session
session.close();
}

//修改
@Test
public void Update(){
//Hibernate配置
Configuration cfg=new Configuration();
cfg.configure();
//产生SessionFactory
SessionFactory sessionFactory=cfg.buildSessionFactory();
//开启Session
Session session=sessionFactory.openSession();
//开启事物
Transaction transaction = session.beginTransaction();
//获取对象
Class_01 cl=(Class_01) session.get(Class_01.class, 21);
//修改数据
cl.setClassName("文学新闻传播");
cl.setClassCount("2个班");
//保存数据
session.save(cl);
//提交事物
transaction.commit();
//关闭事物
session.close();
}

//删除
@Test
public void Delete(){
//Hibernate配置
Configuration cfg=new Configuration();
cfg.configure();
//产生SessionFactory
SessionFactory sessionFactory=cfg.buildSessionFactory();
//开启s
989a
ession
Session session=sessionFactory.openSession();
//开启事物
Transaction transaction =session.beginTransaction();
//获取要删除的对象
Class_01 cl=(Class_01) session.get(Class_01.class, 22);
//删除
session.delete(cl);
//事物提交
transaction.commit();
//关闭session
session.close();
}

//查询信息(查询不需要开启事物)
@Test
public void Select(){
//配置Hebernate
Configuration cfg=new Configuration();
cfg.configure();
//产生SessionFactory
SessionFactory sessionFactory=cfg.buildSessionFactory();
//打开session
Session session=sessionFactory.openSession();
//获取对象
Class_01 cl=(Class_01) session.get(Class_01.class, 23);
//输出结果
System.out.println(cl.toString());
//关闭session
session.close();
}
}
以上增删改查操作,利用单元测试永兴,并在数据库中查看。
本篇博客介绍的是JPA注解,上一篇博客介绍的是利用.hbm.xml配置文件实习基本的增删改查。初学者可以查看,但建议使用JPA注解

相关文章推荐
- PHP程序中使用PDO对象实现对数据库的增删改查操作(PHP+smarty)
- 使用Hibernate实现简单的增、改、删、查操作
- 使用VS2015和Nhibernate实现与MySql数据库连接,实现增删改查操作
- 使用存储过程操作数据库(实现增删改查)
- Hibernate实现数据的增删改查(CRUD)操作
- C#2005中使用控件DataGridView实现对数据库增删改查操作
- struts2 spring4 hibernate4(s2sh)整合开发--简单实体的增删改查操作
- JAVAWEB开发之mybatis详解(一)——mybatis的入门(实现增删改查操作)、自定义别名、抽取代码块以及动态SQL的使用
- 使用VS2015和Nhibernate实现与MySql数据库连接,实现增删改查操作
- JAVAWEB开发之mybatis详解(一)——mybatis的入门(实现增删改查操作)、自定义别名、抽取代码块以及动态SQL的使用
- Android开发(10)使用SQLiteDatabase操作SQLite数据库实现增删改查(源码)
- Android开发(10)使用SQLiteDatabase操作SQLite数据库实现增删改查(源码)
- 使用MyBatis对表执行增删改查操作——基于注解的实现
- python3.6 使用 pymysql 连接 Mysql 数据库及 简单的增删改查操作
- PHP程序中使用PDO对象实现对数据库的增删改查操作的示例代码
- 在struts1中使用DispatchAction对应多个ActionForm,实现写一个Action实现增删改查操作---一个Action处理多个操作的能力
- mongodb的简单使用二(结合springdata实现增删改查)
- 使用Hibernate实现简单的数据库增删改查。
- 使用PHP连接数据库_实现用户数据的增删改查的整体操作示例
- MyBatis第二讲学习笔记 ,使用MyBatis对表执行增删改查操作——基于注解的实现