(学习笔记)Struts2.3.3 入门与配置(一)
2016-09-23 22:16
423 查看
第一步:下载struts2.3.3 http://supergsego.com/apache/struts/2.3.30/struts-2.3.30-all.zip
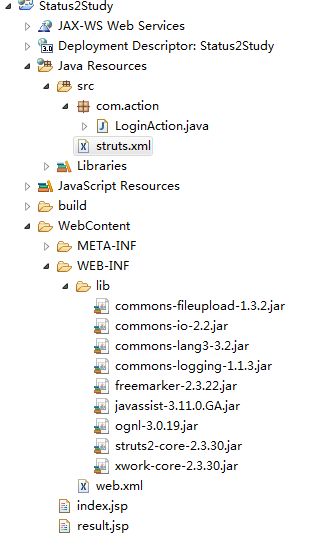
第二步:新建一个WEB项目,导入以下9个jar架包

第三步:修改web.xml文件,配置struts2过滤器
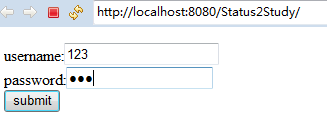
第四步:新建一个index.jsp页面,一个简单额表单提交页面
第五步:在src目录新建一个包com.action,然后在包中新建一个类LoginAction
package com.action;
/**
* index.jsp form表单处理
* **/
public class LoginAction
{
private String username;//必须和表单中的name属性一致
private String password;
public String getUsername() {
return username;
}
public void setUsername(String username) {
this.username = username;
}
public String getPassword() {
return password;
}
public void setPassword(String password) {
this.password = password;
}
//这个方法必须要,处理返回最终结果,和配置文件result name="success" 对应
public String execute()
{
return "success";
}
}
第六步:在src目录中新建一个struts.xml文件,配置请求,action name="Login" 为 index.jsp 中 action的访问地址,后面跟.action
<?xml version="1.0" encoding="UTF-8" ?>
<!DOCTYPE struts PUBLIC
"-//Apache Software Foundation//DTD Struts Configuration 2.3//EN"
"http://struts.apache.org/dtds/struts-2.3.dtd">
<struts>
<!-- name随便填 必须继承struts-default namespace命名空间,说白了就是文件夹 -->
<package name="struts2" extends="struts-default" namespace="/">
<!-- action 一次请求, name为请求路径,这里是指index.jsp中form action的路径 -->
<!-- class 为处理请求的具体实现类 -->
<action name="Login" class="com.action.LoginAction">
<!-- result 根据处理结果,转跳到相关页面 -->
<result name="success">/result.jsp</result>
</action>
</package>
</struts>
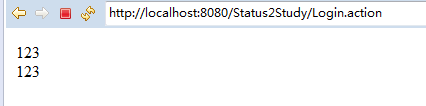
第七步:新建一个result.jsp文件,显示提交的内容
最终结果如下:
最后,部署到tomcat 运行
第二步:新建一个WEB项目,导入以下9个jar架包
第三步:修改web.xml文件,配置struts2过滤器
<?xml version="1.0" encoding="UTF-8"?>
<web-app xmlns:xsi="http://www.w3.org/2001/XMLSchema-instance" xmlns="http://java.sun.com/xml/ns/javaee" xsi:schemaLocation="http://java.sun.com/xml/ns/javaee http://java.sun.com/xml/ns/javaee/web-app_3_0.xsd" id="WebApp_ID" version="3.0">

<welcome-file-list>
<welcome-file>index.jsp</welcome-file>
</welcome-file-list>

<filter>
<filter-name>struts2</filter-name>
<filter-class>org.apache.struts2.dispatcher.ng.filter.StrutsPrepareAndExecuteFilter</filter-class>
</filter>

<filter-mapping>
<filter-name>struts2</filter-name>
<url-pattern>/*</url-pattern>
</filter-mapping>

</web-app>
第四步:新建一个index.jsp页面,一个简单额表单提交页面
<%@ page language="java" contentType="text/html; charset=ISO-8859-1"
pageEncoding="ISO-8859-1"%>
<!DOCTYPE html PUBLIC "-//W3C//DTD HTML 4.01 Transitional//EN" "http://www.w3.org/TR/html4/loose.dtd">
<html>
<head>
<meta http-equiv="Content-Type" content="text/html; charset=ISO-8859-1">
<title>struts2</title>
</head>
<body>
<form action="Login.action" method="post">
username:<input type="text" name="username" /><br>
password:<input type="password" name="password"/><br>
<input type="submit" value="submit">
</form>
</body>
</html>
第五步:在src目录新建一个包com.action,然后在包中新建一个类LoginAction
package com.action;
/**
* index.jsp form表单处理
* **/
public class LoginAction
{
private String username;//必须和表单中的name属性一致
private String password;
public String getUsername() {
return username;
}
public void setUsername(String username) {
this.username = username;
}
public String getPassword() {
return password;
}
public void setPassword(String password) {
this.password = password;
}
//这个方法必须要,处理返回最终结果,和配置文件result name="success" 对应
public String execute()
{
return "success";
}
}
第六步:在src目录中新建一个struts.xml文件,配置请求,action name="Login" 为 index.jsp 中 action的访问地址,后面跟.action
<?xml version="1.0" encoding="UTF-8" ?>
<!DOCTYPE struts PUBLIC
"-//Apache Software Foundation//DTD Struts Configuration 2.3//EN"
"http://struts.apache.org/dtds/struts-2.3.dtd">
<struts>
<!-- name随便填 必须继承struts-default namespace命名空间,说白了就是文件夹 -->
<package name="struts2" extends="struts-default" namespace="/">
<!-- action 一次请求, name为请求路径,这里是指index.jsp中form action的路径 -->
<!-- class 为处理请求的具体实现类 -->
<action name="Login" class="com.action.LoginAction">
<!-- result 根据处理结果,转跳到相关页面 -->
<result name="success">/result.jsp</result>
</action>
</package>
</struts>
第七步:新建一个result.jsp文件,显示提交的内容
<%@ page language="java" contentType="text/html; charset=ISO-8859-1"
pageEncoding="ISO-8859-1"%>
<!DOCTYPE html PUBLIC "-//W3C//DTD HTML 4.01 Transitional//EN" "http://www.w3.org/TR/html4/loose.dtd">
<html>
<head>
<meta http-equiv="Content-Type" content="text/html; charset=ISO-8859-1">
<title>result</title>
</head>
<body>
${requestScope.username}<br>
${requestScope.password}
</body>
</html>
最终结果如下:
最后,部署到tomcat 运行

相关文章推荐
- 尚学堂Struts学习笔记1:Struts标签的配置和使用
- Struts2学习笔记之与struts.xml配置和Action有关的属性
- struts2 学习笔记之 struts.xml 配置解析
- [原]java专业程序代写(qq:928900200),学习笔记之基础入门<数据库连接配置>(二十八)
- SSH学习笔记之关于struts-spring-hibernate整合配置问
- Net-Snmp配置与基本入门学习笔记
- Struts2学习笔记之与struts.xml配置和Action有关的属性
- Struts入门文章系列(链接)及学习笔记
- Hadoop学习笔记-入门伪分布式配置(Mac OS,0.21.0,Eclipse 3.6)
- 学习笔记---------------Hibernian3.3.2入门(配置和annotation两种方式)
- Struts 2 学习笔记 - 3.配置文件深入(1):struts.xml,bean,constant,package,namespace,include
- Node.js入门学习笔记-IDE选择/配置之WebStorm(windows)
- Struts2学习笔记之struts.xml配置常量和Action处理流程
- Struts2 学习笔记——struts.xml文件之Bean的配置
- struts 学习笔记之一 Struts配置
- Node.js入门学习笔记-IDE选择/配置之WebStorm(windows)
- Struts2.0入门的学习笔记
- java 从零开始,学习笔记之基础入门<数据库连接配置>(二十八)
- 学习笔记-轻量级Java EE:Struts 2配置
- 【学习笔记】Struts2之配置文件struts.xml