Spring MVC系列:(6)添加用户的小案例
2016-09-20 03:33
302 查看
1、添加数据库表
使用sqlplus打开数据库
2、添加jar包
项目需要的jar包有spring-core、spring-web、spring-webmvc、oracle数据库驱动、c3p0数据库连接池、dbutils。
3、配置
添加jar包之后,要进行配置:
(1)将springmvc加入到web项目中,需要配置web.xml、springmvc.xml文件
(2)使用c3p0,需要配置c3p0-config.xml文件
web.xml
4、工具类编写
SecurityUtils用来提供UUID,而JDBCUtils用来获取DataSource。
SecurityUtils.java
5、从entity到action
Employee.java
EmpDao.java
EmpService.java
EmpAction.java
6、对dao/service/action的配置
spring-emp.xml
7、JSP页面
WebRoot/jsp/index.jsp
WebRoot/jsp/success.jsp
演示
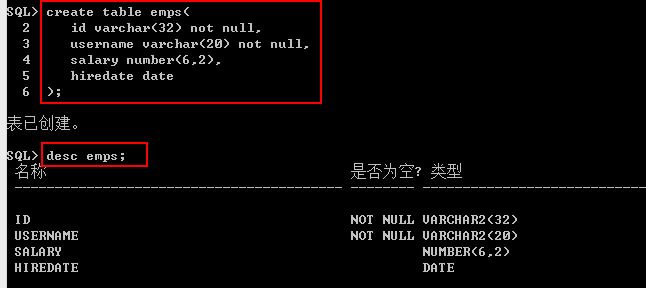
使用sqlplus打开数据库
sqlplus scott/tiger创建emps数据表
create table emps(
id varchar(32) not null,
username varchar(20) not null,
salary number(6,2),
hiredate date
);
2、添加jar包
项目需要的jar包有spring-core、spring-web、spring-webmvc、oracle数据库驱动、c3p0数据库连接池、dbutils。
| jar包分类 | 具体jar包 |
| spring-core | commons-logging-1.2.jar spring-beans-3.2.5.RELEASE.jar spring-context-3.2.5.RELEASE.jar spring-core-3.2.5.RELEASE.jar spring-expression-3.2.5.RELEASE.jar |
| spring-web | spring-web-3.2.5.RELEASE.jar |
| spring-webmvc | spring-webmvc-3.2.5.RELEASE.jar |
| oracle数据库驱动 | ojdbc5.jar 位于:OracleDB\product\11.2.0\dbhome_1\jdbc\lib\ojdbc5.jar |
| c3p0数据库连接池 | c3p0-0.9.1.2.jar |
| dbutils | commons-dbutils-1.6.jar |
添加jar包之后,要进行配置:
(1)将springmvc加入到web项目中,需要配置web.xml、springmvc.xml文件
(2)使用c3p0,需要配置c3p0-config.xml文件
web.xml
<?xml version="1.0" encoding="UTF-8"?>
<web-app xmlns:xsi="http://www.w3.org/2001/XMLSchema-instance" xmlns="http://java.sun.com/xml/ns/javaee" xsi:schemaLocation="http://java.sun.com/xml/ns/javaee http://java.sun.com/xml/ns/javaee/web-app_2_5.xsd" id="WebApp_ID" version="2.5">
<display-name>emp</display-name>
<welcome-file-list>
<welcome-file>index.jsp</welcome-file>
</welcome-file-list>
<!-- 注册springmvc框架核心控制器 -->
<servlet>
<servlet-name>springmvc</servlet-name>
<servlet-class>org.springframework.web.servlet.DispatcherServlet</servlet-class>
<init-param>
<param-name>contextConfigLocation</param-name>
<param-value>classpath:springmvc.xml</param-value>
</init-param>
</servlet>
<servlet-mapping>
<servlet-name>springmvc</servlet-name>
<url-pattern>*.action</url-pattern>
</servlet-mapping>

<!-- 编码过滤器 -->
<filter>
<filter-name>CharacterEncodingFilter</filter-name>
<filter-class>org.springframework.web.filter.CharacterEncodingFilter</filter-class>
<init-param>
<param-name>encoding</param-name>
<param-value>UTF-8</param-value>
</init-param>
</filter>
<filter-mapping>
<filter-name>CharacterEncodingFilter</filter-name>
<url-pattern>/*</url-pattern>
</filter-mapping>
</web-app>
springmvc.xml
<?xml version="1.0" encoding="UTF-8"?>
<beans xmlns="http://www.springframework.org/schema/beans"
xmlns:mvc="http://www.springframework.org/schema/mvc"
xmlns:xsi="http://www.w3.org/2001/XMLSchema-instance"
xsi:schemaLocation=" http://www.springframework.org/schema/beans http://www.springframework.org/schema/beans/spring-beans.xsd http://www.springframework.org/schema/mvc http://www.springframework.org/schema/mvc/spring-mvc.xsd">

<import resource="com/rk/config/spring-emp.xml"/>
</beans>
c3p0-config.xml
<c3p0-config>
<default-config>
<property name="jdbcUrl">jdbc:oracle:thin:@127.0.0.1:1521:orcl</property>
<property name="driverClass">oracle.jdbc.driver.OracleDriver</property>
<property name="user">scott</property>
<property name="password">tiger</property>
<property name="acquireIncrement">2</property>
<property name="initialPoolSize">5</property>
<property name="minPoolSize">1</property>
<property name="maxPoolSize">5</property>
<property name="maxIdleTime">1000</property>
</default-config>
</c3p0-config>
4、工具类编写
SecurityUtils用来提供UUID,而JDBCUtils用来获取DataSource。
SecurityUtils.java
package com.rk.utils;

import java.util.UUID;

public class SecurityUtils {
public static String getUUID()
{
return UUID.randomUUID().toString().replaceAll("-", "");
}
}JDBCUtils.javapackage com.rk.utils;
import com.mchange.v2.c3p0.ComboPooledDataSource;
public class JDBCUtils {
/**
* 去src目录下加载c3p0-config.xml配置文件
*/
private static ComboPooledDataSource dataSource = new ComboPooledDataSource();
/**
* 获取数据源
*/
public static ComboPooledDataSource getDataSource() {
return dataSource;
}
}5、从entity到action
Employee.java
package com.rk.entity;

import java.util.Date;

public class Employee {
private String id;
private String username;
private Double salary;
private Date hiredate;
public Employee(){}

public Employee(String id, String username, Double salary, Date hiredate) {
this.id = id;
this.username = username;
this.salary = salary;
this.hiredate = hiredate;
}

public String getId() {
return id;
}
public void setId(String id) {
this.id = id;
}
public String getUsername() {
return username;
}
public void setUsername(String username) {
this.username = username;
}
public Double getSalary() {
return salary;
}
public void setSalary(Double salary) {
this.salary = salary;
}
public Date getHiredate() {
return hiredate;
}
public void setHiredate(Date hiredate) {
this.hiredate = hiredate;
}

}
EmpDao.java
package com.rk.dao;

import java.sql.Timestamp;
import java.util.Date;

import org.apache.commons.dbutils.QueryRunner;
import org.junit.Test;

import com.rk.entity.Employee;
import com.rk.utils.JDBCUtils;
import com.rk.utils.SecurityUtils;

public class EmpDao {
public void add(Employee emp) throws Exception{
QueryRunner queryRunner = new QueryRunner(JDBCUtils.getDataSource());
String sql = "insert into emps(id,username,salary,hiredate) values(?,?,?,?)";
Object[] params = {SecurityUtils.getUUID(),emp.getUsername(),emp.getSalary(),new Timestamp(emp.getHiredate().getTime())};
queryRunner.update(sql,params);
}

@Test
public void run() throws Exception{
Employee emp = new Employee();
emp.setUsername("小明");
emp.setSalary(88.88);
emp.setHiredate(new Date());
add(emp);
}
}
EmpService.java
package com.rk.service;

import com.rk.dao.EmpDao;
import com.rk.entity.Employee;

public class EmpService {
private EmpDao empDao;
public void setEmpDao(EmpDao empDao) {
this.empDao = empDao;
}

public void register(Employee emp) throws Exception{
empDao.add(emp);
}
}
EmpAction.java
package com.rk.action;

import java.text.SimpleDateFormat;
import java.util.Date;

import javax.servlet.http.HttpServletRequest;
import javax.servlet.http.HttpServletResponse;

import org.springframework.beans.propertyeditors.CustomDateEditor;
import org.springframework.validation.BindException;
import org.springframework.web.bind.ServletRequestDataBinder;
import org.springframework.web.servlet.ModelAndView;
import org.springframework.web.servlet.mvc.AbstractCommandController;

import com.rk.entity.Employee;
import com.rk.service.EmpService;

@SuppressWarnings("deprecation")
public class EmpAction extends AbstractCommandController {
//业务层
private EmpService empService;
public void setEmpService(EmpService empService) {
this.empService = empService;
}
//将表单参数封装到Employee实体中
public EmpAction(){
this.setCommandClass(Employee.class);
}

//自定义String->Date的转换器
@Override
protected void initBinder(HttpServletRequest request, ServletRequestDataBinder binder) throws Exception {
binder.registerCustomEditor(Date.class, new CustomDateEditor(new SimpleDateFormat("yyyy-MM-dd"), true));
}
@Override
protected ModelAndView handle(HttpServletRequest request, HttpServletResponse response, Object obj, BindException bindException)
throws Exception {
ModelAndView modelAndView = new ModelAndView();
Employee emp = (Employee) obj;
empService.register(emp);

modelAndView.addObject("message", "操作成功");
modelAndView.setViewName("success");
return modelAndView;
}

}
6、对dao/service/action的配置
spring-emp.xml
<?xml version="1.0" encoding="UTF-8"?>
<beans xmlns="http://www.springframework.org/schema/beans"
xmlns:mvc="http://www.springframework.org/schema/mvc"
xmlns:xsi="http://www.w3.org/2001/XMLSchema-instance"
xsi:schemaLocation=" http://www.springframework.org/schema/beans http://www.springframework.org/schema/beans/spring-beans.xsd http://www.springframework.org/schema/mvc http://www.springframework.org/schema/mvc/spring-mvc.xsd">

<!-- 注册EmpDao类 -->
<bean id="empDaoID" class="com.rk.dao.EmpDao"></bean>

<!-- 注册EmpService类 -->
<bean id="empServiceID" class="com.rk.service.EmpService">
<property name="empDao" ref="empDaoID"/>
</bean>

<!-- 注册Action -->
<bean name="/add.action" class="com.rk.action.EmpAction">
<property name="empService" ref="empServiceID"/>
</bean>

<!-- /index.action请求,直接转发到/jsp/index.jsp页面 -->
<bean name="/index.action" class="org.springframework.web.servlet.mvc.ParameterizableViewController">
<property name="viewName" value="index"></property>
</bean>

<!-- 映射器(框架) -->
<bean class="org.springframework.web.servlet.handler.BeanNameUrlHandlerMapping"></bean>

<!-- 适配器(框架) -->
<bean class="org.springframework.web.servlet.mvc.SimpleControllerHandlerAdapter"></bean>

<!-- 视图解析器(框架) -->
<bean class="org.springframework.web.servlet.view.InternalResourceViewResolver">
<property name="prefix" value="/jsp/"></property>
<property name="suffix" value=".jsp"></property>
</bean>
</beans>
7、JSP页面
WebRoot/jsp/index.jsp
<%@ page language="java" import="java.util.*" pageEncoding="UTF-8"%>

<!DOCTYPE HTML PUBLIC "-//W3C//DTD HTML 4.01 Transitional//EN">
<html>
<head>
<title>添加员工</title>
</head>

<body>
<form action="${pageContext.request.contextPath}/add.action" method="post">
<table border="1" style="border-collapse: collapse;text-align: center;">
<tr>
<td>员工姓名:</td>
<td><input type="text" name="username"/></td>
</tr>
<tr>
<td>员工薪水:</td>
<td><input type="text" name="salary"/></td>
</tr>
<tr>
<td>入职时间:</td>
<td><input type="text" name="hiredate"/></td>
</tr>
<tr>
<td colspan="2">
<input type="submit" value="提交"/>
</td>
</tr>
</table>
</form>
</body>
</html>
WebRoot/jsp/success.jsp
<%@ page language="java" import="java.util.*" pageEncoding="UTF-8"%>

<!DOCTYPE HTML PUBLIC "-//W3C//DTD HTML 4.01 Transitional//EN">
<html>
<head>
<title>添加成功</title>
</head>

<body>
${message }
</body>
</html>
演示

相关文章推荐
- angular用户添加案例
- ASP.NET MVC+EF框架+EasyUI实现权限管理系列(16)-类库架构扩展以及DLL文件生成修改和用户的简单添加
- 2014Esri全球用户大会——亮点系列之精彩应用案例
- 案例--编写一个Servlet,显示已有用户信息,可添加/修改、删除帐务帐号信息,并重新显示新页面
- SharePoint【Ribbon系列】-- 04.在Ribbon中添加新Group(针对用户自定义Tab)
- [ASP.NET开发系列]在用户控件中添加事件 -- 摘自 tigerwen01
- SharePoint【Ribbon系列】-- 05.在Ribbon中添加新控件(针对用户自定义Tab)
- [ASP.NET开发系列]在用户控件中添加属性 -- 摘自 tigerwen01
- 2014Esri全球用户大会——亮点系列之精彩应用案例
- Redis用户添加、分页、登录、注册、加关注案例
- (Mirage系列之二)VMware Horizon Mirage的经典用户用例及真实案例分析
- mark--[Redis用户添加、分页、登录、注册、加关注案例]
- [ASP.NET开发系列]在用户控件中添加事件
- ASP.NET MVC+EF框架+EasyUI实现权限管理系列(16)-类库架构扩展以及DLL文件生成修改和用户的简单添加
- [ASP.NET开发系列]在用户控件中添加属性
- DotNetNuke系列(一): 如何在DNN中添加自定义的用户注册页面
- ASP.NET MVC+EF框架+EasyUI实现权限管理系列(16)-类库架构扩展以及DLL文件生成修改和用户的简单添加
- [ASP.NET开发系列]在用户控件中添加属性
- Sharepoint进修笔记—Ribbon系列-- 4. 在Ribbon中添加新Group(针对用户自定义Tab)
- Easyui + MVC 系列教程 第19-23 节 完成注销 登录限制过滤 添加用户