源码安装Nginx+PHP-FPM及扩展
2016-09-19 16:44
316 查看
安装依赖组建
安装PHP-FPM
接下来就开始安装PHP扩展了
安装memcache扩展
安装memcached扩展
安装Redis扩展

安装Imagick扩展
启用Zend Opcache扩展
yum install -y gcc gcc-c++ autoconf automake zlib zlib-devel openssl openssl-devel pcre-devel openssl-devel traceroute libtool unzip gcc gcc-c++ autoconf net-snmp-devel vim wget sysstat lrzsz man tree mysql-devel ntpdate rsync libxml2 libcurl libcurl-devel libxml2-devel zlib zlib-devel libjpeg* pcre-devel gd gd-devel bind-utils安装Nginx
wget http://nginx.org/download/nginx-1.10.1.tar.gz useradd -r nginx
tar -zxvf nginx-1.10.1.tar.gz
cd nginx-1.10.1

./configure \
--prefix=/usr/local/nginx --sbin-path=/usr/sbin/nginx --conf-path=/etc/nginx/nginx.conf --error-log-path=/var/log/nginx/error.log --http-log-path=/var/log/nginx/access.log \
--pid-path=/var/run/nginx.pid --lock-path=/var/run/nginx.lock --user=nginx --group=nginx --with-http_ssl_module --with-http_realip_module --with-http_addition_module \
--with-http_sub_module --with-http_dav_module --with-http_flv_module --with-http_mp4_module --with-http_gunzip_module --with-http_gzip_static_module --with-http_random_index_module \
--with-http_secure_link_module --with-http_stub_status_module --with-http_auth_request_module --with-threads \
--with-mail --with-mail_ssl_module --with-file-aio --with-debug --with-ipv6

make && make install

测试Nginx
nginx -t
nginx: the configuration file /etc/nginx/nginx.conf syntax is ok
nginx: configuration file /etc/nginx/nginx.conf test is successful

启动Nginx
/usr/sbin/nginx

关闭nginx
/usr/sbin/nginx -s stop
ps -ef|grep nginx
root     19107     1  0 17:40 ?    00:00:00 nginx: master process /usr/sbin/nginx
nginx    19108 19107  0 17:40 ?       00:00:00 nginx: worker process
root     19115 15982  0 17:40 pts/0    00:00:00 grep nginx
安装PHP-FPM
wget http://museum.php.net/php5/php-5.6.9.tar.gz tar -zxvf php-5.6.9.tar.gz
cd php-5.6.9
./configure  --prefix=/usr/local/php5.6 --with-config-file-path=/usr/local/php5.6/etc --with-iconv=/usr/local/libiconv \
--enable-fpm --with-libxml-dir --with-zlib --with-curl --enable-dba --enable-ftp --with-freetype-dir --with-gd \
--with-jpeg-dir --with-png-dir --with-zlib-dir --enable-gd-native-ttf --with-gettext --enable-mbstring --with-mcrypt \
--with-mysql --with-mysqli --enable-pcntl --with-pdo-mysql --without-pdo-sqlite --enable-shmop --enable-sockets \
--enable-sysvmsg --enable-sysvsem --enable-sysvshm --enable-zip
编译时报错,提示"configure: error: Please reinstall the iconv library."缺少libiconv 组建 手工安装libiconv
wget http://ftp.gnu.org/gnu/libiconv/libiconv-1.10.tar.gz tar -zxvf libiconv-1.10.tar.gz
cd libiconv-1.10
./configure --prefix=/usr/local/libiconv
make && make install
然后继续./configure, 提示"configure: error: mcrypt.h not found. Please reinstall libmcrypt."继续安装libmcrypt组建
wget http://nchc.dl.sourceforge.net/project/mcrypt/Libmcrypt/2.5.8/libmcrypt-2.5.8.tar.gz tar -zxvf libmcrypt-2.5.8.tar.gz
cd libmcrypt-2.5.8
./configure
make && make install
再继续./configure,就一切正常了,接着make make install就可以了
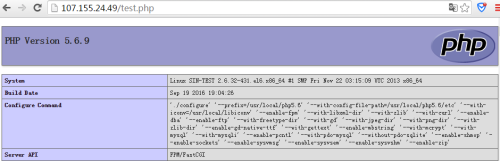
make
make install

检查是否安装成功
/usr/local/php5.6/sbin/php-fpm -ver
PHP 5.6.9 (fpm-fcgi) (built: Sep 19 2016 19:10:16)
Copyright (c) 1997-2015 The PHP Group
Zend Engine v2.6.0, Copyright (c) 1998-2015 Zend Technologies

复制配置文件
cp /tmp/php-5.6.9/php.ini-development /usr/local/php5.6/etc/php.ini
cp /usr/local/php5.6/etc/php-fpm.conf.default /usr/local/php5.6/etc/php-fpm.conf

创建php-fpm启动脚本
cp /tmp/php-5.6.9/sapi/fpm/init.d.php-fpm /etc/init.d/php-fpm
chmod+x /etc/init.d/php-fpm
service php-fpm start
ps -ef|grep php
root     22403     1  0 19:29 ?        00:00:00 php-fpm: master process (/usr/local/php5.6/etc/php-fpm.conf)
nobody   22404 22403  0 19:29 ?        00:00:00 php-fpm: pool www
nobody   22405 22403  0 19:29 ?        00:00:00 php-fpm: pool www
root     22649 15982  0 19:43 pts/0    00:00:00 grep php

添加开机启动
chkconfig php-fpm on
Nginx中增加PHP解析
vim /etc/nginx/nginx.conf
location ~ \.php$ {
root           html;
fastcgi_pass   127.0.0.1:9000;
fastcgi_index  index.php;
fastcgi_param  SCRIPT_FILENAME  /usr/local/nginx/html/$fastcgi_script_name;
include        fastcgi_params;
}

nginx -s reload
接下来就开始安装PHP扩展了
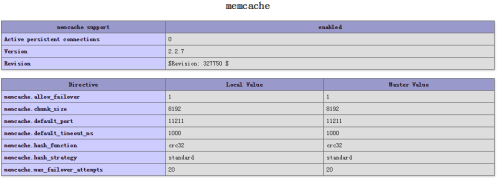
安装memcache扩展
cd /usr/local/php5.6/bin
./pecl install memcache
#在php.ini中增加   extension=memcache.so
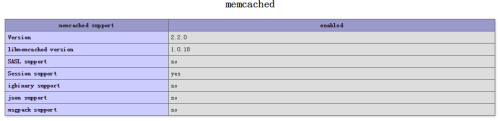
安装memcached扩展
wget https://launchpad.net/libmemcached/1.0/1.0.18/+download/libmemcached-1.0.18.tar.gz tar -zxvf libmemcached-1.0.18.tar.gz
cd libmemcached-1.0.18
./configure --prefix=/usr/local/libmemcached --with-memcached
make && make install

wget http://pecl.php.net/get/memcached-2.2.0.tgz tar -zxvf memcached-2.2.0.tgz
cd memcached-2.2.0
/usr/local/php5.6/bin/phpize
./configure --enable-memcached --with-php-config=/usr/local/php5.6/bin/php-config --with-libmemcached-dir=/usr/local/libmemcached --disable-memcached --disable-memcached-sasl
make && make install
#在php.ini中增加 extension=memcached.so
安装Redis扩展
wget  https://github.com/nicolasff/phpredis/archive/2.2.4.tar.gz tar -zxvf 2.2.4.tar.gz
cd phpredis-2.2.4
/usr/local/php5.6/bin/phpize
./configure --with-php-config=/usr/local/php5.6/bin/php-config
make && make install
#在php.ini中增加 extension=redis.so
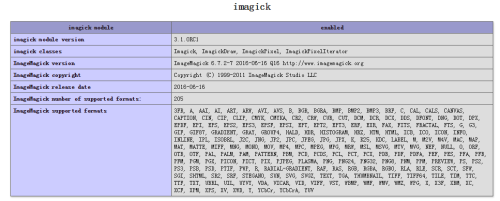
安装Imagick扩展
yum install ImageMagick ImageMagick-devel
#验证是否安装成功
convert -version
Version: ImageMagick 6.7.2-7 2016-06-16 Q16 http://www.imagemagick.org Copyright: Copyright (C) 1999-2011 ImageMagick Studio LLC
Features: OpenMP

wget http://pecl.php.net/get/imagick-3.1.0RC1.tgz tar -zxvf imagick-3.1.0RC1.tgz
cd imagick-3.1.0RC1
/usr/local/php5.6/bin/phpize
./configure --with-php-config=/usr/local/php5.6/bin/php-config --with-imagick=/usr/include/ImageMagick/
make && make install
#在php.ini中增加 extension=imagick.so
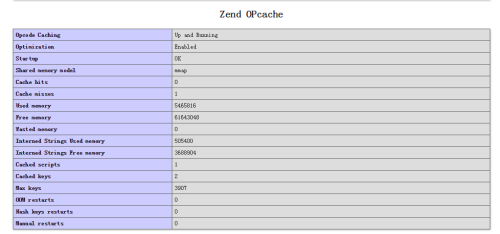
启用Zend Opcache扩展
#在php.ini中将opcache.enable=0,改成1启用,并增加zend_extension=opcache.so
opcache.enable=1
zend_extension=opcache.so

相关文章推荐
- centos5.2 源码安装nginx+php-fpm+http push,演示http push 功能,测试通过
- nginx+php_php-fpm源码安装
- ubuntu安装nginx+php-fpm+mysql
- 源码安装php5.5.7 php-fpm和xcache,以及xcache管理后台
- php安装http扩展 (源码包)
- php+php-fpm+nginx 源码安装
- 转帖:Centos yum 安装nginx+PHP-FPM+eAccelerator+mysql
- 缺少mcrypt 扩展。请检查 PHP 配置。(源码方式安装php扩展mcrypt)
- 烂泥:php5.6源码安装及php-fpm配置与nginx集成
- nginx+php-fpm在Linux下的安装和配置
- PHP源码安装mcrypt扩展error: ‘PHP_FE_END’ undeclared here (not in a function)错误处理
- 源码方式安装php扩展mcrypt
- Ubuntu Server 10.10安装配置Nginx+php-fpm+mysql
- centos 6.4 安装php-fpm 及常用扩展,(转)
- 服务器源码安装PHP 后如何安装mbstring扩展
- Mac OS X 10.9自带php-fpm的配置使用和扩展安装
- FreeBSD安装nginx+php+mysql(fpm方式)
- centos 下编译安装nginx + php 配置nginx+php-fpm
- mac os maverick下安装nginx+php-fpm via homebrew