【神经网络与深度学习】深度学习实战——caffe windows 下训练自己的网络模型
2016-09-15 10:00
1256 查看
1、相关准备
1.1 手写数字数据集
这篇博客上有.jpg格式的图片下载,附带标签信息,有需要的自行下载,博客附带百度云盘下载地址(手写数字.jpg 格式):http://blog.csdn.net/eddy_zheng/article/details/50496194
1.2深度学习框架
本实战基于caffe深度学习框架,需自行参考相关博客搭建环境,这里不再对如何搭建环境作介绍。
2、数据准备
2.1 准备训练与验证图像
准备好你想训练识别的图像数据之后,将其划分为训练集与验证集,并准备好对应的图像名称以及对应的标签信息。这里的验证集和测试集并是不同的,如下图所示,你可以这样简单的划分: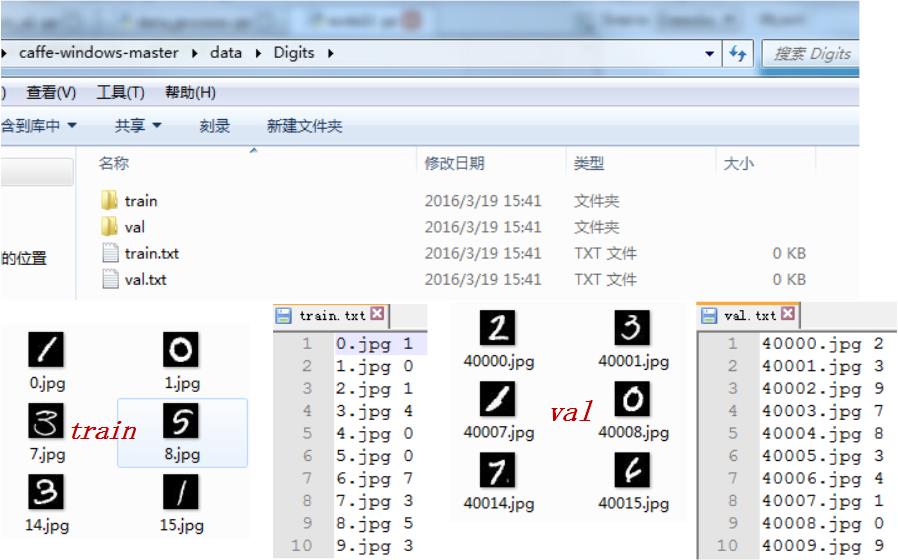
*这里要注意的是,图片名与对应的类别标签一定不能有错,不然你的训练就全乱套了。对了,图片名与标签之间对应一个 space 就可以了。
2.2 转换数据格式
以上工作准备完毕之后,还需将其转换为 caffe 训练的 lmdb 格式。找到你编译的图像转换 convert_imageset.exe 位置。如下我的 caffe bin目录: 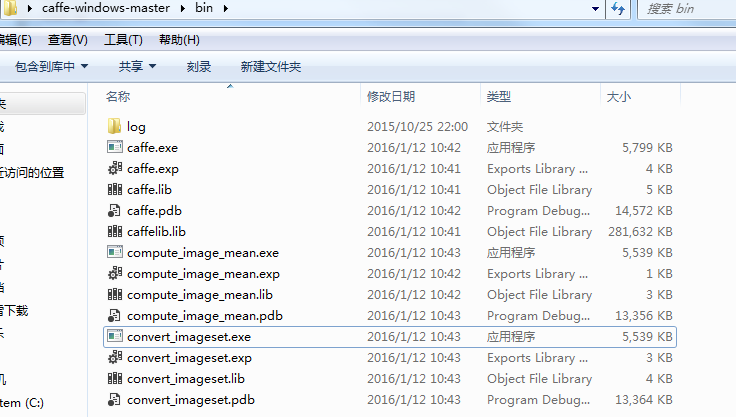
转换训练数据:创建如下文件,写批处理命令:
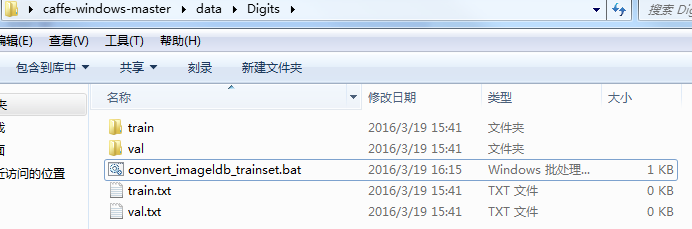
内部代码如下所示,略作解释,1:是你转换图像 convert_imageset.exe 所在位置,2:转换图像数据所在的文件夹位置,3:接着是图像名称对应标签 .txt 文件,4:最后是生成的 lmdb 的位置及文件夹名字:
SET GLOG_logtostderr=1
C:\Users\Administrator\Desktop\caffe-windows-master\bin\convert_imageset.exe C:\Users\Administrator\Desktop\caffe-windows-master\data\Digits\train\ C:\Users\Administrator\Desktop\caffe-windows-master\data\Digits\train.txt C:\Users\Administrator\Desktop\caffe-windows-master\data\Digits\mtrainldb
pause
转换验证数据:操作同上,写批处理命令:
文件名:convert_imageldb_valset.bat
SET GLOG_logtostderr=1
C:\Users\Administrator\Desktop\caffe-windows-master\bin\convert_imageset.exe C:\Users\Administrator\Desktop\caffe-windows-master\data\Digits\val\ C:\Users\Administrator\Desktop\caffe-windows-master\data\Digits\val.txt C:\Users\Administrator\Desktop\caffe-windows-master\data\Digits\mvalldb
pause
3. 网络层参数
文件:train_val.prorotxt,参照 lenet-5 ; 注意将地址对应自己的转换数据的位置,代码如下:
name: "LeNet"
layer {
name: "mnist"
transform_param {
scale: 0.00390625

}
type: "Data"
top: "data"
top: "label"
data_param {
source: "C:/Users/Administrator/Desktop/caffe-windows-master/data/Digits/mtrainldb"
backend: LMDB
batch_size: 80
}

include: { phase: TRAIN }
}
layer {
name: "mnist"
transform_param {
scale: 0.00390625
}
type: "Data"
top: "data"
top: "label"
data_param {
source: "C:/Users/Administrator/Desktop/caffe-windows-master/data/Digits/mvalldb"
backend: LMDB
batch_size: 4
}

include: { phase: TEST }
}
layer {
name: "conv1"
type: "Convolution"
bottom: "data"
top: "conv1"
param {
lr_mult: 1
#decay_mult: 1
}
param {
lr_mult: 2
#decay_mult: 0
}
convolution_param {
num_output: 120
kernel_size: 3
stride: 1
weight_filler {
type: "xavier"
}
bias_filler {
type: "constant"
}
}
}
layer {
name: "relu2"
type: "ReLU"
bottom: "conv1"
top: "conv1"
}
layer {
name: "pool2"
type: "Pooling"
bottom: "conv1"
top: "pool2"
pooling_param {
pool: MAX
kernel_size: 3
stride: 1
}
}
layer {
name: "norm2"
type: "LRN"
bottom: "pool2"
top: "norm2"
lrn_param {
local_size: 5
alpha: 0.0001
beta: 0.75
}
}
layer {
name: "conv3"
type: "Convolution"
bottom: "norm2"
top: "conv3"
param {
lr_mult: 1
#decay_mult: 1
}
param {
lr_mult: 2
#decay_mult: 0
}
convolution_param {
num_output: 180
kernel_size: 3
stride: 1
weight_filler {
type: "xavier"
}
bias_filler {
type: "constant"
}
}
}
layer {
name: "relu3"
type: "ReLU"
bottom: "conv3"
top: "conv3"
}
layer {
name: "pool3"
type: "Pooling"
bottom: "conv3"
top: "pool3"
pooling_param {
pool: MAX
kernel_size: 3
stride: 2
}
}
layer {
name: "norm3"
type: "LRN"
bottom: "pool3"
top: "norm3"
lrn_param {
local_size: 5
alpha: 0.0001
beta: 0.75
}
}
layer {
name: "conv4"
type: "Convolution"
bottom: "norm3"
top: "conv4"
param {
lr_mult: 1
#decay_mult: 1
}
param {
lr_mult: 2
#decay_mult: 0
}
convolution_param {
num_output: 210
kernel_size: 3
stride: 2
weight_filler {
type: "xavier"
}
bias_filler {
type: "constant"
}
}
}
layer {
name: "relu5"
type: "ReLU"
bottom: "conv4"
top: "conv4"
}
layer {
name: "pool5"
type: "Pooling"
bottom: "conv4"
top: "pool5"
pooling_param {
pool: MAX
kernel_size: 3
stride: 1
}
}
layer {
name: "norm5"
type: "LRN"
bottom: "pool5"
top: "norm5"
lrn_param {
local_size: 5
alpha: 0.0001
beta: 0.75
}
}
layer {
name: "ip1"
type: "InnerProduct"
bottom: "norm5"
top: "ip1"
param {
lr_mult: 1
}
param {
lr_mult: 2
}
inner_product_param {
num_output: 256
weight_filler {
type: "xavier"
}
bias_filler {
type: "constant"
}
}
}
layer {
name: "relu7"
type: "Insanity"
bottom: "ip1"
top: "ip1"
}
layer {
name: "drop1"
type: "Dropout"
bottom: "ip1"
top: "ip1"
dropout_param {
dropout_ratio: 0.5
}
}
layer {
name: "ip2"
type: "InnerProduct"
bottom: "ip1"
top: "ip2"
param {
lr_mult: 1
}
param {
lr_mult: 2
}
inner_product_param {
num_output: 512
weight_filler {
type: "xavier"
}
bias_filler {
type: "constant"
}
}
}
layer {
name: "relu8"
type: "Insanity"
bottom: "ip2"
top: "ip2"
}
layer {
name: "drop2"
type: "Dropout"
bottom: "ip2"
top: "ip2"
dropout_param {
dropout_ratio: 0.5
}
}

layer {
name: "accuracy"
type: "Accuracy"
bottom: "ip2"
bottom: "label"
top: "accuracy"
include {
phase: TEST
}
}
layer {
name: "loss"
type: "SoftmaxWithLoss"
bottom: "ip2"
bottom: "label"
top: "loss"
}
4. 开始训练
Digist 文件夹下创建, caffe.bat,内容如下:
LOG=log/train-`date +%Y-%m-%d-%H-%M-%S`.log
C:\Users\Administrator\Desktop\caffe-windows-master\bin\caffe.exe train --solver C:\Users\Administrator\Desktop\caffe-windows-master\data\Digits\solver.prototxt
pause
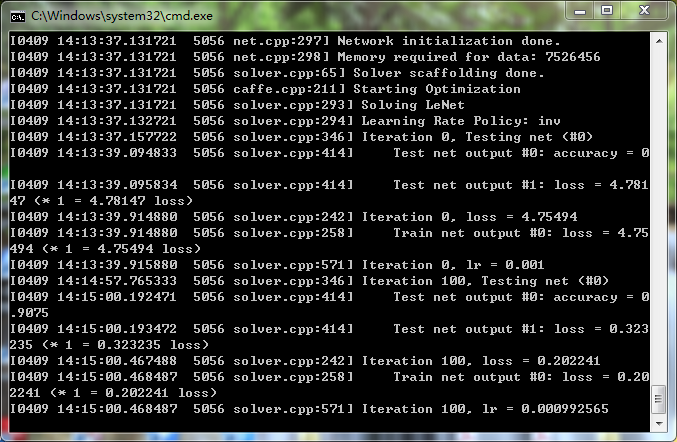
准备完成之后,双击 caffe.bat;

相关文章推荐
- 深度学习实战——caffe windows 下训练自己的网络模型
- 【神经网络与深度学习】Caffe使用step by step:使用自己数据对已经训练好的模型进行finetuning
- 深度学习-CAFFE利用CIFAR10网络模型训练自己的图像数据获得模型-3结合caffe中的CIFAR10修改相关配置文件并训练
- 深度学习-CAFFE利用CIFAR10网络模型训练自己的图像数据获得模型-4应用生成模型进行预测
- 【深度学习】笔记7: CNN训练Cifar-10技巧 ---如何进行实验,如何进行构建自己的网络模型,提高精度
- 深度学习-CAFFE利用CIFAR10网络模型训练自己的图像数据获得模型-1.制作自己的数据集
- 深度学习实战——caffe windows 下训练自己的图像模型
- 【神经网络与深度学习】如何将别人训练好的model用到自己的数据上
- 深度学习-CAFFE利用CIFAR10网络模型训练自己的图像数据获得模型-2生成图像库的均值文件
- 【神经网络与深度学习】在Windows8.1上用VS2013编译Caffe并训练和分类自己的图片
- 【计算机视觉】【神经网络与深度学习】YOLO v2 detection训练自己的数据
- (尤其是训练集验证集的生成)深度学习 tensorflow 实战(2) 实现简单神经网络以及随机梯度下降算法S.G.D
- 【计算机视觉】【神经网络与深度学习】YOLO v2 detection训练自己的数据2
- Caffe深度学习入门—— caffenet 微调网络 训练自己的数据并测试训练的模型
- 【深度学习】笔记6:使用caffe中的CIFAR10网络模型和自己的图片数据训练自己的模型(步骤详解)
- 【深度学习】笔记6:基于CIFAR10网络,训练自己的分类网络的记录
- 【神经网络与深度学习】用训练好的caffemodel来进行分类
- 实战深度学习(一)——利用digits训练road模型
- 【深度学习】神经网络的分布式训练(1)
- 深度学习之五:使用GPU加速神经网络的训练