网络的路由配置以及Centos7的网络组实现 推荐
2016-09-12 12:09
567 查看
1、路由配置
路由是互联网络的核心,没有路由的网络如同一座孤岛,掌握路由的配置是IT人员的必备技能。
例如:现在有三台主机需要通信,其中A和B在同一网段,C在另一网段,这两个网段有三个路由相隔,如何实现他们之间的通信呢?
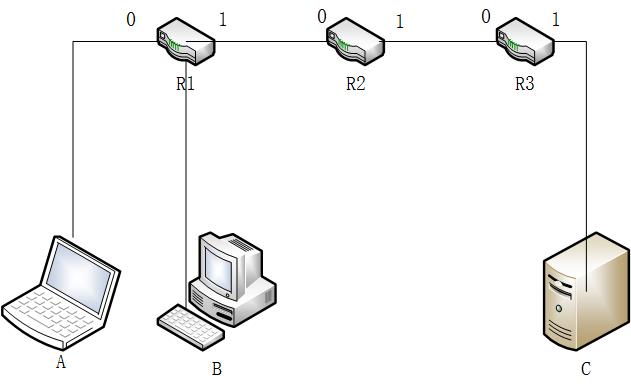
主机A:IP=192.168.1.100/24
主机B:IP=192.168.1.63/24
主机C:IP=10.2.110.100/16
R1的接口0:IP=192.168.1.1/24,接口1:IP=110.1.24.10/24
R2的接口0:IP=110.1.24.20/24,接口1:IP=72.98.2.10/16
R3的接口0:IP=72.98.70.20/16,接口1:IP=10.2.0.1/16
通过分析上面的网络环境,可以得到R1,R2和R3的路由信息,这里我们指定每一个路由的静态路由表
R1:路由表
网段 网关 接口
192.168.1.0/24 0.0.0.0/0 eth0
110.1.24.10/24 0.0.0.0/0 eth1
72.98.0.0/16 110.1.24.20 eth1
10.2.0.0/16 110.1.24.20 eth1
0.0.0.0/0 110.1.24.20 eth1
R2:路由表
网段 网关 接口
192.168.1.0/24 110.1.24.10 eth0
110.1.24.10/24 0.0.0.0/0 eth0
72.98.0.0/16 0.0.0.0/0 eth1
10.2.0.0/16 72.98.70.20 eth1
0.0.0.0/0 外网IP(这里不写)
R3:路由表
网段 网关 接口
192.168.1.0/24 72.98.2.10 eth0
110.1.24.10/24 72.98.2.10 eth0
72.98.0.0/16 0.0.0.0/0 eth0
10.2.0.0/16 0.0.0.0/0 eth1
0.0.0.0/0 72.98.2.10 eth0
这里用3台centos系统作为路由
用node1主机来做route1
测试:
在主机C上:
网络组类似于centos6的bond,都是多个网卡使用一个IP,是增强网络健壮性的一个手段
网络组:是将多个网卡聚合在一起方法,从而实现冗错和提高吞吐量
网络组不同于旧版中bonding技术,提供更好的性能和扩展性
网络组由内核驱动和teamd守护进程实现.包名是teamd
启动网络组接口不会自动启动网络组中的port接口
启动网络组接口中的port接口不会自动启动网络组接口
禁用网络组接口会自动禁用网络组中的port接口
没有port接口的网络组接口可以启动静态IP连接
启用DHCP连接时,没有port接口的网络组会等待port接口的加入
具体的runner方式可以查看man 5 teamd.conf帮助
创建网络组接口:
开启port端口
路由是互联网络的核心,没有路由的网络如同一座孤岛,掌握路由的配置是IT人员的必备技能。
例如:现在有三台主机需要通信,其中A和B在同一网段,C在另一网段,这两个网段有三个路由相隔,如何实现他们之间的通信呢?
主机A:IP=192.168.1.100/24
主机B:IP=192.168.1.63/24
主机C:IP=10.2.110.100/16
R1的接口0:IP=192.168.1.1/24,接口1:IP=110.1.24.10/24
R2的接口0:IP=110.1.24.20/24,接口1:IP=72.98.2.10/16
R3的接口0:IP=72.98.70.20/16,接口1:IP=10.2.0.1/16
通过分析上面的网络环境,可以得到R1,R2和R3的路由信息,这里我们指定每一个路由的静态路由表
R1:路由表
网段 网关 接口
192.168.1.0/24 0.0.0.0/0 eth0
110.1.24.10/24 0.0.0.0/0 eth1
72.98.0.0/16 110.1.24.20 eth1
10.2.0.0/16 110.1.24.20 eth1
0.0.0.0/0 110.1.24.20 eth1
R2:路由表
网段 网关 接口
192.168.1.0/24 110.1.24.10 eth0
110.1.24.10/24 0.0.0.0/0 eth0
72.98.0.0/16 0.0.0.0/0 eth1
10.2.0.0/16 72.98.70.20 eth1
0.0.0.0/0 外网IP(这里不写)
R3:路由表
网段 网关 接口
192.168.1.0/24 72.98.2.10 eth0
110.1.24.10/24 72.98.2.10 eth0
72.98.0.0/16 0.0.0.0/0 eth0
10.2.0.0/16 0.0.0.0/0 eth1
0.0.0.0/0 72.98.2.10 eth0
这里用3台centos系统作为路由
用node1主机来做route1
[root@node1 ~]# ip addr show dev eth1
3: eth1: <BROADCAST,MULTICAST,UP,LOWER_UP> mtu 1500 qdisc pfifo_fast state UP qlen 1000
link/ether 00:0c:29:e2:96:7c brd ff:ff:ff:ff:ff:ff
inet 192.168.1.1/24 scope global eth1
inet6 fe80::20c:29ff:fee2:967c/64 scope link
valid_lft forever preferred_lft forever
[root@node1 ~]# ip addr show dev eth2
4: eth2: <BROADCAST,MULTICAST,UP,LOWER_UP> mtu 1500 qdisc pfifo_fast state UP qlen 1000
link/ether 00:0c:29:e2:96:86 brd ff:ff:ff:ff:ff:ff
inet 110.1.24.10/24 scope global eth2
inet6 fe80::20c:29ff:fee2:9686/64 scope link
valid_lft forever preferred_lft forever
[root@node1 ~]# route add -net 10.2.0.0/16 gw 110.1.24.20 dev eth2
[root@node1 ~]# route -n
Kernel IP routing table
Destination     Gateway         Genmask         Flags Metric Ref    Use Iface
192.168.1.0     0.0.0.0         255.255.255.0   U     0      0        0 eth1
110.1.24.0      0.0.0.0         255.255.255.0   U     0      0        0 eth2
10.2.0.0        110.1.24.20     255.255.0.0     UG    0      0        0 eth2
72.98.0.0       110.1.24.20     255.255.0.0     UG    0      0        0 eth2
10.1.0.0        0.0.0.0         255.255.0.0     U     0      0        0 eth0
169.254.0.0     0.0.0.0         255.255.0.0     U     1002   0
[root@node1 ~]# echo 1 > /proc/sys/net/ipv4/ip_forwardnote2用来做route2
[root@node2 ~]# ip addr add 110.1.24.20/24 dev eth1
[root@node2 ~]# ip addr add 72.98.2.10/16 dev eth2
[root@node2 ~]# ip addr show dev eth1
3: eth1: <BROADCAST,MULTICAST,UP,LOWER_UP> mtu 1500 qdisc pfifo_fast state UP qlen 1000
link/ether 00:0c:29:00:90:24 brd ff:ff:ff:ff:ff:ff
inet 110.1.24.20/24 scope global eth1
inet6 fe80::20c:29ff:fe00:9024/64 scope link
valid_lft forever preferred_lft forever
[root@node2 ~]# ip addr show dev eth2
4: eth2: <BROADCAST,MULTICAST,UP,LOWER_UP> mtu 1500 qdisc pfifo_fast state UP qlen 1000
link/ether 00:0c:29:00:90:2e brd ff:ff:ff:ff:ff:ff
inet 72.98.2.10/16 scope global eth2
inet6 fe80::20c:29ff:fe00:902e/64 scope link
valid_lft forever preferred_lft forever
[root@node2 ~]# route -n
Kernel IP routing table
Destination     Gateway         Genmask         Flags Metric Ref    Use Iface
110.1.24.0      0.0.0.0         255.255.255.0   U     0      0        0 eth1
72.98.0.0       0.0.0.0         255.255.0.0     U     0      0        0 eth2
10.1.0.0        0.0.0.0         255.255.0.0     U     0      0        0 eth0
169.254.0.0     0.0.0.0         255.255.0.0     U     1002   0        0 eth0
169.254.0.0     0.0.0.0         255.255.0.0     U     1003   0        0 eth1
[root@node2 ~]# route add -net 192.168.1.0/24 gw 110.1.24.10 dev eth1
[root@node2 ~]# route add -net 10.2.0.0/16 gw 72.98.70.20 dev eth2
[root@node2 ~]# route -n
Kernel IP routing table
Destination     Gateway         Genmask         Flags Metric Ref    Use Iface
192.168.1.0     110.1.24.10     255.255.255.0   UG    0      0        0 eth1
110.1.24.0      0.0.0.0         255.255.255.0   U     0      0        0 eth1
10.2.0.0        72.98.70.20     255.255.0.0     UG    0      0        0 eth2
72.98.0.0       0.0.0.0         255.255.0.0     U     0      0        0 eth2
10.1.0.0        0.0.0.0         255.255.0.0     U     0      0        0 eth0
169.254.0.0     0.0.0.0         255.255.0.0     U     1002   0        0 eth0
169.254.0.0     0.0.0.0         255.255.0.0     U     1003   0        0 eth1
[root@node2 ~]# echo 1 > /proc/sys/net/ipv4/ip_forwardnote3用来做route3
[root@node3 ~]# ip addr add 72.98.70.20/16 dev eth1
[root@node3 ~]# ip addr add 10.2.0.1/16 dev eth2
[root@node3 ~]# ip addr show dev eth1
3: eth1: <BROADCAST,MULTICAST,UP,LOWER_UP> mtu 1500 qdisc pfifo_fast state UP qlen 1000
link/ether 00:0c:29:47:d8:e1 brd ff:ff:ff:ff:ff:ff
inet 72.98.70.20/16 scope global eth1
inet6 fe80::20c:29ff:fe47:d8e1/64 scope link
valid_lft forever preferred_lft forever
[root@node3 ~]# ip addr show dev eth2
4: eth2: <BROADCAST,MULTICAST,UP,LOWER_UP> mtu 1500 qdisc pfifo_fast state UP qlen 1000
link/ether 00:0c:29:47:d8:eb brd ff:ff:ff:ff:ff:ff
inet 10.2.0.1/16 scope global eth2
inet6 fe80::20c:29ff:fe47:d8eb/64 scope link
valid_lft forever preferred_lft forever
[root@node3 ~]# route add -net 110.1.24.0/24 gw 72.98.2.10 dev eth1
[root@node3 ~]# route -n
Kernel IP routing table
Destination     Gateway         Genmask         Flags Metric Ref    Use Iface
192.168.1.0     72.98.2.10      255.255.255.0   UG    0      0        0 eth1
110.1.24.0      72.98.2.10      255.255.255.0   UG    0      0        0 eth1
10.2.0.0        0.0.0.0         255.255.0.0     U     0      0        0 eth2
72.98.0.0       0.0.0.0         255.255.0.0     U     0      0        0 eth1
10.1.0.0        0.0.0.0         255.255.0.0     U     0      0        0 eth0
169.254.0.0     0.0.0.0         255.255.0.0     U     1002   0        0 eth0
169.254.0.0     0.0.0.0         255.255.0.0     U     1003   0        0 eth1
[root@node3 ~]# echo 1 > /proc/sys/net/ipv4/ip_forward主机A:
[root@host1 ~]# ip addr add 192.168.1.100/24 dev eno33554984
[root@host1 ~]# ip route add default via 192.168.1.1
[root@host1 ~]# ip addr show dev eno33554984
3: eno33554984: <BROADCAST,MULTICAST,UP,LOWER_UP> mtu 1500 qdisc pfifo_fast state UP qlen 1000
link/ether 00:0c:29:2b:82:a6 brd ff:ff:ff:ff:ff:ff
inet 192.168.1.100/24 scope global eno33554984
valid_lft forever preferred_lft forever
inet6 fe80::20c:29ff:fe2b:82a6/64 scope link
valid_lft forever preferred_lft forever
[root@host1 ~]# route -n
-bash: route: command not found
[root@host1 ~]# ip route show
10.1.0.0/16 dev eno16777736  proto kernel  scope link  src 10.1.70.171  metric 100
192.168.1.0/24 dev eno33554984  proto kernel  scope link  src 192.168.1.100
0.0.0.0 via 192.168.1.1 dev eno33554984
主机B:
[root@host2 ~]# ip addr show dev eno33554984
3: eno33554984: <BROADCAST,MULTICAST,UP,LOWER_UP> mtu 1500 qdisc pfifo_fast state UP qlen 1000
link/ether 00:0c:29:aa:22:47 brd ff:ff:ff:ff:ff:ff
inet 192.168.1.63/24 scope global eno33554984
valid_lft forever preferred_lft forever
inet6 fe80::20c:29ff:feaa:2247/64 scope link
valid_lft forever preferred_lft forever
[root@host2 ~]# route -n
Kernel IP routing table
Destination     Gateway         Genmask         Flags Metric Ref    Use Iface
10.1.0.0        0.0.0.0         255.255.0.0     U     100    0        0 eno16777736
192.168.1.0     0.0.0.0         255.255.255.0   U     0      0        0 eno33554984
0.0.0.0    192.168.1.1     255.255.255.255 UGH   0      0        0 eno33554984
主机C:
root@debian:~# ip addr show dev eth1
3: eth1: <BROADCAST,MULTICAST,UP,LOWER_UP> mtu 1500 qdisc pfifo_fast state UP group default qlen 1000
link/ether 00:0c:29:f1:04:08 brd ff:ff:ff:ff:ff:ff
inet 10.2.110.100/16 scope global eth1
valid_lft forever preferred_lft forever
root@debian:~# route -n
Kernel IP routing table
Destination     Gateway         Genmask         Flags Metric Ref    Use Iface
10.1.0.0        0.0.0.0         255.255.0.0     U     0      0        0 eth0
10.2.0.0        0.0.0.0         255.255.0.0     U     0      0        0 eth1
0.0.0.0    10.2.0.1        255.255.255.255 UGH   0      0        0 eth1
root@debian:~#
至此所有配置已经结束,关闭所有主机的网关和selinux
测试:
在主机C上:
root@debian:~# ping -I eth1 192.168.1.1
PING 192.168.1.1 (192.168.1.1) from 10.2.110.100 eth1: 56(84) bytes of data.
64 bytes from 192.168.1.1: icmp_seq=1 ttl=62 time=0.691 ms
64 bytes from 192.168.1.1: icmp_seq=2 ttl=62 time=1.17 ms
^C
--- 192.168.1.1 ping statistics ---
2 packets transmitted, 2 received, 0% packet loss, time 1000ms
rtt min/avg/max/mdev = 0.691/0.931/1.171/0.240 ms
root@debian:~# ping -I eth1 192.168.1.63
PING 192.168.1.63 (192.168.1.63) from 10.2.110.100 eth1: 56(84) bytes of data.
64 bytes from 192.168.1.63: icmp_seq=1 ttl=61 time=1.22 ms
64 bytes from 192.168.1.63: icmp_seq=2 ttl=61 time=0.927 ms
^C
--- 192.168.1.63 ping statistics ---
2 packets transmitted, 2 received, 0% packet loss, time 1001ms
rtt min/avg/max/mdev = 0.927/1.074/1.221/0.147 ms
root@debian:~# ping -I eth1 192.168.1.100
PING 192.168.1.100 (192.168.1.100) from 10.2.110.100 eth1: 56(84) bytes of data.
64 bytes from 192.168.1.100: icmp_seq=1 ttl=61 time=1.21 ms
64 bytes from 192.168.1.100: icmp_seq=2 ttl=61 time=1.78 ms
^C
--- 192.168.1.100 ping statistics ---
2 packets transmitted, 2 received, 0% packet loss, time 1001ms
rtt min/avg/max/mdev = 1.214/1.497/1.780/0.283 ms
root@debian:~#
在主机A上:
[root@host1 ~]# ping -I eno33554984 10.2.110.100
PING 10.2.110.100 (10.2.110.100) from 192.168.1.100 eno33554984: 56(84) bytes of data.
64 bytes from 10.2.110.100: icmp_seq=1 ttl=61 time=0.985 ms
64 bytes from 10.2.110.100: icmp_seq=2 ttl=61 time=1.09 ms
64 bytes from 10.2.110.100: icmp_seq=3 ttl=61 time=1.89 ms
64 bytes from 10.2.110.100: icmp_seq=4 ttl=61 time=2.00 ms
^C
--- 10.2.110.100 ping statistics ---
4 packets transmitted, 4 received, 0% packet loss, time 3005ms
rtt min/avg/max/mdev = 0.985/1.493/2.008/0.459 ms
[root@host1 ~]#
在主机B上:
[root@host2 ~]# ping -I eno33554984 10.2.110.100
PING 10.2.110.100 (10.2.110.100) from 192.168.1.63 eno33554984: 56(84) bytes of data.
64 bytes from 10.2.110.100: icmp_seq=1 ttl=61 time=1.15 ms
64 bytes from 10.2.110.100: icmp_seq=2 ttl=61 time=1.93 ms
64 bytes from 10.2.110.100: icmp_seq=3 ttl=61 time=0.979 ms
^C
--- 10.2.110.100 ping statistics ---
3 packets transmitted, 3 received, 0% packet loss, time 2003ms
rtt min/avg/max/mdev = 0.979/1.355/1.930/0.412 ms
[root@host2 ~]# ping -I eno33554984 72.98.70.20
PING 72.98.70.20 (72.98.70.20) from 192.168.1.63 eno33554984: 56(84) bytes of data.
64 bytes from 72.98.70.20: icmp_seq=1 ttl=62 time=0.751 ms
64 bytes from 72.98.70.20: icmp_seq=2 ttl=62 time=0.807 ms
64 bytes from 72.98.70.20: icmp_seq=3 ttl=62 time=1.33 ms
^C
--- 72.98.70.20 ping statistics ---
3 packets transmitted, 3 received, 0% packet loss, time 2000ms
rtt min/avg/max/mdev = 0.751/0.964/1.335/0.264 ms
[root@host2 ~]# ping -I eno33554984 72.98.70.10  ###不知道为啥ping不通
PING 72.98.70.10 (72.98.70.10) from 192.168.1.63 eno33554984: 56(84) bytes of data.
From 110.1.24.20 icmp_seq=1 Destination Host Unreachable
From 110.1.24.20 icmp_seq=2 Destination Host Unreachable
From 110.1.24.20 icmp_seq=3 Destination Host Unreachable
^C
--- 72.98.70.10 ping statistics ---
5 packets transmitted, 0 received, +3 errors, 100% packet loss, time 4002ms
pipe 4
[root@host2 ~]# ping -I eno33554984 110.1.24.20
PING 110.1.24.20 (110.1.24.20) from 192.168.1.63 eno33554984: 56(84) bytes of data.
64 bytes from 110.1.24.20: icmp_seq=1 ttl=63 time=0.556 ms
64 bytes from 110.1.24.20: icmp_seq=2 ttl=63 time=2.15 ms
64 bytes from 110.1.24.20: icmp_seq=3 ttl=63 time=0.972 ms
^C
--- 110.1.24.20 ping statistics ---
3 packets transmitted, 3 received, 0% packet loss, time 2002ms
rtt min/avg/max/mdev = 0.556/1.228/2.157/0.678 ms
[root@host2 ~]# ping -I eno33554984 110.1.24.10
PING 110.1.24.10 (110.1.24.10) from 192.168.1.63 eno33554984: 56(84) bytes of data.
64 bytes from 110.1.24.10: icmp_seq=1 ttl=64 time=0.282 ms
64 bytes from 110.1.24.10: icmp_seq=2 ttl=64 time=0.598 ms
64 bytes from 110.1.24.10: icmp_seq=3 ttl=64 time=0.367 ms
^C
--- 110.1.24.10 ping statistics ---
3 packets transmitted, 3 received, 0% packet loss, time 2000ms
rtt min/avg/max/mdev = 0.282/0.415/0.598/0.135 ms
[root@host2 ~]#
2.centos7的网络组实现
网络组类似于centos6的bond,都是多个网卡使用一个IP,是增强网络健壮性的一个手段
网络组:是将多个网卡聚合在一起方法,从而实现冗错和提高吞吐量
网络组不同于旧版中bonding技术,提供更好的性能和扩展性
网络组由内核驱动和teamd守护进程实现.包名是teamd
启动网络组接口不会自动启动网络组中的port接口
启动网络组接口中的port接口不会自动启动网络组接口
禁用网络组接口会自动禁用网络组中的port接口
没有port接口的网络组接口可以启动静态IP连接
启用DHCP连接时,没有port接口的网络组会等待port接口的加入
具体的runner方式可以查看man 5 teamd.conf帮助
创建网络组接口:
[root@linux ~]# nmcli con add type team con-name test ifname team0 config '{"runner":{"name":"activebackup"}}'
Connection 'test' (5a3bfb26-993f-45ad-add6-246ff419e7bd) successfully added.此时在网络配置目录下生成了一个文件[root@linux ~]# ls /etc/sysconfig/network-scripts/ifcfg-test /etc/sysconfig/network-scripts/ifcfg-test
[root@linux ~]# nmcli dev show  team0
GENERAL.DEVICE:                         team0
GENERAL.TYPE:                           team
GENERAL.HWADDR:                         82:D0:69:2C:48:6E
GENERAL.MTU:                            1500
GENERAL.STATE:                          70 (connecting (getting IP configuration))
GENERAL.CONNECTION:                     test
GENERAL.CON-PATH:                       /org/freedesktop/NetworkManager/ActiveConnection/3
[root@linux ~]# nmcli con show
NAME         UUID                                  TYPE            DEVICE
eno33554984  fb67dbad-ec81-39b4-42b1-ebf975c3ff13  802-3-ethernet  eno33554984
eno16777736  d329fbf7-4423-4a10-b097-20b266c26768  802-3-ethernet  eno16777736
eno50332208  d2665055-8e83-58f1-e9e3-49a5fb133641  802-3-ethernet  eno50332208
test         5a3bfb26-993f-45ad-add6-246ff419e7bd  team            team0
给team0设置静态IP和开机自启动
[root@linux ~]# nmcli con mod test ipv4.method manual ipv4.addresses "10.1.70.24/16" connection.autoconnect yes
[root@linux ~]# cat /etc/sysconfig/network-scripts/ifcfg-test
DEVICE=team0
TEAM_CONFIG="{\"runner\":{\"name\":\"activebackup\"}}"
DEVICETYPE=Team
BOOTPROTO=none
DEFROUTE=yes
IPV4_FAILURE_FATAL=no
IPV6INIT=yes
IPV6_AUTOCONF=yes
IPV6_DEFROUTE=yes
IPV6_FAILURE_FATAL=no
NAME=test
UUID=5a3bfb26-993f-45ad-add6-246ff419e7bd
ONBOOT=yes
IPADDR=10.1.70.24
PREFIX=16
IPV6_PEERDNS=yes
IPV6_PEERROUTES=yes
[root@linux ~]#创建两个port接口[root@linux ~]# nmcli con add type team-slave con-name test-1 ifname eno33554984 master team0 Connection 'test-1' (234c3e91-d90d-421c-ae88-133deddfce94) successfully added. [root@linux ~]# nmcli con add type team-slave con-name test-2 ifname eno50332208 master team0 Connection 'test-2' (116ef596-d983-456c-a6ae-a74a4f8c03dc) successfully added. [root@linux ~]#
[root@linux ~]# cat /etc/sysconfig/network-scripts/ifcfg-test-1
NAME=test-1
UUID=234c3e91-d90d-421c-ae88-133deddfce94
DEVICE=eno33554984
ONBOOT=yes
TEAM_MASTER=team0
DEVICETYPE=TeamPort
[root@linux ~]# cat /etc/sysconfig/network-scripts/ifcfg-test-2
NAME=test-2
UUID=116ef596-d983-456c-a6ae-a74a4f8c03dc
DEVICE=eno50332208
ONBOOT=yes
TEAM_MASTER=team0
DEVICETYPE=TeamPort
查看网络组状态:
[root@linux ~]# teamdctl team0 stat
setup:
runner: activebackup
runner:
active port:
发现port端口均没有开启
开启port端口
[root@linux ~]# nmcli con up test-1
Connection successfully activated (D-Bus active path: /org/freedesktop/NetworkManager/ActiveConnection/5)
[root@linux ~]# nmcli con up test-2
Connection successfully activated (D-Bus active path: /org/freedesktop/NetworkManager/ActiveConnection/7)
[root@linux ~]# teamdctl team0 stat
setup:
runner: activebackup
ports:
eno33554984
link watches:
link summary: up
instance[link_watch_0]:
name: ethtool
link: up
down count: 0
eno50332208
link watches:
link summary: up
instance[link_watch_0]:
name: ethtool
link: up
down count: 0
runner:
active port: eno33554984
可以看到端口开启成功
[root@linux ~]# ping -I team0 10.1.70.172
PING 10.1.70.172 (10.1.70.172) from 10.1.70.24 team0: 56(84) bytes of data.
64 bytes from 10.1.70.172: icmp_seq=1 ttl=64 time=0.500 ms
64 bytes from 10.1.70.172: icmp_seq=2 ttl=64 time=0.804 ms
^C
--- 10.1.70.172 ping statistics ---
2 packets transmitted, 2 received, 0% packet loss, time 1001ms
rtt min/avg/max/mdev = 0.500/0.652/0.804/0.152 ms
[root@linux ~]#
配置成功,可以看到当前活动的是eno33554984,测试禁用后能否成功
[root@linux ~]# nmcli device disconnect eno33554984
Device 'eno33554984' successfully disconnected.
[root@linux ~]# ping -I team0 10.1.70.172
PING 10.1.70.172 (10.1.70.172) from 10.1.70.24 team0: 56(84) bytes of data.
测试不成功,通过查找资料了解到当使用activebackup的runner时,必须加上一个参数
[root@linux ~]# nmcli con modify test team.config '{"runner":{"name":"activebackup","hwaddr_policy":"by_active"}}'
[root@linux ~]# cat /etc/sysconfig/network-scripts/ifcfg-test
DEVICE=team0
TEAM_CONFIG="{\"runner\":{\"name\":\"activebackup\",\"hwaddr_policy\":\"by_active\"}}"
DEVICETYPE=Team
BOOTPROTO=none
DEFROUTE=yes
IPV4_FAILURE_FATAL=no
IPV6INIT=yes
IPV6_AUTOCONF=yes
IPV6_DEFROUTE=yes
IPV6_FAILURE_FATAL=no
NAME=test
UUID=5a3bfb26-993f-45ad-add6-246ff419e7bd
ONBOOT=yes
IPADDR=10.1.70.24
PREFIX=16
IPV6_PEERDNS=yes
IPV6_PEERROUTES=yes
详情参考:http://183530300.blog.51cto.com/894387/1851388

相关文章推荐
- 三层交换实现vlan间路由与dhcp配置 推荐
- centos7的网络配置以及设置主机名和绑定IP的问题
- 路由重分布新技术实现多种路由协议不同网络间通信案例实操应用 推荐
- linux服务器(centos7)Apache+Tomcat 安装配置以及集群实现(上)
- 在vmware上安装centos7以及网络配置
- haproxy配置详解以及动静分离的实现 推荐
- centos7的网络配置以及设置主机名和绑定IP的问题
- 网络设备配置与管理---VLAN间路由实现部门间通信
- 高可用集群之heartbeat配置,实现web服务的高可用以及Mariadb高可用 推荐
- KVM 【SNAT/DNAT2种配置实现以及扁平化网络模式(flat)实现/virsh2种动态迁移实现】
- centos7的网络配置以及设置主机名和绑定IP的问题
- 华为AR28-31通过单臂路由实现vlan间路由以及介入Internet 推荐
- CentOS6 网络管理之网卡配置及简单路由设置 推荐
- KVM 【SNAT/DNAT2种配置实现以及扁平化网络模式(flat)实现/virsh2种动态迁移实现】 分类: Linux kvm 网络通讯 2015-07-25 00:05 322人阅读 评论(0) 收藏
- Ubuntu server的网络配置,静态IP地址、默认路由以及dns等网络参数配置命令
- 精心为您准备的Openssl实现私有CA的详细过程,以及如何配置安装证书 推荐
- NAT网络地址转换大型服务配置以及详细讲解 推荐
- rhcsa学习杂记—centos7命令行配置网络连接以及修改主机名
- 一步一步实现企业网络架构之二:安装和配置DHCP 推荐