android6.0 Activity(一) Activity创建 初始化
2016-09-01 16:36
381 查看
之前在http://blog.csdn.net/kc58236582/article/details/50069785这篇博客中,讲述了一个Activity如何通过AMS启动的。还有http://blog.csdn.net/kc58236582/article/details/52088224这篇博客分析了Activity和WMS
ViewRootImpl的关系。这样我们对这块有一个初步的认识,这个系列的博客主要和Activity相关,也是看了老罗的博客加上自己的理解,开始整理这块代码。当然代码是android6.0的。
我们先来看下面这张图,context ContextWrapper ContextThemeWrapper Activity的关系:
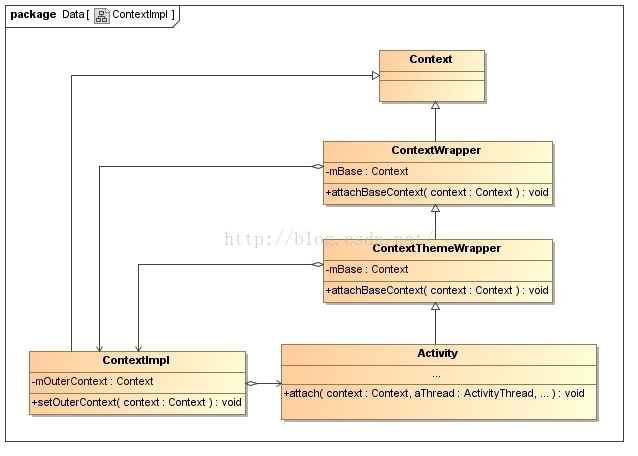
这张图是典型的装饰者模式,ContextImpl是作为ContextWrapper的一个成员变量mBase,上面这张图有点错误ContextThemeWrapper中没有mBase这个成员变量,只有其父类有。因此ContextImpl和ContextThemeWrapper的一个关联线应该去掉。ContextImpl最后会执行很多,比如startActivity,都是通过它实现的。
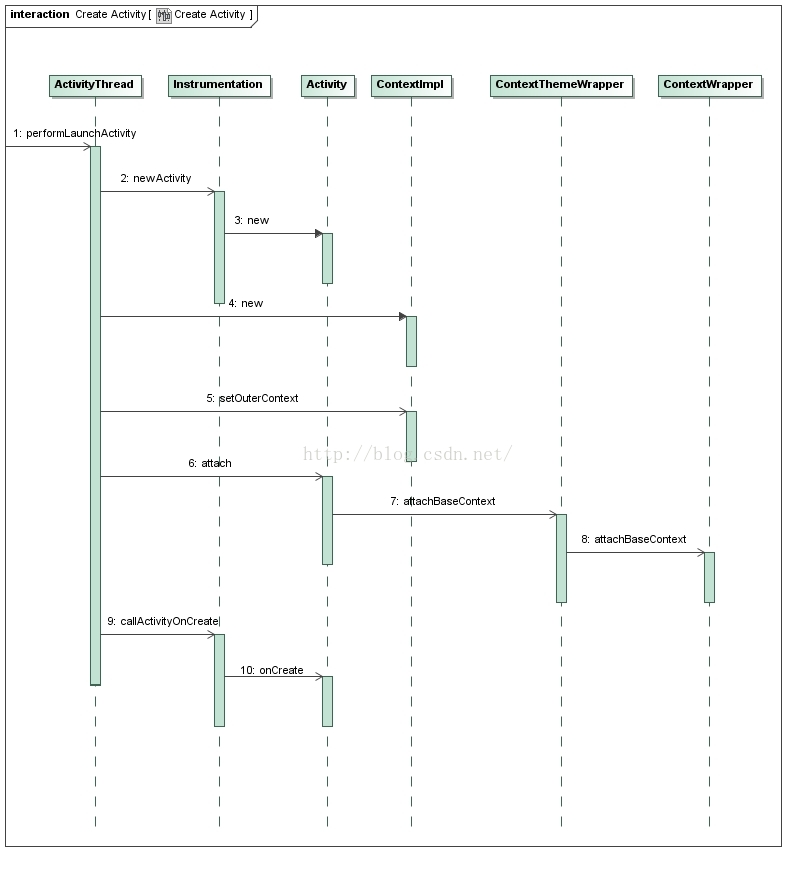
在之前的博客,我们分析过了Activity的启动,这里再盗用一张图:
上面是调用mInstrumentation的newActivity函数来创建Activity的,那我们先看看mInstrumentation是怎么来的。
在之前Activity启动的博客中我们分析过,当进程启动后会调用ActivityThread的main函数,在这个函数中会通过Binder调用AMS的attachApplicationLocked,然后在这里会调用ActivityThread的bindApplication函数建立各种对象,最后才会创建Activity等。
在bindApplication这个函数中最后发送了一个消息,最后会在handleApplication中有下面这行代码创建了mInstrumentation对象
我们再来看看Instrumentation的newActivity函数
ContextImpl是通过createBaseContextForActivity函数创建,然后是通过Activity的attach最后给了ContextWrapper的mBase成员变量
先来看ActivityThread的createBaseContextForActivity函数,这个函数是通过ContextImpl的createActivityContext函数创建的ContextImpl,并且调用setOuterContext把Activity设置为其mOuterContext成员变量。
再来看下ContextImpl的静态函数createActivityContext,直接创建了一个ContextImpl,并且把ActivityThread作为参数传入了。
在ActivityThread中performLaunchActivity函数中,后面调用了Activity的attach函数,并且把之前创建的ContextImpl传入了,我们下面看看Activity是如何处理这个ContextImpl的。
其直接调用了attachBaseContext函数,这个函数是ContextThemeWrapper中的函数,它也是调用了父类的attachBaseContext函数
在ContextWrapper中这个函数,直接把之前的ContextImpl对象赋给其成员变量mBase了。
我们再来看startActivity函数,也就是在Activity中调用startActivity函数最终会调用ContextImpl的startActivity函数。
我们再看ContextImpl的startActivity函数,最后会调用其mMainThread的getInstrumentation接口,也就是mInstrumentation。
最后在Instrumentation的execStartActivity通过binder到AMS中调用了startActivity函数。
Activity的attach在Activity WMS ViewRootImpl三者关系(Activity创建窗口 按键分发等)这篇博客中分析过了,这里我们再分析下。这里主要调用attachBaseContext函数完成ContextImpl的设置,然后创建了PhoneWindow对象,并且调用setCallback设置回调。最后调用了setWindowManager设置窗口管理者
......
mWindow = new PhoneWindow(this);//新建PhoneWindow对象
mWindow.setCallback(this);//这window中设置回调,在按键事件分发的时候中用到。如果有这个回调,就调用Activity的dispatchKeyEvent
mWindow.setOnWindowDismissedCallback(this);
......
mWindow.setWindowManager(
(WindowManager)context.getSystemService(Context.WINDOW_SERVICE),
mToken, mComponent.flattenToString(),
(info.flags & ActivityInfo.FLAG_HARDWARE_ACCELERATED) != 0);
if (mParent != null) {
mWindow.setContainer(mParent.getWindow());
}
mWindowManager = mWindow.getWindowManager();再来看看Window类的setWindowManager方法,也是最后调用了WindowManagerImpl的createLocalWindowManager
mViews保存的是View对象,DecorView
mRoots保存和顶层View关联的ViewRootImpl对象
mParams保存的是创建顶层View的layout参数。
而WindowManagerGlobal类也负责和WMS通信。
而这个WindowManagerGlobal,会在后面的系列中做详细介绍。
mInstrumentation.callActivityOnCreate(activity, r.state);Instrumentation的callActivityOnCreate函数,最后调用了Activity的performCreate函数
在Activity的performCreate函数中最终会调用Activity的onCreate函数
而我们一般会在子类的Activity的onCreate调用setContentView函数,来绘制界面。
之前在http://blog.csdn.net/kc58236582/article/details/50069785这篇博客中,讲述了一个Activity如何通过AMS启动的。还有http://blog.csdn.net/kc58236582/article/details/52088224这篇博客分析了Activity和WMS
ViewRootImpl的关系。这样我们对这块有一个初步的认识,这个系列的博客主要和Activity相关,也是看了老罗的博客加上自己的理解,开始整理这块代码。当然代码是android6.0的。
我们先来看下面这张图,context ContextWrapper ContextThemeWrapper Activity的关系:
这张图是典型的装饰者模式,ContextImpl是作为ContextWrapper的一个成员变量mBase,上面这张图有点错误ContextThemeWrapper中没有mBase这个成员变量,只有其父类有。因此ContextImpl和ContextThemeWrapper的一个关联线应该去掉。ContextImpl最后会执行很多,比如startActivity,都是通过它实现的。
在之前的博客,我们分析过了Activity的启动,这里再盗用一张图:
创建Activity
下面我主要分析下ActivityThread的performLaunchActivity函数,这里我们先分析Activity的创建。private Activity performLaunchActivity(ActivityClientRecord r, Intent customIntent) {
ActivityInfo aInfo = r.activityInfo;
if (r.packageInfo == null) {
r.packageInfo = getPackageInfo(aInfo.applicationInfo, r.compatInfo,
Context.CONTEXT_INCLUDE_CODE);
}
ComponentName component = r.intent.getComponent();
if (component == null) {
component = r.intent.resolveActivity(
mInitialApplication.getPackageManager());
r.intent.setComponent(component);
}
if (r.activityInfo.targetActivity != null) {
component = new ComponentName(r.activityInfo.packageName,
r.activityInfo.targetActivity);
}
Activity activity = null;
try {
java.lang.ClassLoader cl = r.packageInfo.getClassLoader();
activity = mInstrumentation.newActivity(//创建Activity
cl, component.getClassName(), r.intent);
StrictMode.incrementExpectedActivityCount(activity.getClass());
r.intent.setExtrasClassLoader(cl);
r.intent.prepareToEnterProcess();
if (r.state != null) {
r.state.setClassLoader(cl);
}
} catch (Exception e) {
if (!mInstrumentation.onException(activity, e)) {
throw new RuntimeException(
"Unable to instantiate activity " + component
+ ": " + e.toString(), e);
}
}
......上面是调用mInstrumentation的newActivity函数来创建Activity的,那我们先看看mInstrumentation是怎么来的。
在之前Activity启动的博客中我们分析过,当进程启动后会调用ActivityThread的main函数,在这个函数中会通过Binder调用AMS的attachApplicationLocked,然后在这里会调用ActivityThread的bindApplication函数建立各种对象,最后才会创建Activity等。
在bindApplication这个函数中最后发送了一个消息,最后会在handleApplication中有下面这行代码创建了mInstrumentation对象
mInstrumentation = (Instrumentation)
cl.loadClass(data.instrumentationName.getClassName()).newInstance();
我们再来看看Instrumentation的newActivity函数
public Activity newActivity(ClassLoader cl, String className,
Intent intent)
throws InstantiationException, IllegalAccessException,
ClassNotFoundException {
return (Activity)cl.loadClass(className).newInstance();
}
创建ContextImpl
下面我们再来看看ContextImpl的创建Application app = r.packageInfo.makeApplication(false, mInstrumentation);
if (localLOGV) Slog.v(TAG, "Performing launch of " + r);
if (localLOGV) Slog.v(
TAG, r + ": app=" + app
+ ", appName=" + app.getPackageName()
+ ", pkg=" + r.packageInfo.getPackageName()
+ ", comp=" + r.intent.getComponent().toShortString()
+ ", dir=" + r.packageInfo.getAppDir());
if (activity != null) {
Context appContext = createBaseContextForActivity(r, activity);
CharSequence title = r.activityInfo.loadLabel(appContext.getPackageManager());
Configuration config = new Configuration(mCompatConfiguration);
if (DEBUG_CONFIGURATION) Slog.v(TAG, "Launching activity "
+ r.activityInfo.name + " with config " + config);
activity.attach(appContext, this, getInstrumentation(), r.token,
r.ident, app, r.intent, r.activityInfo, title, r.parent,
r.embeddedID, r.lastNonConfigurationInstances, config,ContextImpl是通过createBaseContextForActivity函数创建,然后是通过Activity的attach最后给了ContextWrapper的mBase成员变量
先来看ActivityThread的createBaseContextForActivity函数,这个函数是通过ContextImpl的createActivityContext函数创建的ContextImpl,并且调用setOuterContext把Activity设置为其mOuterContext成员变量。
private Context createBaseContextForActivity(ActivityClientRecord r, final Activity activity) {
int displayId = Display.DEFAULT_DISPLAY;
try {
displayId = ActivityManagerNative.getDefault().getActivityDisplayId(r.token);
} catch (RemoteException e) {
}

ContextImpl appContext = ContextImpl.createActivityContext(
this, r.packageInfo, displayId, r.overrideConfig);
appContext.setOuterContext(activity);
Context baseContext = appContext;

final DisplayManagerGlobal dm = DisplayManagerGlobal.getInstance();
// For debugging purposes, if the activity's package name contains the value of
// the "debug.use-second-display" system property as a substring, then show
// its content on a secondary display if there is one.
String pkgName = SystemProperties.get("debug.second-display.pkg");
if (pkgName != null && !pkgName.isEmpty()
&& r.packageInfo.mPackageName.contains(pkgName)) {
for (int id : dm.getDisplayIds()) {
if (id != Display.DEFAULT_DISPLAY) {
Display display =
dm.getCompatibleDisplay(id, appContext.getDisplayAdjustments(id));
baseContext = appContext.createDisplayContext(display);
break;
}
}
}
return baseContext;
}
再来看下ContextImpl的静态函数createActivityContext,直接创建了一个ContextImpl,并且把ActivityThread作为参数传入了。
static ContextImpl createActivityContext(ActivityThread mainThread,
LoadedApk packageInfo, int displayId, Configuration overrideConfiguration) {
if (packageInfo == null) throw new IllegalArgumentException("packageInfo");
return new ContextImpl(null, mainThread, packageInfo, null, null, false,
null, overrideConfiguration, displayId);
}
在ActivityThread中performLaunchActivity函数中,后面调用了Activity的attach函数,并且把之前创建的ContextImpl传入了,我们下面看看Activity是如何处理这个ContextImpl的。
final void attach(Context context, ActivityThread aThread,
Instrumentation instr, IBinder token, int ident,
Application application, Intent intent, ActivityInfo info,
CharSequence title, Activity parent, String id,
NonConfigurationInstances lastNonConfigurationInstances,
Configuration config, String referrer, IVoiceInteractor voiceInteractor) {
attachBaseContext(context);
其直接调用了attachBaseContext函数,这个函数是ContextThemeWrapper中的函数,它也是调用了父类的attachBaseContext函数
@Override
protected void attachBaseContext(Context newBase) {
super.attachBaseContext(newBase);
}
在ContextWrapper中这个函数,直接把之前的ContextImpl对象赋给其成员变量mBase了。
protected void attachBaseContext(Context base) {
if (mBase != null) {
throw new IllegalStateException("Base context already set");
}
mBase = base;
}
我们再来看startActivity函数,也就是在Activity中调用startActivity函数最终会调用ContextImpl的startActivity函数。
@Override
public void startActivity(Intent intent) {
mBase.startActivity(intent);
}
我们再看ContextImpl的startActivity函数,最后会调用其mMainThread的getInstrumentation接口,也就是mInstrumentation。
@Override
public void startActivity(Intent intent, Bundle options) {
warnIfCallingFromSystemProcess();
if ((intent.getFlags()&Intent.FLAG_ACTIVITY_NEW_TASK) == 0) {
throw new AndroidRuntimeException(
"Calling startActivity() from outside of an Activity "
+ " context requires the FLAG_ACTIVITY_NEW_TASK flag."
+ " Is this really what you want?");
}
mMainThread.getInstrumentation().execStartActivity(
getOuterContext(), mMainThread.getApplicationThread(), null,
(Activity) null, intent, -1, options);
}
最后在Instrumentation的execStartActivity通过binder到AMS中调用了startActivity函数。
public ActivityResult execStartActivity(
Context who, IBinder contextThread, IBinder token, Activity target,
Intent intent, int requestCode, Bundle options) {
IApplicationThread whoThread = (IApplicationThread) contextThread;
Uri referrer = target != null ? target.onProvideReferrer() : null;
if (referrer != null) {
intent.putExtra(Intent.EXTRA_REFERRER, referrer);
}
if (mActivityMonitors != null) {
synchronized (mSync) {
final int N = mActivityMonitors.size();
for (int i=0; i<N; i++) {
final ActivityMonitor am = mActivityMonitors.get(i);
if (am.match(who, null, intent)) {
am.mHits++;
if (am.isBlocking()) {
return requestCode >= 0 ? am.getResult() : null;
}
break;
}
}
}
}
try {
intent.migrateExtraStreamToClipData();
intent.prepareToLeaveProcess();
int result = ActivityManagerNative.getDefault()
.startActivity(whoThread, who.getBasePackageName(), intent,
intent.resolveTypeIfNeeded(who.getContentResolver()),
token, target != null ? target.mEmbeddedID : null,
requestCode, 0, null, options);
Activity的attach函数
Activity的attach在Activity WMS ViewRootImpl三者关系(Activity创建窗口 按键分发等)这篇博客中分析过了,这里我们再分析下。这里主要调用attachBaseContext函数完成ContextImpl的设置,然后创建了PhoneWindow对象,并且调用setCallback设置回调。最后调用了setWindowManager设置窗口管理者......
mWindow = new PhoneWindow(this);//新建PhoneWindow对象
mWindow.setCallback(this);//这window中设置回调,在按键事件分发的时候中用到。如果有这个回调,就调用Activity的dispatchKeyEvent
mWindow.setOnWindowDismissedCallback(this);
......
mWindow.setWindowManager(
(WindowManager)context.getSystemService(Context.WINDOW_SERVICE),
mToken, mComponent.flattenToString(),
(info.flags & ActivityInfo.FLAG_HARDWARE_ACCELERATED) != 0);
if (mParent != null) {
mWindow.setContainer(mParent.getWindow());
}
mWindowManager = mWindow.getWindowManager();再来看看Window类的setWindowManager方法,也是最后调用了WindowManagerImpl的createLocalWindowManager
public void setWindowManager(WindowManager wm, IBinder appToken, String appName,
boolean hardwareAccelerated) {
mAppToken = appToken;
mAppName = appName;
mHardwareAccelerated = hardwareAccelerated
|| SystemProperties.getBoolean(PROPERTY_HARDWARE_UI, false);
if (wm == null) {
wm = (WindowManager)mContext.getSystemService(Context.WINDOW_SERVICE);
}
mWindowManager = ((WindowManagerImpl)wm).createLocalWindowManager(this);
}而createLocalWindowManager函数就是创建了一个WindowManagerImpl对象,因此Activity的mWindowManager成员变量最后就是WindowManagerImpl对象。public WindowManagerImpl createLocalWindowManager(Window parentWindow) {
return new WindowManagerImpl(mDisplay, parentWindow);
}而在WindowManagerImpl中有一个mGlobal的变量,最后都是通过这个变量调用的方法,因此我们来看看这个类。public final class WindowManagerImpl implements WindowManager {
private final WindowManagerGlobal mGlobal = WindowManagerGlobal.getInstance();WindowManagerGlobal类中主要有3个非常重要的变量private final ArrayList<View> mViews = new ArrayList<View>(); private final ArrayList<ViewRootImpl> mRoots = new ArrayList<ViewRootImpl>(); private final ArrayList<WindowManager.LayoutParams> mParams = new ArrayList<WindowManager.LayoutParams>();
mViews保存的是View对象,DecorView
mRoots保存和顶层View关联的ViewRootImpl对象
mParams保存的是创建顶层View的layout参数。
而WindowManagerGlobal类也负责和WMS通信。
而这个WindowManagerGlobal,会在后面的系列中做详细介绍。
Activity的onCreate函数
最后在ActivityThread的performLaunchActivity中调用了如下函数mInstrumentation.callActivityOnCreate(activity, r.state);Instrumentation的callActivityOnCreate函数,最后调用了Activity的performCreate函数
public void callActivityOnCreate(Activity activity, Bundle icicle,
PersistableBundle persistentState) {
prePerformCreate(activity);
activity.performCreate(icicle, persistentState);
postPerformCreate(activity);
}
在Activity的performCreate函数中最终会调用Activity的onCreate函数
final void performCreate(Bundle icicle) {
restoreHasCurrentPermissionRequest(icicle);
onCreate(icicle);
mActivityTransitionState.readState(icicle);
performCreateCommon();
}
而我们一般会在子类的Activity的onCreate调用setContentView函数,来绘制界面。

相关文章推荐
- android6.0 Activity(四) Surface创建
- android6.0 Activity(二) View创建过程
- android6.0 Activity(四) Surface创建
- 创建自定义的Activity
- Java中两种String对象创建和初始化方式比较
- Java:对象创建和初始化过程
- Java对象创建和初始化过程,处理字符串的机制
- 跟我一起学Windows Workflow Foundation(5)-----使用activity设计器创建一个整合的定制activity
- java中对象数组的创建与初始化
- jsf in action 笔记:bean的创建和初始化(三)(List,Map属性)--2008.04.12
- jsf in action 笔记:bean的创建和初始化(一)(3.3 Creating and initializing beans)--2008.04.12
- 有关于在Java 类的静态初始化块中创建一个自身实例的问题。
- JAVA中对象创建和初始化过程
- JAVA中对象创建和初始化过程
- jsf in action 笔记:bean的创建和初始化(四)(List,Map作为单独的managed bean)--2008.04.13
- 创建和初始化bean
- 跟我一起学Windows Workflow Foundation(5)-----使用activity设计器创建一个整合的定制activity
- 跟我一起学Windows Workflow Foundation(5)-----使用activity设计器创建一个整合的定制activity
- C# 3.0新特征之创建和初始化集合对象
- JAVA中对象创建和初始化过程