Spring Boot 集成Swagger2
2016-08-22 15:28
337 查看
第一步: 在pom.xml文件中引入Swagger2的包
第二步: 编写Swagger的控制类
第三步:写一个测试的web类
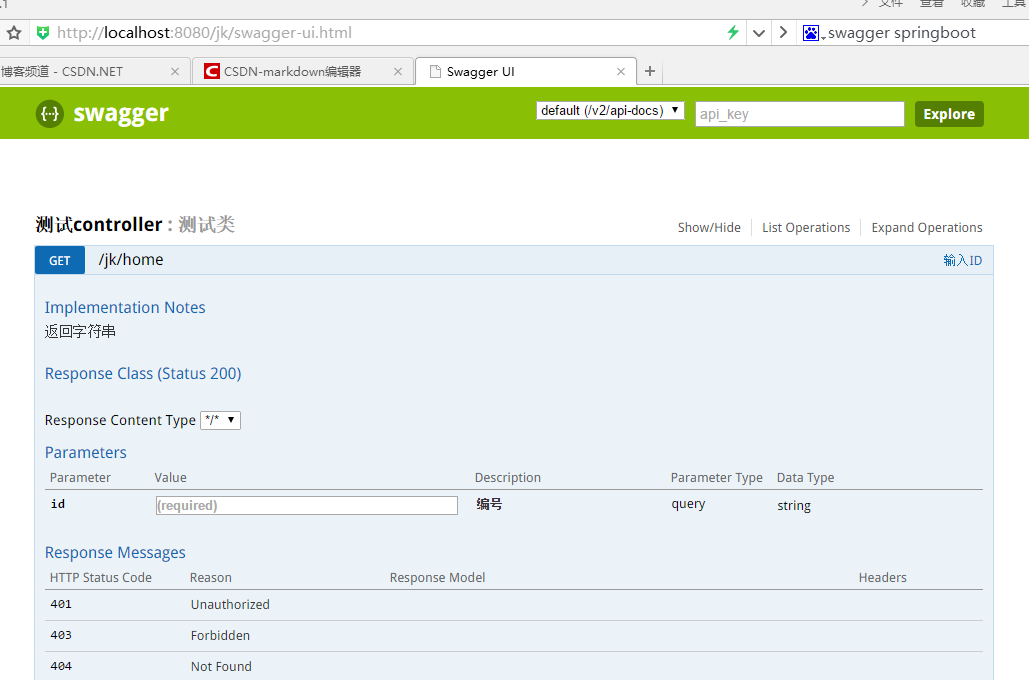
第四步; 启动项目 测试Swagger是否成功。
访问路径:http://localhost:8080/项目名/swagger-ui.html
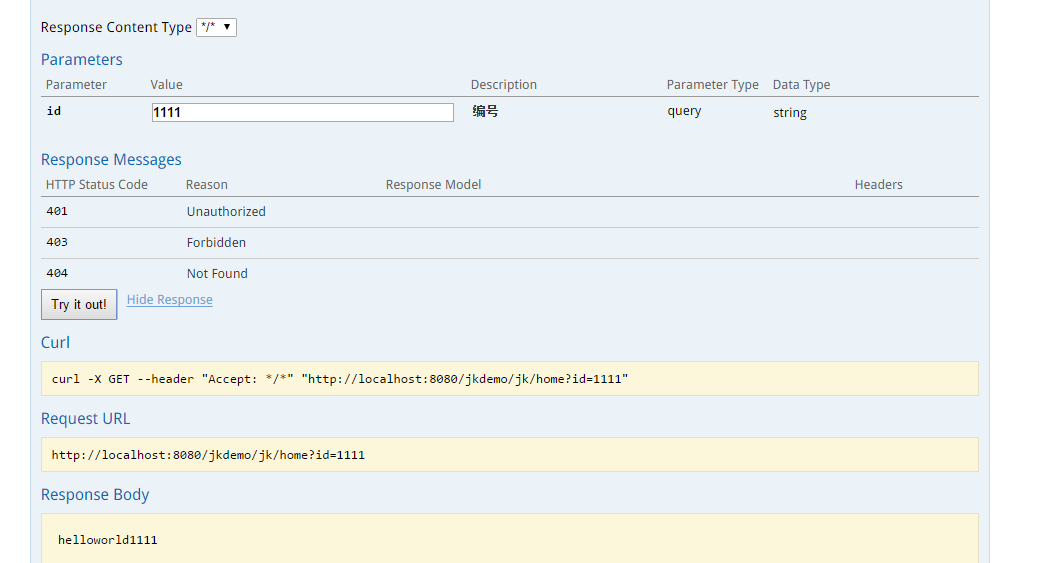
输入字符111后的返回结果:
<properties>
<springfox.version>2.2.2</springfox.version>
</properties>

<dependency>
<groupId>io.springfox</groupId>
<artifactId>springfox-swagger-ui</artifactId>
<version>${springfox.version}</version>
</dependency>
<dependency>
<groupId>io.springfox</groupId>
<artifactId>springfox-swagger2</artifactId>
<version>${springfox.version}</version>
</dependency>
第二步: 编写Swagger的控制类
@Configuration
@EnableSwagger2
public class SwaggerConfiguration implements EnvironmentAware {
private final Logger log = LoggerFactory.getLogger(SwaggerConfiguration.class);
public static final String DEFAULT_INCLUDE_PATTERN = "/.*";
private RelaxedPropertyResolver propertyResolver;

@Override
public void setEnvironment(Environment environment) {
this.propertyResolver = new RelaxedPropertyResolver(environment, "swagger.");
}

@Bean
public Docket swaggerSpringfoxDocket() {
StopWatch watch = new StopWatch();
watch.start();
Docket swaggerSpringMvcPlugin = new Docket(DocumentationType.SWAGGER_2)
.apiInfo(apiInfo())
.genericModelSubstitutes(ResponseEntity.class)
.select()
//设置需要扫描的web包路径,去掉自带的BaseErrorController测试接口,只显示自己包下面的接口
.apis(RequestHandlerSelectors.basePackage("com.vx.jk"))
.paths(regex(SwaggerConfiguration.DEFAULT_INCLUDE_PATTERN))
.build();
watch.stop();
return swaggerSpringMvcPlugin;
}

private ApiInfo apiInfo() {
return new ApiInfo(
propertyResolver.getProperty("title"),
propertyResolver.getProperty("description"),
propertyResolver.getProperty("version"),
propertyResolver.getProperty("termsOfServiceUrl"),
propertyResolver.getProperty("contact"),
propertyResolver.getProperty("license"),
propertyResolver.getProperty("licenseUrl")
);
}

}
第三步:写一个测试的web类
package com.vx.jk.web;

@RestController
@RequestMapping("jk")
@Api(value = "测试Controller", description = "测试类")
public class PhotoPriceController {

private static Logger LOG = LoggerFactory.getLogger(PhotoPriceController.class);

/*
@ApiOperation(value = “接口说明”, httpMethod = “接口请求方式”, response = “接口返回参数类型”, notes = “接口发布说明”;其他参数可参考源码;
@ApiParam(required = “是否必须参数”, name = “参数名称”, value = “参数具体描述”
@RequestParam(value = "id") 再get请求时,已id=数据值的形式拼接到url的?后面,如果不加,参数可能接受不到数据
@RequestBody 添加在输入参数上时,标识输入的数据是一个body体对象,如果不加,post提交的对象数据,参数可能接受不到数据,并且一个接口只能有一个body参数
*/
@ApiOperation(value = "输入ID",httpMethod="GET", notes = "返回字符串", response = String.class)
@RequestMapping(value = "/home", method = RequestMethod.GET)
public String home(@ApiParam(name="id", value="编号", required=true)@RequestParam(value = "id") String id,
HttpServletRequest request){
System.out.println(id+"------"+request.getParameter("id"));
return "helloworld"+id;
}
}
第四步; 启动项目 测试Swagger是否成功。
访问路径:http://localhost:8080/项目名/swagger-ui.html
输入字符111后的返回结果:

相关文章推荐
- SpringBoot 集成Swagger2
- SpringBoot非官方教程 | 第十一篇:springboot集成swagger2,构建优雅的Restful API
- Springboot集成Swagger2
- SpringCloud SpringBoot mybatis 分布式微服务(二十六)集成swagger2构建Restful API
- Swagger2 (2)由浅入深 集成springboot + springfox-swagger
- SpringBoot非官方教程 | 第十一篇:springboot集成swagger2,构建优雅的Restful API
- springboot集成swagger2,构建优雅的Restful API
- SpringBoot(八)_springboot集成swagger2
- SpringBoot实践之---集成Swagger2生成Restful风格的在线API
- SpringBoot集成Swagger2实现Restful(类型转换错误解决办法)
- SpringBoot学习之统一异常处理、404处理以及集成Swagger2
- 88. Spring Boot集成Swagger2【从零开始学Spring Boot】
- SpringBoot集成Swagger2实现Restful(类型转换错误解决办法)
- Spring Boot中Swagger2的集成
- Spring Boot (一) 基础搭建、兼容jar启动及war tomcat启动、集成Swagger2 API。
- 从0开始学习SpringCould(6)--SpringBoot 集成swagger2
- springboot项目集成Swagger2
- Spring Boot集成Swagger2
- 企业分布式微服务云SpringCloud SpringBoot mybatis (二十九)springboot集成swagger2,构建优雅的Restfu API
- SpringCloud SpringBoot mybatis 分布式微服务(三十)springboot集成swagger2,构建优雅的Restfu API