自定义键盘
2016-08-17 18:13
417 查看
主要思路:自定义键盘就是重新加载textfield的inputView
自定义一个可以从相册或者拍照来上传图片的键盘
第一步:对键盘进行监听
//增加监听,当键盘出现时收出消息
[[NSNotificationCenter defaultCenter] addObserver:self selector:@selector(keyboardWillShow:) name:UIKeyboardWillShowNotification object:nil];
//增加监听,当键盘退出时收出消息
[[NSNotificationCenter defaultCenter] addObserver:self selector:@selector(keyboardWillHiden:) name:UIKeyboardWillHideNotification object:nil];
//增加监听,当键盘改变时收出消息
[[NSNotificationCenter defaultCenter] addObserver:self selector:@selector(keyboardChange:) name:UIKeyboardWillChangeFrameNotification object:nil];
//初始化一个View,用来放“照片”按钮
specView = [[UIView alloc] initWithFrame:CGRectMake(0, HEIGHT, WIDTH, 30)];
specView.backgroundColor = [UIColor orangeColor];
[self.view addSubview:specView];
第二步:
#pragma mark -- 当键盘出现时调用
-(void)keyboardWillShow:(NSNotification *)noti {
//获取键盘高度
NSDictionary *userInfo = noti.userInfo;
NSValue *aValue = [userInfo objectForKey:UIKeyboardFrameEndUserInfoKey];
CGRect keyboardRect = [aValue CGRectValue];
int height = keyboardRect.size.height;
//创建“照片”按钮
UIButton *photoBtn = [UIButton buttonWithType:UIButtonTypeSystem];
photoBtn.frame = CGRectMake(SP_W(20), 5, SP_W(30), 20);
[photoBtn setTitle:@"照片" forState:UIControlStateNormal];
[photoBtn setTitleColor:[UIColor whiteColor] forState:UIControlStateNormal];
photoBtn.titleLabel.font = [UIFont systemFontOfSize:13];
[photoBtn addTarget:self action:@selector(ShowPhoto:) forControlEvents:UIControlEventTouchUpInside];
[specView addSubview:photoBtn];
//改变specView的位置,在键盘上面
[UIView animateWithDuration:0.1 animations:^{
specView.frame = CGRectMake(0, HEIGHT - height - 30, WIDTH, 30);
fabiaoText.frame = CGRectMake(SP_W(10), 665 - height - 50 + 30, WIDTH - SP_W(20), 40);
}];
}
第三步:
#pragma mark -- 点击“照片”按钮事件
-(void)ShowPhoto:(UIButton *)button {
if (isPhoto == NO) {
[self layoutPhotoKeyboard];
//将textfield的inputView设置成自定义的视图
textfield.inputView = photoView;
//重新加载inputView
[textfield reloadInputViews];
isPhoto = YES;
}else {
//此时将textfield的inputView设置成nil,键盘会重新换成系统键盘
textfield.inputView = nil;
//重新加载inputView
[textfield reloadInputViews];
isPhoto = NO;
}
}
#pragma mark -- 自定义键盘的样式
-(void)layoutPhotoKeyboard {
//背景
photoView = [[UIView alloc] initWithFrame:CGRectMake(0, 0, WIDTH, 160)];
//相册按钮
UIButton *xiangceBtn = [UIButton buttonWithType:UIButtonTypeSystem];
xiangceBtn.frame = CGRectMake(SP_W(10), 10, SP_W(50), SP_W(50));
[xiangceBtn setTitle:@"相册" forState:UIControlStateNormal];
[xiangceBtn addTarget:self action:@selector(FromXiangce:) forControlEvents:UIControlEventTouchUpInside];
[photoView addSubview:xiangceBtn];
//拍照按钮
UIButton *paizhaoBtn = [UIButton buttonWithType:UIButtonTypeSystem];
paizhaoBtn.frame = CGRectMake(CGRectGetMaxX(xiangceBtn.frame) + SP_W(20), 10, SP_W(50), SP_W(50));
[paizhaoBtn setTitle:@"拍照" forState:UIControlStateNormal];
[paizhaoBtn addTarget:self action:@selector(FromPaiZhao:) forControlEvents:UIControlEventTouchUpInside];
[photoView addSubview:paizhaoBtn];
}
第四步:分别从相册和拍照获取照片
#pragma mark -- 照片 从相册获取
-(void)FromXiangce:(UIButton *)button {
//创建对象
UIImagePickerController *imagePicker = [[UIImagePickerController alloc] init];
//(选择类型)表示仅仅从相册中选取照片
imagePicker.sourceType = UIImagePickerControllerSourceTypePhotoLibrary;
//指定代理,因此我们要实现UIImagePickerControllerDelegate,
// UINavigationControllerDelegate协议
imagePicker.delegate = self;
//设置在相册选完照片后,是否跳到编辑模式进行图片剪裁。(允许用户编辑)
imagePicker.allowsEditing = YES;
//显示相册
[self presentViewController:imagePicker animated:YES completion:nil];
}
#pragma mark -- 照片 拍照获取
-(void)FromPaiZhao:(UIButton *)button {
if ([UIImagePickerController isSourceTypeAvailable:
UIImagePickerControllerSourceTypeCamera]) {
UIImagePickerController *imagePicker = [[UIImagePickerController alloc] init];
imagePicker.sourceType = UIImagePickerControllerSourceTypeCamera;
imagePicker.delegate = self;
imagePicker.allowsEditing = YES; //允许用户编辑
[self presentViewController:imagePicker animated:YES completion:nil];
} else {
//弹出窗口响应点击事件
UIAlertView *alert = [[UIAlertView alloc] initWithTitle:@"警告"
message:@"未检测到摄像头" delegate:nil cancelButtonTitle:nil
otherButtonTitles:@"确定", nil, nil];
[alert show];
}
}
//图片完成之后处理
- (void)imagePickerController:(UIImagePickerController *)picker didFinishPickingImage:(UIImage *)image editingInfo:(NSDictionary *)editingInfo {
//image 就是修改后的照片
//将image放到你想要放的地方就行了
//结束操作
[self dismissViewControllerAnimated:YES completion:nil];
}
自定义表情键盘和上面的原理一样,只是代码比这个稍微复杂点,稍后整理。。。
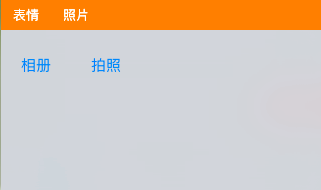
效果图:灰色部分是键盘,再点击一次照片,会换成系统键盘

自定义一个可以从相册或者拍照来上传图片的键盘
第一步:对键盘进行监听
//增加监听,当键盘出现时收出消息
[[NSNotificationCenter defaultCenter] addObserver:self selector:@selector(keyboardWillShow:) name:UIKeyboardWillShowNotification object:nil];
//增加监听,当键盘退出时收出消息
[[NSNotificationCenter defaultCenter] addObserver:self selector:@selector(keyboardWillHiden:) name:UIKeyboardWillHideNotification object:nil];
//增加监听,当键盘改变时收出消息
[[NSNotificationCenter defaultCenter] addObserver:self selector:@selector(keyboardChange:) name:UIKeyboardWillChangeFrameNotification object:nil];
//初始化一个View,用来放“照片”按钮
specView = [[UIView alloc] initWithFrame:CGRectMake(0, HEIGHT, WIDTH, 30)];
specView.backgroundColor = [UIColor orangeColor];
[self.view addSubview:specView];
第二步:
#pragma mark -- 当键盘出现时调用
-(void)keyboardWillShow:(NSNotification *)noti {
//获取键盘高度
NSDictionary *userInfo = noti.userInfo;
NSValue *aValue = [userInfo objectForKey:UIKeyboardFrameEndUserInfoKey];
CGRect keyboardRect = [aValue CGRectValue];
int height = keyboardRect.size.height;
//创建“照片”按钮
UIButton *photoBtn = [UIButton buttonWithType:UIButtonTypeSystem];
photoBtn.frame = CGRectMake(SP_W(20), 5, SP_W(30), 20);
[photoBtn setTitle:@"照片" forState:UIControlStateNormal];
[photoBtn setTitleColor:[UIColor whiteColor] forState:UIControlStateNormal];
photoBtn.titleLabel.font = [UIFont systemFontOfSize:13];
[photoBtn addTarget:self action:@selector(ShowPhoto:) forControlEvents:UIControlEventTouchUpInside];
[specView addSubview:photoBtn];
//改变specView的位置,在键盘上面
[UIView animateWithDuration:0.1 animations:^{
specView.frame = CGRectMake(0, HEIGHT - height - 30, WIDTH, 30);
fabiaoText.frame = CGRectMake(SP_W(10), 665 - height - 50 + 30, WIDTH - SP_W(20), 40);
}];
}
第三步:
#pragma mark -- 点击“照片”按钮事件
-(void)ShowPhoto:(UIButton *)button {
if (isPhoto == NO) {
[self layoutPhotoKeyboard];
//将textfield的inputView设置成自定义的视图
textfield.inputView = photoView;
//重新加载inputView
[textfield reloadInputViews];
isPhoto = YES;
}else {
//此时将textfield的inputView设置成nil,键盘会重新换成系统键盘
textfield.inputView = nil;
//重新加载inputView
[textfield reloadInputViews];
isPhoto = NO;
}
}
#pragma mark -- 自定义键盘的样式
-(void)layoutPhotoKeyboard {
//背景
photoView = [[UIView alloc] initWithFrame:CGRectMake(0, 0, WIDTH, 160)];
//相册按钮
UIButton *xiangceBtn = [UIButton buttonWithType:UIButtonTypeSystem];
xiangceBtn.frame = CGRectMake(SP_W(10), 10, SP_W(50), SP_W(50));
[xiangceBtn setTitle:@"相册" forState:UIControlStateNormal];
[xiangceBtn addTarget:self action:@selector(FromXiangce:) forControlEvents:UIControlEventTouchUpInside];
[photoView addSubview:xiangceBtn];
//拍照按钮
UIButton *paizhaoBtn = [UIButton buttonWithType:UIButtonTypeSystem];
paizhaoBtn.frame = CGRectMake(CGRectGetMaxX(xiangceBtn.frame) + SP_W(20), 10, SP_W(50), SP_W(50));
[paizhaoBtn setTitle:@"拍照" forState:UIControlStateNormal];
[paizhaoBtn addTarget:self action:@selector(FromPaiZhao:) forControlEvents:UIControlEventTouchUpInside];
[photoView addSubview:paizhaoBtn];
}
第四步:分别从相册和拍照获取照片
#pragma mark -- 照片 从相册获取
-(void)FromXiangce:(UIButton *)button {
//创建对象
UIImagePickerController *imagePicker = [[UIImagePickerController alloc] init];
//(选择类型)表示仅仅从相册中选取照片
imagePicker.sourceType = UIImagePickerControllerSourceTypePhotoLibrary;
//指定代理,因此我们要实现UIImagePickerControllerDelegate,
// UINavigationControllerDelegate协议
imagePicker.delegate = self;
//设置在相册选完照片后,是否跳到编辑模式进行图片剪裁。(允许用户编辑)
imagePicker.allowsEditing = YES;
//显示相册
[self presentViewController:imagePicker animated:YES completion:nil];
}
#pragma mark -- 照片 拍照获取
-(void)FromPaiZhao:(UIButton *)button {
if ([UIImagePickerController isSourceTypeAvailable:
UIImagePickerControllerSourceTypeCamera]) {
UIImagePickerController *imagePicker = [[UIImagePickerController alloc] init];
imagePicker.sourceType = UIImagePickerControllerSourceTypeCamera;
imagePicker.delegate = self;
imagePicker.allowsEditing = YES; //允许用户编辑
[self presentViewController:imagePicker animated:YES completion:nil];
} else {
//弹出窗口响应点击事件
UIAlertView *alert = [[UIAlertView alloc] initWithTitle:@"警告"
message:@"未检测到摄像头" delegate:nil cancelButtonTitle:nil
otherButtonTitles:@"确定", nil, nil];
[alert show];
}
}
//图片完成之后处理
- (void)imagePickerController:(UIImagePickerController *)picker didFinishPickingImage:(UIImage *)image editingInfo:(NSDictionary *)editingInfo {
//image 就是修改后的照片
//将image放到你想要放的地方就行了
//结束操作
[self dismissViewControllerAnimated:YES completion:nil];
}
自定义表情键盘和上面的原理一样,只是代码比这个稍微复杂点,稍后整理。。。
效果图:灰色部分是键盘,再点击一次照片,会换成系统键盘

相关文章推荐
- IOS开发之自定义系统弹出键盘上方的view
- android自定义键盘实现
- 自定义键盘
- 自定义键盘
- Android 自定义软键盘
- Android仿支付宝淘宝 - 自定义密码输入框和键盘
- 深入讲解iOS键盘三:自定义键盘的两种方法
- 自定义数字键盘类似于系统键盘
- ios开发之uitextview及uitextfield获得焦点时弹出的自定义键盘及键盘上面的附加view设置
- Android自定义View实现游戏摇杆键盘的方法示例
- AutoCompleteTextView(输入提示)和自定义键盘
- ios 自定义cell中有textField,点击textField时,防止键盘挡住textField
- [译] 用 Swift 创建自定义的键盘
- Swing JTable 自定义上下左右回车键盘事件
- android-使用PopupWindow实现随机排列的自定义密码键盘
- iOS开发之自定义表情键盘(组件封装与自动布局)
- Android自定义键盘
- swift3.0 自定义键盘
- android 自定义键盘 KeyboardView的key 文字颜色发虚模糊
- IOS 键盘右上角完成按钮自定义