Android中Socket通信之TCP与UDP传输原理
2016-08-04 15:17
591 查看
一、Socket通信简介
Android与服务器的通信方式主要有两种,一是Http通信,一是Socket通信。两者的最大差异在于,http连接使用的是“请求—响应方式”,即在请求时建立连接通道,当客户端向服务器发送请求后,服务器端才能向客户端返回数据。
而Socket通信中基于TCP/IP协议的通信则是在双方建立起连接后就可以直接进行数据的传输,在连接时可实现信息的主动推送,而不需要每次由客户端想服务器发送请求。而UDP则是提供无连接的数据报服务,UDP在发送数据报前不需建立连接,不对数据报进行检查即可发送数据包。。
那么,什么是socket?Socket又称套接字,在程序内部提供了与外界通信的端口,即端口通信。通过建立socket连接,可为通信双方的数据传输传提供通道。
1.1什么是Socket Socket
是一种抽象层,应用程序通过它来发送和接收数据,使用Socket可以将应用程序添加到网络中,与处于同一网络中的其他应用程序进行通信。简单来说,Socket提供了程序内部与外界通信的端口并为通信双方的提供了数据传输通道。
1.2Socket的分类
根据不同的的底层协议,Socket的实现是多样化的。本文中只介绍TCP/IP协议和UDP协议的通信,在这个协议族当中主要的Socket类型为流套接字(streamsocket)和数据报套接字(datagramsocket)。流套接字将TCP作为其端对端协议,提供了一个可信赖的字节流服务。数据报套接字使用UDP协议,提供数据打包发送服务。 下面,我们来认识一下这两种Socket类型的基本实现模型。
二、Socket 基本通信模型
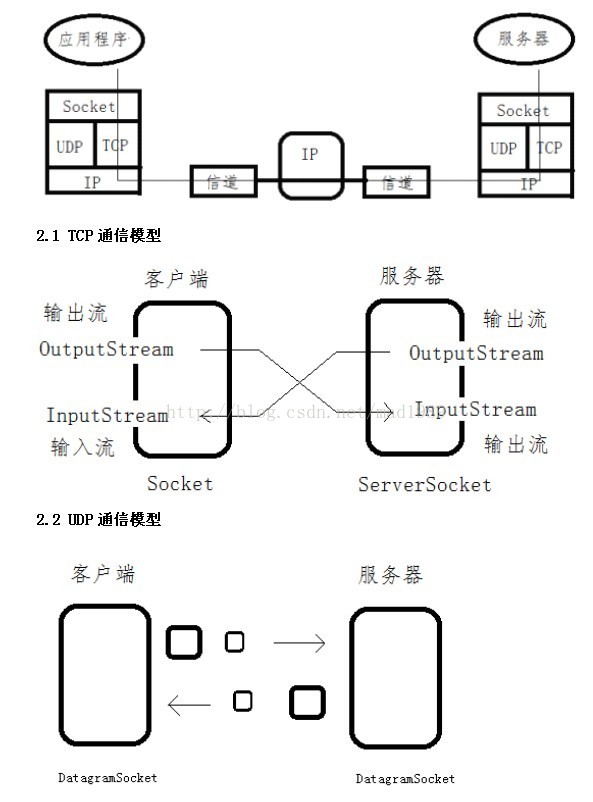
三、Socket基本实现原理
3.1基于TCP协议的Socket
1、服务器端首先声明一个ServerSocket对象并且指定端口号,然后调用Serversocket的accept()方法接收客户端的数据。accept()方法在没有数据进行接收的处于堵塞状态。(Socketsocket=serversocket.accept()),一旦接收到数据,通过inputstream读取接收的数据。
2、客户端创建一个Socket对象,指定目标主机(服务器端)的ip地址和端口号(Socketsocket=newSocket("172.168.10.108",8080);),然后获取客户端发送数据的输出流(OutputStreamoutputstream=socket.getOutputStream()),最后将要发送的数据写入到outputstream即可进行TCP协议的socket数据传输。
3.2基于UDP协议的数据传输
1、服务器端首先创建一个DatagramSocket对象,并且指点监听的端口。接下来创建一个空的DatagramPacket数据包对象并指定大小,用于接收数据(byte[] data=new byte[1024];DatagramPacket packet=new DatagramPacket(data,data.length)),使用DatagramSocket的receive方法接收客户端发送的数据(datagramSocket.receive(packet)),receive()与serversocket的accepet()类似,在没有数据进行接收的处于堵塞状态。
2、客户端也创建个DatagramSocket对象,并且指点监听的端口。接下来创建一个InetAddress对象,这个对象是一个网络地址(InetAddress serveraddress=InetAddress.getByName("172.168.1.100")).定义要发送的一个字符串,创建一个DatagramPacke数据包t对象,并制定要讲这个数据报包发送到网络的哪个地址以及端口号,最后使用DatagramSocket的对象的send()发送数据包。(String
str="hello";byte[] data=str.getByte();DatagramPacket packet=new DatagramPacket(data,data.length,serveraddress,4567);socket.send(packet);)
好了,下面就来看看代码怎么实现吧!
四、实现android基于TCP/IP协议的通信
1、Android端(客户端)代码:
来自CODE的代码片
TCP_Send.java
2、服务端代码:
来自CODE的代码片
TCP_Receive.java
再贴出结果吧:
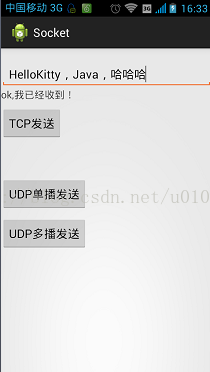
服务器显示:
192.168.1.102
192.168.1.102
HelloKitty,Java,哈哈哈
【总结】基于Socket流式网络编程,也即使用TCP/IP协议,可以对文件的传输进行操作
五、实现android基于UDP协议的通信
1、Android端(客户端)代码:
来自CODE的代码片
UDP_Send
2、服务端代码:
来自CODE的代码片
UDP_Receive
客户端图片:
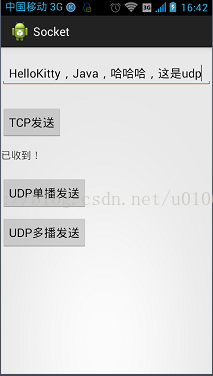
服务器显示:
192.168.1.102发送:HelloKitty,Java,哈哈哈,这是udp
【注】udp的多播还没实现,实现后我会加上来的
好了,这样就实现了基本的Socket网络编程了,注意:在android端使用时还需要加入权限哦:
[java] view
plain copy
print?
<!--允许应用程序改变网络状态-->
<uses-permission android:name="android.permission.CHANGE_NETWORK_STATE"/>
<!--允许应用程序改变WIFI连接状态-->
<uses-permission android:name="android.permission.CHANGE_WIFI_STATE"/>
<!--允许应用程序访问有关的网络信息-->
<uses-permission android:name="android.permission.ACCESS_NETWORK_STATE"/>
<!--允许应用程序访问WIFI网卡的网络信息-->
<uses-permission android:name="android.permission.ACCESS_WIFI_STATE"/>
<!--允许应用程序完全使用网络-->
<uses-permission android:name="android.permission.INTERNET"/>
总结:使用UDP方式android端和服务器端接收可以看出,客户端和服务端的发送和接收大庭相径,只要端口号和目标主机ip地址正确了,相互通信就没有问题,而且UDP它们之间的通信是不需要连接的,因为它不管服务端开启准备接收数据包没,它只管把数据包发出去了就行。而TCP就不一样了,如果在服务器没有开启的情况下,它会报一个错,提示与服务端没有建立连接。TCP使用的是流的方式发送,UDP是以包的形式发送。
Android与服务器的通信方式主要有两种,一是Http通信,一是Socket通信。两者的最大差异在于,http连接使用的是“请求—响应方式”,即在请求时建立连接通道,当客户端向服务器发送请求后,服务器端才能向客户端返回数据。
而Socket通信中基于TCP/IP协议的通信则是在双方建立起连接后就可以直接进行数据的传输,在连接时可实现信息的主动推送,而不需要每次由客户端想服务器发送请求。而UDP则是提供无连接的数据报服务,UDP在发送数据报前不需建立连接,不对数据报进行检查即可发送数据包。。
那么,什么是socket?Socket又称套接字,在程序内部提供了与外界通信的端口,即端口通信。通过建立socket连接,可为通信双方的数据传输传提供通道。
1.1什么是Socket Socket
是一种抽象层,应用程序通过它来发送和接收数据,使用Socket可以将应用程序添加到网络中,与处于同一网络中的其他应用程序进行通信。简单来说,Socket提供了程序内部与外界通信的端口并为通信双方的提供了数据传输通道。
1.2Socket的分类
根据不同的的底层协议,Socket的实现是多样化的。本文中只介绍TCP/IP协议和UDP协议的通信,在这个协议族当中主要的Socket类型为流套接字(streamsocket)和数据报套接字(datagramsocket)。流套接字将TCP作为其端对端协议,提供了一个可信赖的字节流服务。数据报套接字使用UDP协议,提供数据打包发送服务。 下面,我们来认识一下这两种Socket类型的基本实现模型。
二、Socket 基本通信模型
三、Socket基本实现原理
3.1基于TCP协议的Socket
1、服务器端首先声明一个ServerSocket对象并且指定端口号,然后调用Serversocket的accept()方法接收客户端的数据。accept()方法在没有数据进行接收的处于堵塞状态。(Socketsocket=serversocket.accept()),一旦接收到数据,通过inputstream读取接收的数据。
2、客户端创建一个Socket对象,指定目标主机(服务器端)的ip地址和端口号(Socketsocket=newSocket("172.168.10.108",8080);),然后获取客户端发送数据的输出流(OutputStreamoutputstream=socket.getOutputStream()),最后将要发送的数据写入到outputstream即可进行TCP协议的socket数据传输。
3.2基于UDP协议的数据传输
1、服务器端首先创建一个DatagramSocket对象,并且指点监听的端口。接下来创建一个空的DatagramPacket数据包对象并指定大小,用于接收数据(byte[] data=new byte[1024];DatagramPacket packet=new DatagramPacket(data,data.length)),使用DatagramSocket的receive方法接收客户端发送的数据(datagramSocket.receive(packet)),receive()与serversocket的accepet()类似,在没有数据进行接收的处于堵塞状态。
2、客户端也创建个DatagramSocket对象,并且指点监听的端口。接下来创建一个InetAddress对象,这个对象是一个网络地址(InetAddress serveraddress=InetAddress.getByName("172.168.1.100")).定义要发送的一个字符串,创建一个DatagramPacke数据包t对象,并制定要讲这个数据报包发送到网络的哪个地址以及端口号,最后使用DatagramSocket的对象的send()发送数据包。(String
str="hello";byte[] data=str.getByte();DatagramPacket packet=new DatagramPacket(data,data.length,serveraddress,4567);socket.send(packet);)
好了,下面就来看看代码怎么实现吧!
四、实现android基于TCP/IP协议的通信
1、Android端(客户端)代码:
<a target=_blank id="L1" href="http://blog.csdn.net/u010687392/article/details/44649589#L1" rel="#L1" style="text-decoration: none; color: rgb(12, 137, 207);"> 1</a> <a target=_blank id="L2" href="http://blog.csdn.net/u010687392/article/details/44649589#L2" rel="#L2" style="text-decoration: none; color: rgb(12, 137, 207);"> 2</a> <a target=_blank id="L3" href="http://blog.csdn.net/u010687392/article/details/44649589#L3" rel="#L3" style="text-decoration: none; color: rgb(12, 137, 207);"> 3</a> <a target=_blank id="L4" href="http://blog.csdn.net/u010687392/article/details/44649589#L4" rel="#L4" style="text-decoration: none; color: rgb(12, 137, 207);"> 4</a> <a target=_blank id="L5" href="http://blog.csdn.net/u010687392/article/details/44649589#L5" rel="#L5" style="text-decoration: none; color: rgb(12, 137, 207);"> 5</a> <a target=_blank id="L6" href="http://blog.csdn.net/u010687392/article/details/44649589#L6" rel="#L6" style="text-decoration: none; color: rgb(12, 137, 207);"> 6</a> <a target=_blank id="L7" href="http://blog.csdn.net/u010687392/article/details/44649589#L7" rel="#L7" style="text-decoration: none; color: rgb(12, 137, 207);"> 7</a> <a target=_blank id="L8" href="http://blog.csdn.net/u010687392/article/details/44649589#L8" rel="#L8" style="text-decoration: none; color: rgb(12, 137, 207);"> 8</a> <a target=_blank id="L9" href="http://blog.csdn.net/u010687392/article/details/44649589#L9" rel="#L9" style="text-decoration: none; color: rgb(12, 137, 207);"> 9</a> <a target=_blank id="L10" href="http://blog.csdn.net/u010687392/article/details/44649589#L10" rel="#L10" style="text-decoration: none; color: rgb(12, 137, 207);"> 10</a> <a target=_blank id="L11" href="http://blog.csdn.net/u010687392/article/details/44649589#L11" rel="#L11" style="text-decoration: none; color: rgb(12, 137, 207);"> 11</a> <a target=_blank id="L12" href="http://blog.csdn.net/u010687392/article/details/44649589#L12" rel="#L12" style="text-decoration: none; color: rgb(12, 137, 207);"> 12</a> <a target=_blank id="L13" href="http://blog.csdn.net/u010687392/article/details/44649589#L13" rel="#L13" style="text-decoration: none; color: rgb(12, 137, 207);"> 13</a> <a target=_blank id="L14" href="http://blog.csdn.net/u010687392/article/details/44649589#L14" rel="#L14" style="text-decoration: none; color: rgb(12, 137, 207);"> 14</a> <a target=_blank id="L15" href="http://blog.csdn.net/u010687392/article/details/44649589#L15" rel="#L15" style="text-decoration: none; color: rgb(12, 137, 207);"> 15</a> <a target=_blank id="L16" href="http://blog.csdn.net/u010687392/article/details/44649589#L16" rel="#L16" style="text-decoration: none; color: rgb(12, 137, 207);"> 16</a> <a target=_blank id="L17" href="http://blog.csdn.net/u010687392/article/details/44649589#L17" rel="#L17" style="text-decoration: none; color: rgb(12, 137, 207);"> 17</a> <a target=_blank id="L18" href="http://blog.csdn.net/u010687392/article/details/44649589#L18" rel="#L18" style="text-decoration: none; color: rgb(12, 137, 207);"> 18</a> <a target=_blank id="L19" href="http://blog.csdn.net/u010687392/article/details/44649589#L19" rel="#L19" style="text-decoration: none; color: rgb(12, 137, 207);"> 19</a> <a target=_blank id="L20" href="http://blog.csdn.net/u010687392/article/details/44649589#L20" rel="#L20" style="text-decoration: none; color: rgb(12, 137, 207);"> 20</a> <a target=_blank id="L21" href="http://blog.csdn.net/u010687392/article/details/44649589#L21" rel="#L21" style="text-decoration: none; color: rgb(12, 137, 207);"> 21</a> <a target=_blank id="L22" href="http://blog.csdn.net/u010687392/article/details/44649589#L22" rel="#L22" style="text-decoration: none; color: rgb(12, 137, 207);"> 22</a> <a target=_blank id="L23" href="http://blog.csdn.net/u010687392/article/details/44649589#L23" rel="#L23" style="text-decoration: none; color: rgb(12, 137, 207);"> 23</a> <a target=_blank id="L24" href="http://blog.csdn.net/u010687392/article/details/44649589#L24" rel="#L24" style="text-decoration: none; color: rgb(12, 137, 207);"> 24</a> <a target=_blank id="L25" href="http://blog.csdn.net/u010687392/article/details/44649589#L25" rel="#L25" style="text-decoration: none; color: rgb(12, 137, 207);"> 25</a> <a target=_blank id="L26" href="http://blog.csdn.net/u010687392/article/details/44649589#L26" rel="#L26" style="text-decoration: none; color: rgb(12, 137, 207);"> 26</a> <a target=_blank id="L27" href="http://blog.csdn.net/u010687392/article/details/44649589#L27" rel="#L27" style="text-decoration: none; color: rgb(12, 137, 207);"> 27</a> <a target=_blank id="L28" href="http://blog.csdn.net/u010687392/article/details/44649589#L28" rel="#L28" style="text-decoration: none; color: rgb(12, 137, 207);"> 28</a> <a target=_blank id="L29" href="http://blog.csdn.net/u010687392/article/details/44649589#L29" rel="#L29" style="text-decoration: none; color: rgb(12, 137, 207);"> 29</a> <a target=_blank id="L30" href="http://blog.csdn.net/u010687392/article/details/44649589#L30" rel="#L30" style="text-decoration: none; color: rgb(12, 137, 207);"> 30</a> <a target=_blank id="L31" href="http://blog.csdn.net/u010687392/article/details/44649589#L31" rel="#L31" style="text-decoration: none; color: rgb(12, 137, 207);"> 31</a> <a target=_blank id="L32" href="http://blog.csdn.net/u010687392/article/details/44649589#L32" rel="#L32" style="text-decoration: none; color: rgb(12, 137, 207);"> 32</a> <a target=_blank id="L33" href="http://blog.csdn.net/u010687392/article/details/44649589#L33" rel="#L33" style="text-decoration: none; color: rgb(12, 137, 207);"> 33</a> <a target=_blank id="L34" href="http://blog.csdn.net/u010687392/article/details/44649589#L34" rel="#L34" style="text-decoration: none; color: rgb(12, 137, 207);"> 34</a> <a target=_blank id="L35" href="http://blog.csdn.net/u010687392/article/details/44649589#L35" rel="#L35" style="text-decoration: none; color: rgb(12, 137, 207);"> 35</a> <a target=_blank id="L36" href="http://blog.csdn.net/u010687392/article/details/44649589#L36" rel="#L36" style="text-decoration: none; color: rgb(12, 137, 207);"> 36</a> <a target=_blank id="L37" href="http://blog.csdn.net/u010687392/article/details/44649589#L37" rel="#L37" style="text-decoration: none; color: rgb(12, 137, 207);"> 37</a> <a target=_blank id="L38" href="http://blog.csdn.net/u010687392/article/details/44649589#L38" rel="#L38" style="text-decoration: none; color: rgb(12, 137, 207);"> 38</a> <a target=_blank id="L39" href="http://blog.csdn.net/u010687392/article/details/44649589#L39" rel="#L39" style="text-decoration: none; color: rgb(12, 137, 207);"> 39</a> <a target=_blank id="L40" href="http://blog.csdn.net/u010687392/article/details/44649589#L40" rel="#L40" style="text-decoration: none; color: rgb(12, 137, 207);"> 40</a> <a target=_blank id="L41" href="http://blog.csdn.net/u010687392/article/details/44649589#L41" rel="#L41" style="text-decoration: none; color: rgb(12, 137, 207);"> 41</a> | //TCP向服务端发送数据 public void TCP_sendMsg(String msg) { Socket socket = null; OutputStream output = null; InputStream input = null; try { // socket = new Socket(InetAddress.getByName("192.168.1.100"), 8888);//这种形式也行 socket = new Socket("192.168.1.100", 8888);// 第一个参数是目标主机名或目标主机的ip地址,第二个参数是目标主机端口号 output = socket.getOutputStream(); output.write(msg.getBytes());// 把msg信息写入输出流中 //--------接收服务端的返回信息------------- socket.shutdownOutput(); // 一定要加上这句,否则收不到来自服务器端的消息返回 ,意思就是结束msg信息的写入 input = socket.getInputStream(); byte[] b = new byte[1024]; int len = -1; sb = new StringBuffer(); while ((len = input.read(b)) != -1) { sb.append(new String(b, 0, len, Charset.forName("gbk")));// 得到返回信息 } // 在主线程中更新UI runOnUiThread(new Runnable() { @Override public void run() { mTextView.setText(sb.toString());// 将返回信息设置到界面显示 } }); } catch (UnknownHostException e) { e.printStackTrace(); } catch (IOException e) { e.printStackTrace(); } finally { try { // 注意,输出流不需要关闭,因为它只是在Socket中得到输出流对象,并没有创建 if (socket != null) { socket.close();// 释放资源,关闭这个Socket } } catch (IOException e) { e.printStackTrace(); } } } |
来自CODE的代码片
TCP_Send.java
2、服务端代码:
<a target=_blank id="L1" href="http://blog.csdn.net/u010687392/article/details/44649589#L1" rel="#L1" style="text-decoration: none; color: rgb(12, 137, 207);"> 1</a> <a target=_blank id="L2" href="http://blog.csdn.net/u010687392/article/details/44649589#L2" rel="#L2" style="text-decoration: none; color: rgb(12, 137, 207);"> 2</a> <a target=_blank id="L3" href="http://blog.csdn.net/u010687392/article/details/44649589#L3" rel="#L3" style="text-decoration: none; color: rgb(12, 137, 207);"> 3</a> <a target=_blank id="L4" href="http://blog.csdn.net/u010687392/article/details/44649589#L4" rel="#L4" style="text-decoration: none; color: rgb(12, 137, 207);"> 4</a> <a target=_blank id="L5" href="http://blog.csdn.net/u010687392/article/details/44649589#L5" rel="#L5" style="text-decoration: none; color: rgb(12, 137, 207);"> 5</a> <a target=_blank id="L6" href="http://blog.csdn.net/u010687392/article/details/44649589#L6" rel="#L6" style="text-decoration: none; color: rgb(12, 137, 207);"> 6</a> <a target=_blank id="L7" href="http://blog.csdn.net/u010687392/article/details/44649589#L7" rel="#L7" style="text-decoration: none; color: rgb(12, 137, 207);"> 7</a> <a target=_blank id="L8" href="http://blog.csdn.net/u010687392/article/details/44649589#L8" rel="#L8" style="text-decoration: none; color: rgb(12, 137, 207);"> 8</a> <a target=_blank id="L9" href="http://blog.csdn.net/u010687392/article/details/44649589#L9" rel="#L9" style="text-decoration: none; color: rgb(12, 137, 207);"> 9</a> <a target=_blank id="L10" href="http://blog.csdn.net/u010687392/article/details/44649589#L10" rel="#L10" style="text-decoration: none; color: rgb(12, 137, 207);"> 10</a> <a target=_blank id="L11" href="http://blog.csdn.net/u010687392/article/details/44649589#L11" rel="#L11" style="text-decoration: none; color: rgb(12, 137, 207);"> 11</a> <a target=_blank id="L12" href="http://blog.csdn.net/u010687392/article/details/44649589#L12" rel="#L12" style="text-decoration: none; color: rgb(12, 137, 207);"> 12</a> <a target=_blank id="L13" href="http://blog.csdn.net/u010687392/article/details/44649589#L13" rel="#L13" style="text-decoration: none; color: rgb(12, 137, 207);"> 13</a> <a target=_blank id="L14" href="http://blog.csdn.net/u010687392/article/details/44649589#L14" rel="#L14" style="text-decoration: none; color: rgb(12, 137, 207);"> 14</a> <a target=_blank id="L15" href="http://blog.csdn.net/u010687392/article/details/44649589#L15" rel="#L15" style="text-decoration: none; color: rgb(12, 137, 207);"> 15</a> <a target=_blank id="L16" href="http://blog.csdn.net/u010687392/article/details/44649589#L16" rel="#L16" style="text-decoration: none; color: rgb(12, 137, 207);"> 16</a> <a target=_blank id="L17" href="http://blog.csdn.net/u010687392/article/details/44649589#L17" rel="#L17" style="text-decoration: none; color: rgb(12, 137, 207);"> 17</a> <a target=_blank id="L18" href="http://blog.csdn.net/u010687392/article/details/44649589#L18" rel="#L18" style="text-decoration: none; color: rgb(12, 137, 207);"> 18</a> <a target=_blank id="L19" href="http://blog.csdn.net/u010687392/article/details/44649589#L19" rel="#L19" style="text-decoration: none; color: rgb(12, 137, 207);"> 19</a> <a target=_blank id="L20" href="http://blog.csdn.net/u010687392/article/details/44649589#L20" rel="#L20" style="text-decoration: none; color: rgb(12, 137, 207);"> 20</a> <a target=_blank id="L21" href="http://blog.csdn.net/u010687392/article/details/44649589#L21" rel="#L21" style="text-decoration: none; color: rgb(12, 137, 207);"> 21</a> <a target=_blank id="L22" href="http://blog.csdn.net/u010687392/article/details/44649589#L22" rel="#L22" style="text-decoration: none; color: rgb(12, 137, 207);"> 22</a> <a target=_blank id="L23" href="http://blog.csdn.net/u010687392/article/details/44649589#L23" rel="#L23" style="text-decoration: none; color: rgb(12, 137, 207);"> 23</a> <a target=_blank id="L24" href="http://blog.csdn.net/u010687392/article/details/44649589#L24" rel="#L24" style="text-decoration: none; color: rgb(12, 137, 207);"> 24</a> <a target=_blank id="L25" href="http://blog.csdn.net/u010687392/article/details/44649589#L25" rel="#L25" style="text-decoration: none; color: rgb(12, 137, 207);"> 25</a> <a target=_blank id="L26" href="http://blog.csdn.net/u010687392/article/details/44649589#L26" rel="#L26" style="text-decoration: none; color: rgb(12, 137, 207);"> 26</a> <a target=_blank id="L27" href="http://blog.csdn.net/u010687392/article/details/44649589#L27" rel="#L27" style="text-decoration: none; color: rgb(12, 137, 207);"> 27</a> <a target=_blank id="L28" href="http://blog.csdn.net/u010687392/article/details/44649589#L28" rel="#L28" style="text-decoration: none; color: rgb(12, 137, 207);"> 28</a> <a target=_blank id="L29" href="http://blog.csdn.net/u010687392/article/details/44649589#L29" rel="#L29" style="text-decoration: none; color: rgb(12, 137, 207);"> 29</a> <a target=_blank id="L30" href="http://blog.csdn.net/u010687392/article/details/44649589#L30" rel="#L30" style="text-decoration: none; color: rgb(12, 137, 207);"> 30</a> <a target=_blank id="L31" href="http://blog.csdn.net/u010687392/article/details/44649589#L31" rel="#L31" style="text-decoration: none; color: rgb(12, 137, 207);"> 31</a> | public void ReceiveMsg() { ServerSocket server = null; Socket socket = null; try { server = new ServerSocket(8888);// 创建一个ServerSocket对象,并让这个Socket在8080端口监听 // 调用ServerSocket的accept()方法,接受客户端所发送的请求,同时创建一个Socket对象 // 如果客户端没有发送数据,那么该线程就停滞不继续,也就是阻塞 while(true){ socket = server.accept(); System.out.println(socket.getInetAddress().getHostName()); System.out.println(socket.getInetAddress().getHostAddress());//得到当前发送数据Socket对象的主机名和ip地址 InputStream input = socket.getInputStream();// 得到该Socket对象的输入流 BufferedInputStream bis = new BufferedInputStream(input); byte[] b = new byte[1024]; int len = -1; while ((len = bis.read(b)) != -1) {// 从InputStream当中读取客户端所发送的数据 System.out.println(new String(b, 0, len,"UTF-8")); } //--------向客户端的返回信息------------- socket.shutdownInput();//结束读取 OutputStream outputResult = socket.getOutputStream();//不需要关闭 outputResult.write("ok,我已经收到!".getBytes()); bis.close();//关闭缓存输入流,注意,输入流input不需要关闭,因为它只是在Socket中得到输入流对象,并没有创建 socket.close();//接收这个Socket的数据后释放资源,因为每一次客户端发送数据都会在服务端创建一个Socket对象,注意ServerSocket不应该关闭,因为这是服务器ServerSocket对象,关闭了客户端就不能发送数据了 socket = null; } } catch (IOException e) { e.printStackTrace(); } } |
来自CODE的代码片
TCP_Receive.java
再贴出结果吧:
服务器显示:
192.168.1.102
192.168.1.102
HelloKitty,Java,哈哈哈
【总结】基于Socket流式网络编程,也即使用TCP/IP协议,可以对文件的传输进行操作
五、实现android基于UDP协议的通信
1、Android端(客户端)代码:
<a target=_blank id="L1" href="http://blog.csdn.net/u010687392/article/details/44649589#L1" rel="#L1" style="text-decoration: none; color: rgb(12, 137, 207);"> 1</a> <a target=_blank id="L2" href="http://blog.csdn.net/u010687392/article/details/44649589#L2" rel="#L2" style="text-decoration: none; color: rgb(12, 137, 207);"> 2</a> <a target=_blank id="L3" href="http://blog.csdn.net/u010687392/article/details/44649589#L3" rel="#L3" style="text-decoration: none; color: rgb(12, 137, 207);"> 3</a> <a target=_blank id="L4" href="http://blog.csdn.net/u010687392/article/details/44649589#L4" rel="#L4" style="text-decoration: none; color: rgb(12, 137, 207);"> 4</a> <a target=_blank id="L5" href="http://blog.csdn.net/u010687392/article/details/44649589#L5" rel="#L5" style="text-decoration: none; color: rgb(12, 137, 207);"> 5</a> <a target=_blank id="L6" href="http://blog.csdn.net/u010687392/article/details/44649589#L6" rel="#L6" style="text-decoration: none; color: rgb(12, 137, 207);"> 6</a> <a target=_blank id="L7" href="http://blog.csdn.net/u010687392/article/details/44649589#L7" rel="#L7" style="text-decoration: none; color: rgb(12, 137, 207);"> 7</a> <a target=_blank id="L8" href="http://blog.csdn.net/u010687392/article/details/44649589#L8" rel="#L8" style="text-decoration: none; color: rgb(12, 137, 207);"> 8</a> <a target=_blank id="L9" href="http://blog.csdn.net/u010687392/article/details/44649589#L9" rel="#L9" style="text-decoration: none; color: rgb(12, 137, 207);"> 9</a> <a target=_blank id="L10" href="http://blog.csdn.net/u010687392/article/details/44649589#L10" rel="#L10" style="text-decoration: none; color: rgb(12, 137, 207);"> 10</a> <a target=_blank id="L11" href="http://blog.csdn.net/u010687392/article/details/44649589#L11" rel="#L11" style="text-decoration: none; color: rgb(12, 137, 207);"> 11</a> <a target=_blank id="L12" href="http://blog.csdn.net/u010687392/article/details/44649589#L12" rel="#L12" style="text-decoration: none; color: rgb(12, 137, 207);"> 12</a> <a target=_blank id="L13" href="http://blog.csdn.net/u010687392/article/details/44649589#L13" rel="#L13" style="text-decoration: none; color: rgb(12, 137, 207);"> 13</a> <a target=_blank id="L14" href="http://blog.csdn.net/u010687392/article/details/44649589#L14" rel="#L14" style="text-decoration: none; color: rgb(12, 137, 207);"> 14</a> <a target=_blank id="L15" href="http://blog.csdn.net/u010687392/article/details/44649589#L15" rel="#L15" style="text-decoration: none; color: rgb(12, 137, 207);"> 15</a> <a target=_blank id="L16" href="http://blog.csdn.net/u010687392/article/details/44649589#L16" rel="#L16" style="text-decoration: none; color: rgb(12, 137, 207);"> 16</a> <a target=_blank id="L17" href="http://blog.csdn.net/u010687392/article/details/44649589#L17" rel="#L17" style="text-decoration: none; color: rgb(12, 137, 207);"> 17</a> <a target=_blank id="L18" href="http://blog.csdn.net/u010687392/article/details/44649589#L18" rel="#L18" style="text-decoration: none; color: rgb(12, 137, 207);"> 18</a> <a target=_blank id="L19" href="http://blog.csdn.net/u010687392/article/details/44649589#L19" rel="#L19" style="text-decoration: none; color: rgb(12, 137, 207);"> 19</a> <a target=_blank id="L20" href="http://blog.csdn.net/u010687392/article/details/44649589#L20" rel="#L20" style="text-decoration: none; color: rgb(12, 137, 207);"> 20</a> <a target=_blank id="L21" href="http://blog.csdn.net/u010687392/article/details/44649589#L21" rel="#L21" style="text-decoration: none; color: rgb(12, 137, 207);"> 21</a> <a target=_blank id="L22" href="http://blog.csdn.net/u010687392/article/details/44649589#L22" rel="#L22" style="text-decoration: none; color: rgb(12, 137, 207);"> 22</a> <a target=_blank id="L23" href="http://blog.csdn.net/u010687392/article/details/44649589#L23" rel="#L23" style="text-decoration: none; color: rgb(12, 137, 207);"> 23</a> <a target=_blank id="L24" href="http://blog.csdn.net/u010687392/article/details/44649589#L24" rel="#L24" style="text-decoration: none; color: rgb(12, 137, 207);"> 24</a> <a target=_blank id="L25" href="http://blog.csdn.net/u010687392/article/details/44649589#L25" rel="#L25" style="text-decoration: none; color: rgb(12, 137, 207);"> 25</a> <a target=_blank id="L26" href="http://blog.csdn.net/u010687392/article/details/44649589#L26" rel="#L26" style="text-decoration: none; color: rgb(12, 137, 207);"> 26</a> <a target=_blank id="L27" href="http://blog.csdn.net/u010687392/article/details/44649589#L27" rel="#L27" style="text-decoration: none; color: rgb(12, 137, 207);"> 27</a> <a target=_blank id="L28" href="http://blog.csdn.net/u010687392/article/details/44649589#L28" rel="#L28" style="text-decoration: none; color: rgb(12, 137, 207);"> 28</a> <a target=_blank id="L29" href="http://blog.csdn.net/u010687392/article/details/44649589#L29" rel="#L29" style="text-decoration: none; color: rgb(12, 137, 207);"> 29</a> <a target=_blank id="L30" href="http://blog.csdn.net/u010687392/article/details/44649589#L30" rel="#L30" style="text-decoration: none; color: rgb(12, 137, 207);"> 30</a> <a target=_blank id="L31" href="http://blog.csdn.net/u010687392/article/details/44649589#L31" rel="#L31" style="text-decoration: none; color: rgb(12, 137, 207);"> 31</a> | //发送数据包给服务端和接收返回的数据 public void UDP_send(String msg) { DatagramSocket socket = null; try { socket = new DatagramSocket(8880);// 创建DatagramSocket对象并绑定一个本地端口号,注意,如果客户端需要接收服务器的返回数据,还需要使用这个端口号来接收数据,所以一定要记住 byte[] data = msg.getBytes();// 把字符串转为字节数组 // Inet4Address inetAddress = (Inet4Address)Inet4Address.getByName("192.168.1.100");//使用这个也行,表示使用4个字节的ip地址 InetAddress inetAddress = InetAddress.getByName("192.168.1.100");// 得到ip或主机名为192.168.1.100的网络地址对象 DatagramPacket pack = new DatagramPacket(data, data.length, inetAddress, 8881);// 参数分别为:发送数据的字节数组对象、数据的长度、目标主机的网络地址、目标主机端口号,发送数据时一定要指定接收方的网络地址和端口号 socket.send(pack);//发送数据包 //-----------接收服务器返回的数据------------- byte[] b = new byte[4*1024];//创建一个byte类型的数组,用于存放接收到得数据 DatagramPacket pack2 = new DatagramPacket(b, b.length);// 定义一个DatagramPacket对象用来存储接收的数据包,并指定大小和长度 socket.receive(pack2);//接收数据包 // data.getData()是得到接收到的数据的字节数组对象,0为起始位置,pack.getLength()得到数据的长度 final String result = new String(pack2.getData(),0,pack2.getLength(), "gbk");//把返回的数据转换为字符串 socket.close();//释放资源 //在线程中更新UI runOnUiThread(new Runnable() { @Override public void run() { mTextView1.setText(result); } }); } catch (SocketException e) { e.printStackTrace(); } catch (UnknownHostException e) { e.printStackTrace(); } catch (IOException e) { e.printStackTrace(); } } |
来自CODE的代码片
UDP_Send
2、服务端代码:
<a target=_blank id="L1" href="http://blog.csdn.net/u010687392/article/details/44649589#L1" rel="#L1" style="text-decoration: none; color: rgb(12, 137, 207);"> 1</a> <a target=_blank id="L2" href="http://blog.csdn.net/u010687392/article/details/44649589#L2" rel="#L2" style="text-decoration: none; color: rgb(12, 137, 207);"> 2</a> <a target=_blank id="L3" href="http://blog.csdn.net/u010687392/article/details/44649589#L3" rel="#L3" style="text-decoration: none; color: rgb(12, 137, 207);"> 3</a> <a target=_blank id="L4" href="http://blog.csdn.net/u010687392/article/details/44649589#L4" rel="#L4" style="text-decoration: none; color: rgb(12, 137, 207);"> 4</a> <a target=_blank id="L5" href="http://blog.csdn.net/u010687392/article/details/44649589#L5" rel="#L5" style="text-decoration: none; color: rgb(12, 137, 207);"> 5</a> <a target=_blank id="L6" href="http://blog.csdn.net/u010687392/article/details/44649589#L6" rel="#L6" style="text-decoration: none; color: rgb(12, 137, 207);"> 6</a> <a target=_blank id="L7" href="http://blog.csdn.net/u010687392/article/details/44649589#L7" rel="#L7" style="text-decoration: none; color: rgb(12, 137, 207);"> 7</a> <a target=_blank id="L8" href="http://blog.csdn.net/u010687392/article/details/44649589#L8" rel="#L8" style="text-decoration: none; color: rgb(12, 137, 207);"> 8</a> <a target=_blank id="L9" href="http://blog.csdn.net/u010687392/article/details/44649589#L9" rel="#L9" style="text-decoration: none; color: rgb(12, 137, 207);"> 9</a> <a target=_blank id="L10" href="http://blog.csdn.net/u010687392/article/details/44649589#L10" rel="#L10" style="text-decoration: none; color: rgb(12, 137, 207);"> 10</a> <a target=_blank id="L11" href="http://blog.csdn.net/u010687392/article/details/44649589#L11" rel="#L11" style="text-decoration: none; color: rgb(12, 137, 207);"> 11</a> <a target=_blank id="L12" href="http://blog.csdn.net/u010687392/article/details/44649589#L12" rel="#L12" style="text-decoration: none; color: rgb(12, 137, 207);"> 12</a> <a target=_blank id="L13" href="http://blog.csdn.net/u010687392/article/details/44649589#L13" rel="#L13" style="text-decoration: none; color: rgb(12, 137, 207);"> 13</a> <a target=_blank id="L14" href="http://blog.csdn.net/u010687392/article/details/44649589#L14" rel="#L14" style="text-decoration: none; color: rgb(12, 137, 207);"> 14</a> <a target=_blank id="L15" href="http://blog.csdn.net/u010687392/article/details/44649589#L15" rel="#L15" style="text-decoration: none; color: rgb(12, 137, 207);"> 15</a> <a target=_blank id="L16" href="http://blog.csdn.net/u010687392/article/details/44649589#L16" rel="#L16" style="text-decoration: none; color: rgb(12, 137, 207);"> 16</a> <a target=_blank id="L17" href="http://blog.csdn.net/u010687392/article/details/44649589#L17" rel="#L17" style="text-decoration: none; color: rgb(12, 137, 207);"> 17</a> <a target=_blank id="L18" href="http://blog.csdn.net/u010687392/article/details/44649589#L18" rel="#L18" style="text-decoration: none; color: rgb(12, 137, 207);"> 18</a> <a target=_blank id="L19" href="http://blog.csdn.net/u010687392/article/details/44649589#L19" rel="#L19" style="text-decoration: none; color: rgb(12, 137, 207);"> 19</a> <a target=_blank id="L20" href="http://blog.csdn.net/u010687392/article/details/44649589#L20" rel="#L20" style="text-decoration: none; color: rgb(12, 137, 207);"> 20</a> <a target=_blank id="L21" href="http://blog.csdn.net/u010687392/article/details/44649589#L21" rel="#L21" style="text-decoration: none; color: rgb(12, 137, 207);"> 21</a> <a target=_blank id="L22" href="http://blog.csdn.net/u010687392/article/details/44649589#L22" rel="#L22" style="text-decoration: none; color: rgb(12, 137, 207);"> 22</a> <a target=_blank id="L23" href="http://blog.csdn.net/u010687392/article/details/44649589#L23" rel="#L23" style="text-decoration: none; color: rgb(12, 137, 207);"> 23</a> <a target=_blank id="L24" href="http://blog.csdn.net/u010687392/article/details/44649589#L24" rel="#L24" style="text-decoration: none; color: rgb(12, 137, 207);"> 24</a> | public void ReceiveMsg(){ DatagramSocket socket = null; try { socket = new DatagramSocket(8881);// 创建DatagramSocket对象并绑定一个本地端口号 while(true){ byte[] buf = new byte[4*1024];//创建一个byte类型的数组,用于存放接收到得数据 DatagramPacket pack = new DatagramPacket(buf, buf.length);//创建一个DatagramPacket对象,并指定DatagramPacket对象的大小和长度 socket.receive(pack);//读取接收到得数据 包,如果客户端没有发送数据包,那么该线程就停滞不继续,这个同样也是阻塞式的 String str = new String(pack.getData(), 0,pack.getLength(),"UTF-8");//将接收到的数据包转为字符串输出显示 String ip = pack.getAddress().getHostAddress();//得到发送数据包的主机的ip地址 System.out.println(ip+"发送:"+str); //-----------返回数据给客户端------------ InetAddress address = pack.getAddress();//得到发送数据包主机的网络地址对象 byte[] data = "已收到!".getBytes(); DatagramPacket p = new DatagramPacket(data, data.length, address, 8880); socket.send(p); } //注意不需要关闭服务器的socket,因为它一直等待接收数据 } catch (SocketException e) { e.printStackTrace(); } catch (IOException e) { e.printStackTrace(); } } |
来自CODE的代码片
UDP_Receive
客户端图片:
服务器显示:
192.168.1.102发送:HelloKitty,Java,哈哈哈,这是udp
【注】udp的多播还没实现,实现后我会加上来的
好了,这样就实现了基本的Socket网络编程了,注意:在android端使用时还需要加入权限哦:
[java] view
plain copy
print?
<!--允许应用程序改变网络状态-->
<uses-permission android:name="android.permission.CHANGE_NETWORK_STATE"/>
<!--允许应用程序改变WIFI连接状态-->
<uses-permission android:name="android.permission.CHANGE_WIFI_STATE"/>
<!--允许应用程序访问有关的网络信息-->
<uses-permission android:name="android.permission.ACCESS_NETWORK_STATE"/>
<!--允许应用程序访问WIFI网卡的网络信息-->
<uses-permission android:name="android.permission.ACCESS_WIFI_STATE"/>
<!--允许应用程序完全使用网络-->
<uses-permission android:name="android.permission.INTERNET"/>
总结:使用UDP方式android端和服务器端接收可以看出,客户端和服务端的发送和接收大庭相径,只要端口号和目标主机ip地址正确了,相互通信就没有问题,而且UDP它们之间的通信是不需要连接的,因为它不管服务端开启准备接收数据包没,它只管把数据包发出去了就行。而TCP就不一样了,如果在服务器没有开启的情况下,它会报一个错,提示与服务端没有建立连接。TCP使用的是流的方式发送,UDP是以包的形式发送。

相关文章推荐
- Android中Socket通信之TCP与UDP传输原理
- Android中Socket通信之TCP与UDP传输原理
- Android中Socket通信之TCP与UDP传输原理
- Android中Socket通信之TCP与UDP传输原理
- Socket 通信原理(Android客户端和服务器以TCP&&UDP方式互通)
- Socket 通信原理(Android客户端和服务器以TCP&&UDP方式互通)
- Socket 通信原理(Android客户端和服务器以TCP&&UDP方式互通)
- Socket 通信原理(Android客户端和服务器以TCP&&UDP方式互通)
- Socket 通信原理(Android客户端和服务器以TCP&&UDP方式互通)
- Socket 通信原理(Android客户端和服务器以TCP&&UDP方式互通)
- Socket 通信原理(Android客户端和服务器以TCP&&UDP方式互通)
- Socket 通信原理(Android客户端和服务器以TCP&&UDP方式互通)
- Socket 通信原理(Android客户端和服务器以TCP&&UDP方式互通)
- Socket 通信原理(Android客户端和服务器以TCP&&UDP方式互通)
- Socket 通信原理(Android客户端和服务器以TCP&&UDP方式互通)
- Socket 通信原理(Android客户端和服务器以TCP&&UDP方式互通) .
- Socket 通信原理(Android客户端和服务器以TCP&&UDP方式互通)
- Socket 通信原理(Android客户端和服务器以TCP&&UDP方式互通)
- Socket 通信原理(Android客户端和服务器以TCP&&UDP方式互通)
- Socket 通信原理(Android客户端和服务器以TCP&&UDP方式互通)