ios如何使用xib自定义单元格
2016-07-17 09:29
351 查看
故事板是一个好用的东西,可以节省很多时间,并且可直观看到效果,所以当页面构造复杂时有必要使用故事板来自定义单元格.
一.创建步骤;
1.创建一个类自带xib文件,(也可以自己不带xib,不过xib文件名最好和类名相同,再进行关联即可)
2.绘制控件在单元格上,当控件需要显示不同的数据时必须要连接cell单元格,如下图:
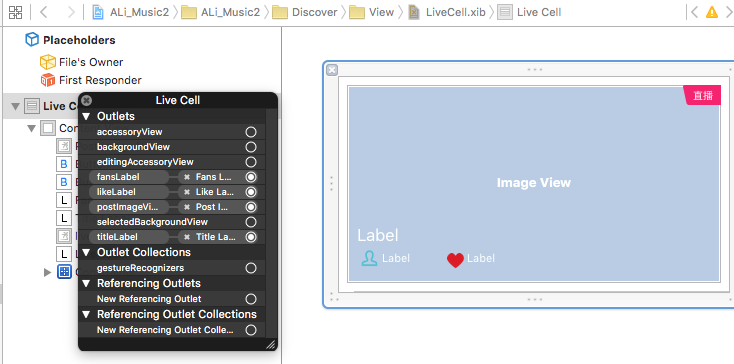
注意:xib文件的file’s owner 一定要关联,这里关联的是 LiveCell类.
如果使用plist文件的单元格上的控件需要显示不同数据是一定要连接那个cell类.
3.下面看一段代码:
#import "LiveCell.h"

@interface LiveCell()

@property (weak, nonatomic) IBOutlet UIImageView *postImageView;

@property (weak, nonatomic) IBOutlet UILabel *titleLabel;

@property (weak, nonatomic) IBOutlet UILabel *fansLabel;

@property (weak, nonatomic) IBOutlet UILabel *likeLabel;

@end

@implementation LiveCell

- (void)awakeFromNib {

self.titleLabel.font = [UIFont systemFontOfSize:17];

}

- (void) setDic:(NSDictionary *)dic {
_dic = dic;

//2.给子视图赋值
self.postImageView.image = [UIImage imageNamed:_dic[@"image"]];

self.titleLabel.text = _dic[@"title"];

self.fansLabel.text = [NSString stringWithFormat:@"%d",[_dic[@"number"] intValue]];
self.likeLabel.text = _dic[@"favorite"];
}

- (void)setSelected:(BOOL)selected animated:(BOOL)animated {
[super setSelected:selected animated:animated];

// Configure the view for the selected state
}
@end
如何加载xib文件,请见以下代码:
//
// LiveViewController.m
// ALi_Music2
//
// Created by mac on 16/7/16.
// Copyright © 2016年 huang. All rights reserved.
//
#import "LiveViewController.h"
#import "LiveCell.h"
#import "ReuseLoopView.h"
//1085 × 602
#define kScreenWidth [UIScreen mainScreen].bounds.size.width
#define kScreenHeight [UIScreen mainScreen].bounds.size.height
#define CellHeight (kScreenWidth / 1086 * 602)
@interface LiveViewController ()<UITableViewDataSource,UITableViewDelegate>
@property(nonatomic,strong) NSArray *data;
@property(nonatomic,strong) UITableView *tableView;
@end
@implementation LiveViewController
- (void)viewDidLoad {
[super viewDidLoad];
//设置背景图片
self.view.backgroundColor = [UIColor colorWithPatternImage:[UIImage imageNamed:@"view-background.jpg"]];;
//1.读取表视图的数据源
[self loadData];
//2. 初始化表视图
_tableView = [[UITableView alloc] initWithFrame:CGRectMake(0, 0, kScreenWidth, kScreenHeight-49) style:UITableViewStylePlain];
//实现数据源和代理
_tableView.dataSource = self;
_tableView.delegate =self;
//行高
_tableView.rowHeight = CellHeight;
//定义一个imageArray
NSArray *imageArray = @[@"01",@"02",@"03",@"04",@"05"];
//自定义一个头部视图
ReuseLoopView *reuseLoopView = [[ReuseLoopView alloc] initWithFrame:CGRectMake(0, 0, 400, 260)];
//图片数组
reuseLoopView.dataArray = imageArray;
//添加头部视图
_tableView.tableHeaderView =reuseLoopView;
//使用表视图注册单元格
[_tableView registerNib:[UINib nibWithNibName:@"LiveCell" bundle:nil] forCellReuseIdentifier:@"LiveCell"];
[self.view addSubview:_tableView];
}
#pragma mark - 读取表视图数据源
- (void) loadData {
NSString *filePath = [[NSBundle mainBundle] pathForResource:@"Lives.plist" ofType:nil];
_data = [NSArray arrayWithContentsOfFile:filePath];
}
- (NSInteger)tableView:(UITableView *)tableView numberOfRowsInSection:(NSInteger)section{
return _data.count;
}
- (UITableViewCell *)tableView:(UITableView *)tableView cellForRowAtIndexPath:(NSIndexPath *)indexPath {
LiveCell *cell = [tableView dequeueReusableCellWithIdentifier:@"LiveCell"];
cell.selectionStyle = UITableViewCellSelectionStyleNone;
cell.dic = _data[indexPath.row];
return cell;
}
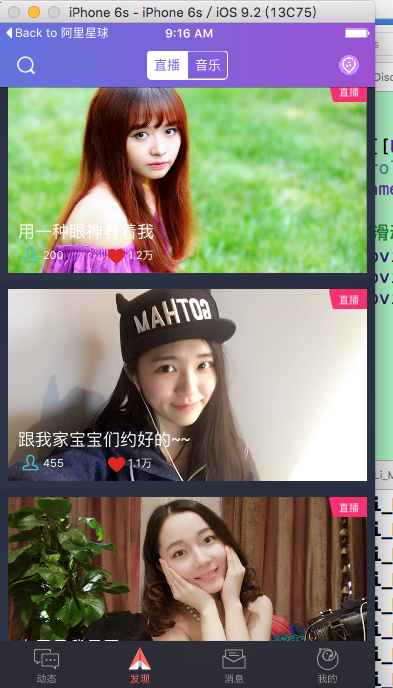
@end运行效果:

相关文章推荐
- iOS 启动引导页面
- tableView使用SDWebImage加载图片时滚动优化
- iOS Core Graphics手写板
- iOS 【在iOS中自动检测内存泄漏】
- iOS - 内存管理十全大补丸——内存泄露检查实战总结
- iOS开发支付集成之支付宝支付
- iOS之深入了解控制器View的加载
- IOS 设备m3u8流媒体协议标签解析
- iOS-沙盒相关
- iOS 多线程: dispatch_barrier_async
- iOS Core Graphics基础入门(1)
- UVA 11111 Generalized Matrioshkas
- iOS开源加密相册Agony的实现(六)
- iOS开源加密相册Agony的实现(六)
- iOS TDD
- iOS 无限循环滚动视图
- iOS - 类扩展与分类的区别
- iOS-浅谈block
- ios - 调整button内部控件位置
- 三星笔记本bios设置里找不到U盘启动盘的解决方法