Asp.Net Core WebApi学习笔记(四)-- Middleware
2016-07-15 09:10
751 查看
Asp.Net Core WebApi学习笔记(四)-- Middleware
本文记录了Asp.Net管道模型和Asp.Net Core的Middleware模型的对比,并在上一篇的基础上增加Middleware功能支持。
在演示Middleware功能之前,先要了解一下Asp.Net管道模型发生了什么样的变化。
第一部分:管道模型
1. Asp.Net管道
在之前的Asp.Net里,主要的管道模型流程如下图所示:HttpModule.cs
HttpHandler.cs
配置Web.Config。以下是在IIS7环境下的配置内容。
HelloworldMiddleware.cs
HelloworldTooMiddleware.cs
修改 Startup.cs 的Configure方法内容
1         public void Configure(IApplicationBuilder app, ILoggerFactory loggerFactory)
2         {
3             // 添加日志支持
4             loggerFactory.AddConsole();
5             loggerFactory.AddDebug();
6
7             // 添加NLog日志支持
8             loggerFactory.AddNLog();
9
10             // 添加自定义中间件
11             app.UseMiddleware<HelloworldMiddleware>();
12             app.UseMiddleware<HelloworldTooMiddleware>();
13
14             // 添加MVC中间件
15             //app.UseMvc();
16         }
启动调试,访问页面,可以看到同样的效果。
三、Map方法
Map方法主要通过请求路径和其他自定义条件过滤来指定注册的中间件,看起来更像一个路由。修改 Startup.cs 的Configure方法内容,增加静态方法MapTest
1         public void Configure(IApplicationBuilder app, ILoggerFactory loggerFactory)
2         {
3             // 添加日志支持
4             loggerFactory.AddConsole();
5             loggerFactory.AddDebug();
6
7             // 添加NLog日志支持
8             loggerFactory.AddNLog();
9
10             // 添加自定义中间件
11             app.Map("/test", MapTest);
12
13             // 添加MVC中间件
14             //app.UseMvc();
15         }
16
17         private static void MapTest(IApplicationBuilder app){
18             app.Run(async context => {
19                 await context.Response.WriteAsync("Url is " + context.Request.PathBase.ToString());
20             });
21         }
启动调试,访问路径 http://localhost:5000/test ,页面显示如下内容
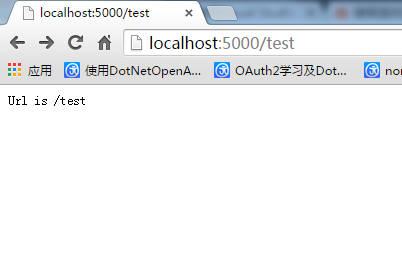
但是访问其他路径时,页面没有内容显示。从这个可以看到,Map方法通过类似路由的机制,将特定的Url地址请求引导到固定的方法里,由特定的中间件处理。
另外,Map方法还可以实现多级Url“路由”,其实就是Map方法的嵌套使用
1             // 添加自定义中间件
2             app.Map("/level1", lv1App => {
3                 app.Map("/level1.1", lv11App => {
4                     // /level1/level1.1
5
6                 });
7
8                 app.Map("/level1.2", lv12App => {
9                     // /level1/level1.2
10
11                 });
12             });
也可以通过MapWhen方法使用自定义条件进行“路由”
1         public void Configure(IApplicationBuilder app, ILoggerFactory loggerFactory)
2         {
3             // 添加日志支持
4             loggerFactory.AddConsole();
5             loggerFactory.AddDebug();
6
7             // 添加NLog日志支持
8             loggerFactory.AddNLog();
9
10             // 添加自定义中间件
11             app.MapWhen(context =>
12             {
13                 return context.Request.Query.ContainsKey("a");
14             }, MapTest);
15
16             // 添加MVC中间件
17             //app.UseMvc();
18         }
19
20         private static void MapTest(IApplicationBuilder app)
21         {
22             app.Run(async context =>
23             {
24                 await context.Response.WriteAsync($"Url is {context.Request.Path.ToString()}{context.Request.QueryString.Value}");
25             });
26
27         }
启动调试,访问路径 http://localhost:5000/path?a=1&b=2 ,页面显示如下内容
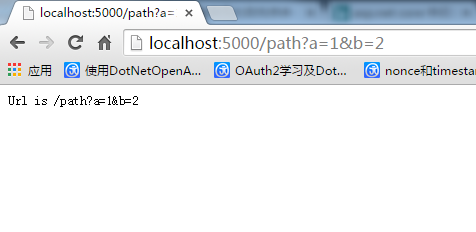
只有当请求参数中含有a时,页面才正常显示内容。
四、其他内置的中间件
Asp.Net Core框架内置了几个中间件
最后,用自定义中间件实现一个简单的访问日志记录功能,记录每一次请求的内容和响应时间。
1. 添加日志模型 VisitLog.cs
1 using System;
2 using System.Collections.Generic;
3 using System.Linq;
4
5 namespace WebApiFrame.Models
6 {
7     public class VisitLog
8     {
9         public string Url { get; set; }
10
11         public IDictionary<string, string> Headers { get; set; } = new Dictionary<string, string>();
12
13         public string Method { get; set; }
14
15         public string RequestBody { get; set; }
16
17         public DateTime ExcuteStartTime { get; set; }
18
19         public DateTime ExcuteEndTime { get; set; }
20
21         public override string ToString()
22         {
23             string headers = "[" + string.Join(",", this.Headers.Select(i => "{" + $"\"{i.Key}\":\"{i.Value}\"" + "}")) + "]";
24             return $"Url: {this.Url},\r\nHeaders: {headers},\r\nMethod: {this.Method},\r\nRequestBody: {this.RequestBody},\r\nExcuteStartTime: {this.ExcuteStartTime.ToString("yyyy-MM-dd HH:mm:ss.fff")},\r\nExcuteStartTime: {this.ExcuteEndTime.ToString("yyyy-MM-dd HH:mm:ss.fff")}";
25         }
26     }
27 }
2. 添加访问日志记录中间件 VisitLogMiddleware.cs ,同时添加UseVisitLogger扩展方法。
1 using Microsoft.AspNetCore.Builder;
2 using Microsoft.AspNetCore.Http;
3 using Microsoft.Extensions.Logging;
4 using System;
5 using System.IO;
6 using System.Linq;
7 using System.Threading.Tasks;
8 using WebApiFrame.Models;
9
10 namespace WebApiFrame.Core.Middlewares
11 {
12     public class VisitLogMiddleware
13     {
14         private readonly RequestDelegate _next;
15
16         private readonly ILogger logger;
17
18         private VisitLog visitLog;
19
20         public VisitLogMiddleware(RequestDelegate next, ILoggerFactory loggerFactory)
21         {
22             _next = next;
23             logger = loggerFactory.CreateLogger<VisitLogMiddleware>();
24         }
25
26         public async Task Invoke(HttpContext context)
27         {
28             visitLog = new VisitLog();
29             HttpRequest request = context.Request;
30             visitLog.Url = request.Path.ToString();
31             visitLog.Headers = request.Headers.ToDictionary(k => k.Key, v => string.Join(";", v.Value.ToList()));
32             visitLog.Method = request.Method;
33             visitLog.ExcuteStartTime = DateTime.Now;
34
35             using (StreamReader reader = new StreamReader(request.Body))
36             {
37                 visitLog.RequestBody = reader.ReadToEnd();
38             }
39
40             context.Response.OnCompleted(ResponseCompletedCallback, context);
41             await _next(context);
42         }
43
44         private Task ResponseCompletedCallback(object obj)
45         {
46             visitLog.ExcuteEndTime = DateTime.Now;
47             logger.LogInformation($"VisitLog: {visitLog.ToString()}");
48             return Task.FromResult(0);
49         }
50     }
51
52     public static class VisitLogMiddlewareExtensions
53     {
54         public static IApplicationBuilder UseVisitLogger(this IApplicationBuilder builder)
55         {
56             return builder.UseMiddleware<VisitLogMiddleware>();
57         }
58     }
59 }
3. 在 Startup.cs 添加中间件支持
1         public void Configure(IApplicationBuilder app, ILoggerFactory loggerFactory)
2         {
3             // 添加日志支持
4             loggerFactory.AddConsole();
5             loggerFactory.AddDebug();
6
7             // 添加NLog日志支持
8             loggerFactory.AddNLog();
9
10             // 添加自定义中间件
11             app.UseVisitLogger();
12
13             app.Run(async context =>
14             {
15                 await context.Response.WriteAsync("Hello World!");
16             });
17
18
19             // 添加MVC中间件
20             //app.UseMvc();
21         }
4. 启动调试,访问地址 http://localhost:5000/ ,查看调试控制台日志打印信息。
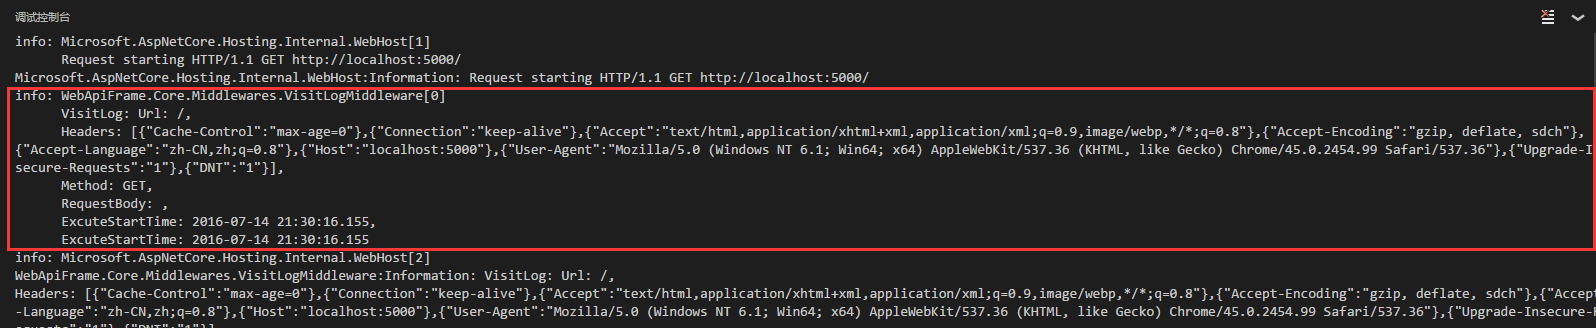
另外,如果你比较细心会发现,在Configure方法里有这样一句代码: app.UseMvc(); ,Asp.Net Core Mvc正是通过这个方法借用中间件来扩展实现了MVC框架。
分类: Asp.Net Core

相关文章推荐
- yoeman构建Asp.net core项目并且实现分层
- 七天学会ASP.NET MVC (一)——深入理解ASP.NET MVC
- 【Asp.Net Core】二、添加控制器和视图
- 在Mac上开发使用yoeman构建Asp.net core项目并且实现分层引用
- ASP.NET MVC进阶之路:依赖注入(Di)和Ninject
- asp.net MVC EFCodeFirst 生成数据库注意事项
- asp.net mvc code first实体关系一对一、一对多、多对多的设置方法
- ASP.NET MVC 基础
- 使用Visual Studio Code开发Asp.Net Core WebApi学习笔记(四)-- Middleware
- Raspberry Pi 3 Model B 安装 OSMC
- ASP.NET MVC TryUpdateModel 更新model
- ASP.Net简介、IIS服务器和Repeater重复器
- ASP.NET MVC过滤器(一)
- 用ASP实现文件下载
- asp.net mvc ajax分页 CPager(秒杀杨涛ajax分页) 封装之前
- ASP.Net Core-TagHelpers
- ASP.NET Core Token认证
- asp.net mvc 之旅 —— 第六站 ActionFilter的应用及源码分析
- ASP.NET Web API 自定义MediaType实现jsonp跨域调用
- Asp.Net Unix时间戳和DateTime类型转换