使用Visual Studio Code开发Asp.Net Core WebApi学习笔记(二)-- Web Api Demo
2016-07-10 23:23
1281 查看
一、添加ASP.NET Core MVC包
1. 在project.json文件添加Microsoft.AspNetCore.Mvc包{
"version": "1.0.0-*",
"buildOptions": {
"debugType": "portable",
"emitEntryPoint": true
},
"dependencies": {
"Microsoft.NETCore.App": {
"type": "platform",
"version": "1.0.0"
},
"Microsoft.AspNetCore.Server.Kestrel": "1.0.0",
"Microsoft.AspNetCore.Mvc": "1.0.0"
},
"frameworks": {
"netcoreapp1.0": {
"imports": "dnxcore50"
}
}
}2. 在cmd窗口使用 dotnet restore 将新添加的包还原至本地
二、修改Startup.cs文件内容,添加Asp.Net Mvc能力
using Microsoft.AspNetCore.Builder;
using Microsoft.Extensions.DependencyInjection;

namespace WebApiFrame
{
public class Startup
{
public void ConfigureServices(IServiceCollection services)
{

// 注入MVC框架
services.AddMvc();
}

public void Configure(IApplicationBuilder app)
{
// 添加MVC中间件
app.UseMvc();
}
}
}
三、新建Controller,编写Web Api方法
1. 控制器UsersControllerusing System;
using Microsoft.AspNetCore.Mvc;
using WebApiFrame.Models;
namespace WebApiFrame.Controller
{
[Route("api/[controller]")]
public class UsersController : Microsoft.AspNetCore.Mvc.Controller
{
[HttpGet("{id}")]
public IActionResult Get(int id)
{
var user = new User() { Id = id, Name = "Name:" + id, Sex = "Male" };
return new ObjectResult(user);
}
[HttpPost]
public IActionResult Post([FromBody] User user){
if(user == null){
return BadRequest();
}
// TODO:新增操作
user.Id = new Random().Next(1, 10);
return CreatedAtAction("Get", new { id = user.Id }, user);
}
[HttpPut("{id}")]
public IActionResult Put(int id, [FromBody] User user){
if(user == null){
return BadRequest();
}
// TODO: 更新操作
return new NoContentResult();
}
[HttpDelete("{id}")]
public void Delete(int id){
// TODO: 删除操作
}
}
}不同于之前的ASP.NET MVC版本,ASP.NET Core MVC里实现Web Api的控制器都继承自唯一的一个基类Controller。
2. 模型User.cs
namespace WebApiFrame.Models
{
public class User
{
public int Id { get; set; }
public string Name { get; set; }
public string Sex { get; set; }
}
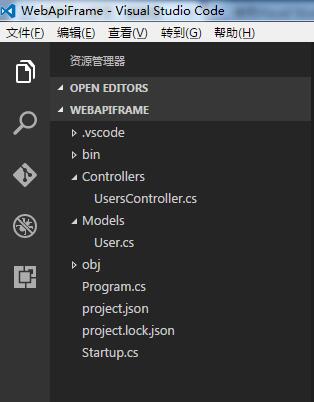
}最终文件夹结构如下图
四、启动调试,使用Fiddler工具调试Web Api接口
1. GET Request
GET Response

2. POST Request

POST Response
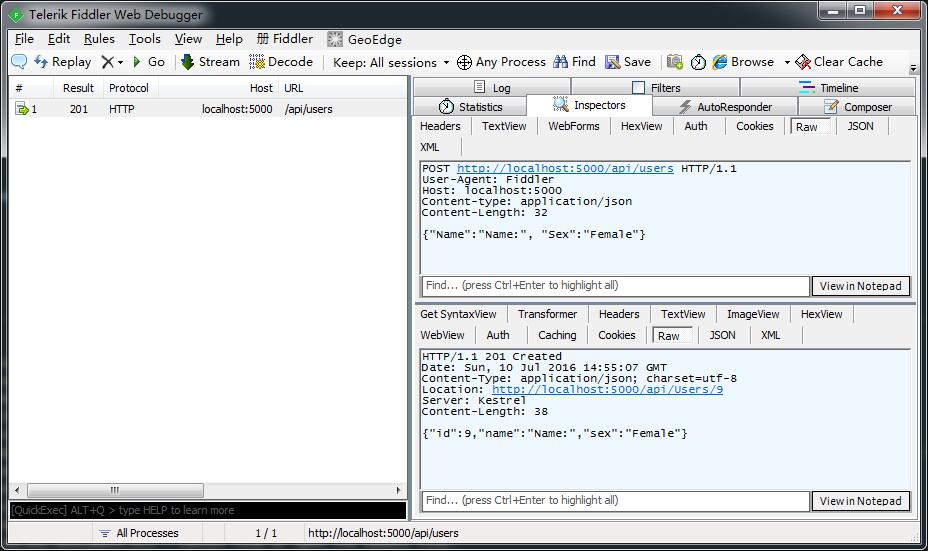
POST响应码为201,表示资源创建成功。
在响应头里有一个Location属性,这是一个导航属性,属性值是一个url地址,直接指向了刚刚Post成功的资源地址。
3. PUT Request

PUT Response
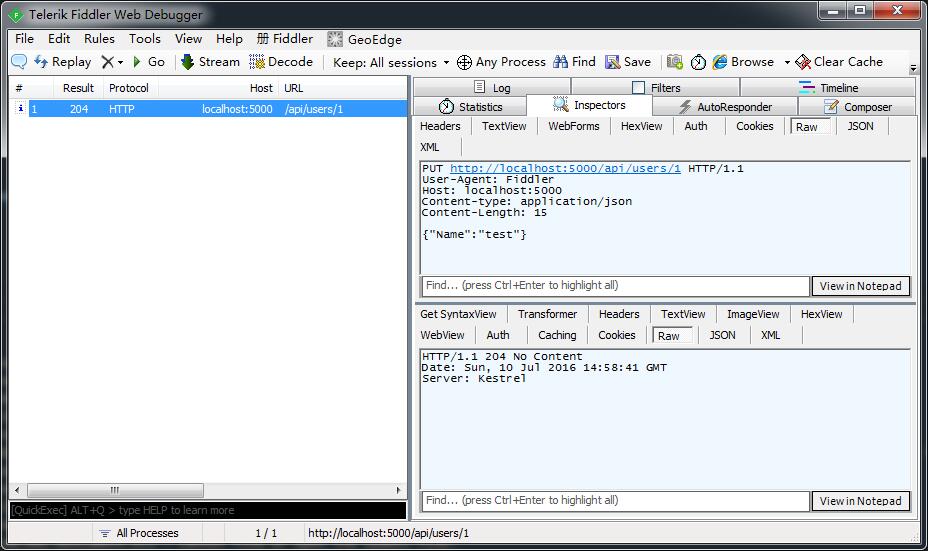
PUT为更新操作。按照规范,当服务更新操作执行成功后,直接通过响应码204告诉客户端调用成功,默认没有响应body。
4. DELETE Request
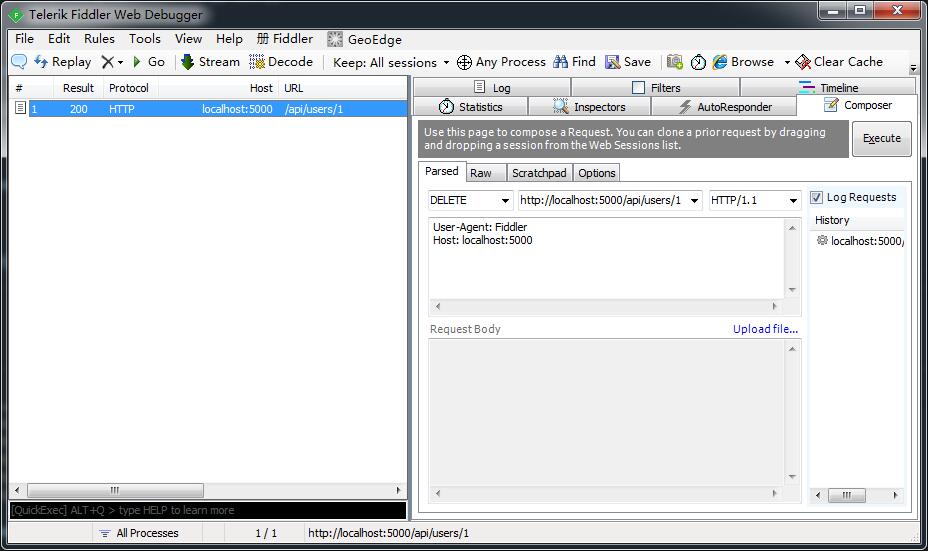
DELETE Response
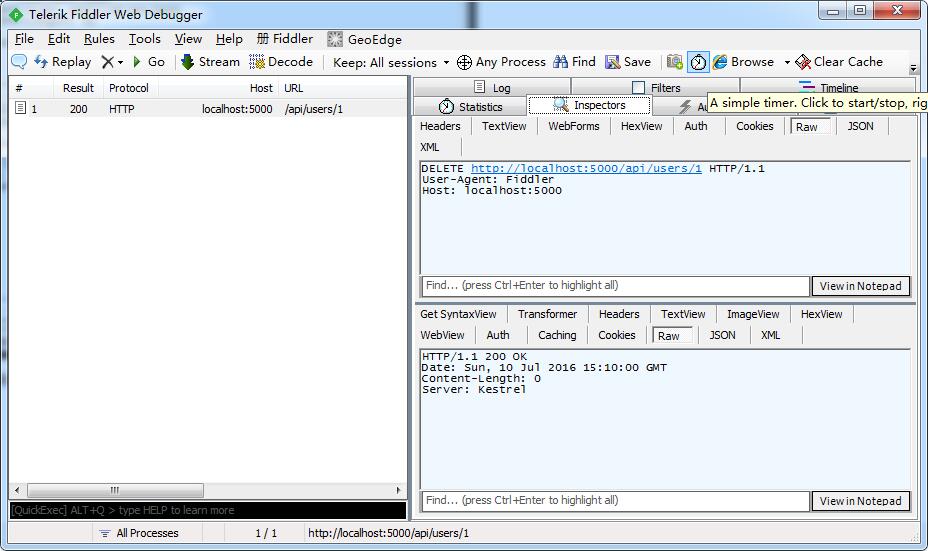
DELETE为删除操作。按照规范,需要通过响应码判断是否成功(200)还是失败(500),默认没有响应body。

相关文章推荐
- win10下iis部署asp.net core rtm
- Could not instnested exception is java.lang.NoClassDefFoundError: org/aspectj/lang/annotation/Around
- ASP.NET Core重写个人博客站点小结
- ASP.NET页面之间传递值的几种方式
- Spring配置项之<aop:aspectj-autoproxy />
- asp.net中,用Ajax实现客户端调用服务器端的函数(PageMethods)
- SpringMVC+Jasperreports出现的java.lang.NoSuchMethodError问题
- ASP.NET + SqlSever 大数据解决方案 PK HADOOP
- 在树莓派上安装GUI的FreeRadius(Raspberry PI based FreeRadius Server with GUI)
- Asp.net-不能在DropDownList中选择多个项
- Repeater控件绑定及分页
- 使用 dotnet watch 开发 ASP.NET Core 应用程序
- asp.net用input控件上传文件时Check错误文件路径的方法
- asp.net的tag用法
- asp.net中GridView的应用
- ASP.net的页面缓存导致Session更新不及时的解决方法
- 捣鼓了一辆智能微型坦克-raspberry pi3
- 发布ASP(非.Net)网站
- 安装raspbian系统开始
- Win10 ASP.NET 4.0 尚未在 Web 服务器上注册 解决方案