mongo-connector实现MongoDB与elasticsearch实时同步深入详解
2016-07-06 22:20
836 查看
引言:
验证表明:mongo-connector工具支持MongoDB与ES之间的实时增insert、删delete、改update操作。对于历史数据,mongo-connector工具不能同步到ES中,根因是本身工具不支持(初步界定),还是没有这种场景,待查(进一步研究后再更新)。
1. mongo-connector 地址:
https://github.com/mongodb-labs/mongo-connector2、 mongo-connector 工具简介
mongo-connector工具创建一个从MongoDB簇到一个或多个目标系统的管道,目标系统包括:Solr,Elasticsearch,或MongoDB簇。该工具在MongoDB与目标系统间同步数据,并跟踪MongoDB的oplog,保持操作与MongoDB的实时同步。
该工具已经在python2.6,2.7,3.3+下进行验证。
mongo-connector工具是基于python开发的实时同步服务工具。它要求mongo运行在replica-set模式,且需要 elastic2_doc_manager将数据写入ES。
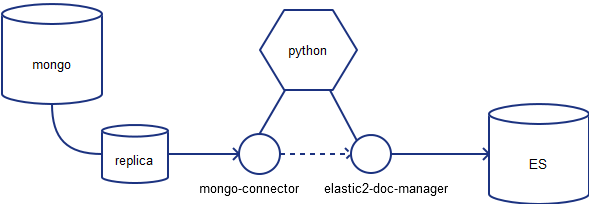
3、 elastic2-doc-manager 工具简介
这是Elastic2.x版本的文档管理器。对应Elastic1.x版本需要使用 elastic-doc-manager。4、ES与MongoDB同步步骤:
(1)安装 mongo-connector。
pip install mongo-connector(2)安装 elastic2-doc-manager。
pip install elastic2-doc-manager注意:
如果不安装(2)直接进入(3)、(4)则会报错:
[root@5b9dbaaa148a bin]# mongo-connector -m 10.8.5.99:27017 -t 10.8.5.101:9200 -d elastic2_doc_manager
Logging to mongo-connector.log.
Exception in thread Thread-1:
Traceback (most recent call last):
File "/usr/lib64/python2.6/threading.py", line 532, in __bootstrap_inner
self.run()
(3)mongo端启动
MongoDB 必须开启复制集,如果已经开启请忽略这一步:1)通过 –replSet 设定副本集名称。
[root@b48eafd69929 bin]# ./mongod --replSet "rs0"
2)将mongo与副本集成员连接
[root@b48eafd69929 bin]# ./mongo
MongoDB shell version: 3.2.4
connecting to: test
Server has startup warnings:
2016-07-05T09:49:01.330+0100 I CONTROL [initandlisten] ** WARNING: You are running this process as the root user, which is not recommended.
2016-07-05T09:49:01.330+0100 I CONTROL [initandlisten]
2016-07-05T09:49:01.331+0100 I CONTROL [initandlisten]
2016-07-05T09:49:01.331+0100 I CONTROL [initandlisten] ** WARNING: You are running on a NUMA machine.
2016-07-05T09:49:01.331+0100 I CONTROL [initandlisten] ** We suggest launching mongod like this to avoid performance problems:
2016-07-05T09:49:01.332+0100 I CONTROL [initandlisten] ** numactl --interleave=all mongod [other options]
2016-07-05T09:49:01.332+0100 I CONTROL [initandlisten]
2016-07-05T09:49:01.332+0100 I CONTROL [initandlisten] ** WARNING: /sys/kernel/mm/transparent_hugepage/enabled is 'always'.
2016-07-05T09:49:01.332+0100 I CONTROL [initandlisten] ** We suggest setting it to 'never'
2016-07-05T09:49:01.332+0100 I CONTROL [initandlisten]
2016-07-05T09:49:01.332+0100 I CONTROL [initandlisten] ** WARNING: /sys/kernel/mm/transparent_hugepage/defrag is 'always'.
2016-07-05T09:49:01.332+0100 I CONTROL [initandlisten] ** We suggest setting it to 'never'
2016-07-05T09:49:01.332+0100 I CONTROL [initandlisten]
3)初始化副本集
> rs.initiate()
{
"info2" : "no configuration specified. Using a default configuration for the set",
"me" : "b48eafd69929:27017",
"ok" : 1
}
4)【验证】初始化副本集的配置
rs0:SECONDARY> rs.conf()
{
"_id" : "rs0",
"version" : 1,
"protocolVersion" : NumberLong(1),
"members" : [
{
"_id" : 0,
"host" : "b48eafd69929:27017",
"arbiterOnly" : false,
"buildIndexes" : true,
"hidden" : false,
"priority" : 1,
"tags" : {

},
"slaveDelay" : NumberLong(0),
"votes" : 1
}
],
"settings" : {
"chainingAllowed" : true,
"heartbeatIntervalMillis" : 2000,
"heartbeatTimeoutSecs" : 10,
"electionTimeoutMillis" : 10000,
"getLastErrorModes" : {

},
"getLastErrorDefaults" : {
"w" : 1,
"wtimeout" : 0
},
"replicaSetId" : ObjectId("577b74bd0ba41a313110ad62")
}
}
5)【验证】副本集的状态。
rs0:PRIMARY> rs.status()
{
"set" : "rs0",
"date" : ISODate("2016-07-05T08:50:55.272Z"),
"myState" : 1,
"term" : NumberLong(1),
"heartbeatIntervalMillis" : NumberLong(2000),
"members" : [
{
"_id" : 0,
"name" : "b48eafd69929:27017",
"health" : 1,
"state" : 1,
"stateStr" : "PRIMARY",
"uptime" : 115,
"optime" : {
"ts" : Timestamp(1467708606, 1),
"t" : NumberLong(1)
},
"optimeDate" : ISODate("2016-07-05T08:50:06Z"),
"infoMessage" : "could not find member to sync from",
"electionTime" : Timestamp(1467708605, 2),
"electionDate" : ISODate("2016-07-05T08:50:05Z"),
"configVersion" : 1,
"self" : true
}
],
"ok" : 1
}
(4)ES端同步操作
[root@5b9dbaaa148a bin]# mongo-connector -m 10.8.5.99:27017 -t 10.8.5.101:9200 -d elastic2_doc_manager
Logging to mongo-connector.log.
参数含义:
-m: mongodb的地址与端口,端口默认为27017。
-t:ES的地址与端口,端口默认为9200。
-d:doc manager的名称,2.x版本为: elastic2-doc-manager。
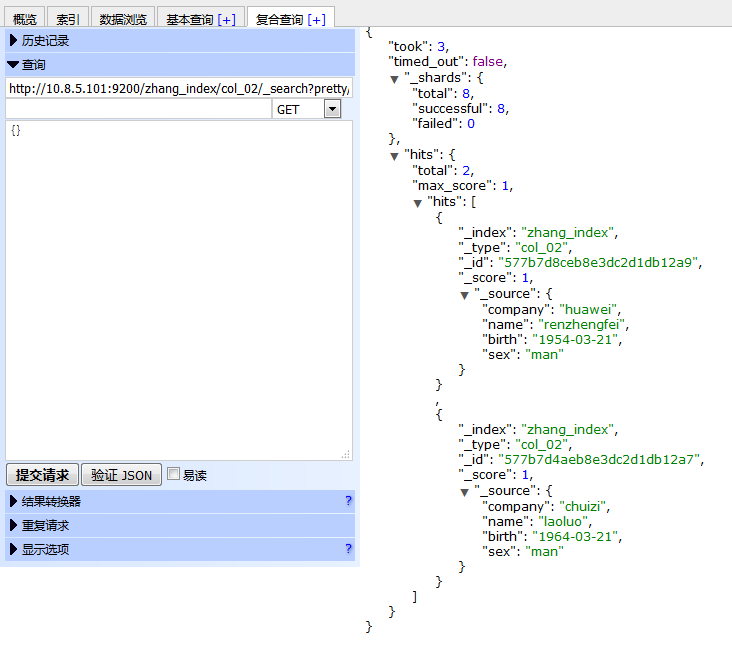
5、ES与MongoDB Insert插入操作的同步验证
(1)Mongo端插入数据操作:
#Mongo创建数据库(对应ES的Index)
rs0:PRIMARY> use zhang_index
switched to db zhang_index

#Mongo中插入数据(其中col_02对应ES中的Type)
rs0:PRIMARY> db.col_02.insert({name:"laoluo", birth:"1964-03-21", sex:"man", company:"chuizi"});
WriteResult({ "nInserted" : 1 })
rs0:PRIMARY> db.col_02.insert({name:"renzhengfei", birth:"1954-03-21", sex:"man", company:"huawei"});
(2)Es端检索验证
[root@5b9dbaaa148a test_log]# curl -XGET http://10.8.5.101:9200/zhang_index/col_02/_search?pretty {
"took" : 4,
"timed_out" : false,
"_shards" : {
"total" : 8,
"successful" : 8,
"failed" : 0
},
"hits" : {
"total" : 2,
"max_score" : 1.0,
"hits" : [ {
"_index" : "zhang_index",
"_type" : "col_02",
"_id" : "577b7d8ceb8e3dc2d1db12a9",
"_score" : 1.0,
"_source" : {
"company" : "huawei",
"name" : "renzhengfei",
"birth" : "1954-03-21",
"sex" : "man"
}
}, {
"_index" : "zhang_index",
"_type" : "col_02",
"_id" : "577b7d4aeb8e3dc2d1db12a7",
"_score" : 1.0,
"_source" : {
"company" : "chuizi",
"name" : "laoluo",
"birth" : "1964-03-21",
"sex" : "man"
}
} ]
}
}
6、 ES与MongoDB Update更新操作的同步验证
(1)MongoDB的更新update操作
rs0:PRIMARY> db.col_02.update({'name':'laoluo'}, {$set:{'name':'luoyonghao'}})
WriteResult({ "nMatched" : 1, "nUpserted" : 0, "nModified" : 1 })
rs0:PRIMARY>
rs0:PRIMARY> db.col_02.find().pretty()
{
"_id" : ObjectId("577b7d4aeb8e3dc2d1db12a7"),
"name" : "luoyonghao",
"birth" : "1964-03-21",
"sex" : "man",
"company" : "chuizi"
}
{
"_id" : ObjectId("577b7d8ceb8e3dc2d1db12a9"),
"name" : "renzhengfei",
"birth" : "1954-03-21",
"sex" : "man",
"company" : "huawei"
}
(2)Es端检索更新后结果
[root@5b9dbaaa148a test_log]# curl -XGET http://10.8.5.101:9200/zhang_index/col_02/_search?pretty {
"took" : 1,
"timed_out" : false,
"_shards" : {
"total" : 8,
"successful" : 8,
"failed" : 0
},
"hits" : {
"total" : 2,
"max_score" : 1.0,
"hits" : [ {
"_index" : "zhang_index",
"_type" : "col_02",
"_id" : "577b7d8ceb8e3dc2d1db12a9",
"_score" : 1.0,
"_source" : {
"company" : "huawei",
"name" : "renzhengfei",
"birth" : "1954-03-21",
"sex" : "man"
}
}, {
"_index" : "zhang_index",
"_type" : "col_02",
"_id" : "577b7d4aeb8e3dc2d1db12a7",
"_score" : 1.0,
"_source" : {
"company" : "chuizi",
"name" : "luoyonghao",
"birth" : "1964-03-21",
"sex" : "man"
}
} ]
}
}
7、 ES与MongoDB delete删除操作的同步验证
(1) MongoDB的删除delete操作
rs0:PRIMARY> db.col_02.remove({'name':'renzhengfei'})
WriteResult({ "nRemoved" : 1 })
rs0:PRIMARY> db.col_02.find()
{ "_id" : ObjectId("577b7d4aeb8e3dc2d1db12a7"), "name" : "luoyonghao", "birth" : "1964-03-21", "sex" : "man", "company" : "chuizi" }
rs0:PRIMARY> db.col_02.find().pretty()
{
"_id" : ObjectId("577b7d4aeb8e3dc2d1db12a7"),
"name" : "luoyonghao",
"birth" : "1964-03-21",
"sex" : "man",
"company" : "chuizi"
}
(2)ES端检索删除后结果
结果表明,MongoDB删除的内容,ES端已经同步删除。[root@5b9dbaaa148a test_log]# curl -XGET http://10.8.5.101:9200/zhang_index/col_02/_search?pretty { "took" : 2, "timed_out" : false, "_shards" : { "total" : 8, "successful" : 8, "failed" : 0 }, "hits" : { "total" : 1, "max_score" : 1.0, "hits" : [ { "_index" : "zhang_index", "_type" : "col_02", "_id" : "577b7d4aeb8e3dc2d1db12a7", "_score" : 1.0, "_source" : { "company" : "chuizi", "name" : "luoyonghao", "birth" : "1964-03-21", "sex" : "man" } } ] } }
参见详细介绍:
https://docs.mongodb.com/manual/tutorial/deploy-replica-set/Mongo与ES同步的5种方式:
https://www.linkedin.com/pulse/5-way-sync-data-from-mongodb-es-kai-hao常见Bug:
How to setup a MongoDB replica set for the connector?https://docs.mongodb.com/manual/tutorial/deploy-replica-set/
——————————————————————————————————
更多ES相关实战干货经验分享,请扫描下方【铭毅天下】微信公众号二维码关注。
(每周至少更新一篇!)

和你一起,死磕Elasticsearch!
——————————————————————————————————
2016年7月6日 23:22 思于家中床前
作者:铭毅天下
转载请标明出处,原文地址:
http://blog.csdn.net/laoyang360/article/details/51842822
如果感觉本文对您有帮助,请点击‘顶’支持一下,您的支持是我坚持写作最大的动力,谢谢!

相关文章推荐
- MongoDB过过瘾
- windows下mongodb分片设置与集群搭建
- window平台安装MongoDB
- mongodb使用配置文件安装
- mongodb 3.0 用户角色
- mongodb c++driver连接数据错误
- Install MongoDB and Node.js on a Raspberry Pi
- mongodb数据库的备份
- mongoskin 是让 Node.js 支持 MongoDB 的内嵌访问层。
- MongoDB初步认识
- MongoDB增删改查
- MongoDB启动和停止
- mongodb入门学习小记
- centos6.5安装MongoDB3.0及安装对应php mongo扩展
- centos6.5安装MongoDB2.4.9
- [置顶] centos安装mongodb3.0及php mongo扩展和代码测试
- 如何在MongoDB中建立新数据库和集合
- 利用JAVA操作MongoDB
- 安装mongodb,创建数据库、用户、创建表、导出导入数据库
- php mongodb操作类,适合mongodb2.x和mongodb3.x