Cent6.5下zabbix监控mysql5.6版本
2016-07-06 12:08
633 查看
文章参考:http://www.ttlsa.com/zabbix/zabbix-monitor-mysql/
在原文中:
如果发现监控没有数据,请排查如下问题
1. zabbix客户端是否重启
2. 脚本是否有执行权限
3. 数据库是否有权限
4. 环境变量是否有问题
5. 请看zabbix item列,鼠标移至红色叉上,有错误提示。
6. 如果数据库密码保存在脚本中,会导致监控没有数据会不断的报错为Warning: Using a password on the command line interface can be insecure.需要将帐号密码等配置添加到my.cnf中。
问题6有更好的解决办法:(我的mysql是源码安装至/usr/local/mysql)
使用mysql5.6的新功能,--login-path
具体方法:
1)/usr/local/mysql/bin/mysql_config_editor set --login-path=local --host=localhost --user=zabbix –password
其实是生成了验证文件到 ~/.mylogin.cnf
命令解释:
--login-path是设置访问的名字,我设置的local;
--host是指定允许访问的host地址,这个地址是你grant的时候配置的;
--user是用户名,也是grant时候配置的;
--password是指定密码,同样是grant配置。
运行上面命令后,会要求你属于密码,输入后会什么反馈都没有,可以使用下面命令查看
/usr/local/mysql/bin/mysql_config_editor print –all
2)配置sudo
修改 /etc/sudoers
Defaults requiretty ===》 Defaults:zabbix !requiretty
并添加一行
zabbix ALL=(root) NOPASSWD:/usr/local/mysql/bin/mysql,/usr/local/mysql/bin/mysqladmin
3)各脚本相应修改
这里列出我使用的脚本和zabbix客户端配置
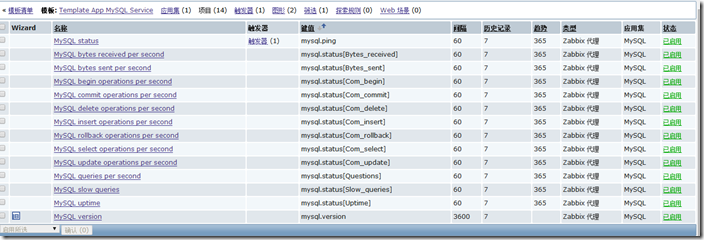
[root@tsm-test1 etc]# cat /usr/local/zabbix/etc/zabbix_agentd.conf.d/check_mysql_performance_key
UserParameter=mysql.version,/usr/local/mysql/bin/mysql -V
UserParameter=mysql.ping,sudo /usr/local/mysql/bin/mysqladmin --login-path=local -S /tmp/mysql.sock ping | grep -c alive
UserParameter=mysql.status[*],/usr/local/zabbix/shell/check_mysql_performance.sh $1 $2[root@tsm-test1 etc]#
[root@tsm-test1 etc]# cat /usr/local/zabbix/shell/check_mysql_performance.sh #!/bin/sh #Create by zijin 2014.09.28##Need "grant select on mysql.* to zabbix@localhost identified by 'zabbix_agent'"#Mysql5.6# mysql_config_editor set --login-path=local --host=localhost --user=zabbix -p
MYSQL_SOCK="/tmp/mysql.sock" MYSQL_PWD="zabbix_server"MYSQL_ADMIN="/usr/local/mysql/bin/mysqladmin"ARGS=1 if [ $# -ne "$ARGS" ];then echo "Please input one arguement:" fi case $1 in
Uptime)
result=`sudo ${MYSQL_ADMIN} --login-path=local -S $MYSQL_SOCK status|cut -f2 -d":"|cut -f1 -d"T"` echo $result
;;
Com_update)
result=`sudo ${MYSQL_ADMIN} --login-path=local -S $MYSQL_SOCK extended-status |grep -w "Com_update"|cut -d"|" -f3` echo $result
;;
Slow_queries)
result=`sudo ${MYSQL_ADMIN} --login-path=local -S $MYSQL_SOCK status |cut -f5 -d":"|cut -f1 -d"O"` echo $result
;;
Com_select)
result=`sudo ${MYSQL_ADMIN} --login-path=local -S $MYSQL_SOCK extended-status |grep -w "Com_select"|cut -d"|" -f3` echo $result
;;
Com_rollback)
result=`sudo ${MYSQL_ADMIN} --login-path=local -S $MYSQL_SOCK extended-status |grep -w "Com_rollback"|cut -d"|" -f3` echo $result
;;
Questions)
result=`sudo ${MYSQL_ADMIN} --login-path=local -S $MYSQL_SOCK status|cut -f4 -d":"|cut -f1 -d"S"` echo $result
;;
Com_insert)
result=`sudo ${MYSQL_ADMIN} --login-path=local -S $MYSQL_SOCK extended-status |grep -w "Com_insert"|cut -d"|" -f3` echo $result
;;
Com_delete)
result=`sudo ${MYSQL_ADMIN} --login-path=local -S $MYSQL_SOCK extended-status |grep -w "Com_delete"|cut -d"|" -f3` echo $result
;;
Com_commit)
result=`sudo ${MYSQL_ADMIN} --login-path=local -S $MYSQL_SOCK extended-status |grep -w "Com_commit"|cut -d"|" -f3` echo $result
;;
Bytes_sent)
result=`sudo ${MYSQL_ADMIN} --login-path=local -S $MYSQL_SOCK extended-status |grep -w "Bytes_sent" |cut -d"|" -f3` echo $result
;;
Bytes_received)
result=`sudo ${MYSQL_ADMIN} --login-path=local -S $MYSQL_SOCK extended-status |grep -w "Bytes_received" |cut -d"|" -f3` echo $result
;;
Com_begin)
result=`sudo ${MYSQL_ADMIN} --login-path=local -S $MYSQL_SOCK extended-status |grep -w "Com_begin"|cut -d"|" -f3` echo $result
;;                *) echo "Usage:$0(Uptime|Com_update|Slow_queries|Com_select|Com_rollback|Questions|Com_insert|Com_delete|Com_commit|Bytes_sent|Bytes_received|Com_begin)";;
esac [root@tsm-test1 etc]#
4)添加相应的模板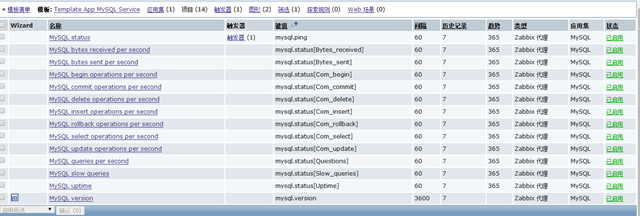

相关文章推荐
- SQL Server 2016 CTP2.2安装配置方法图文教程
- SQLSERVER 中GO的作用详解
- SQL Server 2016 CTP2.2安装配置方法图文教程
- SqlBulkCopy插入1亿条数据需要20分钟?
- 安装SQL2008 R2出现 chould not open key:unknown\components
- 通过Sqoop实现Mysql / Oracle 与HDFS / Hbase互导数据
- 监控mysql索引使用效率的脚本
- Linux Golang 打开Mysql
- mysql IFNUll+leftpad
- Mysql数据导入到Hbase报错:org.apache.hadoop.hbase.HTableDescriptor.addFamily
- 解决SQL Server 2008 R2安装过程中提示Could not open key的解决方法
- HAWQ ——功能强大的SQL-on-Hadoop引擎
- PL/SQL Developer如何连接64位的Oracle图解
- lvs+keepalived+mha+mysql高可用架构
- 错误分析及解决办法---MySQL server has gone away
- mac os mysql启动报错 Can't open the mysql.plugin table
- MySql主从架构之-概述
- hadoop学习之HIVE(3):hadoop2.7.2下安装hive2.1.0并关联mysql数据库
- CentOS 7运维管理笔记(10)----MySQL源码安装
- Hadoop Hive基础sql语法