在Bluemix 使用OpenWhisk & Node-red 開發Event-Driven 應用系
2016-07-04 02:00
656 查看
在Bluemix 使用OpenWhisk & Node-red 开发Event-Driven 应用系统
作者:陳兆麟 Email:chenlin2@ms9.hinet.net
2016/2/22 IBM Bluemix 已宣布推出开源的 OpenWhisk,有了OpenWhisk,开发者对于前端的触发 (trigger) 事件,后端不需安装 Server,只要开发一小段的JavaScript程序代码片段、Swift程序代码,或是嵌在Docker container里面的二进制程序(统称为 Action )来响应这些不同的触发事件。同时使用 rule 来绑定 trigger 与 action 之间的关系,也就说是对于特定的 trigger 定义有哪些 action 与之对应。部署与执行OpenWhisk的动作,也相当快速,只要外界触发事件启动,则立即执行相对的 Action。如果没有触发器启动,就不会执行动作相关的程序代码,所以也不会耗用IT基础架构的资源。例如人脸辨识技术,它有别于以往的方法,只有在侦测到人脸, OpenWhisk才会将对应的Action放入内存处理人脸识别及标签; OpenWhisk 执行动作的方式也相当特别,它将 Action应用程序分解成多个小型建构模块(building blocks)来执行又称微服务(microservices),OpenWhisk动作可以在其中执行;有了OpenWhisk这类型服务,开发者可以更专心于程序代码的处理上,而不需要针对监控、漏洞修补,或底层系统、储存、网络的防护等日常维护作业,耗费心思。
開發環境: Win7 (64 bit), Docker Toolbox, Bluemix, OpenWhisk
1.安裝 Docker Toolbox (https://www.docker.com/products/docker-toolbox)
桌面點選
$ docker-machine ls (Docker Quickstart Terminal介面執行,確認虛擬機default 已安裝)
NAME ACTIVE DRIVER STATE URL SWARM DOCKER ERRORSdefault virtualbox Running tcp://192.168.99.101:2376 v1.10.3
$ docker-machine env default
export DOCKER_TLS_VERIFY="1
"
export DOCKER_HOST=
"tcp://192.168.99.100:2376
"
export DOCKER_CERT_PATH=
"C:\Users\slim1.docker\machine\machines\default
"
export DOCKER_MACHINE_NAME=
"default
"
Run this command to configure your shell:
eval $(
"C:\Program Files\Docker Toolbox\docker-machine.exe
"env default)
$
eval $("
C:\Program Files\Docker Toolbox\docker-machine.exe"
env default)
$ docker-machine ls
NAME ACTIVE DRIVER STATE URL SWARM DOCKER ERRORSdefault * virtualbox Running tcp://192.168.99.100:2376 v1.10.3
2.進入IBM Bluemix: https://console.ng.bluemix.net/ 點選 Sign Up 註冊後登錄 (30天試用期免費) 將 username 及 password 記錄。

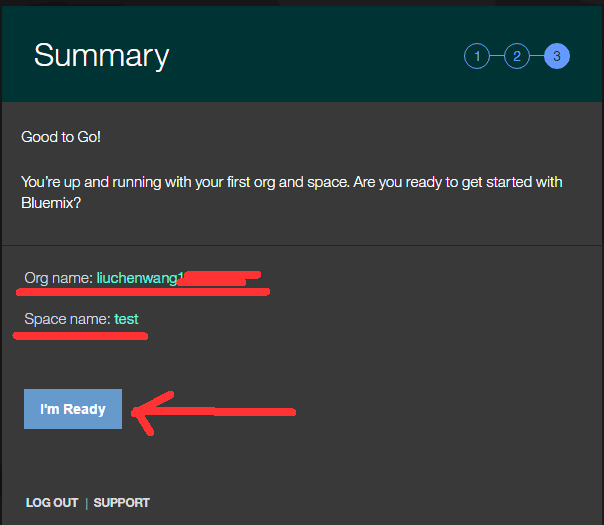
3.建立 Organization 名稱

4. 建立 Space 名稱
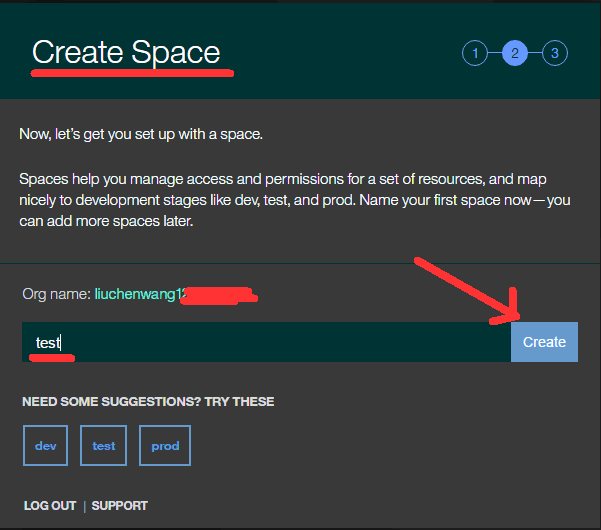
確認 Organization, Space名稱
5. 根據以下網址: 安裝 python, pip (for win 7)
(python-2.7.11.amd64.msi)(https://www.python.org/downloads/release/python-2711/)
將 C:\Python27\Scripts 及 C:\Python27\ 存於控制台->環境變數->path
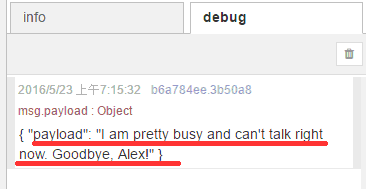
$ python
--version
Python 2.7.11
$ pip
--version
pip 8.1.2
根據以下網址安裝 git (for win 7),要在環境變數 path 設置路徑
https://git-for-windows.github.io/
根據以下網址安裝 cf (for win 7), 要在環境變數 path 設置路徑
https://github.com/cloudfoundry/cli/releases
根據以下網址安裝 node.js (for win 7 node-v4.4.4-x64.msi)
https://nodejs.org/en/#download
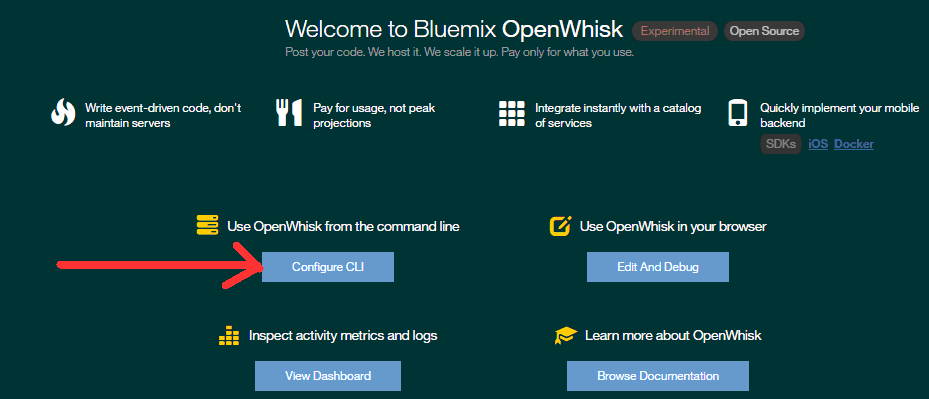
6. 進入 bluemix OpenWhisk:
https://new-console.ng.bluemix.net/openwhisk/7.點選 Configure CLI
8. 根據以下順序將指令在 window 命令提示執行 (以下指令在 Quick start terminal 執行,若有误再至 window 命令提示字符窗口执行 )
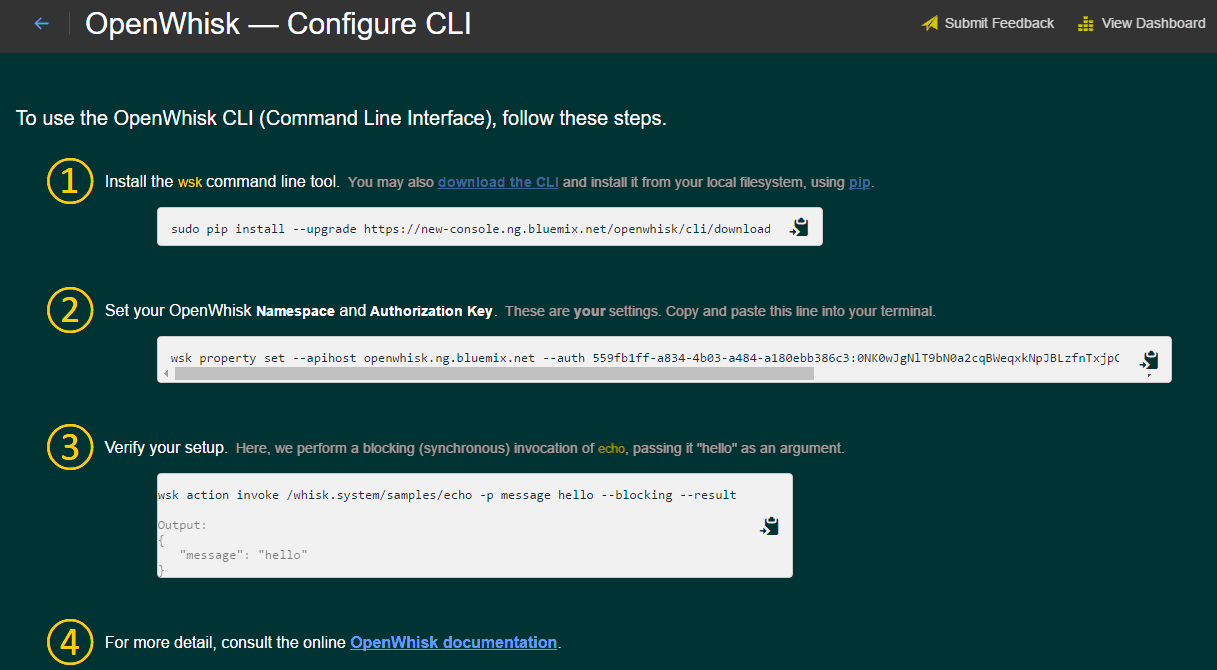
9. 依據編號 1 的指令 (安裝 wsk 套件)
$pip install--upgrade https://new-console.ng.bluemix.net/openwhisk/cli/download
10. 執行編號 2 指令 (設定Namespace and Authorization Key )
$wsk property set--apihost openwhisk.ng.bluemix.net –auth xxxxxxxxxx –namespace “xxxxxxxxxxxxxxxxxxx”
ok: whisk auth set

ok: whisk API host set

ok: namespace set to liuchenwang12345@gmail.com_test
11. 執行編號 3 指令 (檢驗 wsk 是否已完成安裝)
以下 command 直接啟動 OpenWhisk 內的範例event, 然後列印執行結果$ wsk action invoke /whisk.system/samples/echo -p message hello --
blocking --
result
{

"message": "hello"

}
12. 開發 OpenWhisk微服務 (Developing a Microservice)
$ git clone https://github.com/Altoros/getting-started-with-openwhisk.git
$ cd getting-started-with-openwhisk/goodbye-sir
$./deploy.sh (建立 goodbye-sir action)
ok: updated action goodbye-sir
$ wsk list (顯示系統有哪些 Action)
/liuchenxxxxxxx@gmail.com_test/goodbye-sir private
13. 同步啟動 goodbye-sir Action
$wsk action invoke --
blocking goodbye-sir
ok: invoked goodbye-sir with id 4e8f1905956844f7b752ca8881e8e0ca

response:

{

"activationId": "4e8f1905956844f7b752ca8881e8e0ca",

"annotations": [],

"end": 1463117951512,

"logs": [],

"name": "goodbye-sir",

"namespace": "liuchenwang12345@gmail.com",

"publish": false,

"response": {

"result": {

"payload": "I am pretty busy and can't talk right now. Goodbye, sir!"

},

"status": "success",

"success": true

},

"start": 1463117951056,

"subject": "liuchenwang12345@gmail.com",

"version": "0.0.3"

}
14.非同步啟動 goodbye-sir Action
$wsk action invoke goodbye-sir
ok: invoked goodbye-sir with id 606ddab9022041d99e8dcc8c43f66702

以下指令將印出 Action 執行結果
$ wsk activation result 606ddab9022041d99e8dcc8c43f66702
{

"payload": "I am pretty busy and can't talk right now. Goodbye, sir!"

}
$ wsk action invoke --
blocking goodbye-sir --
param name Alex (附帶參數)
"result": {

"payload": "I am pretty busy and can't talk right now. Goodbye, Alex!"

},
15. OpenWhisk 可下載已儲存於 doker hub 的 images 並建立 container action
$ wsk action create --
docker example hello-world (建立 hello-world container action )
ok: created action example
16. 以下指令在 Openwhisk以非同步執行example container,並印出結果
$wsk action invoke --
blocking --
result example
error: {

"error": "the action did not produce a valid JSON response"

},

以上error,是因為 OpenWhisk 以 stdin, stdout 與 container 溝通

其格式為JSON ,如果輸出不是 JSON 格式會導致錯誤,所以會顯示錯誤:
17. 在 bluemix Openwhisk製作Docker Actions 的步驟:
先在 local 將程式流程寫成 Dockerfile 然後 build 為 docker images 上傳至 docker hub;在由第三者將 docker hub 之 images deploy 至 OpenWhisk 成為 container action.18. 製作Docker Actions for OpenWhisk 範例
$ wsk sdk install docker
19 在工作目錄自動產生子目錄 dockerSkeleton
Server 資料夾: Node.js 用來與 Openwhisk 交談

Client  資料夾: C 語言程式 example.c 作為回應 event 使用
$cd dockerSkeleton
$docker build -t chenlin2/openwhisk .
$docker images
REPOSITORY           TAG                 IMAGE ID            CREATED              SIZE

chenlin2/openwhisk   latest                75f52d13625f        About a minute ago      435.1 MB

ubuntu               14.04               90d5884b1ee0        9 days ago             188 MB

container 啟動包含 2 部分,等待接受 http request 並執行 example.c
$docker run chenlin2/openwhisk & (建立 container)
Starting a blackbox service
$ docker ps
CONTAINER ID        IMAGE        COMMAND  REATED       STATUS     PORTS    NAMES

a155fa55a29c   chenlin2/openwhisk   "/bin/bash -c 'cd bla"   6 minutes ago   8080/tcp   stupefied_varahamihira
$ docker exec -it a155fa55a29c bash
# ifconfig (查詢 container ip)
eth0 Link encap:Ethernet HWaddr 02:42:ac:11:00:02 inet addr:172.17.0.2 Bcast:0.0.0.0
20. 以下指令執行後container 將接受http request,並執行example.c
#curl -H "
Content-Type: application/json"
-d '
{"
value"
:{"
YOUR"
:"
PAYLOAD"
}}'
172.17.0.2:8080/run
{"result":{"msg":"Hello undefined from arbitrary C program!\n"}}#exit
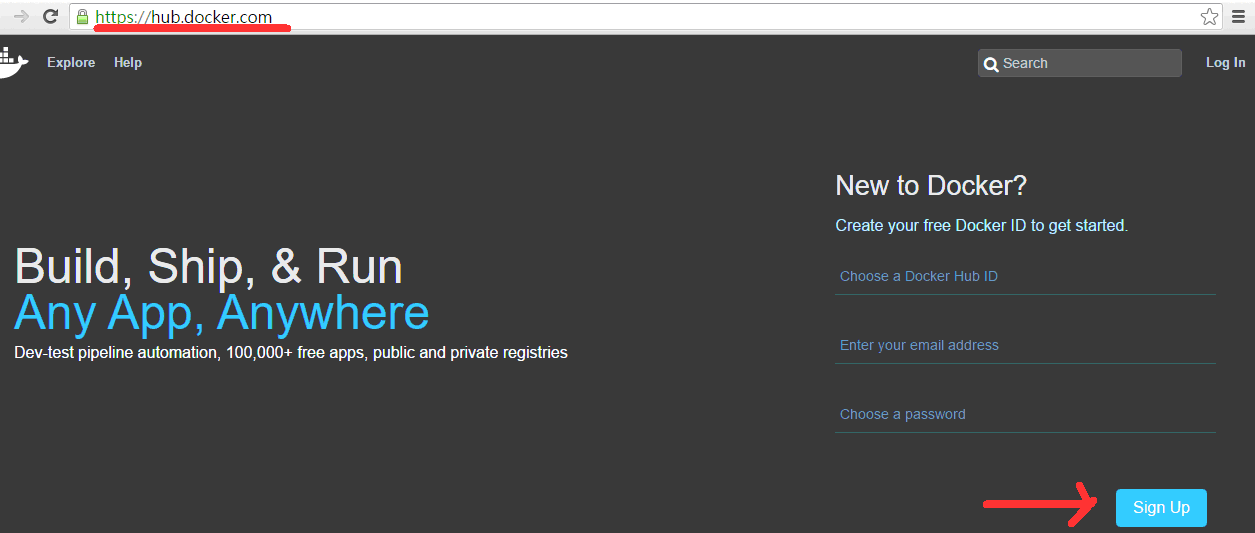
21. 將 chenlin2/openwhisk 上傳至 docker hub,請先登錄 docker hub: https://hub.docker.com/ 建立 OpenWhisk repository
點選 [Create Repository]

點選 [Create]

顯示已建立的 Repository

22. 將 local images 上傳 docker hub 步驟
$ docker login -u uuu -p ppp (uuu=username , ppp=password)
Login Succeeded

將 chenlin2/openwhisk images上傳至 docker hub
$ docker push chenlin2/openwhisk
23.其他使用者可將 docker hub 之 chenlin2/openwhisk 下載並建立 container action.
$ wsk action update --
docker ACTION chenlin2/openwhisk (建立 container action ACTION)
ok: updated action ACTION
$ wsk list (檢測 ACTION 是否建立)
/liuchenwang12345@gmail.com_test/ACTION private
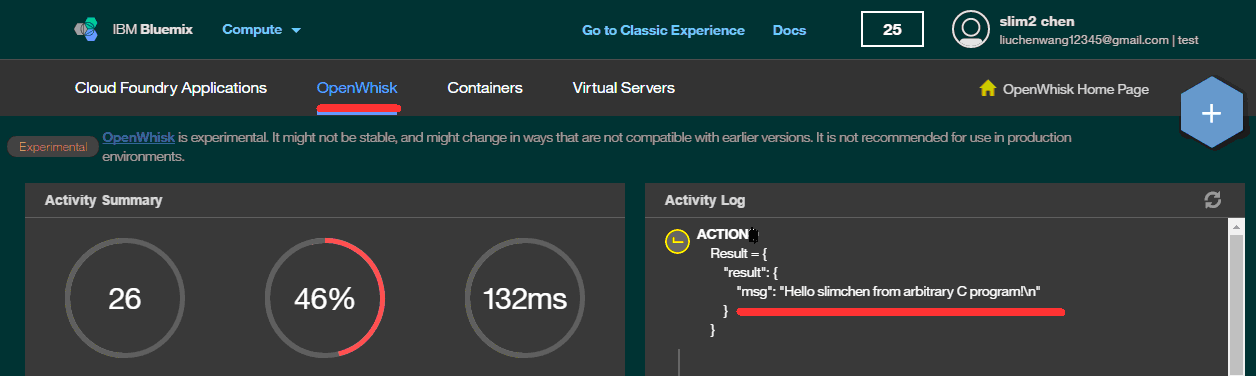
24. 測試 container action ACTION 是否正常工作
以 wsk 指令啟動在 Openwhisk Server 內名為 ACTION 的 action$ wsk action invoke -b -r -p payload slimchen ACTION
payload =參數名稱, slimchen =參數值

{

"result": {

"msg": "Hello slimchen from arbitrary C program!\n"

}

}
25. 進入 OpenWhisk UI 介面,觀察 ACTION container 執行結果.
(https://new-console.ng.bluemix.net/openwhisk/dashboard)
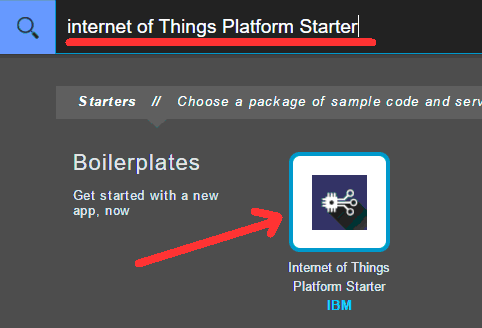
26. 在 bluemix 樣板選擇 [internet of Things Platform Starter] 建立 App
進入網址: https://console.ng.bluemix.net/點選型錄 =>選擇 [internet of Things Platform Starter]
27.名稱:xxxxxx
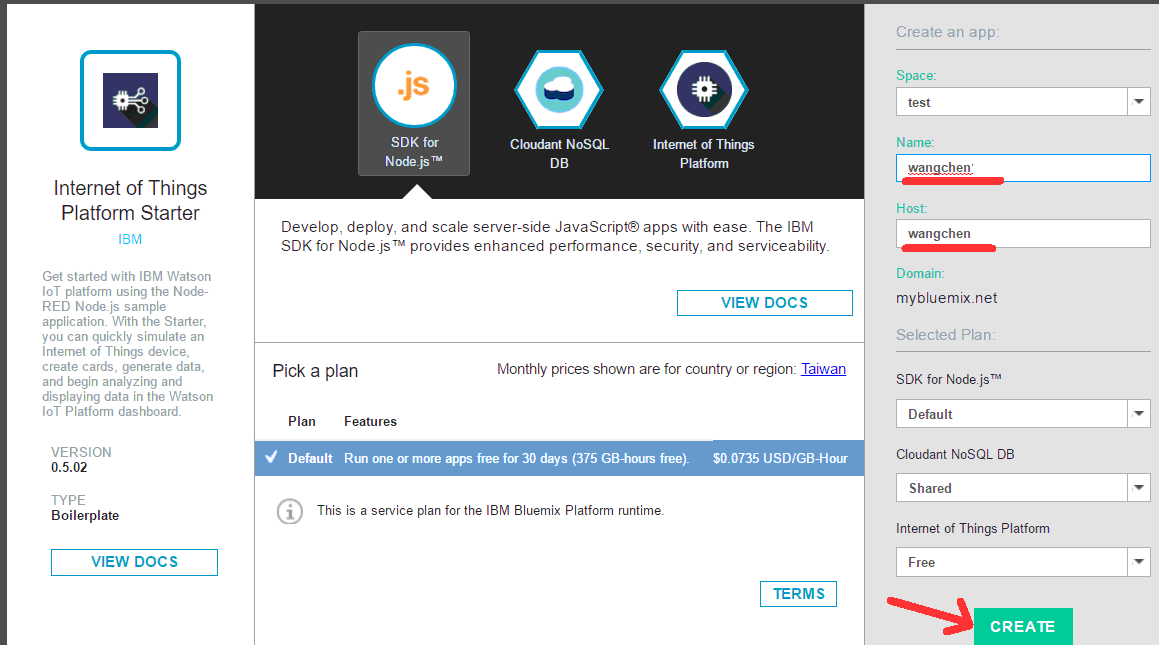
點選 [xxxxx.mybluemix.net]

28.進入bluemix Nord-Red 編輯器http://xxxxxxxx.mybluemix.net/red/

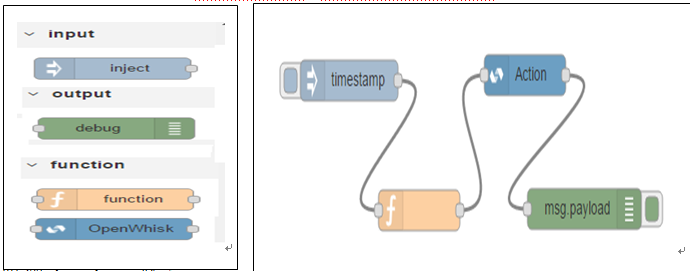
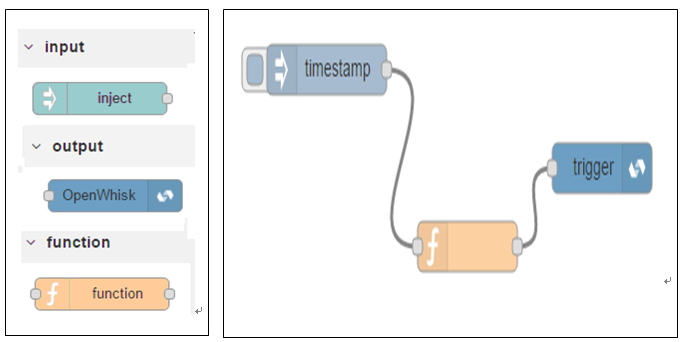
29. 將調色盤 4 nodes (inject,debug, function,openwhisk) 拖曳至 workspace
30.點選 function 輸入:
msg.payload = {

"name":"Alex"

};

return msg;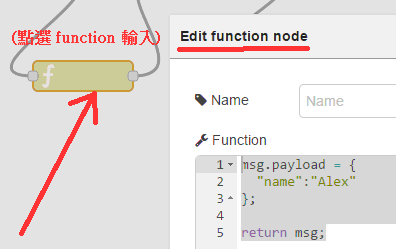
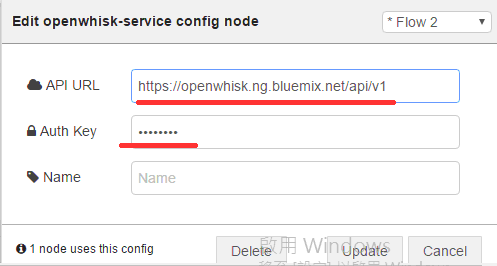
31. 點選 Action node
Namespace: 根據步驟 4 取得

Action : goodbye-sir

點選上圖 Service 編輯圖示後, Auth key: 可根據步驟 10 取得


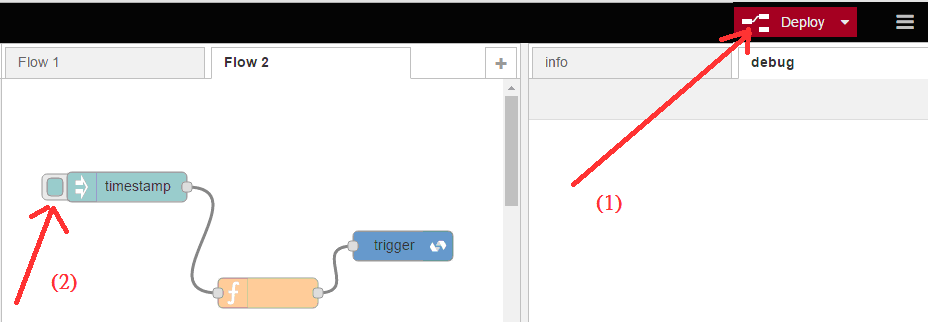
32.依序點選 [deploy],[debug],[timestamp] 執行
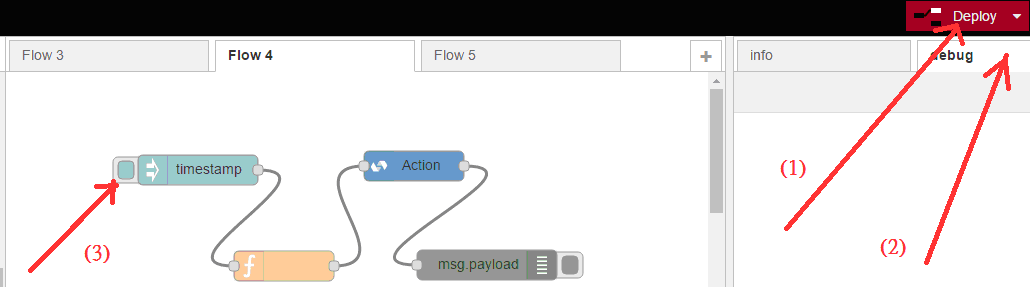
33. debug 顯示輸出如下
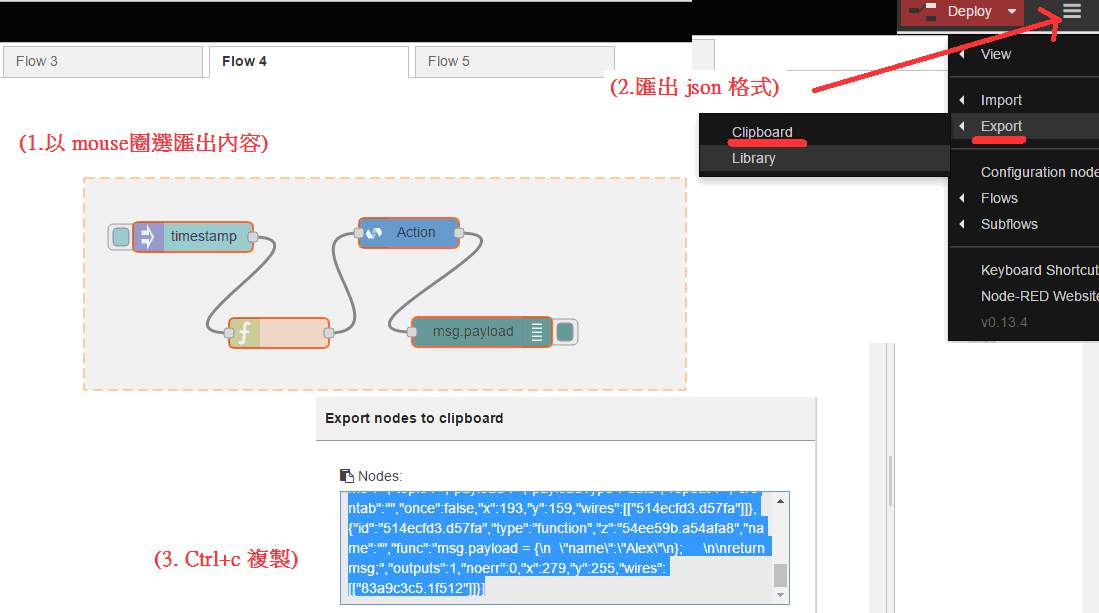
34. 將worksapce flow匯出(Ctrl+c)儲存,可選import 匯入
35. 使用trigger 啟動 Action
$ wsk trigger create goodbye-sir-trigger (建立 trigger)
$ wsk trigger list (檢視 trigger 已被建立)
triggers

/liuchenwang123456@gmail.com_test/goodbye-sir-trigger             private
$ wsk action list (檢視 goodbye-sir action已被建立)
actions

/liuchenwang123456@gmail.com_test/goodbye-sir                     private
36.建立myRule (rule) 綁定 goodbye-sir-trigger(trigger) 及 goodbye-sir (Action)
$ wsk rule create --
enable myRule goodbye-sir-trigger goodbye-sir
37.發動 trigger後會根據 rule 啟動相對應的Action
$wsk trigger fire goodbye-sir-trigger --
param name “ruby”
$wsk activation list --
limit 1 goodbye-sir (檢視最近一次 goodbye-sir Action id)
activations

fe83bb0d314b490c8f8789fbb93761fe             goodbye-sir
38.檢視 Action 啟動後的回應
$wsk activation result fe83bb0d314b490c8f8789fbb93761fe
{

"payload": "I am pretty busy and can't talk right now. Goodbye, ruby!"

}
39. 將調色盤 3 nodes (inject, function,openwhisk) 拖曳至 workspace
37. 同步驟 15 點選 function 輸入:
msg.payload = {

"name":"rubychen"

};

return msg;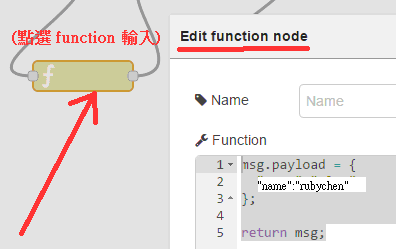
40.點選 trigger node
Namespace: 根據步驟 4

點選上圖 Service 編輯圖示後, Auth key: 可根據步驟 10 取得
41.依序點選 [deploy],[timestamp] 執行trigger
42.驗證是否啟動goodbye-sir Action
$wsk activation list --
limit 1 goodbye-sir (顯示最後一次啟動的 action id)
activations

1b4bcee1ae1044139317810e7c321bfd             goodbye-sir
43. 驗證 goodbye-sir Action 啟動後的回覆是否正確
$wsk activation result 1b4bcee1ae1044139317810e7c321bfd
{

"payload": "I am pretty busy and can't talk right now. Goodbye, rubychen!"

}
參考文獻:
http://www.ithome.com.tw/review/104198http://blog.altoros.com/how-to-use-openwhisk-docker-actions-in-ibm-bluemix.html
http://blog.altoros.com/bluemix-openwhisk-101-developing-a-microservice.html
http://blog.altoros.com/introduction-to-ibm-bluemix-openwhisk.html
https://new-console.ng.bluemix.net/openwhisk/
http://www.infoq.com/cn/news/2016/05/bluemix-ibm-interconnect
https://dzone.com/articles/how-to-write-javascript-actions-for-openwhisk-on-b
https://new-console.ng.bluemix.net/docs/openwhisk/openwhisk_packages.html#openwhisk_packages_trigger
https://amanoblog.wordpress.com/2016/03/03/ibm-bluemix-openwhisk-rest-api/
http://www.slideshare.net/HsuanJuLin/bluemixopenwhisk
http://blog.altoros.com/bluemix-openwhisk-101-developing-a-microservice.html
http://ryanjbaxter.com/cloud/bluemix/2016/03/24/running-whisk-actions-from-node-red.html
http://www.stevenatkin.com/index.php/2016/03/25/call-openwhisk-actions-node-red/
https://console.ng.bluemix.net/docs/openwhisk/openwhisk_triggers_rules.html
https://github.com/openwhisk/openwhisk/blob/master/docs/packages.md
https://read01.com/gRddP.html
https://drive.google.com/folderview?id=0B7_CUSsY2cbnbm90UTNDWmcwaGs&usp=sharing

相关文章推荐
- centos6.5上安装docker
- docker容器的网络信息查看
- openstack kilo-with-dokcer
- 在windows下的安装Docker的教程
- 8个你可能不知道的Docker知识
- 在Docker中自动化部署Ruby on Rails的教程
- 搭建基于Docker的PHP开发环境的详细教程
- Docker容器的Tengine实践
- 利用OpenVSwitch在多台主机上部署Docker的教程
- ubuntu14.04+docker的安装及使用
- Docker 清理命令集锦
- 再Docker中架设完整的WordPress站点全攻略
- 基于 Docker 开发 NodeJS 应用
- 使用Docker来加速构建Android应用的基本部署思路解析
- 在Docker上部署Python的Flask框架的教程
- 在Docker上开始部署Python应用的教程
- 详解在Python和IPython中使用Docker
- python脚本监控docker容器
- 使用IPython来操作Docker容器的入门指引
- Alpine Linux Repository本地镜像制作