iOS手势抽屉效果(定位与复位)实现
2016-06-26 00:00
561 查看
摘要: iOS手势抽屉效果(定位与复位)实现
手势抽屉效果实现
1.首先看一下效果,顺便加上一些定位
图片一

图片二
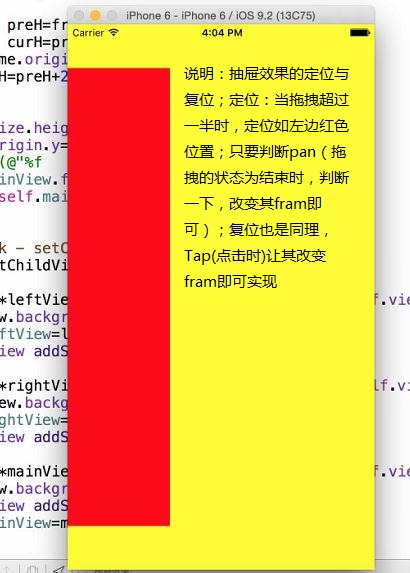
图形上加了一些说明,主要说明红色view移动过程中,它的大小变化与y轴移动距离的一些算法
具体效果,执行代码就可;代码在最后说明
2.添加拖拽手势
2.1添加手势代码
2.2手势触发时做的操作(当拖拽动作结束时,做一个操作:定位,判断其是否达到一半屏幕距离,再做一些操作)
改变view的frame分离成一个涵数(当拖拽发生时,根据x轴位移的距离,算出y轴移动了多少,以及红色view的实际高度)
复位操作(当定位成功时,点击一下复位到原始状态)
最后说明的是上述操作的对象的添加
3.源代码的地址
1.github上手势抽屉效果的复杂实现(定位与复位)
2.第一个上的包括了其它抽屉效果
手势抽屉效果实现
1.首先看一下效果,顺便加上一些定位
图片一
图片二
图形上加了一些说明,主要说明红色view移动过程中,它的大小变化与y轴移动距离的一些算法
具体效果,执行代码就可;代码在最后说明
2.添加拖拽手势
2.1添加手势代码
#pragma mark - setPan
-(void) setPan{
UIPanGestureRecognizer *pan=[[UIPanGestureRecognizer alloc]initWithTarget:self action:@selector(pan:)];
[self.mainView addGestureRecognizer:pan];
}
2.2手势触发时做的操作(当拖拽动作结束时,做一个操作:定位,判断其是否达到一半屏幕距离,再做一些操作)
#define kTargetR 275
#define kTargetL -250
-(void) pan:(UIPanGestureRecognizer *) pan{
CGPoint transP=[pan translationInView:self.mainView];
CGFloat offX=transP.x;
if (self.mainView.frame.origin.x<0) {
self.rightView.hidden=YES;
self.leftView.hidden=NO;
}else{
self.rightView.hidden=NO;
self.leftView.hidden=YES;
}
[self frameWithOffX:offX];
//NSLog(@"%@",NSStringFromCGRect(self.mainView.frame));
[pan setTranslation:CGPointZero inView:self.mainView];

CGFloat target=0;
if (pan.state==UIGestureRecognizerStateEnded) {
//定位
if (self.mainView.frame.origin.x>mainScreenS.width*0.5) {
target=kTargetR;
}else if(CGRectGetMaxX(self.mainView.frame)<mainScreenS.width*0.5){
target=kTargetL;
}
offX=target-self.mainView.frame.origin.x;
[UIView animateWithDuration:0.5 animations:^{
self.mainView.frame=target==0? [UIScreen mainScreen].bounds :[self frameWithOffX:offX];
}];
}
}
改变view的frame分离成一个涵数(当拖拽发生时,根据x轴位移的距离,算出y轴移动了多少,以及红色view的实际高度)
#define kMaxY 80
-(CGRect) frameWithOffX:(CGFloat) offX{
//x方向平移
CGRect frame=self.mainView.frame;
frame.origin.x+=offX;
//y方向平移
CGFloat offY=offX*(kMaxY/375.0);
//NSLog(@"%f",offY);
//frame.origin.y+=offY;

CGFloat preH=frame.size.height;
CGFloat curH=preH-2*offY;
if (frame.origin.x<0) {
curH=preH+2*offY;
}
frame.size.height=curH;
frame.origin.y=(mainScreenS.height-curH)/2;
//NSLog(@"%f   %f",curH,preH);
self.mainView.frame=frame;
return self.mainView.frame;
}
复位操作(当定位成功时,点击一下复位到原始状态)
#pragma mark - setTap
-(void) setTap{
UITapGestureRecognizer *tap=[[UITapGestureRecognizer alloc]initWithTarget:self action:@selector(tap:)];
[self.mainView addGestureRecognizer:tap];
}

-(void) tap:(UITapGestureRecognizer *) tap{
[UIView animateWithDuration:0.5 animations:^{
self.mainView.frame=[UIScreen mainScreen].bounds;
}];
}
最后说明的是上述操作的对象的添加
#pragma mark - setChildView
- (void) setChildView{

UIView *leftView=[[UIView alloc]initWithFrame:self.view.bounds];
leftView.backgroundColor=[UIColor yellowColor];
self.leftView=leftView;
[self.view addSubview:self.leftView];

UIView *rightView=[[UIView alloc]initWithFrame:self.view.bounds];
rightView.backgroundColor=[UIColor greenColor];
self.rightView=rightView;
[self.view addSubview:self.rightView];

UIView *mainView=[[UIView alloc]initWithFrame:self.view.bounds];
mainView.backgroundColor=[UIColor redColor];
[self.view addSubview:mainView];
self.mainView=mainView;
}
3.源代码的地址
1.github上手势抽屉效果的复杂实现(定位与复位)
2.第一个上的包括了其它抽屉效果

相关文章推荐
- 第一篇iOS博客
- iOS开发 -李洪强-清除缓存
- pch文件
- IOS Dev Intro - FBO
- IOS Dev Intro - Opengl ES Context Share Group
- iOS学习笔记——滚动视图(scrollView)
- iOS 偏好设置 NSUserDefault
- ios视频直播(二)- RTMP协议学习总结
- ios开发—事件处理与如何获得最佳点击的View
- iOS中的事件处理流程
- 【iOS开发】强制修改 iOS 状态栏颜色
- IOS开发之功能模块--输入框随着键盘的位置移动而移动
- iOS 进度框(一) MBProgressHUD
- iOS 推送通知授权请求优化
- ios设备分辨率
- nagios配置过程详解
- iOS开发中,打包为ipa格式的软件包以及怎么安装到手机终端上
- ios开发
- 毛玻璃
- iOS - 类似朋友圈的社交界面实现