Pacemaker+ISCSI 实现Apache高可用实战 推荐
2016-06-22 21:19
766 查看
Pacemaker
1.1 概述
pacemaker(直译:心脏起搏器),是一个群集资源管理器。它实现最大可用性群集服务(亦称资源管理)的节点和资源级故障检测和恢复使用您的首选集群基础设施(OpenAIS的或Heaerbeat)提供的消息和成员能力。Pacemaker 承担集群资源管理者(CRM - Cluster Resource
Manager)的角色,它是一款开源的高可用资源管理软件,适合各种大小集群。Pacemaker 由 Novell 支持,SLES HAE 就是用
Pacemaker 来管理集群,并且 Pacemaker
得到了来自Redhat,Linbit等公司的支持。它用资源级别的监测和恢复来保证集群服务(aka.
资源)的最大可用性。它可以用基础组件(Corosync 或者是Heartbeat)来实现集群中各成员之间的通信和关系管理。它包含以下的关键特性:监测并恢复节点和服务级别的故障
存储无关,并不需要共享存储
资源无关,任何能用脚本控制的资源都可以作为服务
支持使用 STONITH 来保证数据一致性
支持大型或者小型的集群
支持 quorum (仲裁) 或 resource(资源) 驱动的集群
支持任何的冗余配置
自动同步各个节点的配置文件
可以设定集群范围内的 ordering, colocation and anti-colocation
支持高级的服务模式
1.2 Pacemaker 集群的架构
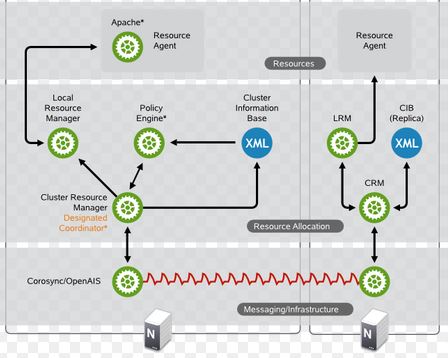
1.2.1 软件架构

Pacemaker - 资源管理器(CRM),负责启动和停止服务,而且保证它们是一直运行着的以及某个时刻某服务只在一个节点上运行(避免多服务同时操作数据造成的混乱)。
Corosync - 消息层组件(Messaging Layer),管理成员关系、消息和仲裁。见 1.2 部分介绍。
Resource Agents - 资源代理,实现在节点上接收 CRM
的调度对某一个资源进行管理的工具,这个管理的工具通常是脚本,所以我们通常称为资源代理。任何资源代理都要使用同一种风格,接收四个参数:
{start|stop|restart|status},包括配置IP地址的也是。每个种资源的代理都要完成这四个参数据的输出。Pacemaker 的
RA 可以分为三种:(1)Pacemaker 自己实现的 (2)第三方实现的,比如 RabbitMQ 的 RA (3)自己实现的,比如
OpenStack 实现的它的各种服务的RA,这是 mysql 的 RA。
1.2.2 Pacemaker 支持的集群类型
Pacemaker 支持多种类型的集群,包括 Active/Active, Active/Passive, N+1, N+M, N-to-1 and N-to-N 等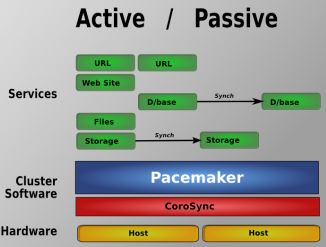


1.3 Corosync
Corosync用于高可用环境中提供通讯服务,位于高可用集群架构中的底层,扮演着为各节点(node)之间提供心跳信息传递这样的一个角色。Pacemaker 位于 HA
集群架构中资源管理、资源代理这么个层次,它本身不提供底层心跳信息传递的功能,它要想与对方节点通信就需要借助底层的心跳传递服务,将信息通告给对方。
关于心跳的基本概念:
心跳:就是将多台服务器用网络连接起来,而后每一台服务器都不停的将自己依然在线的信息使用很简短很小的通告给同一个网络中的其它主机,告诉它们自己依然在线,其它服务器收到这个心跳信息就认为它是在线的,尤其是主服务器。
心跳信息怎么发送,由谁来收,其实就是进程间通信。两台主机是没法通信的,只能利用网络功能,通过进程监听在
某一套接字上,实现数据发送,数据请求,所以多台服务器就得运行同等的进程,这两个进程不停的进行通信,主节点(主服务器)不停的向对方同等的节点发送自
己的心跳信息,那这个软件就叫高可用的集群的基准层次,也叫心跳信息传递层以及事物信息的传递层,这是运行在集群中的各节点上的进程,这个进程是个服务软
件,关机后需要将其启动起来,主机间才可以传递信息的,一般是主节点传给备节点。
1.4 Fencing Agent
一个 Pacemaker 集群往往需要使用 Fencing agent。https://alteeve.ca/w/ANCluster_Tutorial_2#Concept.3B_Fencing 详细地阐述了Fencing的概念及其必要性。Fencing 是在一个节点不稳定或者无答复时将其关闭,使得它不会损坏集群的其它资源,其主要用途是消除脑裂。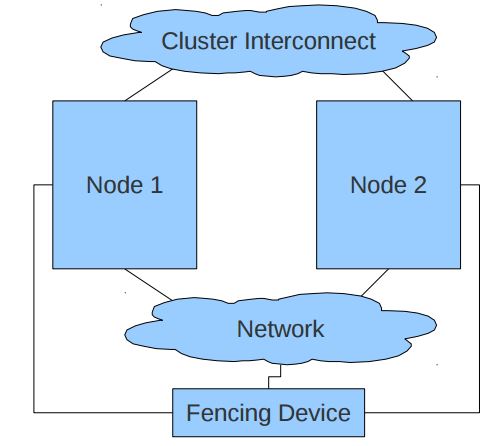
1.5 资源代理(Resource Agent - RA)
一个 RA 是管理一个集群资源的可执行程序,没有固定其实现的编程语言,但是大部分RA都是用 shell 脚本实现的。Pacemaker 使用 RA 来和受管理资源进行交互,它既支持它自身实现的70多个RA,也支持第三方RA。1.6 Pacemaker 集群管理器
Red Hat Enterprise Linux 7 使用 Pacemaker 替换 rgmanager 进行集群资源管理以及从节点失败中恢复。Pacemaker 的优点包括:
资源配置的自动同步和版本管理。
灵活的资源和 fencing 模式可与用户环境更紧密地对应。
可使用 fencing 恢复资源层失败。
基于时间的配置选项。
在多节点中运行同一资源的能力。例如:网页服务器或者集群文件系统。
在两个不同模式之一的多个节点中运行同一资源的能力。例如:同步资源和目标。
Pacemaker 不需要分布式锁管理程序。
仲裁丢失或者形成多个分区时的可配置行为。
Pacemaker 配置系统,也称 pcs,替换了 ccs、ricci 和 luci 作为统一的集群配置和管理工具。pcs 的优点包括:
命令行工具。
可轻松自我启动集群,即初始化集群并使其开始运行。
可配置集群选项。
可添加、删除或者修改资源及其之间的关系。
2.部署准备
部署平台:KVM
部署系统版本:centos7.2(three)
部署方案:HA+Pacemaker
部署数量:node1,node2,storage
部署ip:node1(192.168.122.10) node2(192.168.122.20)storage(192.168.122.30) VIP(192.168.122.100)
准备工作:设置静态ip,关闭服务(NetworkManager!,iptables,SElinux),设置hostname!,配置hosts解析!,配置ssh互信,安装ntp,配置好yum
注:!为必不可少的步骤。
3.网络拓扑
Client: CIP:任意一台非集群设备即可
Director: VIP:192.168.122.100 DIP(storage):192.168.122.30
Real Server: RIP:192.168.122.10 192.168.122.20
DNS: hosts能解析即可
3.1 系统初始化
node1 node2 storage 相同步骤,需要执行三次
配置防火墙及SELinux
systemctl disable firewalld
systemctl stop firewalld
iptables -F
[root@localhost ~]# sed -r -i '/^SELINUX=/cSELINUX=disabled' /etc/selinux/config
[root@localhost ~]# setenforce 0
3.2. 主机名解析
[root@localhost ~]# hostnamectl set-hostname node1
[root@localhost ~]# hostname
node1
[root@localhost ~]# cat /etc/hosts
127.0.0.1   localhost localhost.localdomain localhost4 localhost4.localdomain4
::1         localhost localhost.localdomain localhost6 localhost6.localdomain6
192.168.122.10 node1
192.168.122.20 node2
3.3. 时间同步
[root@localhost ~]# yum -y install ntp
[root@localhost ~]# ntpdate cn.pool.ntp.org(以自己的时间服务器为准)
3.4. 双机互信(可选)
[root@localhost ~]# ssh-keygen -f /root/.ssh/id_rsa -N ""
Generating public/private rsa key pair.
Created directory '/root/.ssh'.
Your identification has been saved in /root/.ssh/id_rsa.
Your public key has been saved in /root/.ssh/id_rsa.pub.
The key fingerprint is:
9c:7a:00:b9:22:9b:24:8e:65:a6:f1:79:79:11:0e:ad root@node1
The key's randomart image is:
+--[ RSA 2048]----+
|                 |
|     o           |
|    + o          |
|     * o .       |
|+.= E + S        |
|=@ o . +         |
|=.o o o .        |
|   . . .         |
|                 |
+-----------------+

[root@localhost ~]# rsync -va /root/.ssh/ node2:/root/
[root@localhost ~]# rsync -va /root/.ssh/ 192.168.122.30:/root/
到此,初始化步骤完毕。
4. ISCSI Target
关闭storage节点,选择添加磁盘的时候,要以自己自己原来的存储类型为准,避免出错
4.1. storage 添加一块新硬盘用作共享
[root@storage ~]# lsblk
NAME            MAJ:MIN RM  SIZE RO TYPE MOUNTPOINT
vda             252:0    0   20G  0 disk
├─vda1          252:1    0  500M  0 part /boot
├─vda2          252:2    0    1G  0 part
│ └─centos-swap 253:0    0    1G  0 lvm  [SWAP]
└─vda3          252:3    0 18.5G  0 part /
vdb为新硬盘,类型根据自己的来定
vdb             252:16   0    8G  0 disk
[root@storage ~]# hostname
storage
[root@storage  ~]#  fdisk /dev/vdb
[root@storage ~]# 确认工作在storage端,而不是其他节点
[root@storage ~]# yum -y install targetcli
[root@storage ~]# systemctl enable target
Created symlink from /etc/systemd/system/multi-user.target.wants/target.service to /usr/lib/systemd/system/target.service.
[root@storage ~]# systemctl start target.service
4.2 配置Target
4.2.1. targetcli介绍
targetcli是Linux-IO Target的用户态的管理配置工具。用户可以使用yum或apt-get直接从各大发行版的官方仓库安装。targetcli提供一个类似shell的界面,而前文提到的各种Target、TPG、LUN、backstore对象则被组织成目录树的形式,用户可以用ls、cd命令来浏览目录树,用create、delete命令来创建和删除各种对象。浏览配置,就是浏览目录树,创建删除各种对象,就是在目录树的各级节点中创建新的节点。同时targetcli还提供了常见的shell命令辅助编辑功能,例如TAB智能补全、上下键切换命令历史、Ctrl + R搜索命令历史。凡是有不熟悉的命令,都可以用help命令查询使用说明。以下步骤为动态交互,一定要检查安全策略是否关闭运行targetcli进入交互模式,在终端中显示为彩色版,而且支持tab。
[root@storage ~]# targetcli
Warning: Could not load preferences file /root/.targetcli/prefs.bin.
targetcli shell version 2.1.fb41
Copyright 2011-2013 by Datera, Inc and others.
For help on commands, type 'help'.

/> ls
o- / ..................................................................... [...]
o- backstores .......................................................... [...]
| o- block .............................................. [Storage Objects: 0]
| o- fileio ............................................. [Storage Objects: 0]
| o- pscsi .............................................. [Storage Objects: 0]
| o- ramdisk ............................................ [Storage Objects: 0]
o- iscsi ........................................................ [Targets: 0]
o- loopback ..................................................... [Targets: 0]
/>
4.2.2. 建立一个块存储
/> /backstores/block create san1 /dev/vdb1
Created block storage object san1 using /dev/vdb.
4.2.3. 给存储起一个名称
/> /iscsi create iqn.2016-06.com.node.san1

Created target iqn.2016-06.com.node.san1.
Created TPG 1.
Global pref auto_add_default_portal=true
Created default portal listening on all IPs (0.0.0.0), port 3260.
/>
4.2.4. 进入
/> cd /iscsi/iqn.2016-06.com.node.san1/tpg1/
/iscsi/iqn.20...ode.san1/tpg1> ls
o- tpg1 ................................................. [no-gen-acls, no-auth]
o- acls ............................................................ [ACLs: 0]
o- luns ............................................................ [LUNs: 0]
o- portals ...................................................... [Portals: 1]
o- 0.0.0.0:3260 ....................................................... [OK]
/iscsi/iqn.20...ode.san1/tpg1>
4.2.5 创建lun(target块设备的逻辑单元)
/iscsi/iqn.20...ode.san1/tpg1> luns/ create /backstores/block/san1
Created LUN 0.
/iscsi/iqn.20...ode.san1/tpg1> ls
o- tpg1 ................................................. [no-gen-acls, no-auth]
o- acls ............................................................ [ACLs: 0]
o- luns ............................................................ [LUNs: 1]
| o- lun0 ............................................ [block/san1 (/dev/vdb)]
o- portals ...................................................... [Portals: 1]
o- 0.0.0.0:3260 ....................................................... [OK]
/iscsi/iqn.20...ode.san1/tpg1>
4.2.6. 返回/目录
/iscsi/iqn.20...ode.san1/tpg1> cd /
/> ls
o- / ..................................................................... [...]
o- backstores .......................................................... [...]
| o- block .............................................. [Storage Objects: 1]
| | o- san1 ......................... [/dev/vdb (8.0GiB) write-thru activated]
| o- fileio ............................................. [Storage Objects: 0]
| o- pscsi .............................................. [Storage Objects: 0]
| o- ramdisk ............................................ [Storage Objects: 0]
o- iscsi ........................................................ [Targets: 1]
| o- iqn.2016-06.com.node.san1 ..................................... [TPGs: 1]
|   o- tpg1 ........................................... [no-gen-acls, no-auth]
|     o- acls ...................................................... [ACLs: 0]
|     o- luns ...................................................... [LUNs: 1]
|     | o- lun0 ...................................... [block/san1 (/dev/vdb)]
|     o- portals ................................................ [Portals: 1]
|       o- 0.0.0.0:3260 ................................................. [OK]
o- loopback ..................................................... [Targets: 0]
/>
优化,可选步骤
/> cd iscsi/iqn.2016-06.com.node.san1/tpg1/
/iscsi/iqn.20...ode.san1/tpg1> set attribute demo_mode_write_protect=0
Parameter demo_mode_write_protect is now '0'.
/iscsi/iqn.20...ode.san1/tpg1> set attribute generate_node_acls=1
Parameter generate_node_acls is now '1'.
/iscsi/iqn.20...ode.san1/tpg1> set attribute cache_dynamic_acls=1
Parameter cache_dynamic_acls is now '1'.
/iscsi/iqn.20...ode.san1/tpg1>
4.2.7. 保存,如果发现添加有问题,请运行clearconfig清除,再运行clearconfig confirm=True重置,然后再按照上面步骤重新添加。
/iscsi/iqn.20...ode.san1/tpg1>
/iscsi/iqn.20...ode.san1/tpg1> cd /
/> saveconfig
Last 10 configs saved in /etc/target/backup.
Configuration saved to /etc/target/saveconfig.json
/> exit
Global pref auto_save_on_exit=true
Last 10 configs saved in /etc/target/backup.
Configuration saved to /etc/target/saveconfig.json
[root@storage ~]#
如果最后发现集群重启资源服务全是stop状态,估计是存储没挂上,系统重启存储就掉了,如果遇到这种情况必须重启添加重启磁盘。
storage端添加完毕。
5. Iscsi initiator(客户端配置)
iscsi-initiator-utils [node1,node1]
node1和node2 都要做一遍,在这里我就只显示添加一个节点了,只要命令复制过去就可以了。
[root@node1 ~]# yum -y install lvm2-cluster iscsi*5.1. 发现并连接iscsi设备
[root@node1 ~]# iscsiadm -m discovery -t st -p 192.168.122.30
192.168.122.30:3260,1 iqn.2016-06.com.node.san1
node2别忘记执行一遍,然后重启服务。
-m discovery表示发现查找
-t senbtargets 表示发布的target("-t st" 为缩写)
-p ip:port用来指定服务器ip地址
5.2. 重启服务
[root@node2 ~]# systemctl restart iscsi
[root@node2  ~]# systemctl enable iscsi
[root@node2  ~]# systemctl enable iscsid
[root@node2 ~]# lsblk
NAME            MAJ:MIN RM  SIZE RO TYPE MOUNTPOINT
sda               8:0    0    8G  0 disk 此设备为新发现设备,node1和node2都需要看一下是否有
vda             252:0    0   20G  0 disk
├─vda1          252:1    0  500M  0 part /boot
├─vda2          252:2    0    1G  0 part
│ └─centos-swap 253:0    0    1G  0 lvm  [SWAP]
└─vda3          252:3    0 18.5G  0 part /
6. 创建集群 corosync
node1 and node2
6.1 . 安装并启动
软件包的名称不要写错,检查清楚
[root@node1 ~]# yum -y install pcs pacemaker corosync fence-agents-all
[root@node2 ~]# systemctl start pcsd.service
[root@node2 ~]# systemctl enable pcsd.service
Created symlink from /etc/systemd/system/multi-user.target.wants/pcsd.service to /usr/lib/systemd/system/pcsd.service.
[root@node2 ~]#
6.2. 生成hacluster密码(node1和node2的hacluster密码必须,必须一样)
[root@node1 ~]# passwd hacluster  别忘记了node2
Changing password for user hacluster.
New password:
BAD PASSWORD: The password fails the dictionary check - it is based on a dictionary word
Retype new password:
passwd: all authentication tokens updated successfully.
6.3. 创建集群
以下步骤在任意节点操作(node1 or node2)
认证节点,并创建名为web_cluster的集群
查看
[root@node1 ~]# pcs cluster auth node1 node2
Username: hacluster
Password:
node1: Authorized
node2: Authorized
创建
[root@node1 ~]# pcs cluster setup --start --name web_cluster node1 node2
Shutting down pacemaker/corosync services...
Redirecting to /bin/systemctl stop  pacemaker.service
Redirecting to /bin/systemctl stop  corosync.service
Killing any remaining services...
Removing all cluster configuration files...
node1: Succeeded
node2: Succeeded
Starting cluster on nodes: node1, node2...
node2: Starting Cluster...
node1: Starting Cluster...
Synchronizing pcsd certificates on nodes node1, node2...
node1: Success
node2: Success

Restaring pcsd on the nodes in order to reload the certificates...
node1: Success
node2: Success

看见Success为成功。
6.4. 检查状态
[root@node1 ~]# pcs cluster enable --all
node1: Cluster Enabled
node2: Cluster Enabled
[root@node1 ~]#
[root@node2 ~]# pcs cluster status
Cluster Status:
Last updated: Wed Jun 22 05:40:36 2016        Last change: Wed Jun 22 05:38:13 2016 by hacluster via crmd on node1
Stack: corosync
Current DC: node1 (version 1.1.13-10.el7-44eb2dd) - partition with quorum
2 nodes and 0 resources configured
Online: [ node1 node2 ]

PCSD Status:
node1: Online
node2: Online
[root@node2 ~]#
[root@node1 ~]# ps aux|grep pacemaker
root      2554  0.0  1.3 130488  7404 ?        Ss   05:37   0:00 /usr/sbin/pacemakerd -f
haclust+  2579  0.4  2.6 132304 14576 ?        Ss   05:37   0:01 /usr/libexec/pacemaker/cib
root      2580  0.0  1.5 133964  8380 ?        Ss   05:37   0:00 /usr/libexec/pacemaker/stonithd
root      2581  0.0  0.8 102936  5000 ?        Ss   05:37   0:00 /usr/libexec/pacemaker/lrmd
haclust+  2582  0.0  1.3 124780  7628 ?        Ss   05:37   0:00 /usr/libexec/pacemaker/attrd
haclust+  2583  0.0  3.7 150992 20916 ?        Ss   05:37   0:00 /usr/libexec/pacemaker/pengine
haclust+  2584  0.0  2.0 184188 11264 ?        Ss   05:37   0:00 /usr/libexec/pacemaker/crmd
root     14879  0.0  0.1 112644   996 pts/0    R+   05:42   0:00 grep --color=auto pacemaker
[root@node1 ~]#
6.5. 验证corosync的安装
[root@node2 ~]# corosync-cfgtool -s
Printing ring status.
Local node ID 2
RING ID 0
id    = 192.168.122.20
status    = ring 0 active with no faults
[root@node2 ~]#
如果没有Fence,建议禁用STONITH
pcs property set stonith-enabled=false
正常集群Quorum(法定)需要半数以上的票数,如果是双节点的集群
pcs property set no-quorum-policy=ignore
[root@node1 ~]# crm_verify -L -V
如果为空,说明禁用了,如果没禁用,会提示error。
如果想验证的话可以用pcs创建一个testvip来测试节点的可用性,但测试完testvip必须删除,这里就先不验证了。
集群[b]创建完毕[/b]
7. 配置资源(resource)
任意节点即可(node1 or node2)
7.1.1. 配置文件系统
[root@node2 ~]# lsblk
NAME            MAJ:MIN RM  SIZE RO TYPE MOUNTPOINT
sda               8:0    0    8G  0 disk
vda             252:0    0   20G  0 disk
├─vda1          252:1    0  500M  0 part /boot
├─vda2          252:2    0    1G  0 part
│ └─centos-swap 253:0    0    1G  0 lvm  [SWAP]
└─vda3          252:3    0 18.5G  0 part /
任意节点创建LVM
[root@node1 ~]# pvcreate /dev/sda
Physical volume "/dev/sda" successfully created
[root@node1 ~]# vgcreate web_vg /dev/sda
Volume group "web_vg" successfully created
[root@node1 ~]# lvcreate -L 2G -n web_lv web_vg
Logical volume "web_lv" created.
[root@node1 ~]# lvscan
ACTIVE            '/dev/web_vg/web_lv' [2.00 GiB] inherit
[root@node1 ~]#
7.1.2. 格式化
[root@node1 ~]# mkfs.xfs /dev/web_vg/web_lv 格式化
meta-data=/dev/web_vg/web_lv     isize=256    agcount=4, agsize=131072 blks
=                       sectsz=512   attr=2, projid32bit=1
=                       crc=0        finobt=0
data     =                       bsize=4096   blocks=524288, imaxpct=25
=                       sunit=0      swidth=0 blks
naming   =version 2              bsize=4096   ascii-ci=0 ftype=0
log      =internal log           bsize=4096   blocks=2560, version=2
=                       sectsz=512   sunit=0 blks, lazy-count=1
realtime =none                   extsz=4096   blocks=0, rtextents=0
[root@node1 ~]#
7.1.3. 配置lvm
所有节点都需要做(node1 and node2)
root@node1 ~]# lvmconf --enable-halvm --services --startstopservices
Warning: Stopping lvm2-lvmetad.service, but it can still be activated by:
lvm2-lvmetad.socket
Removed symlink /etc/systemd/system/sysinit.target.wants/lvm2-lvmetad.socket.
[root@node1 ~]#
[root@node1 ~]# vgs --noheadings -o vg_name
centos
web_vg
[root@node1 ~]#
[root@node1 ~]# vgs
VG     #PV #LV #SN Attr   VSize VFree
centos   1   1   0 wz--n- 1.00g    0
web_vg   1   1   0 wz--n- 4.00g 2.00g
[root@node1 ~]#
[root@node1 ~]# vim /etc/lvm/lvm.conf
#
# Example
# volume_list = [ "vg1", "vg2/lvol1", "@tag1", "@*" ]
volume_list = [ "centos" ]
#
7.1.4. 保存并推送到node2
[root@node1 ~]# rsync -va /etc/lvm/lvm.conf node2:/etc/lvm/lvm.conf
sending incremental file list
lvm.conf

sent 1272 bytes  received 739 bytes  4022.00 bytes/sec
total size is 82243  speedup is 40.90
[root@node1 ~]#
7.1.5. 升级版本
[root@node2 ~]# dracut -H -f /boot/initramfs-$(uname -r).img $(uname -r)node1 and node 2 reboot
7.1.6. 重启之后验证共享存储状态
[root@node1 ~]# lvscan
ACTIVE            '/dev/centos/swap' [1.00 GiB] inherit
inactive          '/dev/web_vg/web_lv' [2.00 GiB] inherit
[root@node1 ~]#

[root@node2 ~]# lvscan
ACTIVE            '/dev/centos/swap' [1.00 GiB] inherit
inactive          '/dev/web_vg/web_lv' [2.00 GiB] inherit
[root@node2 ~]#
7.2.1 Apache配置
Apache必须 "不" 能设置开机启动!(node1 and node2)
[root@node2 ~]# yum -y install httpd wget
[root@node2 ~]# vim /etc/httpd/conf/httpd.conf
# Load config files in the "/etc/httpd/conf.d" directory, if any.
IncludeOptional conf.d/*.conf
<Location /server-status>
sethandler server-status
order deny,allow
deny from all
allow from 127.0.0.1
</Location>
7.2.2. 推送
[root@node2 ~]# rsync -va /etc/httpd/conf/httpd.conf node1:/etc/httpd/conf/httpd.conf
Warning: Permanently added 'node1,192.168.122.10' (ECDSA) to the list of known hosts.
sending incremental file list
httpd.conf

sent 795 bytes  received 133 bytes  618.67 bytes/sec
total size is 11853  speedup is 12.77
[root@node2 ~]#
7.2.3. 测试(成功之后要关闭httpd服务)
[root@node1 ~]# curl  -I http://192.168.122.20 HTTP/1.1 200 ok
Date: Wed, 22 Jun 2016 10:36:04 GMT
Server: Apache/2.4.6 (CentOS)
Last-Modified: Thu, 16 Oct 2014 13:20:58 GMT
ETag: "1321-5058a1e728280"
Accept-Ranges: bytes
Content-Length: 4897
Content-Type: text/html; charset=UTF-8
7.2.4. 创建文件系统资源
任意节点
确认状态
[root@node1 ~]# pcs status
Cluster name: web_cluster
Last updated: Wed Jun 22 06:39:17 2016        Last change: Wed Jun 22 06:09:10 2016 by root via cibadmin on node1
Stack: corosync
Current DC: node1 (version 1.1.13-10.el7-44eb2dd) - partition with quorum
2 nodes and 0 resources configured

Online: [ node1 node2 ]

Full list of resources:

==========================================================================================
PCSD Status:
node1: Online
node2: Online

Daemon Status:
corosync: active/enabled
pacemaker: active/enabled
pcsd: active/enabled
==========================================================================================
状态括号内为正常
2 nodes and 0 resources
[root@node1 ~]#
添加
[root@node1 ~]# pcs resource create web_lv LVM \
> volgrpname=web_vg \
> exclusive=true \
> --group apachegroup
web_lv web_vg group都是自定义的resource,以自己的为准
创建文件系统资源(添加资源要慎重,添加错了必须删了重新建)
查看
[root@node1 ~]# pcs resource show
Resource Group: apachegroup
web_lv    (ocf::heartbeat:LVM):    Started node1
[root@node1 ~]#
创建
[root@node1 ~]# pcs resource create web_fs Filesystem \
> device="/dev/web_vg/web_lv" \
> directory="/var/www/html/" \
> fstype="xfs" \
> --group apachegroup
[root@node1 ~]# pcs resource show
Resource Group: apachegroup
web_lv    (ocf::heartbeat:LVM):    Started node1
web_fs    (ocf::heartbeat:Filesystem):    Started node1
[root@node1 ~]#
7.3. 创建ip资源
[root@node1 ~]# pcs resource create web_ip IPaddr2 \
> ip=192.168.122.100 \
> cidr_netmask=24 \
> --group apachegroup
[root@node1 ~]# pcs resource show
Resource Group: apachegroup
web_lv    (ocf::heartbeat:LVM):    Started node1
web_fs    (ocf::heartbeat:Filesystem):    Started node1
web_ip    (ocf::heartbeat:IPaddr2):    Started node1
[root@node1 ~]#
7.4. 创建Apache资源
[root@node1 ~]# pcs resource create website apache \
> configfile="/etc/httpd/conf/httpd.conf" \
> statusurl="http://127.0.0.1/server-status" \
> --group apachegroup
[root@node1 ~]# pcs resource show (node2也查看一下资源)
Resource Group: apachegroup
web_lv    (ocf::heartbeat:LVM):    Started node1
web_fs    (ocf::heartbeat:Filesystem):    Started node1
web_ip    (ocf::heartbeat:IPaddr2):    Started node1
website    (ocf::heartbeat:apache):    Started node1
[root@node1 ~]#
如果需要删除资源:pcs resource delete (web_lv,web_fs,web_ip,website等)
reboot node1 node2
parcemacker集群搭建完毕
8. 测试
[root@node1 ~]# pcs resource show
Resource Group: apachegroup
web_lv    (ocf::heartbeat:LVM):    Started node1
web_fs    (ocf::heartbeat:Filesystem):    Started node1
web_ip    (ocf::heartbeat:IPaddr2):    Started node1
website    (ocf::heartbeat:apache):    Started node1
[root@node1 ~]#

[root@node2 ~]# pcs status
Cluster name: web_cluster
Last updated: Wed Jun 22 07:01:45 2016        Last change: Wed Jun 22 06:55:28 2016 by root via cibadmin on node1
Stack: corosync
Current DC: node2 (version 1.1.13-10.el7-44eb2dd) - partition with quorum
2 nodes and 4 resources configured

Online: [ node1 node2 ]

Full list of resources:

Resource Group: apachegroup
web_lv    (ocf::heartbeat:LVM):    Started node1
web_fs    (ocf::heartbeat:Filesystem):    Started node1
web_ip    (ocf::heartbeat:IPaddr2):    Started node1
website    (ocf::heartbeat:apache):    Started node1

PCSD Status:
node1: Online
node2: Online

Daemon Status:
corosync: active/enabled
pacemaker: active/enabled
pcsd: active/enabled
查看VIP资源
[root@node1 ~]# ip a
1: eth0: <BROADCAST,MULTICAST,UP,LOWER_UP> mtu 1500 qdisc pfifo_fast state UP qlen 1000
link/ether 52:54:7a:0d:a4:bf brd ff:ff:ff:ff:ff:ff
inet 192.168.122.10/24 brd 192.168.122.255 scope global eth0
valid_lft forever preferred_lft forever
inet 192.168.122.100/24 brd 192.168.122.255 scope global secondary eth0
valid_lft forever preferred_lft forever
inet6 fe80::5054:7aff:fe0d:a4bf/64 scope link
valid_lft forever preferred_lft forever
[root@node1 ~]#
查看lvm资源
[root@node1 ~]# lvscan
ACTIVE '/dev/centos/swap' [1.00 GiB] inherit
ACTIVE '/dev/web_vg/web_lv' [2.00 GiB] inherit
[root@node1 ~]#
查看挂载资源
[root@node1 ~]# df -T /var/www/html/
Filesystem Type 1K-blocks Used Available Use% Mounted on
/dev/mapper/web_vg-web_lv xfs 2086912 32928 2053984 2% /var/www/html
[root@node1 ~]#
8.1. 测试网页
[root@node1 ~]# echo "<h1>Hello World</h1>" >/var/www/html/index.html
[root@node1 ~]# ss -an | grep :80
tcp    TIME-WAIT  0      0      127.0.0.1:56378              127.0.0.1:80
tcp    TIME-WAIT  0      0      127.0.0.1:33486              127.0.0.1:80
tcp    TIME-WAIT  0      0      127.0.0.1:37408              127.0.0.1:80
tcp    TIME-WAIT  0      0      127.0.0.1:60674              127.0.0.1:80
tcp    TIME-WAIT  0      0      127.0.0.1:52606              127.0.0.1:80
tcp    LISTEN     0      128      :::80                   :::*
[root@node1 ~]#
8.2 结果
[root@localhost ~]# curl -I http://192.168.122.100 HTTP/1.1 200 OK
Date: Wed, 22 Jun 2016 11:09:51 GMT
Server: Apache/2.4.6 (CentOS)
Last-Modified: Wed, 22 Jun 2016 11:07:51 GMT
ETag: "15-535dbf2ccdb58"
Accept-Ranges: bytes
Content-Length: 21
Content-Type: text/html; charset=UTF-8
或者用浏览器访问VIP地址http://192.168.122.100,查看是否显示正常,然后模拟一台node节点故障,用pcs resource show查看资源状态即可。
总结:
Pacemaker是一款非常强大的高可用软件,但是对centos6的支持不是太好,而且配置复杂,所以建议用centos7,核心命令就是pcs,配置简单,只要命令不敲错,节点整理清楚,基本上不会出问题。
做技术,必须要有一颗永不磨灭的好奇心,不能偷懒。

相关文章推荐
- SQL Server高可用的常见问题分析
- 使用pcs api往免费的百度网盘上传下载文件的方法
- windows NLB+ARR实现Web负载均衡高可用/可伸缩的方法
- MySQL数据库的高可用方案总结
- CentOS下Redis高可用安装笔记
- 高可用,完全分布式Hadoop集群HDFS和MapReduce安装配置指南
- 使用 RMI + ZooKeeper 实现远程调用框架
- 基于zookeeper+leveldb搭建activemq集群
- tns load balance及master/slave使用模式和灰度发布
- MySQL数据库的高可用方案总结
- 使用pcs api往免费的百度网盘上传下载文件的方法
- How to Setup a windows 2008 Failover cluster[01]
- HA高可用集群
- 基于SWOOLE的高可用分布式SOKET服务器系统搭建V2.0
- 搭建高可用及负载均衡的REDIS
- 分布式系统的特点以及设计理念
- keepalived实现LVS的高可用以及实现web服务的高可用(主从模型、双主模型)
- Keepalived原理与实战精讲
- keepalived之vrrp_script篇
- OpenStack 高可用和灾备方案(上)