使用Nginx代理thrift NIO实现SSL链路加密
2016-06-22 17:48
686 查看
1 目标说明
1.1 调研目的
本次调研主要为了解决两个问题:thrift提供的SSL API只支持BIO(阻塞式IO),而我们使用的是NIO API,希望能在不改变IO模型的前提下对链路进行加密;
未来系统可能需要对thrift服务进行扩展,采用多个thrift服务进行负载均衡,以提升吞吐量。
结合这两点,通过调研是否可以使用nginx ssl代理来解决。同时熟悉下nginx对tcp代理的配置。
1.2 目标网络模型
希望达到的目标网络模型如下: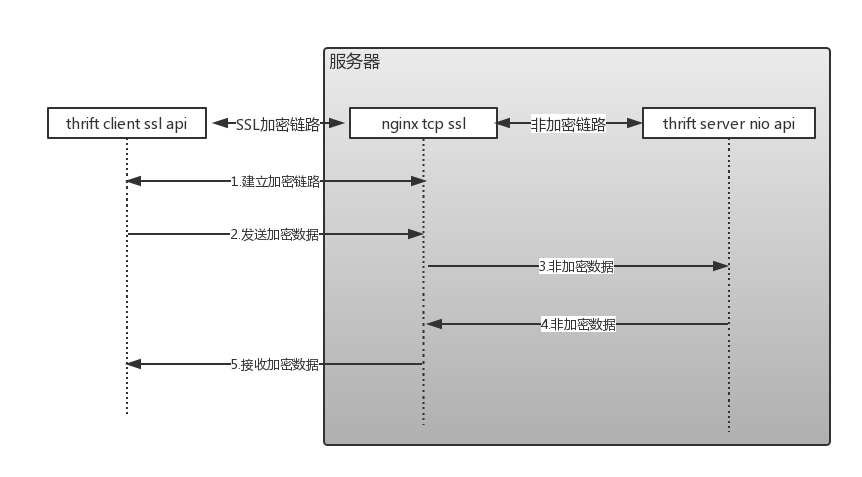
1.3 SSL说明
通过对SSL的学习,结合自身业务的考虑,对SSL的使用做如下说明:我这里SSL使用TLSv1,并且服务端不需要校验客户端的身份合法性,则使用SSL单向认证方式,只需要服务端证书。另外我们只需要用到SSL的链路加密,所以可以设置客户端对服务端证书保持永久信任
2 调研步骤
由于对网络相关的知识比较欠缺,所以采用如下步骤一一尝试可行性。先测试nginx对普通tcp的代理,再测试nginx ssl代理在bio 和 nio IO模型下的使用,最后使用nginx ssl代理Thrift NIO。BIO:同步阻塞IO;NIO:同步非阻塞IO
nginx代理 tcp bio socket server(Server -> BIO,Client -> BIO);
nginx SSL 代理 tcp bio socket server(Server->BIO, Client -> BIO,SSL);
nginx SSL 代理 tcp nio socket server(Server->NIO, Client->BIO,SSL);
nginx SSL 代理 thrift nio server(Server-> thrift NIO, Client->thrift BIO);
3 调研过程
3.1 nginx安装
在windows7机器上安装nginx-1.10.1,其中包括了ngx_stream_core_module模块,可用于代理TCP协议,nginx具体安装方法在此不详述。3.2 nginx代理 tcp bio socket server
3.2.1 nginx配置
worker_processes  1;

events {
worker_connections  1024;
}

stream {
server {
listen 9000;
proxy_pass localhost:9091;
}
}
3.2.2 服务端代码
public class TcpServer {

private ServerSocket serverSocket = null;

public void guest (Socket socket) {
Thread t = new Thread(new ServiceHandler(socket));
t.start();
}

public void start(int port) throws IOException {

try {
serverSocket = new ServerSocket(port);
} catch (IOException e) {
throw e;
}

System.out.println("TCP server start, port -> " + port);

while (true) {
guest(serverSocket.accept());
System.out.println("Guest client");
}
}

class ServiceHandler implements Runnable {

private Socket socket = null;
private BufferedReader reader = null;
private PrintWriter writer = null;

public ServiceHandler(Socket socket) {
this.socket = socket;
}

public Socket getSocket() {
return socket;
}

@Override
public void run() {

try {
reader = new BufferedReader(new InputStreamReader(this.socket.getInputStream()));
writer = new PrintWriter(this.socket.getOutputStream());

String line = null;
while ((line = reader.readLine()) != null) {

if ("close".equals(line)) {
break;
}

System.out.println("c -> " + line);
writer.println("Received, t - " + new Date().toString());
writer.flush();
}
} catch (IOException e) {
e.printStackTrace();
} finally {
if (reader != null) {
try {
reader.close();
} catch (IOException e) {
}
}
if (writer != null) {
writer.close();
}

if (this.socket != null) {
try {
this.socket.close();
} catch (IOException e) {
}
}
}
}
}

public static void main(String[] args) {

TcpServer tcpServer = new TcpServer();
try {
tcpServer.start(9091);
} catch (IOException e) {
e.printStackTrace();
}

}
}
3.2.3 客户端代码
public class TcpClient {

private Socket socket = null;
private BufferedReader reader = null;
private PrintWriter writer = null;

public void start(int port) throws IOException {
try {
socket = new Socket("localhost", port);
System.out.println("Connected, port -> " + port);
} catch (IOException e) {
throw e;
}

try {
reader = new BufferedReader(new InputStreamReader(this.socket.getInputStream()));

Thread t = new Thread(new TcpReader(reader));
t.setDaemon(true);
t.start();

writer = new PrintWriter(this.socket.getOutputStream());

Scanner scanner = new Scanner(System.in);

while (true) {
System.out.println("input -> ");
String input = scanner.next();
writer.println(input);
writer.flush();
}
} catch (IOException e) {
throw e;
} finally {
if (reader != null) {
try {
reader.close();
} catch (IOException e) {
}
}
if (writer != null) {
writer.close();
}

if (this.socket != null) {
try {
this.socket.close();
} catch (IOException e) {
}
}
}
}

public class TcpReader implements Runnable {

private BufferedReader reader = null;

public TcpReader(BufferedReader reader) {
this.reader = reader;
}

@Override
public void run() {
String returnLine = null;

while (true) {
try {
returnLine = reader.readLine();
System.out.println(returnLine);
} catch (IOException e) {
e.printStackTrace();
break;
}
}
}
}

public static void main(String[] args) {
TcpClient tcpClient = new TcpClient();
try {
tcpClient.start(9000);
} catch (IOException e) {
e.printStackTrace();
}
}
}
服务端开启TCP监听9091端口,nginx TCP代理9091端口,并监听9000端口,客户端连接9000端口,经测试连接成功,并可与服务端进行交互。
3.3 nginx SSL 代理 tcp bio socket server
3.3.1 nginx配置
worker_processes  1;

events {
worker_connections  1024;
}

stream {
server {
listen 9000 ssl;
proxy_pass localhost:9091;
ssl_certificate       D:/server.crt;
ssl_certificate_key   D:/_server.key;
}
}
_server.key为服务器私钥,server.crt为服务器证书,通过openssl生成,具体生成方法在此不详述。
3.3.2 服务器端代码
同3.2.23.3.3 客户端代码
import com.spiro.test.net.common.Configuration;

import javax.net.ssl.*;
import java.io.BufferedReader;
import java.io.IOException;
import java.io.InputStreamReader;
import java.io.PrintWriter;
import java.security.cert.X509Certificate;
import java.util.Scanner;

/**
* Created by tz0643 on 2016/6/17.
*/
public class SSLTcpClient {

private SSLSocket socket = null;
private BufferedReader reader = null;
private PrintWriter writer = null;

public void start(int port) throws Exception {

// Create a trust manager that does not validate certificate chains
TrustManager[] trustAllCerts = new TrustManager[]{
new X509TrustManager() {
public java.security.cert.X509Certificate[] getAcceptedIssuers() {
return null;
}

public void checkClientTrusted(X509Certificate[] certs, String authType) {
}

public void checkServerTrusted(X509Certificate[] certs, String authType) {
}
}
};

SSLContext sslContext = SSLContext.getInstance("TLSv1");
sslContext.init(null, trustAllCerts, null);

try {
SSLSocketFactory factory = sslContext.getSocketFactory();
socket = (SSLSocket) factory.createSocket("192.168.10.188", port);
System.out.println("Connected, port -> " + port);
} catch (IOException e) {
throw e;
}

try {
reader = new BufferedReader(new InputStreamReader(this.socket.getInputStream()));
Thread t = new Thread(new TcpReader(reader));
t.setDaemon(true);
t.start();

writer = new PrintWriter(this.socket.getOutputStream());

Scanner scanner = new Scanner(System.in);

while (true) {
System.out.println("input -> ");
String input = scanner.next();
writer.println(input);
writer.flush();
}
} catch (IOException e) {
throw e;
} finally {
if (reader != null) {
try {
reader.close();
} catch (IOException e) {
}
}
if (writer != null) {
writer.close();
}

if (this.socket != null) {
try {
this.socket.close();
} catch (IOException e) {
}
}
}
}

public class TcpReader implements Runnable {

private BufferedReader reader = null;

public TcpReader(BufferedReader reader) {
this.reader = reader;
}

@Override
public void run() {
String returnLine = null;

while (true) {
try {
returnLine = reader.readLine();
System.out.println(returnLine);
} catch (IOException e) {
e.printStackTrace();
break;
}
}
}
}

public static void main(String[] args) {

Configuration conf = Configuration.getInstance();

try {
conf.init();
} catch (IOException e) {
e.printStackTrace();
System.exit(-1);
}

SSLTcpClient tcpClient = new SSLTcpClient();
try {
tcpClient.start(9000);
} catch (Exception e) {
e.printStackTrace();
}
}
}
服务端开启BIO socket监听9091端口,nginx TCP SSL代理9091端口,并监听9000端口,客户端BIO SSL socket连接9000端口,经测试连接成功,并可与服务端进行交互。
3.4 nginx SSL 代理 tcp nio socket server
3.4.1 nginx配置
同3.3.13.4.2 服务端代码
import java.io.IOException;
import java.net.InetSocketAddress;
import java.nio.ByteBuffer;
import java.nio.channels.SelectionKey;
import java.nio.channels.Selector;
import java.nio.channels.ServerSocketChannel;
import java.nio.channels.SocketChannel;
import java.util.Date;
import java.util.Iterator;

public class NIOServer {

private Selector selector;

public void initServer(int port) throws IOException {
ServerSocketChannel serverChannel = ServerSocketChannel.open();
serverChannel.configureBlocking(false);
serverChannel.socket().bind(new InetSocketAddress(port));
this.selector = Selector.open();
serverChannel.register(selector, SelectionKey.OP_ACCEPT);
}

/**
* @throws IOException
*/
public void listen() throws IOException {
System.out.println("Server started");
while (true) {
selector.select();
Iterator ite = this.selector.selectedKeys().iterator();
while (ite.hasNext()) {
SelectionKey key = (SelectionKey) ite.next();
ite.remove();

if (key.isAcceptable()) {

System.out.println("Accept 1 socket");

ServerSocketChannel server = (ServerSocketChannel) key
.channel();

SocketChannel channel = server.accept();
channel.configureBlocking(false);
channel.register(this.selector, SelectionKey.OP_READ);

} else if (key.isReadable()) {
read(key);
}

}

}
}

public void read(SelectionKey key) throws IOException{
SocketChannel channel = (SocketChannel) key.channel();
ByteBuffer buffer = ByteBuffer.allocate(1024);
channel.read(buffer);
buffer.flip();
byte[] data = new byte[buffer.remaining()];
buffer.get(data);

System.out.println("c -> "
+ new String(data).trim());

String msg = "Received, t - " + new Date().toString() + "\n";
ByteBuffer outBuffer = ByteBuffer.wrap(msg.getBytes());
channel.write(outBuffer);

}

/**
* @throws IOException
*/
public static void main(String[] args) throws IOException {
NIOServer server = new NIOServer();
server.initServer(9091);
server.listen();
}
}
3.4.3 客户端代码
同3.3.3服务端开启NIO socket监听9091端口,nginx TCP SSL代理9091端口,并监听9000端口,客户端BIO SSL socket连接9000端口,经测试连接成功,并可与服务端进行交互。
3.5 nginx SSL 代理 thrift nio server
3.5.1 nginx配置
同3.3.13.5.2 服务端代码
public void serve() {
try {
TNonblockingServerTransport transport =
new TNonblockingServerSocket(port);
TServer server = new TNonblockingServer(
new TNonblockingServer.Args(transport).processor(processor));

System.out.println("Starting the simple nio server...");
server.serve();
} catch (Exception e) {
e.printStackTrace();
}
}
查看完整代码
3.5.3 客户端代码
由于Thrift客户端API 参数TSSLTransportParameters必须设置trustStore,故必须根据服务端证书生成trust store文件。其实也可自己重新实现TSSLTransportFactory从而达到不需要设置trustStore,即永久信任服务端证书,这里暂时不实现。protected void connectAndInvoke() {
TTransport transport = null;
try {
TSSLTransportFactory.TSSLTransportParameters params
= new TSSLTransportFactory.TSSLTransportParameters();
String truststoreFilename = Configuration.getInstance()
.getConf("ssl.truststore.filename");
String truststorePassword = Configuration.getInstance()
.getConf("ssl.truststore.password");
params.setTrustStore(truststoreFilename, truststorePassword, "SunX509", "JKS");
transport = TSSLTransportFactory.getClientSocket("localhost", 9091, 0, params);
transport.open();
TProtocol protocol = new TBinaryProtocol(transport);
Calculator.Client client = new Calculator.Client(protocol);
perform(client);
} catch (TException x) {
x.printStackTrace();
} finally {
if (transport != null) {
transport.close();
}
}
}查看完整代码
服务端开启NIO thrift服务监听9091端口,nginx TCP SSL代理9091端口,并监听9000端口,客户端使用Thrift SSL API连接9000端口,经测试连接成功,RPC调用正常。
4 总结
经过调研,thrift服务端仍然使用NIO API,通过nginx ssl tcp代理对链路进行加密是可行的。只需要修改客户端代码为 Thrift SSL API,同时这里客户端必须为服务端证书生成trust store 文件,当然通过重新实现TSSLTransportFactory还是可以做到不需要这个trust store文件,只对链路进行加密不验证服务端的合法性,这个待后续有时间再研究。另外nginx ssl tcp代理也可用于进行负载均衡,这个类似对web http代理做负载均衡,这里不做详细介绍。

相关文章推荐
- nginx代理指定目录
- 访问Nginx发生SSL connection error的一种情况
- spymemcached源码中Reactor模式分析
- Nginx+Naxsi部署专业级Web应用防火墙
- CentOS 6.2实战部署Nginx+MySQL+PHP
- Java IO与NIO的一些文件拷贝测试
- nginx中http核心模块的配置指令2
- nginx中http核心模块的配置指令3
- nginx中http核心模块的配置指令4
- nginx中http的fastcgi模块的配置指令1
- Nginx 学习笔记(一)
- 网站502与504错误分析
- 用zabbix监控nginx_status状态
- 艰难完成 nginx + puma 部署 rails 4的详细记录
- 把Lua编译进nginx步骤方法
- web 应用中常用的各种 cache详解
- Linux系统上配置Nginx+Ruby on Rails+MySQL超攻略
- window+nginx+php环境配置 附配置搭配说明
- 基于HBase Thrift接口的一些使用问题及相关注意事项的详解