编译安装nginx
2016-06-22 10:58
381 查看
操作系统:CentOS release 6.8 (Final)
虚拟机:VMware Workstation
编译安装Nginx
到目前为止,还未发现操作系统盘自带或者yum可以直接通过rpm包方法安装的nginx的情况,接下来,我们重点讲nginx的编译方式安装。安装Nginx所需的pcre库pcre是为了使Nginx支持httprewrite模块。wget ftp://ftp.csx.cam.ac.uk/pub/software/programming/pcre/pcre2-10.20.tar.gz
# dmidecode |grep "Product Name" #显示机器名称 Product Name: VMware Virtual Platform
Product Name: 440BX Desktop Reference Platform
#tar zxfpcre2-10.20.tar.gz
#cd pcre2-10.20
# ./configure
#make
#make install
安装nginx
# useradd nginx -s /sbin/nologin -M#wget http://nginx.org/download/nginx-1.10.1.tar.gz# tar zxf nginx-1.10.1.tar.gz # cd nginx-1.10.1nginx-1.10.1#./configure --user=nginx \--group=nginx \--prefix=/application/nginx-1.10.1 \--with-http_stub_status_module \--with-http_ssl_module \#make && make install #./configure –help [root@~ nginx-1.10.1]# ln -s /application/nginx-1.10.1 /application/nginx#ln命令的意义十分深远重大。这可是生产环境的经验。启动并检查安装结果: Nginx安装完后,并不能直接提供服务,需要先启动nginx服务,具体操作如下:
检查语法:
[root@NFS-Server/]# /application/nginx/sbin/nginx -t
nginx: theconfiguration file /application/nginx-1.10.1/conf/nginx.conf syntax is ok
nginx:configuration file /application/nginx-1.10.1/conf/nginx.conf test is successful
启动服务:
[root@NFS-Server/]# /application/nginx/sbin/nginx
nginx: [emerg]bind() to 0.0.0.0:80 failed (98: Address already in use)
nginx: [emerg]bind() to 0.0.0.0:80 failed (98: Address already in use)
nginx: [emerg]bind() to 0.0.0.0:80 failed (98: Address already in use)
nginx: [emerg]bind() to 0.0.0.0:80 failed (98: Address already in use)
nginx: [emerg]bind() to 0.0.0.0:80 failed (98: Address already in use)
nginx: [emerg]still could not bind() #端口冲突
查看端口:
[root@NFS-Server/]# lsof -i :80
COMMAND PID USER FD TYPE DEVICE SIZE/OFF NODE NAME
httpd 1693 root 4u IPv6 11596 0t0 TCP *:http (LISTEN)
httpd 1977 apache 4u IPv6 11596 0t0 TCP *:http (LISTEN)
httpd 1978 apache 4u IPv6 11596 0t0 TCP *:http (LISTEN)
httpd 1979 apache 4u IPv6 11596 0t0 TCP *:http (LISTEN)
httpd 1980 apache 4u IPv6 11596 0t0 TCP *:http (LISTEN)
httpd 1981 apache 4u IPv6 11596 0t0 TCP *:http (LISTEN)
httpd 1982 apache 4u IPv6 11596 0t0 TCP *:http (LISTEN)
httpd 1983 apache 4u IPv6 11596 0t0 TCP *:http (LISTEN)
httpd 1984 apache 4u IPv6 11596 0t0 TCP *:http (LISTEN)
[root@NFS-Server/]# lsof -i :80
COMMAND PID USER FD TYPE DEVICE SIZE/OFF NODE NAME
nginx 9283 root 6u IPv4 24103 0t0 TCP *:http (LISTEN)
nginx 9284 nginx 6u IPv4 24103 0t0 TCP *:http (LISTEN)
[root@NFS-Server/]# netstat -lnt #检查80端口是否启动
ActiveInternet connections (only servers)
ProtoRecv-Q Send-Q Local Address Foreign Address State
tcp 0 0 0.0.0.0:53913 0.0.0.0:* LISTEN
tcp 0 0 0.0.0.0:892 0.0.0.0:* LISTEN
tcp 0 0 0.0.0.0:2049 0.0.0.0:* LISTEN
tcp 0 0 0.0.0.0:32803 0.0.0.0:* LISTEN
tcp 0 0 127.0.0.1:199 0.0.0.0:* LISTEN
tcp 0 0 0.0.0.0:875 0.0.0.0:* LISTEN
tcp 0 0 0.0.0.0:111 0.0.0.0:* LISTEN
tcp 0 0 0.0.0.0:80 0.0.0.0:* LISTEN
tcp 0 0 0.0.0.0:22 0.0.0.0:* LISTEN
tcp 0 0 :::892 :::* LISTEN
tcp 0 0 :::2049 :::* LISTEN
tcp 0 0 :::56673 :::* LISTEN
tcp 0 0 :::9890 :::* LISTEN
tcp 0 0 :::32803 :::* LISTEN
tcp 0 0 ::ffff:127.0.0.1:8005 :::* LISTEN
tcp 0 0 :::8009 :::* LISTEN
tcp 0 0 :::111 :::* LISTEN
tcp 0 0 :::8080 :::* LISTEN
tcp 0 0 :::22 :::* LISTEN
[root@NFS-Server/]# ps -ef|grep nginx
root 9283 1 0 09:58 ? 00:00:00 nginx: master process/application/nginx/sbin/nginx
nginx 9284 9283 0 09:58 ? 00:00:00 nginx: worker process
root 9552 2106 0 10:05 pts/0 00:00:00 grep nginx
检查启动的结果:
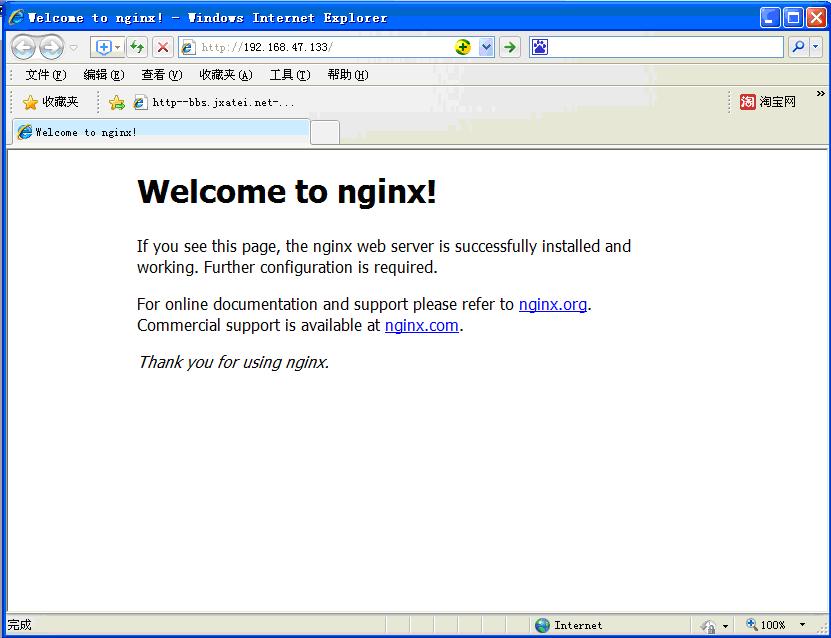
打开浏览器输入:http://192.168.47.133
如果能看到下面的内容,就表示nginx已经启动了。
当然你也可以在服务器本地通过wget访问,例如:
[root@NFS-Server/]# wget 192.168.47.133
[root@NFS-Server/]# cat index.html
<!DOCTYPEhtml>
<html>
<head>
<title>Welcometo nginx!</title>
<style>
body {
width: 35em;
margin: 0 auto;
font-family: Tahoma, Verdana, Arial,sans-serif;
}
</style>
</head>
<body>
<h1>Welcometo nginx!</h1>
<p>If yousee this page, the nginx web server is successfully installed and
working. Furtherconfiguration is required.</p>
<p>Foronline documentation and support please refer to
<ahref="http://nginx.org/">nginx.org</a>.<br/>
Commercial supportis available at
<ahref="http://nginx.com/">nginx.com</a>.</p>
<p><em>Thankyou for using nginx.</em></p>
</body>
</html>
出现上面的结果表示nginx安装浏览一切正常。
如果出不来Welcome to Nginx的内容页面,请从下面原因中依次排查:
1. iptables防火墙和selinux是否关闭
[root@NFS-Server/]# /etc/init.d/iptables status #查看iptables的当前状态
iptables:未运行防火墙。
#/etc/init.d/iptables stop 关闭防火墙的命令,如果是有外网IP生产环境允许80端口的访问,而不是关闭防火墙。
#iptables –I INPUT–p tcp –dport 80 –j ACCEPT
#chkconfig iptables off #非正式环境下可以禁止防火墙开机自启动,便于学习调式nginx服务。
2. 关闭selinux
# setenforce0 #这是临时关闭方法
[root@NFS-Server/]# cat /etc/selinux/config |grep SELINUX
# SELINUX= cantake one of these three values:
#SELINUX=enforcing
# SELINUXTYPE= cantake one of these two values:
#SELINUXTYPE=targeted
SELINUX=disabled #设置为disabled,为永久关闭
3. 查看错误日志信息
[root@NFS-Server/]# cat /application/nginx/logs/error.log #查看错误日志信息
注意:遇到问题时要在第一时间看屏幕返回的提示和nginx服务的错误log,获取信息解决问题。这是运维工程师必须具备的基本技能!实际教学工作中,发现有不少学生,一遇到问题无论大小,不经过思考就到处去问。这样的学习方法非常不好,养成屏幕输出和看错误日志的习惯,这才是正确发展的路线。
部署一个简单的nginx web站点
Nginx的默认站点目录,是nginx安装目录下的/application/nginx/html目录,这可以从nginx主配置文件/application/nginx/conf/nginx.conf中查到,内容如下:
[root@NFS-Server ~]# grep html /application/nginx/conf/nginx.conf
root html;
index index.html index.htm;
#error_page 404 /404.html;
# redirect servererror pages to the static page /50x.html
error_page 500 502 503 504 /50x.html;
location = /50x.html{
root html; #默认站点目录
此时,如果要部署网站业务服务,只需把开发好的程序全部放置到
/applicaton/nginx/html 目录下面即可。
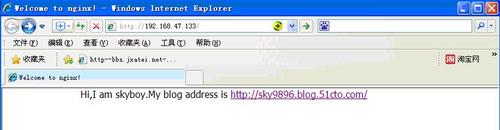
这里我们进入到/application/nginx/html下,删除掉nginx默认的首页index.html,然后建立一个index.html,加入网页网内然后保存:<html><head><title>Welcometo nginx!</title></head><body>Hi,I am skyboy.Myblog address is<ahref="http://sky9896.blog.51cto.com/" target="_blank">http://sky9896.blog.51cto.com/</a></body></html> 此时,打开浏览器输入:http://192.168.47.133 ,然后回车,即可以看到如下内容:
配置nginx自动启动服务:#vi /etc/rc.local在末尾增加一条路径即可:/application/nginx/sbin/nginx
虚拟机:VMware Workstation
编译安装Nginx
到目前为止,还未发现操作系统盘自带或者yum可以直接通过rpm包方法安装的nginx的情况,接下来,我们重点讲nginx的编译方式安装。安装Nginx所需的pcre库pcre是为了使Nginx支持httprewrite模块。wget ftp://ftp.csx.cam.ac.uk/pub/software/programming/pcre/pcre2-10.20.tar.gz
# dmidecode |grep "Product Name" #显示机器名称 Product Name: VMware Virtual Platform
Product Name: 440BX Desktop Reference Platform
#tar zxfpcre2-10.20.tar.gz
#cd pcre2-10.20
# ./configure
#make
#make install
安装nginx
# useradd nginx -s /sbin/nologin -M#wget http://nginx.org/download/nginx-1.10.1.tar.gz# tar zxf nginx-1.10.1.tar.gz # cd nginx-1.10.1nginx-1.10.1#./configure --user=nginx \--group=nginx \--prefix=/application/nginx-1.10.1 \--with-http_stub_status_module \--with-http_ssl_module \#make && make install #./configure –help [root@~ nginx-1.10.1]# ln -s /application/nginx-1.10.1 /application/nginx#ln命令的意义十分深远重大。这可是生产环境的经验。启动并检查安装结果: Nginx安装完后,并不能直接提供服务,需要先启动nginx服务,具体操作如下:
检查语法:
[root@NFS-Server/]# /application/nginx/sbin/nginx -t
nginx: theconfiguration file /application/nginx-1.10.1/conf/nginx.conf syntax is ok
nginx:configuration file /application/nginx-1.10.1/conf/nginx.conf test is successful
启动服务:
[root@NFS-Server/]# /application/nginx/sbin/nginx
nginx: [emerg]bind() to 0.0.0.0:80 failed (98: Address already in use)
nginx: [emerg]bind() to 0.0.0.0:80 failed (98: Address already in use)
nginx: [emerg]bind() to 0.0.0.0:80 failed (98: Address already in use)
nginx: [emerg]bind() to 0.0.0.0:80 failed (98: Address already in use)
nginx: [emerg]bind() to 0.0.0.0:80 failed (98: Address already in use)
nginx: [emerg]still could not bind() #端口冲突
查看端口:
[root@NFS-Server/]# lsof -i :80
COMMAND PID USER FD TYPE DEVICE SIZE/OFF NODE NAME
httpd 1693 root 4u IPv6 11596 0t0 TCP *:http (LISTEN)
httpd 1977 apache 4u IPv6 11596 0t0 TCP *:http (LISTEN)
httpd 1978 apache 4u IPv6 11596 0t0 TCP *:http (LISTEN)
httpd 1979 apache 4u IPv6 11596 0t0 TCP *:http (LISTEN)
httpd 1980 apache 4u IPv6 11596 0t0 TCP *:http (LISTEN)
httpd 1981 apache 4u IPv6 11596 0t0 TCP *:http (LISTEN)
httpd 1982 apache 4u IPv6 11596 0t0 TCP *:http (LISTEN)
httpd 1983 apache 4u IPv6 11596 0t0 TCP *:http (LISTEN)
httpd 1984 apache 4u IPv6 11596 0t0 TCP *:http (LISTEN)
[root@NFS-Server/]# lsof -i :80
COMMAND PID USER FD TYPE DEVICE SIZE/OFF NODE NAME
nginx 9283 root 6u IPv4 24103 0t0 TCP *:http (LISTEN)
nginx 9284 nginx 6u IPv4 24103 0t0 TCP *:http (LISTEN)
[root@NFS-Server/]# netstat -lnt #检查80端口是否启动
ActiveInternet connections (only servers)
ProtoRecv-Q Send-Q Local Address Foreign Address State
tcp 0 0 0.0.0.0:53913 0.0.0.0:* LISTEN
tcp 0 0 0.0.0.0:892 0.0.0.0:* LISTEN
tcp 0 0 0.0.0.0:2049 0.0.0.0:* LISTEN
tcp 0 0 0.0.0.0:32803 0.0.0.0:* LISTEN
tcp 0 0 127.0.0.1:199 0.0.0.0:* LISTEN
tcp 0 0 0.0.0.0:875 0.0.0.0:* LISTEN
tcp 0 0 0.0.0.0:111 0.0.0.0:* LISTEN
tcp 0 0 0.0.0.0:80 0.0.0.0:* LISTEN
tcp 0 0 0.0.0.0:22 0.0.0.0:* LISTEN
tcp 0 0 :::892 :::* LISTEN
tcp 0 0 :::2049 :::* LISTEN
tcp 0 0 :::56673 :::* LISTEN
tcp 0 0 :::9890 :::* LISTEN
tcp 0 0 :::32803 :::* LISTEN
tcp 0 0 ::ffff:127.0.0.1:8005 :::* LISTEN
tcp 0 0 :::8009 :::* LISTEN
tcp 0 0 :::111 :::* LISTEN
tcp 0 0 :::8080 :::* LISTEN
tcp 0 0 :::22 :::* LISTEN
[root@NFS-Server/]# ps -ef|grep nginx
root 9283 1 0 09:58 ? 00:00:00 nginx: master process/application/nginx/sbin/nginx
nginx 9284 9283 0 09:58 ? 00:00:00 nginx: worker process
root 9552 2106 0 10:05 pts/0 00:00:00 grep nginx
检查启动的结果:
打开浏览器输入:http://192.168.47.133
如果能看到下面的内容,就表示nginx已经启动了。
当然你也可以在服务器本地通过wget访问,例如:
[root@NFS-Server/]# wget 192.168.47.133
[root@NFS-Server/]# cat index.html
<!DOCTYPEhtml>
<html>
<head>
<title>Welcometo nginx!</title>
<style>
body {
width: 35em;
margin: 0 auto;
font-family: Tahoma, Verdana, Arial,sans-serif;
}
</style>
</head>
<body>
<h1>Welcometo nginx!</h1>
<p>If yousee this page, the nginx web server is successfully installed and
working. Furtherconfiguration is required.</p>
<p>Foronline documentation and support please refer to
<ahref="http://nginx.org/">nginx.org</a>.<br/>
Commercial supportis available at
<ahref="http://nginx.com/">nginx.com</a>.</p>
<p><em>Thankyou for using nginx.</em></p>
</body>
</html>
出现上面的结果表示nginx安装浏览一切正常。
如果出不来Welcome to Nginx的内容页面,请从下面原因中依次排查:
1. iptables防火墙和selinux是否关闭
[root@NFS-Server/]# /etc/init.d/iptables status #查看iptables的当前状态
iptables:未运行防火墙。
#/etc/init.d/iptables stop 关闭防火墙的命令,如果是有外网IP生产环境允许80端口的访问,而不是关闭防火墙。
#iptables –I INPUT–p tcp –dport 80 –j ACCEPT
#chkconfig iptables off #非正式环境下可以禁止防火墙开机自启动,便于学习调式nginx服务。
2. 关闭selinux
# setenforce0 #这是临时关闭方法
[root@NFS-Server/]# cat /etc/selinux/config |grep SELINUX
# SELINUX= cantake one of these three values:
#SELINUX=enforcing
# SELINUXTYPE= cantake one of these two values:
#SELINUXTYPE=targeted
SELINUX=disabled #设置为disabled,为永久关闭
3. 查看错误日志信息
[root@NFS-Server/]# cat /application/nginx/logs/error.log #查看错误日志信息
注意:遇到问题时要在第一时间看屏幕返回的提示和nginx服务的错误log,获取信息解决问题。这是运维工程师必须具备的基本技能!实际教学工作中,发现有不少学生,一遇到问题无论大小,不经过思考就到处去问。这样的学习方法非常不好,养成屏幕输出和看错误日志的习惯,这才是正确发展的路线。
部署一个简单的nginx web站点
Nginx的默认站点目录,是nginx安装目录下的/application/nginx/html目录,这可以从nginx主配置文件/application/nginx/conf/nginx.conf中查到,内容如下:
[root@NFS-Server ~]# grep html /application/nginx/conf/nginx.conf
root html;
index index.html index.htm;
#error_page 404 /404.html;
# redirect servererror pages to the static page /50x.html
error_page 500 502 503 504 /50x.html;
location = /50x.html{
root html; #默认站点目录
此时,如果要部署网站业务服务,只需把开发好的程序全部放置到
/applicaton/nginx/html 目录下面即可。
这里我们进入到/application/nginx/html下,删除掉nginx默认的首页index.html,然后建立一个index.html,加入网页网内然后保存:<html><head><title>Welcometo nginx!</title></head><body>Hi,I am skyboy.Myblog address is<ahref="http://sky9896.blog.51cto.com/" target="_blank">http://sky9896.blog.51cto.com/</a></body></html> 此时,打开浏览器输入:http://192.168.47.133 ,然后回车,即可以看到如下内容:
配置nginx自动启动服务:#vi /etc/rc.local在末尾增加一条路径即可:/application/nginx/sbin/nginx

相关文章推荐
- nginx代理指定目录
- 访问Nginx发生SSL connection error的一种情况
- XP下使用虚拟机安装配置Solaris[多图]
- Nginx+Naxsi部署专业级Web应用防火墙
- VirtualBox虚拟机XP与宿主机Ubuntu互访共享文件夹
- CentOS 6.2实战部署Nginx+MySQL+PHP
- 应用领航:盘点那些年我们一起追过的OS
- 无奇不有!盘点各国自己开发的操作系统
- nginx中http核心模块的配置指令2
- nginx中http核心模块的配置指令3
- nginx中http核心模块的配置指令4
- nginx中http的fastcgi模块的配置指令1
- Linux下三大免费桌面虚拟机评测
- 当存储无可用空间时无法启动虚拟机
- Windows 8虚拟机不能全屏的解决方法
- 使用VMware Workstation虚拟机保护数据
- Nginx 学习笔记(一)
- 用 GNOME Boxes 下载一个操作系统镜像
- 网站502与504错误分析