hsp Spring学习笔记
2016-06-21 14:44
645 查看
一、Spring是什么及快速入门案例
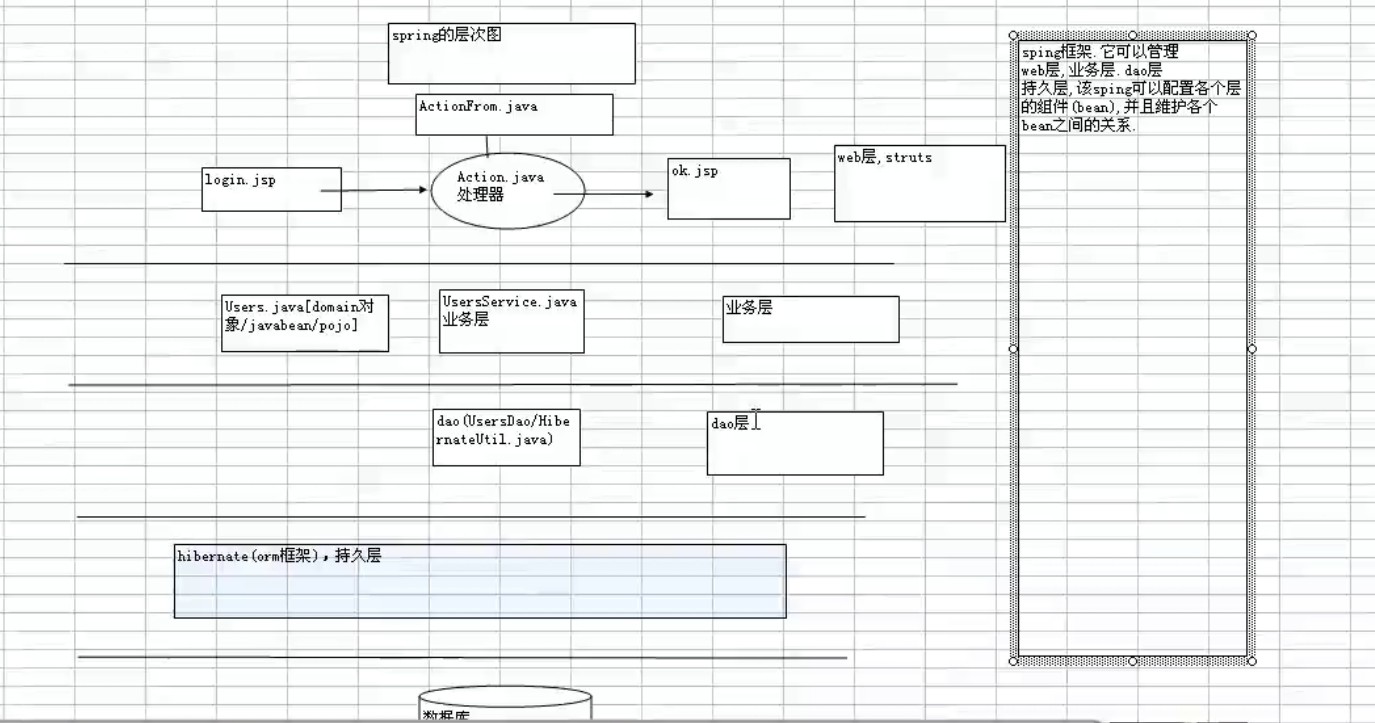
1、spring纵跨三层
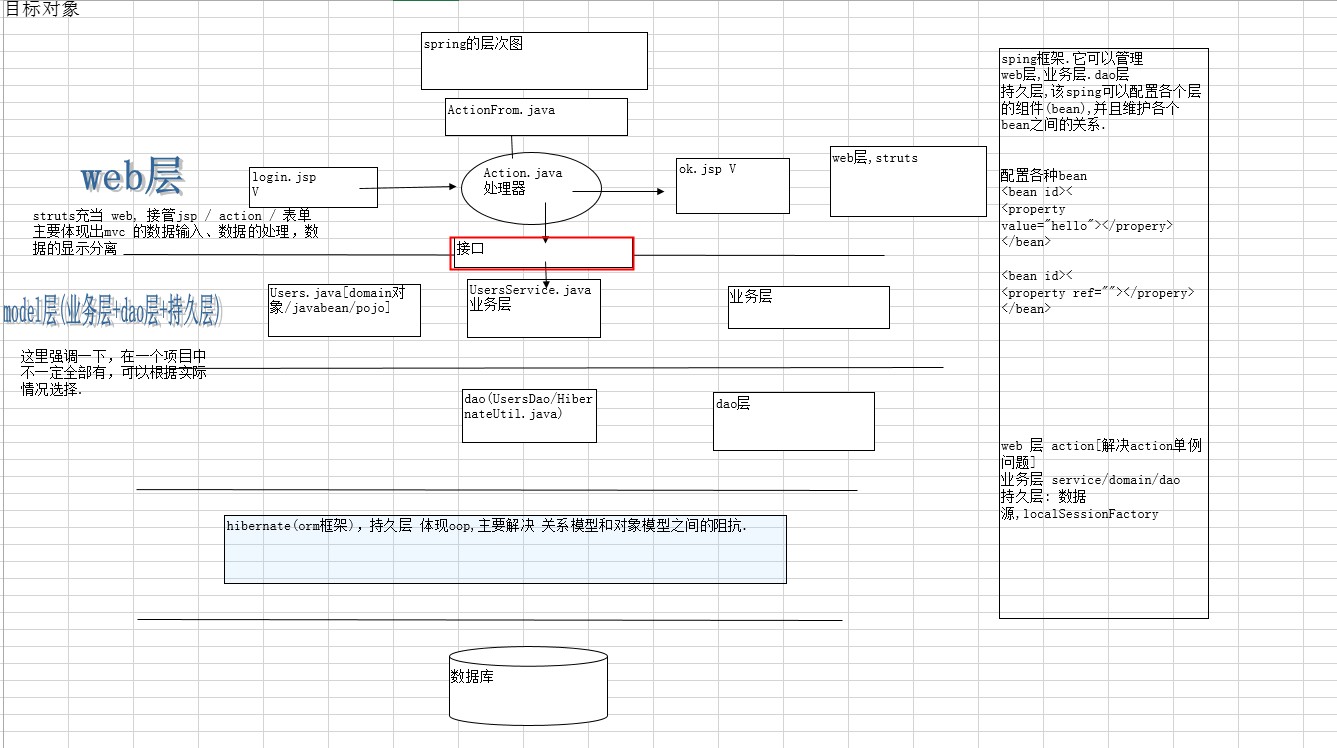
spring纵跨web层、业务层、dao层,接管这三层,配置bean,维护bean关系(1)Struts是web框架(jsp/action/actionform)
(2)hibernate是orm框架,处于持久层
(3)spring是容器框架,用于配置bean,并维护bean之间关系的框架
Spring中的bean,Java中的任何对象
Ioc控制反转
DI 依赖注入
☞快速入门
开发一个spring项目
1、 引入spring的开发包(最小配置,总包spring.jar 包括常用jar包),还有一个日志包 common-logging
2、 创建spring的核心文件,applicationContext.xml(容器文件,可以改名字),该文件一般放在src目录下,该文件中引入xsd文件:可以用给出的samples中拷贝一份
最基本的配置:
<?xml version="1.0" encoding="utf-8"?>

<beans xmlns="http://www.springframework.org/schema/beans"
xmlns:xsi="http://www.w3.org/2001/XMLSchema-instance"
xmlns:context="http://www.springframework.org/schema/context"
xmlns:tx="http://www.springframework.org/schema/tx"
xsi:schemaLocation="http://www.springframework.org/schema/beans http://www.springframework.org/schema/beans/spring-beans-2.5.xsd http://www.springframework.org/schema/context http://www.springframework.org/schema/context/spring-context-2.5.xsd http://www.springframework.org/schema/tx http://www.springframework.org/schema/tx/spring-tx-2.5.xsd">
<!-- 在容器文件中配置bean -->
<!-- bean元素:spring加载,自动创建一个bean,并放入内存 -->
<bean id="userService" class="com.service.UserService">
<property name="name">
<value>琥魄</value>
</property>
</bean>

</beans>
3、 配置bean
4、 在test.java中,
package com.test;

import org.springframework.context.ApplicationContext;
import org.springframework.context.support.ClassPathXmlApplicationContext;

import com.service.UserService;

public class Test {

public static void main(String[] args) {
// TODO Auto-generated method stub

//传统方法调用UserService的sayHello
//      UserService userService = new UserService();
//      userService.setName("琥魄");
//      userService.sayHello();

//用spring
//1、得到spring的applicationContext对象(容器对象)

//容器对象引用 ac
ApplicationContext ac = new ClassPathXmlApplicationContext("applicationContext.xml");
UserService us= (UserService) ac.getBean("userService");
us.sayHello();
}

}
二、快速入门案例、IOC是什么、DI是什么
5 、细节讨论传统方法和使用spring
5.1 使用spring:没有new对象,把创建对象的任务交给了spring框架
5.2 spring的运行原理图
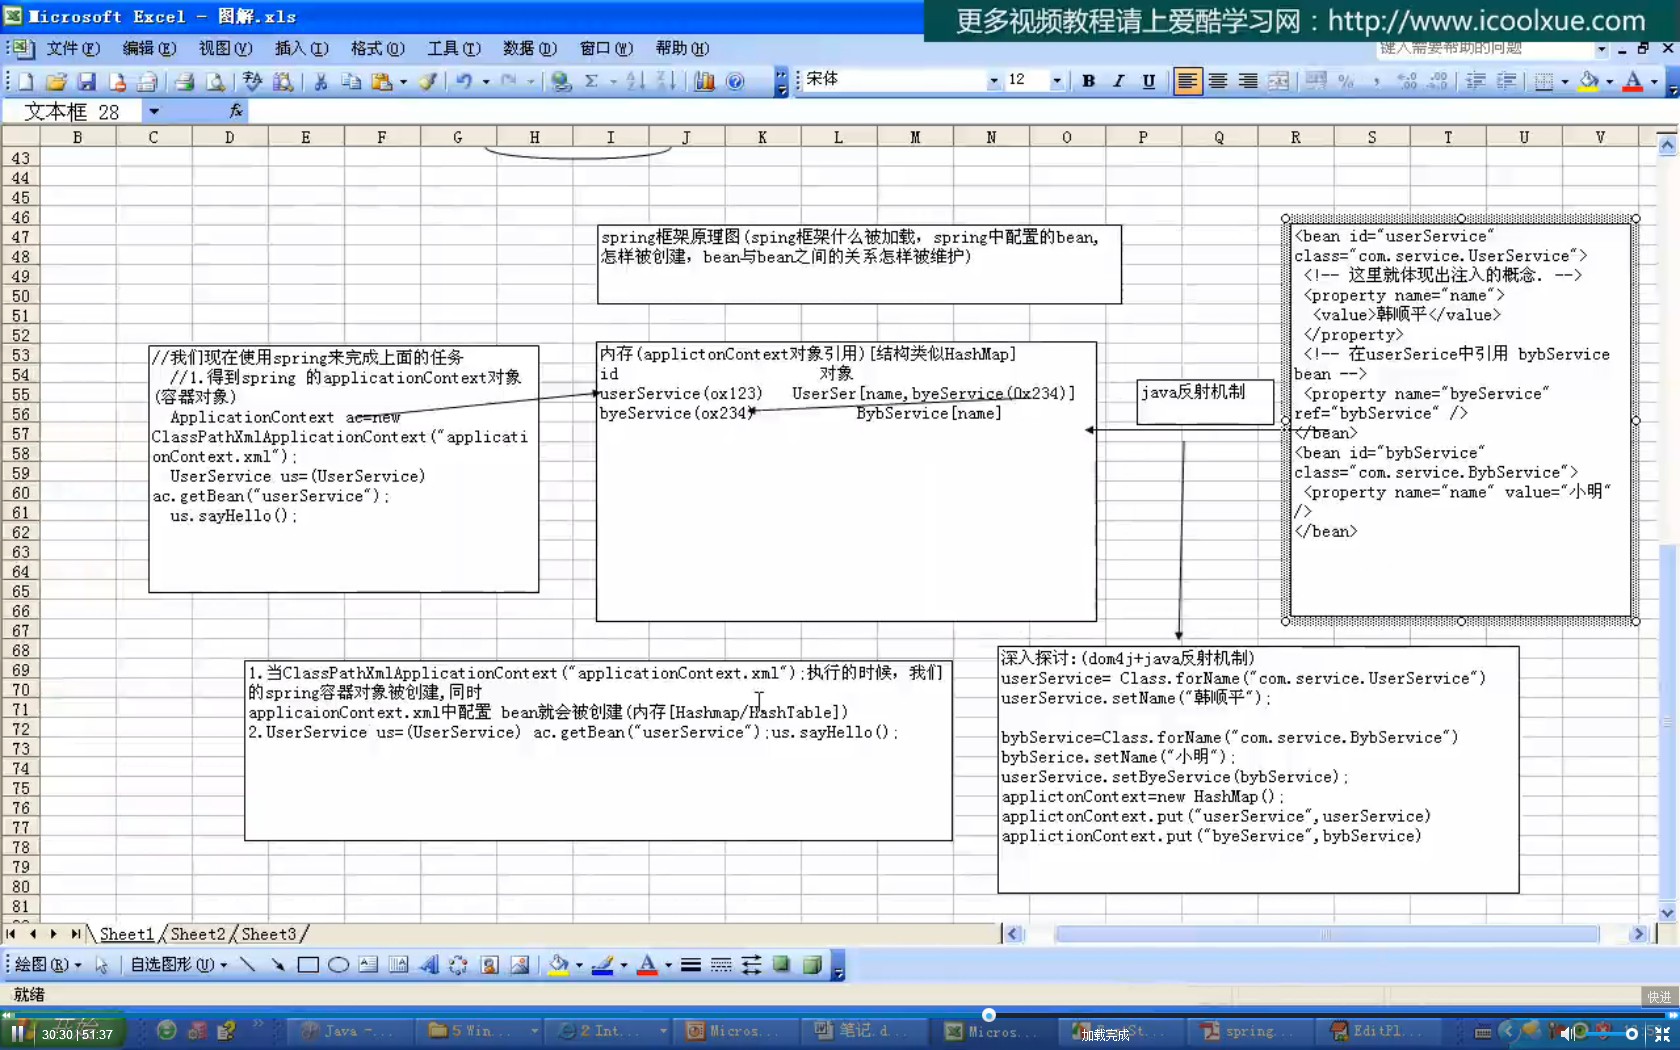
<!-- 在容器文件中配置bean -->
<!-- bean元素:spring加载,自动创建一个bean,并放入内存 -->
<bean id="userService" class="com.service.UserService">
<property name="name">
<value>琥魄</value>
</property>
<!-- 引用 byeService-->
<!-- name="byeService" 表示一个属性叫,ref="byeService"是ID -->
<property name="byeService" ref="byeService" />
</bean>

<!-- id不可重复 -->
<bean id="byeService" class="com.service.ByeService">
<property name="name" value="小琥" />
</bean>

</beans>
5.3 再看spring
spring实际上是一个容器框架,可以配置各种bean(action/service/domain/dao),并且可以维护bean和bean的关系,当我们需要使用某个bean的时候,我们可以getBean(id),使用即可。
IOC是什么?
答:IOC(inverse of controll)控制反转(控制权反转),就是把创建对象(bean),和维护对象(bean)的关系和权力从程序中转移到spring的容器(applicationContext.xml),而程序本身不再关心、维护对象创建和关系
DI是什么?
答:DI(dependency injection)依赖注入,实际上跟IOC是同一个概念,spring的设计者(2个HP工作的两个哥们)认为DI更能表示spring的核心技术。依赖:对象的关系是互相依赖的,很像搭积木的过程,共有的都可以写到bean里面去。
applicationContext因为是重量级的类,所以必然是单例模式。
☞学习框架,最重要的就是学习各个配置
写代码:把ApplicationContext做成一个单例。
model层范围很广,不一定业务层+dao层+持久层都有。
三、DI配合接口编程实例
◆ spring开发提倡接口编程,配合di技术,可以程序间解耦举例说明
字母大小写转换案例
思路:
1、创建一个接口 ChangeLetter
2、两个类实现接口
3、把对象配置到spring容器中
4、使用
package com.hp.inter;

import org.springframework.context.ApplicationContext;
import org.springframework.context.support.ClassPathXmlApplicationContext;

public class App1 {

public static void main(String[] args) {
// TODO Auto-generated method stub

ApplicationContext ac = new ClassPathXmlApplicationContext("com/hp/inter/beans.xml");

//获取对象,不用接口
//      UpperLetter changeLetter = (UpperLetter) ac.getBean("changeLetter");
//      System.out.println(changeLetter.change());

//使用接口来访问bean
ChangeLetter changeLetter = (ChangeLetter) ac.getBean("changeLetter");
System.out.println(changeLetter.change());
}

}
通过案例初步体会,di配合接口编程的确可以层(web)层(业务层)之间的耦合度。
完成:接口 ValidateUser,一个方法check(??)
有两个类
CheckUser1 implements ValidateUser {
//xml验证
}

CheckUser2 implements ValidateUser {
//数据库验证
}
四、Bean工厂和ApplicationContext
从ApplicationContex 应用上下文容器中获取bean和从bean工厂容器中获取bean具体案例:
//从ApplicationContext中取bean
ApplicationContext ac=new ClassPathXmlApplicationContext("com/hsp/ioc/beans.xml");
//当我们去实例化beans.xml,该文件中配置的bean被实例(该bean scope是 singleton)从bean中取出student

//如果我们使用beanfactory去获取bean,当你只是实例化该容器, 那么
//容器的bean不被实例化,只有当你去使用getBean某个bean时,才会实时的创建.

BeanFactory factory = new XmlBeanFactory(
new ClassPathResource("com/hsp/ioc/beans.xml"));
factory.getBean("student");
结论:
1.如果使用ApplicationContext ,则配置的bean如果是 singlton不管你用不用,都被实例化.(好处就是可以预先加载,缺点就是耗内存)
2.如果是 BeanFactory ,则当你获取beanfacotry时候,配置的bean不会被马上实例化,当你使用的时候,才被实例(好处节约内存,缺点就是速度)
3.规定: 一般没有特殊要求,应当使用ApplicatioContext完成(90%),比如移动设备。
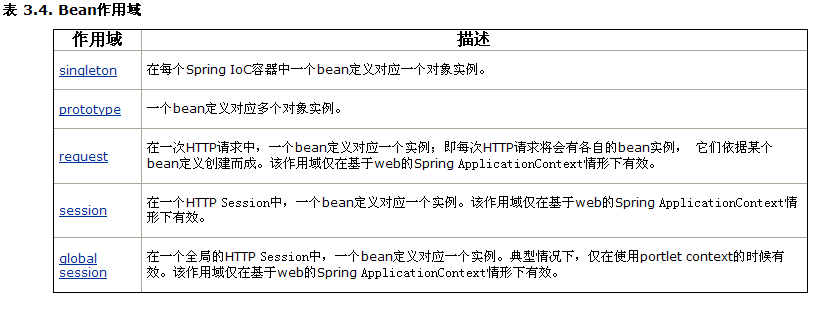
bean 的 scope的细节

入门案例:
//获取两个student
Student s1=(Student) ac.getBean("student");
Student s2=(Student) ac.getBean("student");
System.out.println(s1+" "+s2);
request—相当于web中的prototype
session
global-session
是在web开发中才有意义。
三种获取ApplicationContext 对象引用的方法
ClassPathXmlApplicationContext -> 通过类路径
FileSystemXmlApplicationContext -> 通过文件路径
举例:
ApplicationContext ac=new FileSystemXmlApplicationContext(“文件路径beans.xml / applicationContext.xml”);
XmlWebApplicationContext,从web系统中加载,Tomcat启动的时候自动加载
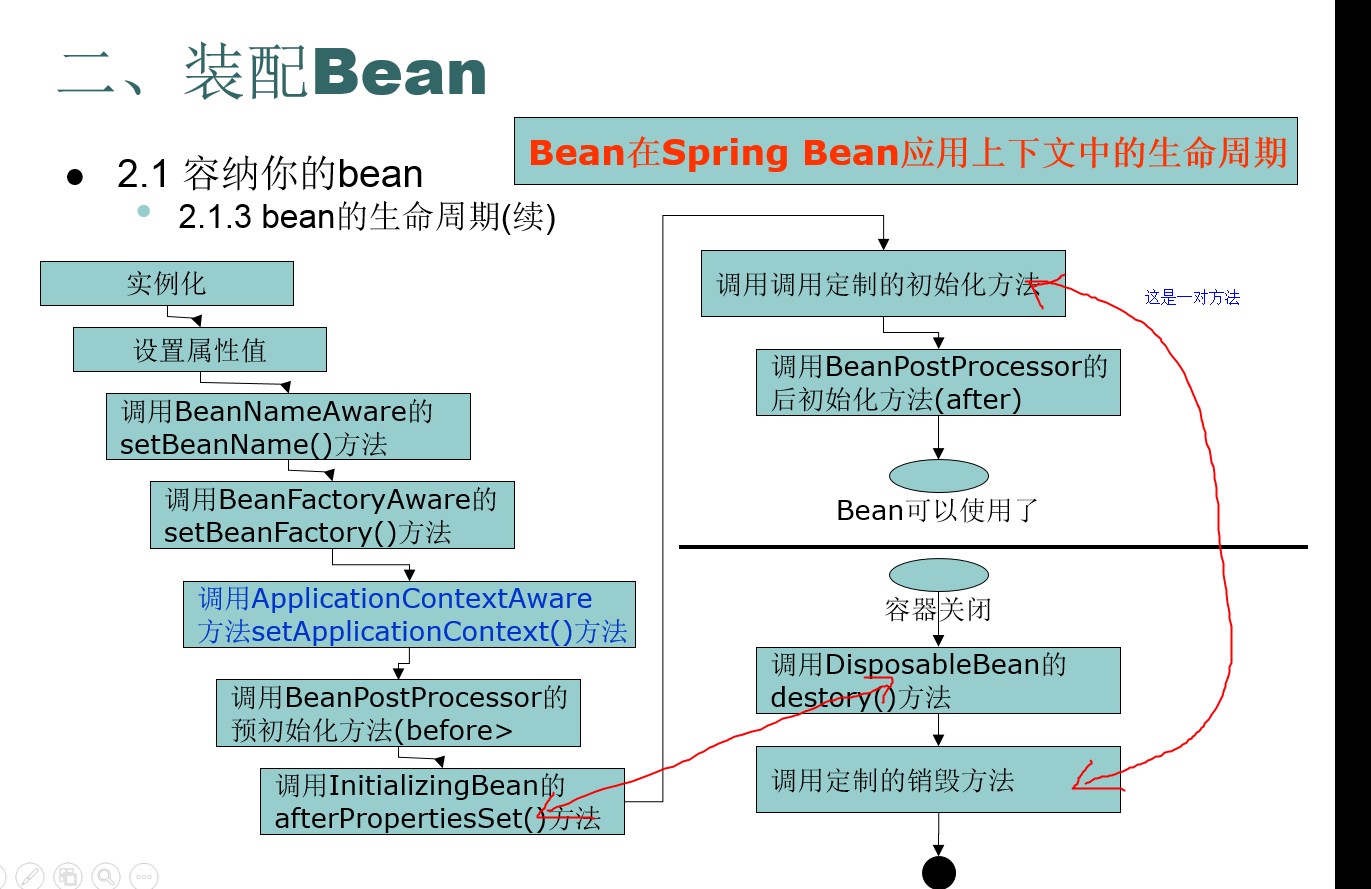
五、Bean的生命周期
为什么总是一个生命周期当做一个重点?Servlet -> servlet生命周期 init() destory()
java对象生命周期.
往往笔试,面试总喜欢问生命周期的问题
生命周期:
① 实例化(当我们的程序加载beans.xml文件),把我们的bean(前提是scope=singleton,单例是生命周期最复杂的)实例化到内存,证明:构造函数被调用② 调用set方法设置属性
③ 如果你实现了bean名字关注接口(BeanNameAware) 则,可以通过setBeanName获取id号
④ 如果你实现了 bean工厂关注接口(BeanFactoryAware),则可以获取BeanFactory
⑤ 如果你实现了 ApplicationContextAware接口,则调用方法
一般aware是用Autowired注解
//该方法传递ApplicationContext
public void setApplicationContext(ApplicationContext arg0)
throws BeansException {
// TODO Auto-generated method stub
System.out.println("setApplicationContext"+arg0);
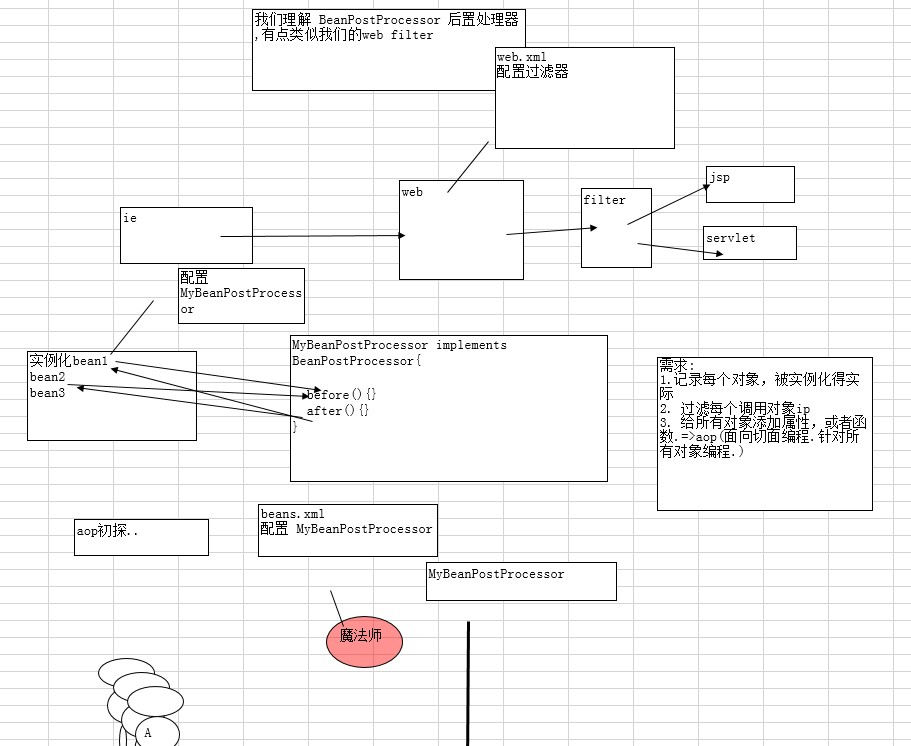
}⑥ 如果bean 和 一个后置处理器关联,则会自动去调用 Object postProcessBeforeInitialization方法
后置处理器,面向aop切面编程(针对所有对象编程);可以在每一个bean实例化的时候做
比如写日志、过滤
package com.hp.beanlife;

import org.springframework.beans.BeansException;
import org.springframework.beans.factory.config.BeanPostProcessor;

//后置处理器
public class MyBeanPostProcessor implements BeanPostProcessor {

public MyBeanPostProcessor() {
// TODO Auto-generated constructor stub
//System.out.println("MyBeanPostProcessor 构造了!!!!!!");
}

@Override
public Object postProcessAfterInitialization(Object arg0, String arg1) throws BeansException {
// TODO Auto-generated method stub
//arg0就是初始化的对象
System.out.println("postProcessAfterInitialization 函数被调用");
return arg0;
}

@Override
public Object postProcessBeforeInitialization(Object arg0, String arg1) throws BeansException {
// TODO Auto-generated method stub
System.out.println("postProcessBeforeInitialization 函数被调用");
return arg0;
}

}
⑦ 如果你实现InitializingBean 接口,则会调用 afterPropertiesSet
⑧ 如果自己在
<bean init-method=”init” />则可以在bean定义自己的初始化方法.
⑨ 如果bean 和 一个后置处理器关联,则会自动去调用 Object postProcessAfterInitialization方法
⑩ 使用我们的bean
⑪ 容器关闭
⑫ 可以通过实现DisposableBean 接口来调用方法 destory,可以在这释放资源,可以关闭数据连接,socket连接,文件流,释放bean的资源
但是不提倡这种方法,因为这种方法是bean来实现接口了,就很针对实现编程,绑定过于死
⑬可以在
<bean destory-method=”fun1”/>调用定制的销毁方法,建议用这个方法,可以在文件中配置
小结: 我们实际开发中往往,没有用的这么的过程,常见的是:
1->2->6->10->9->11
问题:通过BeanFactory来获取bean对象,bean的生命周期是否和Applicationcontext 是一样吗?
不是一样的,bean是工厂中创建的生命周期会简单一些:
使用ApplicationContext
使用beanfactory
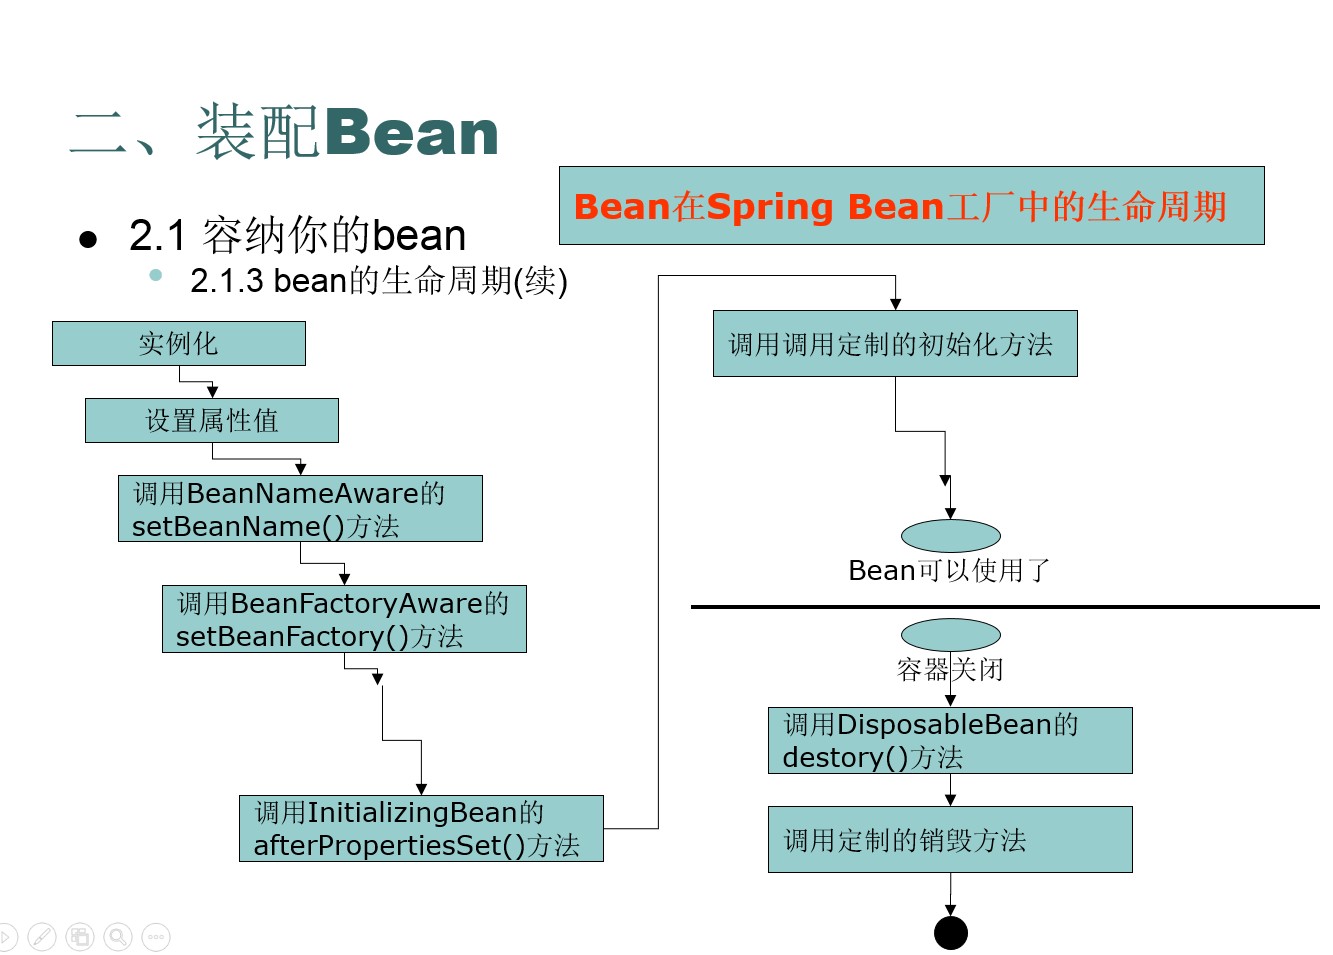
public class App1 {

public static void main(String[] args) {
// TODO Auto-generated method stub

//      ApplicationContext ac = new ClassPathXmlApplicationContext("com/hp/beanlife/beans.xml");
//      PersonService p1 = (PersonService) ac.getBean("personService");
//      p1.sayHi();

BeanFactory factroy = new XmlBeanFactory(
new ClassPathResource("com/hp/beanlife/beans.xml"));
PersonService p1 = (PersonService) factroy.getBean("personService");
p1.sayHi();

}
}
六、装配Bean
配置bean的细节① scope 的说明:
☞ 尽量使用 scope=”singleton” ,不要使用prototype,因为这样对我们的性能影响较大(特别是重量级的bean)
注解要善用,因为注解又是在编译期确定了的,所以不能达到解耦的目的。具体使用xml还是注解,这个需要自己衡量。但是现在注解用的还是挺多的。
//也可以通过注解的方式来配置哪个方法init-method
@PostConstruct
public void init() {
System.out.println("我自己的init方法");
}

@Override
public void afterPropertiesSet() throws Exception {
// TODO Auto-generated method stub
System.out.println("afterPropertiesSet()");
}

@PreDestroy
public void whDestory() {
System.out.println("在此各种销毁");
}
② 如何给集合类型注入值.
java中主要的集合有几种: map set list / 数组
Department类:
package com.hsp.collection;

import java.util.List;
import java.util.Map;
import java.util.Set;

public class Department {

private String name;
private String [] empName;
private List<Employee> empList;
private Set<Employee> empsets;
private Map<String,Employee> empMaps;

public Set<Employee> getEmpsets() {
return empsets;
}
public void setEmpsets(Set<Employee> empsets) {
this.empsets = empsets;
}
public String[] getEmpName() {
return empName;
}
public void setEmpName(String[] empName) {
this.empName = empName;
}
public String getName() {
return name;
}
public void setName(String name) {
this.name = name;
}
public List<Employee> getEmpList() {
return empList;
}
public void setEmpList(List<Employee> empList) {
this.empList = empList;
}
public Map<String, Employee> getEmpMaps() {
return empMaps;
}
public void setEmpMaps(Map<String, Employee> empMaps) {
this.empMaps = empMaps;
}

}

//Employeel类
package com.hsp.collection;
public class Employee {
private String name;
private int id;
public int getId() {
return id;
}
public void setId(int id) {
this.id = id;
}
public String getName() {
return name;
}
public void setName(String name) {
this.name = name;
}
}
测试类:
package com.hp.collection;

import java.util.Properties;
import java.util.Map.Entry;

import org.springframework.context.ApplicationContext;
import org.springframework.context.support.ClassPathXmlApplicationContext;

public class App1 {

public static void main(String[] args) {
// TODO Auto-generated method stub

ApplicationContext ac = new ClassPathXmlApplicationContext("com/hp/collection/beans.xml");
Department department = (Department) ac.getBean("department");
System.out.println(department.getName());

for(String emName:department.getEmpName()) {
System.out.println(emName);
}

System.out.println("**********通过list集合取出数据**********");
for(Employee e:department.getEmpList()) {

System.out.println("name == "+e.getName());
}

System.out.println("**********通过set集合取出数据**********");
for(Employee e:department.getEmpSet()) {

System.out.println("name == "+e.getName());
}

System.out.println("**********通过map集合取出数据**********");
//1、迭代器
//2、Entry
for(Entry<String,Employee> entry1:department.getEmpMap().entrySet()) {

System.out.println(entry1.getKey()+" "+entry1.getValue().getName());
}

System.out.println("**********通过Properties取出数据**********");
Properties pp = department.getPp();
System.out.println(pp.get("pp1").toString());

for(Entry<Object , Object> entry :pp.entrySet()) {
System.out.println("properties哈哈 == "+entry.toString());
}
}

}
beans.xml配置文件:
<?xml version="1.0" encoding="utf-8"?>
<beans xmlns="http://www.springframework.org/schema/beans"
xmlns:xsi="http://www.w3.org/2001/XMLSchema-instance"
xmlns:context="http://www.springframework.org/schema/context"
xmlns:tx="http://www.springframework.org/schema/tx"
xsi:schemaLocation="http://www.springframework.org/schema/beans http://www.springframework.org/schema/beans/spring-beans-2.5.xsd http://www.springframework.org/schema/context http://www.springframework.org/schema/context/spring-context-2.5.xsd http://www.springframework.org/schema/tx http://www.springframework.org/schema/tx/spring-tx-2.5.xsd">
<bean id="department" class="com.hsp.collection.Department">
<property name="name" value="财务部"/>
<!-- 给数组注入值 -->
<property name="empName">
<list>
<value>小明</value>
<value>小明小明</value>
<value>小明小明小明小明</value>
</list>
</property>
<!-- 给list注入值 list 中可以有相当的对象 -->
<property name="empList">
<list>
<ref bean="emp2" />
<ref bean="emp1"/>
<ref bean="emp1"/>
<ref bean="emp1"/>
<ref bean="emp1"/>
<ref bean="emp1"/>
<ref bean="emp1"/>
</list>
</property>
<!-- 给set注入值 set不能有相同的对象 -->
<property name="empsets">
<set>
<ref bean="emp1" />
<ref bean="emp2"/>
<ref bean="emp2"/>
<ref bean="emp2"/>
<ref bean="emp2"/>
</set>
</property>
<!-- 给map注入值 map只有key不一样,就可以装配value -->
<property name="empMaps">
<map>
<entry key="11" value-ref="emp1" />
<entry key="22" value-ref="emp2"/>
<entry key="33" value-ref="emp1"/>
</map>
</property>
<!-- 给属性集合配置 -->【点http协议 referer 】
<property name="pp">
<props>
<prop key="pp1">abcd</prop>
<prop key="pp2">hello</prop>
</props>
</property>
</bean>
<bean id="emp1" class="com.hsp.collection.Employee">
<property name="name" value="北京"/>
<property name="id" value="1"/>
</bean>
<bean id="emp2" class="com.hsp.collection.Employee">
<property name="name" value="天津"/>
<property name="id" value="2"/>
</bean>
</beans>
若bean的属性是集合类型,按如下处理:
设置null:
<property name="barlist">
<null/>
</property>
③ 内部bean
<bean id=”foo” class=”...Foo”>
<property name=”属性”>
<!—第一方法引用-->
<ref bean=’bean对象名’/>
<!—内部bean-->
<bean class="...Bar">
<properyt></property>
</bean>
</property>
</bean>
④ 继承配置
public class Student
public class Gradate extends Student
在beans.xml文件中体现配置
<!-- 配置一个学生对象 -->
<bean id="student" class="com.hsp.inherit.Student">
<property name="name" value="顺平" />
<property name="age" value="30"/>
</bean>
<!-- 配置Grdate对象 -->
<bean id="grdate" parent="student" class="com.hsp.inherit.Gradate">
<!-- 如果自己配置属性name,age,则会替换从父对象继承的数据  -->
<property name="name" value="小明"/>
<property name="degree" value="学士"/>
</bean>
思考: 目前我们都是通过set方式给bean注入值,spring还提供其它的方式注入值,比如通过构造函数注入值!
通过构造函数注入值
beans.xml 关键代码:
<!-- 配置一个雇员对象 -->
<bean id="employee" class="com.hsp.constructor.Employee">
<!-- 通过构造函数来注入属性值 -->
<constructor-arg index="0" type="java.lang.String" value="大明" />
</bean>
<constructor-arg index="0" type="java.lang.String" value="顺平" />
<constructor-arg index="1" type="int" value="20"/>
<constructor-arg  index="2" type="double" value="34.5" />
set和构造注入方式优缺点
set注入的缺点是无法清晰表达哪些属性是必须的,哪些是可选的,构造注入的优势是通过构造强制依赖关系,不可能实例化不完全的或无法使用的bean。
自动装配bean的属性值
特别注意:
写到bean就是配置对象了,而不是装配类
(1) byName的用法:
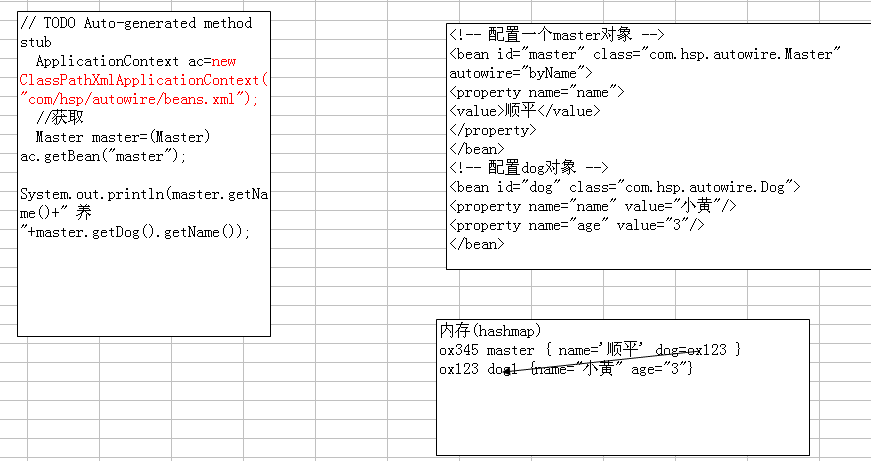
<!-- 配置一个master对象 -->
<bean id="master" class="com.hsp.autowire.Master" autowire="byName">
<property name="name">
<value>顺平</value>
</property>
</bean>

<!-- 配置dog对象 -->
<bean id="dog" class="com.hsp.autowire.Dog">
<property name="name" value="小黄"/>
<property name="age" value="3"/>
</bean>
原理图:
自动装配,能不用就不要用,没有set明确,会出现稀奇古怪的bug,如果必须用就用(开始定不下来是哪个)
<bean id="foo" class="...Foo" autowire="autowire type">
有四种自动装配类型:
(1) byName寻找和属性名相同的bean,若找不到,则装不上。
(2) byType: byType:寻找和属性类型相同的bean,找不到,装不上,找到多个抛异常。
(3) constructor: autowire=”constructor”
说明 : 查找和bean的构造参数一致的一个或
多个bean,若找不到或找到多个,抛异常。按照参数的类型装配
(4) autodetect
说明 : autowire=”autodetect”
(3)和(2)之间选一个方式。不确定
性的处理与(3)和(2)一致。
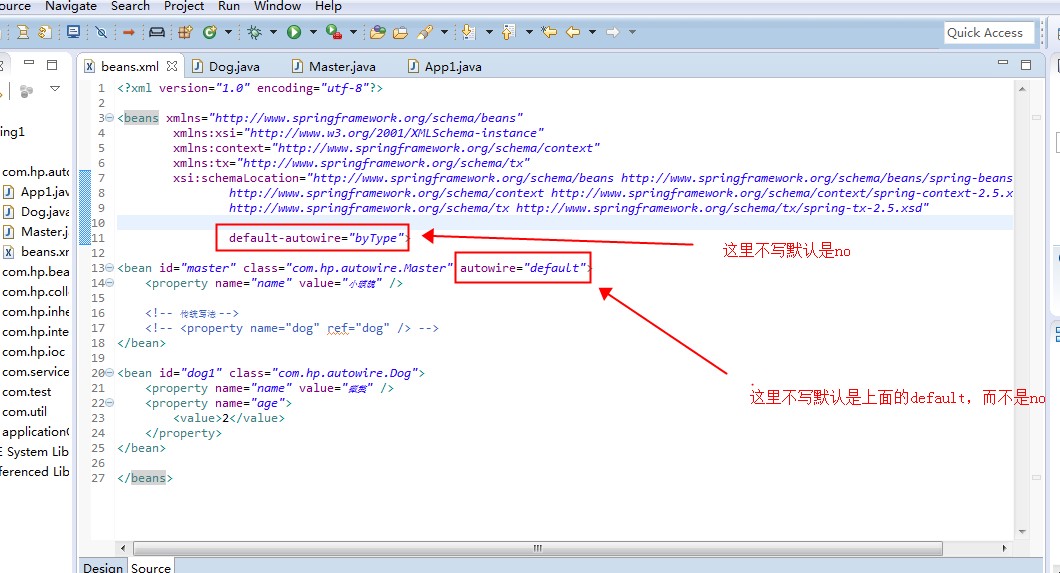
(5) default
这个需要在
<beans default-autorwire=“指定” />
当你在
<beans >指定了 default-autowrite后, 所有的bean的 默认的autowire就是 指定的装配方法;
如果没有在
<beans default-autorwire=“指定” />没有 default-autorwire=“指定” ,则默认是
default-autorwire=”no”
(6) no: 不自动装配
使用spring的特殊bean,完成分散配置:
beans.xml
说明: 当通过
context:property-placeholder引入 属性文件的时候,有多个需要使用 , 号间隔.
<!-- 引入我们的db.properties文件 -->
<context:property-placeholder location="classpath:com/hsp/dispatch/db.properties,classpath:com/hsp/dispatch/db2.properties"/>
<!-- 配置一DBUtil对象 $占位符号 -->
<bean id="dbutil" class="com.hsp.dispatch.DBUtil">
<property name="name" value="${name}" />
<property name="drivername" value="${drivername}" />
<property name="url" value="${url}" />
<property name="pwd" value="${pwd}" />
</bean>

<!-- 配置一DBUtil对象 -->
<bean id="dbutil2" class="com.hsp.dispatch.DBUtil">
<property name="name" value="${db2.name}" />
<property name="drivername" value="${db2.drivername}" />
<property name="url" value="${db2.url}" />
<property name="pwd" value="${db2.pwd}" />
</bean>
db.properties: name=scott drivername=oracle:jdbc:driver:OracleDirver url=jdbc:oracle:thin:@127.0.0.1:1521:hsp pwd=tiger
七、AOP编程
aop( aspect oriented programming ) 面向切面(方面)编程,是对所有对象或者是一类对象编程,核心是( 在不增加代码的基础上, 还增加新功能 )汇编(伪机器指令 mov jump) 面向机器
c语言(面向过程 )->系统软件(操作系统,数据库, 杀毒软件,防火墙,驱动..)
语句1;
语句2;
…
java语法(面向对象->类-对象)
class Dog{
属性;->变量
行为->函数
}
面向切面 spring( ->aop) 面向n多对象编程,面向一批对象编程
aop特别提醒: aop编程,实际上在开发框架本身用的多,在实际项目中,用的不是很多,但是将来会越来越多,这个一个趋势.

就有交叉点了,交叉功能放入的过程叫做织入
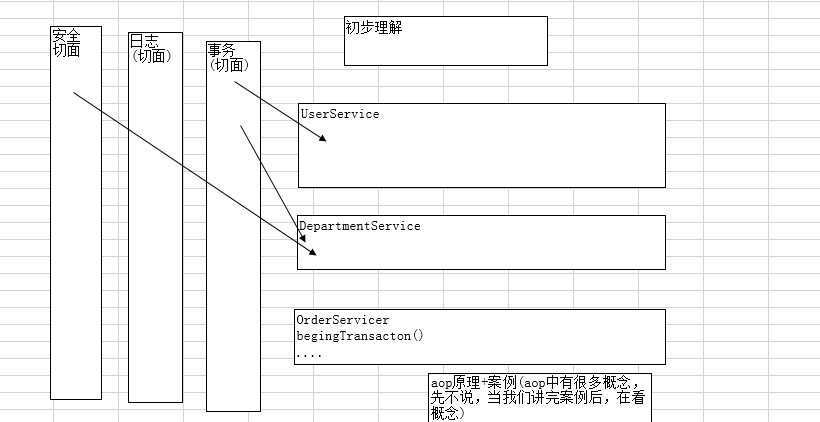
● aop原理+案例
编程说明:
步骤:
1. 定义接口
2. 编写对象(被代理对象=目标对象)
3. 编写通知(前置通知目标方法调用前调用)
4. 在beans.xml文件配置
4.1 配置 被代理对象=目标对象
4.2 配置通知
4.3 配置代理对象 是 ProxyFactoryBean的对象实例
4.3.1
4.3.2 织入通知
4.3.3 配置被代理对象
前置通知类:
package com.hp.aop;

import java.lang.reflect.Method;
import org.springframework.aop.MethodBeforeAdvice;

public class MyMethodBeforeAdvice implements MethodBeforeAdvice {

/**
* method: 被调用的方法名
* args: 给method传递的参数
* target: 目标对象
*/
@Override
public void before(Method method, Object[] args, Object target)
throws Throwable {
// TODO Auto-generated method stub

System.out.println("***************");
System.out.println("记录日志..."+method.getName());
}

}
<?xml version="1.0" encoding="utf-8"?> <beans xmlns="http://www.springframework.org/schema/beans" xmlns:xsi="http://www.w3.org/2001/XMLSchema-instance" xmlns:context="http://www.springframework.org/schema/context" xmlns:tx="http://www.springframework.org/schema/tx" xsi:schemaLocation="http://www.springframework.org/schema/beans http://www.springframework.org/schema/beans/spring-beans-2.5.xsd http://www.springframework.org/schema/context http://www.springframework.org/schema/context/spring-context-2.5.xsd http://www.springframework.org/schema/tx http://www.springframework.org/schema/tx/spring-tx-2.5.xsd" default-autowire="no"> <!-- 配置被代理的对象 --> <bean id="test1Service" class="com.hp.aop.Test1Service"> <property name="name" value="琥魄" /> </bean> <!-- 配置前置通知 --> <bean id="MyMethodBeforeAdvice" class="com.hp.aop.MyMethodBeforeAdvice"/> <!-- 配置代理对象 --> <bean id="ProxyFactoryBean" class="org.springframework.aop.framework.ProxyFactoryBean"> <!-- 代理接口集 --> <property name="proxyInterfaces"> <list> <value>com.hp.aop.TestServiceInter</value> <value>com.hp.aop.TestServiceInter2</value> </list> </property> <!-- 把通知织入到代理对象--> <property name="interceptorNames"> <!-- 相当于把 MyMethodBeforeAdvice 前置通知和代理对象关联 ,通知相当于拦截器 --> <value>MyMethodBeforeAdvice</value> </property> <!-- 配置被代理的对象,可以指定 --> <property name="target" ref="test1Service" /> </bean> </beans>
public class App1 {

public static void main(String[] args) {
// TODO Auto-generated method stub

ApplicationContext ac = new ClassPathXmlApplicationContext("com/hp/aop/beans.xml");
TestServiceInter ts = (TestServiceInter) ac.getBean("ProxyFactoryBean");
ts.sayHello();
TestServiceInter2 ts2 = (TestServiceInter2) ts;
ts2.sayBye();
}

}
但是发现,ProxyFactoryBean不能转为自己~~~
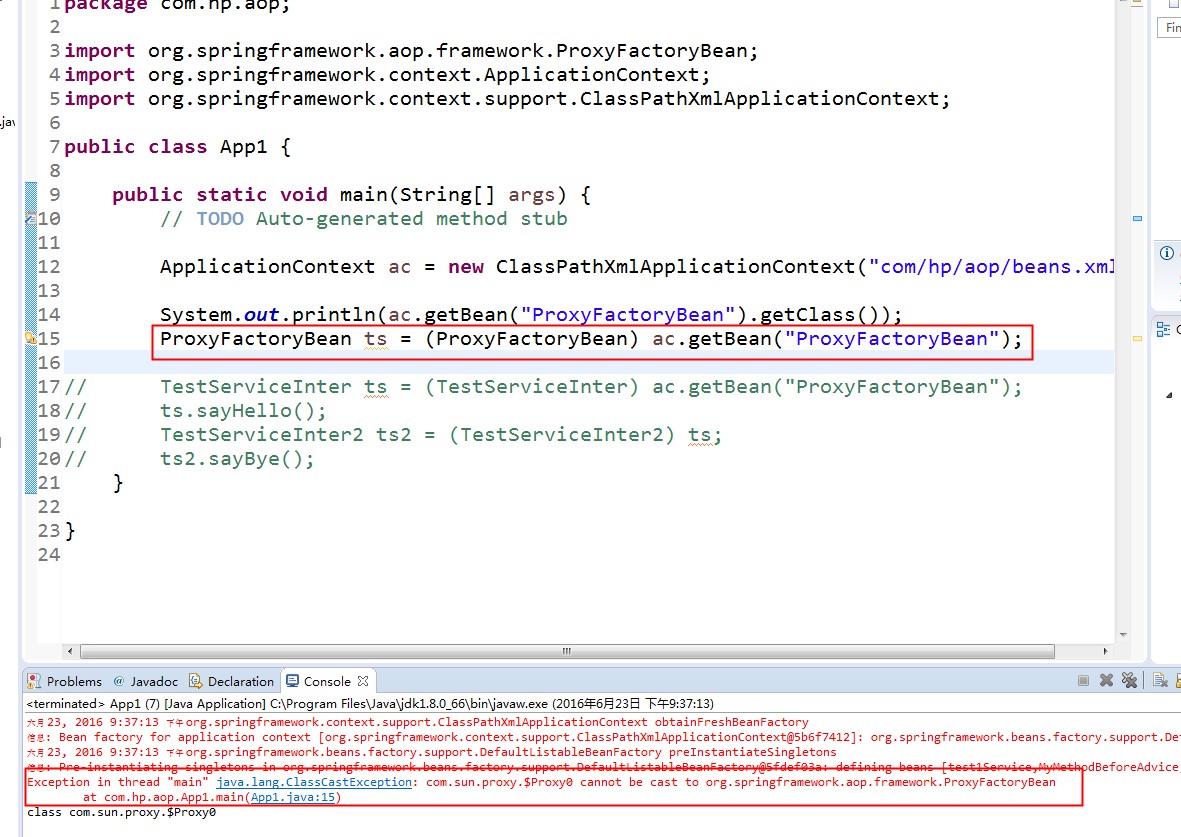
看来spring还做了很多其他的事情,
<bean id="ProxyFactoryBean" class="org.springframework.aop.framework.ProxyFactoryBean">,并不代表就是类 org.springframework.aop.framework.ProxyFactoryBean 来实现的
这个代理类既然代理那两个接口,应该底层也实现那两个接口,后来反射打印也确实实现了那两个接口,但是变成了$proxy0
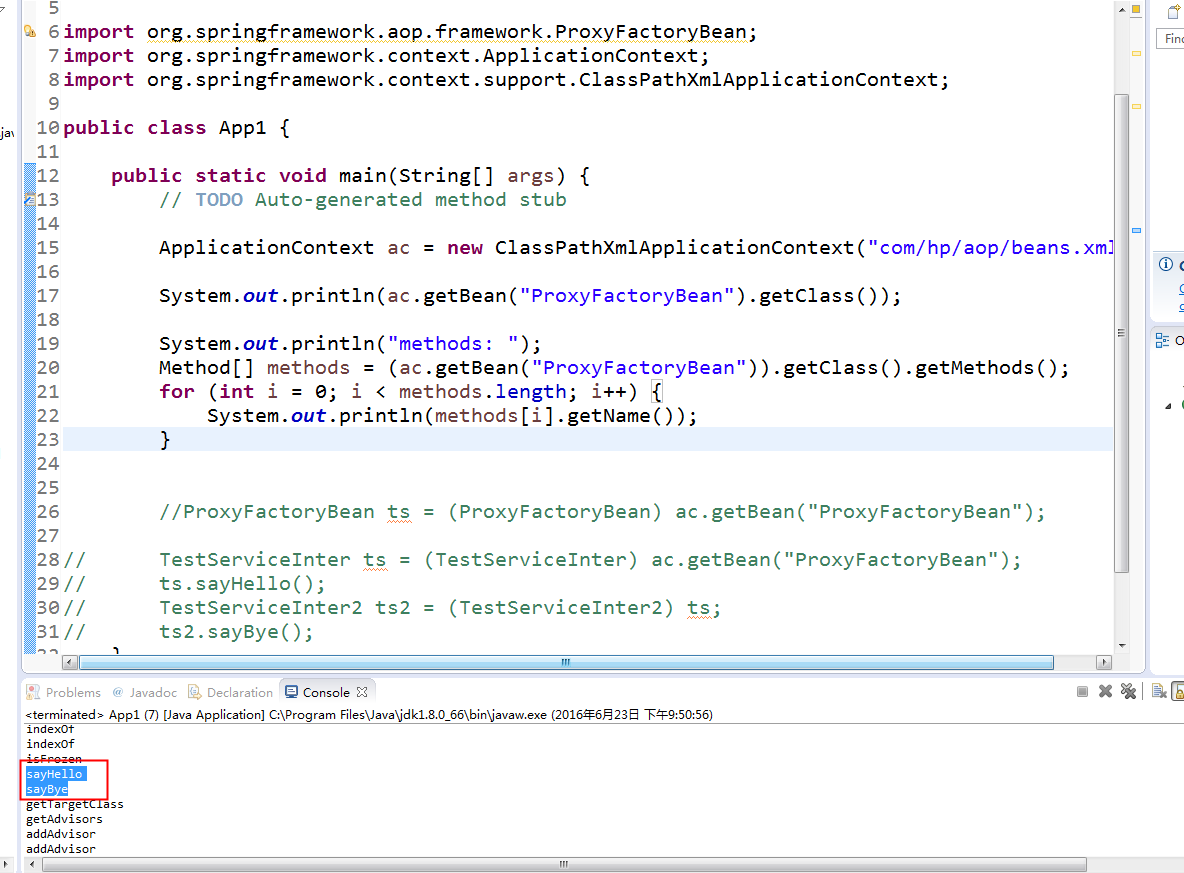
请教师兄,得到的答案是,有两种模式的代理:一种是改字节流的方法,一种是jdk原生的代理。。。
1.切面(aspect):要实现的交叉功能,是系统模块化的一个切面或领域。如日志记录。
2.连接点:应用程序执行过程中插入切面的地点,可以是方法调用,异常抛出,或者要修改的
字段。
3.通知:切面的实际实现,他通知系统新的行为。如在日志通知包含了实
现日志功能的代码,如向日志文件写日志。通知在连接点插入到应用系统中。
4.切入点:定义了通知应该应用在哪些连接点,通知可以应用到AOP框架支持的任何连接点。
5.引入:为类添加新方法和属性。
6.目标对象:被通知的对象。既可以是你编写的类也可以是第三方类。
7.代理:将通知应用到目标对象后创建的对象,应用系统的其他部分不用为了支持代理对象而
改变。
8.织入:将切面应用到目标对象从而创建一个新代理对象的过程。织入发生在目标
对象生命周期的多个点上:
编译期:切面在目标对象编译时织入.这需要一个特殊的编译器.
类装载期:切面在目标对象被载入JVM时织入.这需要一个特殊的类载入器.
运行期:切面在应用系统运行时织入.
提问? 说spring的aop中,当你通过代理对象去实现aop的时候,获取的ProxyFactoryBean是什么类型?
答: 返回的是一个代理对象,如果目标对象实现了接口,则spring使用jdk 动态代理技术,如果目标对象没有实现接口,则spring使用CGLIB技术.
这个问题相关之前的问题。
提一个问题
class A{
private Strinag name;
public viod setName(String name){
this.name=name;
System.out.println(“name”+name);
}
}
beans.xml
<bean id=”a” class=”...A”>
<property name=”name” value=”顺平” />
</bean>
A a=new A();
a.setName(“琥魄”);

相关文章推荐
- java中 static变量和方法到底是存在内存什么区域呢?
- Java对象与垃圾回收
- Java 中 Map与JavaBean实体类之间的相互转化
- JavaBean
- 工作问题-java-一个好用的正则表达式
- Eclipse中添加组件
- eclipse formatter.xml Code Templates
- struts2 链接包含汉字乱码的问题
- 《java并发编程的艺术》读书笔记-第四章java并发的基础
- java根据ftl模板生成word文档(列表)
- Eclipse-----JRebel Eclipse插件实现热部署
- java mail实现Email的发送,完整代码
- Spring如何利用XmlBeanFactory类加载bean的配置文件?
- Java遍历List的时候删除item
- Struts2学习(三)—OGNL
- maven+springMVC+mybatis+junit详细搭建过程
- 折半二分插入排序Java代码
- 深入理解java中的synchronized关键字
- 【Spring学习】Bean生命周期
- Spring介绍