JAVA多线程实现的三种方式及内部原理
2016-06-16 14:42
706 查看
JAVA多线程实现方式主要有三种:继承Thread类、实现Runnable接口、使用ExecutorService、Callable、Future实现有返回结果的多线程。其中前两种方式线程执行完后都没有返回值,只有最后一种是带返回值的。
1、继承Thread类实现多线程
继承Thread类的方法尽管被我列为一种多线程实现方式,但Thread本质上也是实现了Runnable接口的一个实例,它代表一个线程的实例,并且,启动线程的唯一方法就是通过Thread类的start()实例方法。start()方法是一个native方法,它将启动一个新线程,并执行run()方法。这种方式实现多线程很简单,通过自己的类直接extend Thread,并复写run()方法,就可以启动新线程并执行自己定义的run()方法。例如:
[java] view plaincopyprint?
public class MyThread extends Thread {
public void run() {
System.out.println("MyThread.run()");
}
}
[java] view plaincopyprint?
MyThread myThread1 = new MyThread();
MyThread myThread2 = new MyThread();
myThread1.start();
myThread2.start();
2、实现Runnable接口方式实现多线程
如果自己的类已经extends另一个类,就无法直接extends Thread,此时,必须实现一个Runnable接口,如下:
[java] view plaincopyprint?
public class MyThread extends OtherClass implements Runnable {
public void run() {
System.out.println("MyThread.run()");
}
}
[java] view plaincopyprint?
MyThread myThread = new MyThread();
Thread thread = new Thread(myThread);
thread.start();
[java] view plaincopyprint?
public void run() {
if (target != null) {
target.run();
}
}
3、使用ExecutorService、Callable、Future实现有返回结果的多线程
ExecutorService、Callable、Future这个对象实际上都是属于Executor框架中的功能类。想要详细了解Executor框架的可以访问http://www.javaeye.com/topic/366591 ,这里面对该框架做了很详细的解释。返回结果的线程是在JDK1.5中引入的新特征,确实很实用,有了这种特征我就不需要再为了得到返回值而大费周折了,而且即便实现了也可能漏洞百出。
可返回值的任务必须实现Callable接口,类似的,无返回值的任务必须Runnable接口。执行Callable任务后,可以获取一个Future的对象,在该对象上调用get就可以获取到Callable任务返回的Object了,再结合线程池接口ExecutorService就可以实现传说中有返回结果的多线程了。下面提供了一个完整的有返回结果的多线程测试例子,在JDK1.5下验证过没问题可以直接使用。代码如下:
[java] view plaincopyprint?
import java.util.concurrent.*;
import java.util.Date;
import java.util.List;
import java.util.ArrayList;
/**
* 有返回值的线程
*/
@SuppressWarnings("unchecked")
public class Test {
public static void main(String[] args) throws ExecutionException,
InterruptedException {
System.out.println("----程序开始运行----");
Date date1 = new Date();
int taskSize = 5;
// 创建一个线程池
ExecutorService pool = Executors.newFixedThreadPool(taskSize);
// 创建多个有返回值的任务
List<Future> list = new ArrayList<Future>();
for (int i = 0; i < taskSize; i++) {
Callable c = new MyCallable(i + " ");
// 执行任务并获取Future对象
Future f = pool.submit(c);
// System.out.println(">>>" + f.get().toString());
list.add(f);
}
// 关闭线程池
pool.shutdown();
// 获取所有并发任务的运行结果
for (Future f : list) {
// 从Future对象上获取任务的返回值,并输出到控制台
System.out.println(">>>" + f.get().toString());
}
Date date2 = new Date();
System.out.println("----程序结束运行----,程序运行时间【"
+ (date2.getTime() - date1.getTime()) + "毫秒】");
}
}
class MyCallable implements Callable<Object> {
private String taskNum;
MyCallable(String taskNum) {
this.taskNum = taskNum;
}
public Object call() throws Exception {
System.out.println(">>>" + taskNum + "任务启动");
Date dateTmp1 = new Date();
Thread.sleep(1000);
Date dateTmp2 = new Date();
long time = dateTmp2.getTime() - dateTmp1.getTime();
System.out.println(">>>" + taskNum + "任务终止");
return taskNum + "任务返回运行结果,当前任务时间【" + time + "毫秒】";
}
}
上述代码中Executors类,提供了一系列工厂方法用于创先线程池,返回的线程池都实现了ExecutorService接口。
public static ExecutorService newFixedThreadPool(int nThreads)
创建固定数目线程的线程池。
public static ExecutorService newCachedThreadPool()
创建一个可缓存的线程池,调用execute 将重用以前构造的线程(如果线程可用)。如果现有线程没有可用的,则创建一个新线程并添加到池中。终止并从缓存中移除那些已有 60 秒钟未被使用的线程。
public static ExecutorService newSingleThreadExecutor()
创建一个单线程化的Executor。
public static ScheduledExecutorService newScheduledThreadPool(int corePoolSize)
创建一个支持定时及周期性的任务执行的线程池,多数情况下可用来替代Timer类。
ExecutoreService提供了submit()方法,传递一个Callable,或Runnable,返回Future。如果Executor后台线程池还没有完成Callable的计算,这调用返回Future对象的get()方法,会阻塞直到计算完成。
以上参考:http://www.cnblogs.com/yezhenhan/archive/2012/01/09/2317636.html
4、线程池的内部原理以及callable的内部实现原理,看下面调用栈及源码
4.1首先调用submit,就是在线程池中进行处理
Thread [main] (Suspended (breakpoint at line 895 in ThreadPoolExecutor))
ThreadPoolExecutor.addWorker(Runnable, boolean) line: 895
ThreadPoolExecutor.execute(Runnable) line: 1360
ThreadPoolExecutor(AbstractExecutorService).submit(Callable<T>) line: 132
CallableTest.main(String[]) line: 26
addWorker中创建了线程并最终调用了 t.start();
4.2这个时候创建了线程池中第一个线程执行任务
Thread [pool-1-thread-1] (Suspended (breakpoint at line 1124 in ThreadPoolExecutor))
ThreadPoolExecutor.runWorker(ThreadPoolExecutor$Worker) line: 1124
ThreadPoolExecutor$Worker.run() line: 615
Thread.run() line: 745
4.3执行完任务后会将f.get中的唤醒并返回,其逻辑就在finishCompletion中
Thread [pool-1-thread-1] (Suspended (breakpoint at line 362 in FutureTask))
FutureTask<V>.finishCompletion() line: 362 [local variables unavailable]
FutureTask<V>.set(V) line: 229
FutureTask<V>.run() line: 270
ThreadPoolExecutor.runWorker(ThreadPoolExecutor$Worker) line: 1145
ThreadPoolExecutor$Worker.run() line: 615
Thread.run() line: 745
5.至于线程的创建可以参考大神的Dalvik虚拟机进程和线程创建过程,JVM中略有不同但大题流程就是如此
就从start函数开始分析Dalvik虚拟机线程的创建过程,如图2所示:
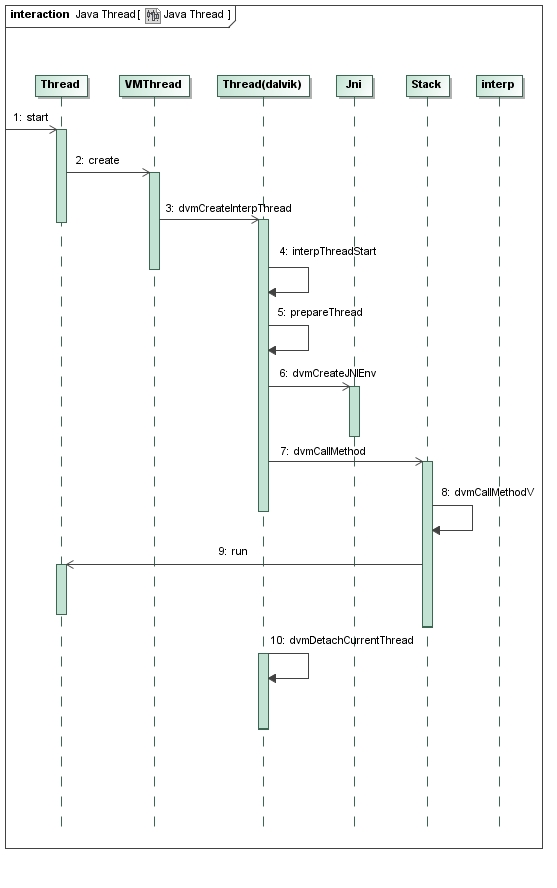
图2 Dalvik虚拟机线程的创建过程
http://blog.csdn.net/luoshengyang/article/details/8923484
1、继承Thread类实现多线程
继承Thread类的方法尽管被我列为一种多线程实现方式,但Thread本质上也是实现了Runnable接口的一个实例,它代表一个线程的实例,并且,启动线程的唯一方法就是通过Thread类的start()实例方法。start()方法是一个native方法,它将启动一个新线程,并执行run()方法。这种方式实现多线程很简单,通过自己的类直接extend Thread,并复写run()方法,就可以启动新线程并执行自己定义的run()方法。例如:
[java] view plaincopyprint?
public class MyThread extends Thread {
public void run() {
System.out.println("MyThread.run()");
}
}
<span style="font-size:14px;"><span style="font-size:14px;">public class MyThread extends Thread {
  public void run() {
   System.out.println("MyThread.run()");
  }
}</span></span>在合适的地方启动线程如下:[java] view plaincopyprint?
MyThread myThread1 = new MyThread();
MyThread myThread2 = new MyThread();
myThread1.start();
myThread2.start();
<span style="font-size:14px;"><span style="font-size:14px;">MyThread myThread1 = new MyThread();
MyThread myThread2 = new MyThread();
myThread1.start();
myThread2.start();</span></span>
2、实现Runnable接口方式实现多线程
如果自己的类已经extends另一个类,就无法直接extends Thread,此时,必须实现一个Runnable接口,如下:
[java] view plaincopyprint?
public class MyThread extends OtherClass implements Runnable {
public void run() {
System.out.println("MyThread.run()");
}
}
<span style="font-size:14px;"><span style="font-size:14px;">public class MyThread extends OtherClass implements Runnable {
  public void run() {
   System.out.println("MyThread.run()");
  }
}</span></span>为了启动MyThread,需要首先实例化一个Thread,并传入自己的MyThread实例:[java] view plaincopyprint?
MyThread myThread = new MyThread();
Thread thread = new Thread(myThread);
thread.start();
<span style="font-size:14px;"><span style="font-size:14px;">MyThread myThread = new MyThread();
Thread thread = new Thread(myThread);
thread.start();</span></span>
事实上,当传入一个Runnable target参数给Thread后,Thread的run()方法就会调用target.run(),参考JDK源代码:
[java] view plaincopyprint?
public void run() {
if (target != null) {
target.run();
}
}
<span style="font-size:14px;"><span style="font-size:14px;">public void run() {
  if (target != null) {
   target.run();
  }
}</span></span>
3、使用ExecutorService、Callable、Future实现有返回结果的多线程
ExecutorService、Callable、Future这个对象实际上都是属于Executor框架中的功能类。想要详细了解Executor框架的可以访问http://www.javaeye.com/topic/366591 ,这里面对该框架做了很详细的解释。返回结果的线程是在JDK1.5中引入的新特征,确实很实用,有了这种特征我就不需要再为了得到返回值而大费周折了,而且即便实现了也可能漏洞百出。
可返回值的任务必须实现Callable接口,类似的,无返回值的任务必须Runnable接口。执行Callable任务后,可以获取一个Future的对象,在该对象上调用get就可以获取到Callable任务返回的Object了,再结合线程池接口ExecutorService就可以实现传说中有返回结果的多线程了。下面提供了一个完整的有返回结果的多线程测试例子,在JDK1.5下验证过没问题可以直接使用。代码如下:
[java] view plaincopyprint?
import java.util.concurrent.*;
import java.util.Date;
import java.util.List;
import java.util.ArrayList;
/**
* 有返回值的线程
*/
@SuppressWarnings("unchecked")
public class Test {
public static void main(String[] args) throws ExecutionException,
InterruptedException {
System.out.println("----程序开始运行----");
Date date1 = new Date();
int taskSize = 5;
// 创建一个线程池
ExecutorService pool = Executors.newFixedThreadPool(taskSize);
// 创建多个有返回值的任务
List<Future> list = new ArrayList<Future>();
for (int i = 0; i < taskSize; i++) {
Callable c = new MyCallable(i + " ");
// 执行任务并获取Future对象
Future f = pool.submit(c);
// System.out.println(">>>" + f.get().toString());
list.add(f);
}
// 关闭线程池
pool.shutdown();
// 获取所有并发任务的运行结果
for (Future f : list) {
// 从Future对象上获取任务的返回值,并输出到控制台
System.out.println(">>>" + f.get().toString());
}
Date date2 = new Date();
System.out.println("----程序结束运行----,程序运行时间【"
+ (date2.getTime() - date1.getTime()) + "毫秒】");
}
}
class MyCallable implements Callable<Object> {
private String taskNum;
MyCallable(String taskNum) {
this.taskNum = taskNum;
}
public Object call() throws Exception {
System.out.println(">>>" + taskNum + "任务启动");
Date dateTmp1 = new Date();
Thread.sleep(1000);
Date dateTmp2 = new Date();
long time = dateTmp2.getTime() - dateTmp1.getTime();
System.out.println(">>>" + taskNum + "任务终止");
return taskNum + "任务返回运行结果,当前任务时间【" + time + "毫秒】";
}
}
<span style="font-size:14px;"><span style="font-size:14px;">import java.util.concurrent.*;
import java.util.Date;
import java.util.List;
import java.util.ArrayList;

/**
* 有返回值的线程
*/
@SuppressWarnings("unchecked")
public class Test {
public static void main(String[] args) throws ExecutionException,
InterruptedException {
System.out.println("----程序开始运行----");
Date date1 = new Date();

int taskSize = 5;
// 创建一个线程池
ExecutorService pool = Executors.newFixedThreadPool(taskSize);
// 创建多个有返回值的任务
List<Future> list = new ArrayList<Future>();
for (int i = 0; i < taskSize; i++) {
Callable c = new MyCallable(i + " ");
// 执行任务并获取Future对象
Future f = pool.submit(c);
// System.out.println(">>>" + f.get().toString());
list.add(f);
}
// 关闭线程池
pool.shutdown();

// 获取所有并发任务的运行结果
for (Future f : list) {
// 从Future对象上获取任务的返回值,并输出到控制台
System.out.println(">>>" + f.get().toString());
}

Date date2 = new Date();
System.out.println("----程序结束运行----,程序运行时间【"
+ (date2.getTime() - date1.getTime()) + "毫秒】");
}
}

class MyCallable implements Callable<Object> {
private String taskNum;

MyCallable(String taskNum) {
this.taskNum = taskNum;
}

public Object call() throws Exception {
System.out.println(">>>" + taskNum + "任务启动");
Date dateTmp1 = new Date();
Thread.sleep(1000);
Date dateTmp2 = new Date();
long time = dateTmp2.getTime() - dateTmp1.getTime();
System.out.println(">>>" + taskNum + "任务终止");
return taskNum + "任务返回运行结果,当前任务时间【" + time + "毫秒】";
}
}</span></span>代码说明:上述代码中Executors类,提供了一系列工厂方法用于创先线程池,返回的线程池都实现了ExecutorService接口。
public static ExecutorService newFixedThreadPool(int nThreads)
创建固定数目线程的线程池。
public static ExecutorService newCachedThreadPool()
创建一个可缓存的线程池,调用execute 将重用以前构造的线程(如果线程可用)。如果现有线程没有可用的,则创建一个新线程并添加到池中。终止并从缓存中移除那些已有 60 秒钟未被使用的线程。
public static ExecutorService newSingleThreadExecutor()
创建一个单线程化的Executor。
public static ScheduledExecutorService newScheduledThreadPool(int corePoolSize)
创建一个支持定时及周期性的任务执行的线程池,多数情况下可用来替代Timer类。
ExecutoreService提供了submit()方法,传递一个Callable,或Runnable,返回Future。如果Executor后台线程池还没有完成Callable的计算,这调用返回Future对象的get()方法,会阻塞直到计算完成。
以上参考:http://www.cnblogs.com/yezhenhan/archive/2012/01/09/2317636.html
4、线程池的内部原理以及callable的内部实现原理,看下面调用栈及源码
4.1首先调用submit,就是在线程池中进行处理
Thread [main] (Suspended (breakpoint at line 895 in ThreadPoolExecutor))
ThreadPoolExecutor.addWorker(Runnable, boolean) line: 895
ThreadPoolExecutor.execute(Runnable) line: 1360
ThreadPoolExecutor(AbstractExecutorService).submit(Callable<T>) line: 132
CallableTest.main(String[]) line: 26
addWorker中创建了线程并最终调用了 t.start();
4.2这个时候创建了线程池中第一个线程执行任务
Thread [pool-1-thread-1] (Suspended (breakpoint at line 1124 in ThreadPoolExecutor))
ThreadPoolExecutor.runWorker(ThreadPoolExecutor$Worker) line: 1124
ThreadPoolExecutor$Worker.run() line: 615
Thread.run() line: 745
4.3执行完任务后会将f.get中的唤醒并返回,其逻辑就在finishCompletion中
Thread [pool-1-thread-1] (Suspended (breakpoint at line 362 in FutureTask))
FutureTask<V>.finishCompletion() line: 362 [local variables unavailable]
FutureTask<V>.set(V) line: 229
FutureTask<V>.run() line: 270
ThreadPoolExecutor.runWorker(ThreadPoolExecutor$Worker) line: 1145
ThreadPoolExecutor$Worker.run() line: 615
Thread.run() line: 745
5.至于线程的创建可以参考大神的Dalvik虚拟机进程和线程创建过程,JVM中略有不同但大题流程就是如此
就从start函数开始分析Dalvik虚拟机线程的创建过程,如图2所示:
图2 Dalvik虚拟机线程的创建过程
http://blog.csdn.net/luoshengyang/article/details/8923484

相关文章推荐
- java对世界各个时区(TimeZone)的通用转换处理方法(转载)
- java-注解annotation
- java-模拟tomcat服务器
- java-用HttpURLConnection发送Http请求.
- java-WEB中的监听器Lisener
- Android IPC进程间通讯机制
- Android Native 绘图方法
- Android java 与 javascript互访(相互调用)的方法例子
- Python3写爬虫(四)多线程实现数据爬取
- 介绍一款信息管理系统的开源框架---jeecg
- 聚类算法之kmeans算法java版本
- java实现 PageRank算法
- PropertyChangeListener简单理解
- c++11 + SDL2 + ffmpeg +OpenAL + java = Android播放器
- 插入排序
- 冒泡排序
- 堆排序
- 快速排序