spring(5)构建 spring web 应用程序
2016-06-06 11:40
495 查看
【0】README
1)本文部分文字描述转自:“Spring In Action(中/英文版)”,旨在review “spring(5)构建 spring web 应用程序” 的相关知识;
【1】spring mvc 起步
【1.1】跟踪spring mvc的请求
1)请求时一个十分繁忙的家伙,下图展示了请求使用spring mvc所经历的 站点;
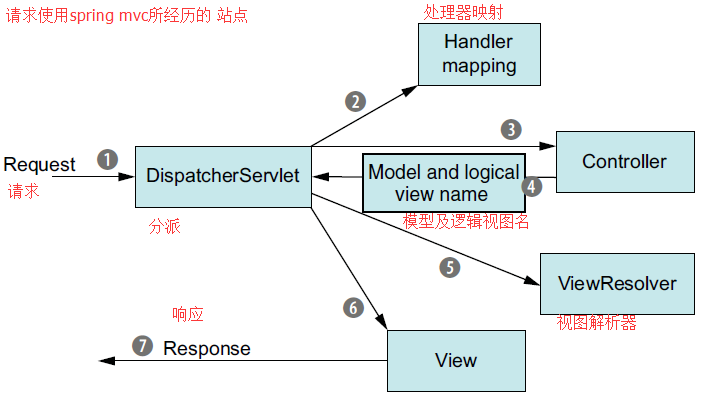
对以上调用过程的分析(Analysis):(不能再干货——请求使用spring mvc 所经历的调用过程)
step1)请求旅程的第一站是spring 的 DispatchServlet: 与大多数java web 框架一样,spring mvc所有请求都会通过一个前端控制器 servlet,而DispatchServlet就是前端控制器;
step2)接着,DispatchServlet的任务是将请求发送给 spring mvc控制器。因为应用程序中有很多控制器,在发送之前DispatchServlet需要查询一个或多个控制器映射来确定请求的下一站在哪里;处理器映射会根据所携带的URL信息来进行决策;
step3)DispatchServlet会将请求发送给选中的控制器;到了控制器 , 请求会卸下其负载(用于提交的info),并耐心等待控制器处理这些 info;
step4)处理器完成逻辑处理后,会产生一些info,这些info 需要返回给用户并在浏览器上显示。这些info 被称为 模型;(干货——模型的定义);这些info
需要以用户友好的方式进行格式化,一般会是 HTML,所以,info需要发送给一个视图(view),通常会是 JSP;控制器所做的最后一件事情是将模型数据打包,并标示出用于渲染输出的视图名。它接下来会将请求连同模型和视图名发送回 DispatchServlet;(总结:这样,控制器就不会与特定的视图相耦合了,传递给DispatchServlet的视图名并不直接表示某个特定的JSP,。实际上,它仅仅传递了一个逻辑名称,这个名字将会用来产生结果的真正视图)(干货——引入了逻辑名称,由控制器传递给DispatchServlet,前者还传递了模型(响应info的打包))
step5)DispatchServlet将会使用视图解析器来将逻辑视图名匹配为一个特定的视图实现,可能是也可能不是JSP;
step6)通过控制器传递过来的逻辑名称,DispatchServlet知道由哪个视图渲染结果。DispatchServlet交付模型数据到某个视图的实现,请求的任务完成了;
step7)视图将使用模型数据渲染输出,这个输出会通过响应对象传递给客户端;
【1.2】搭建spring mvc
【1.2.1】配置DispatchServlet
1)intro to DispatchServlet:DispatchServlet 是 spring mvc的核心,它负责将请求路由到其他组件中;(干货——引入了路由的概念,路由分发)
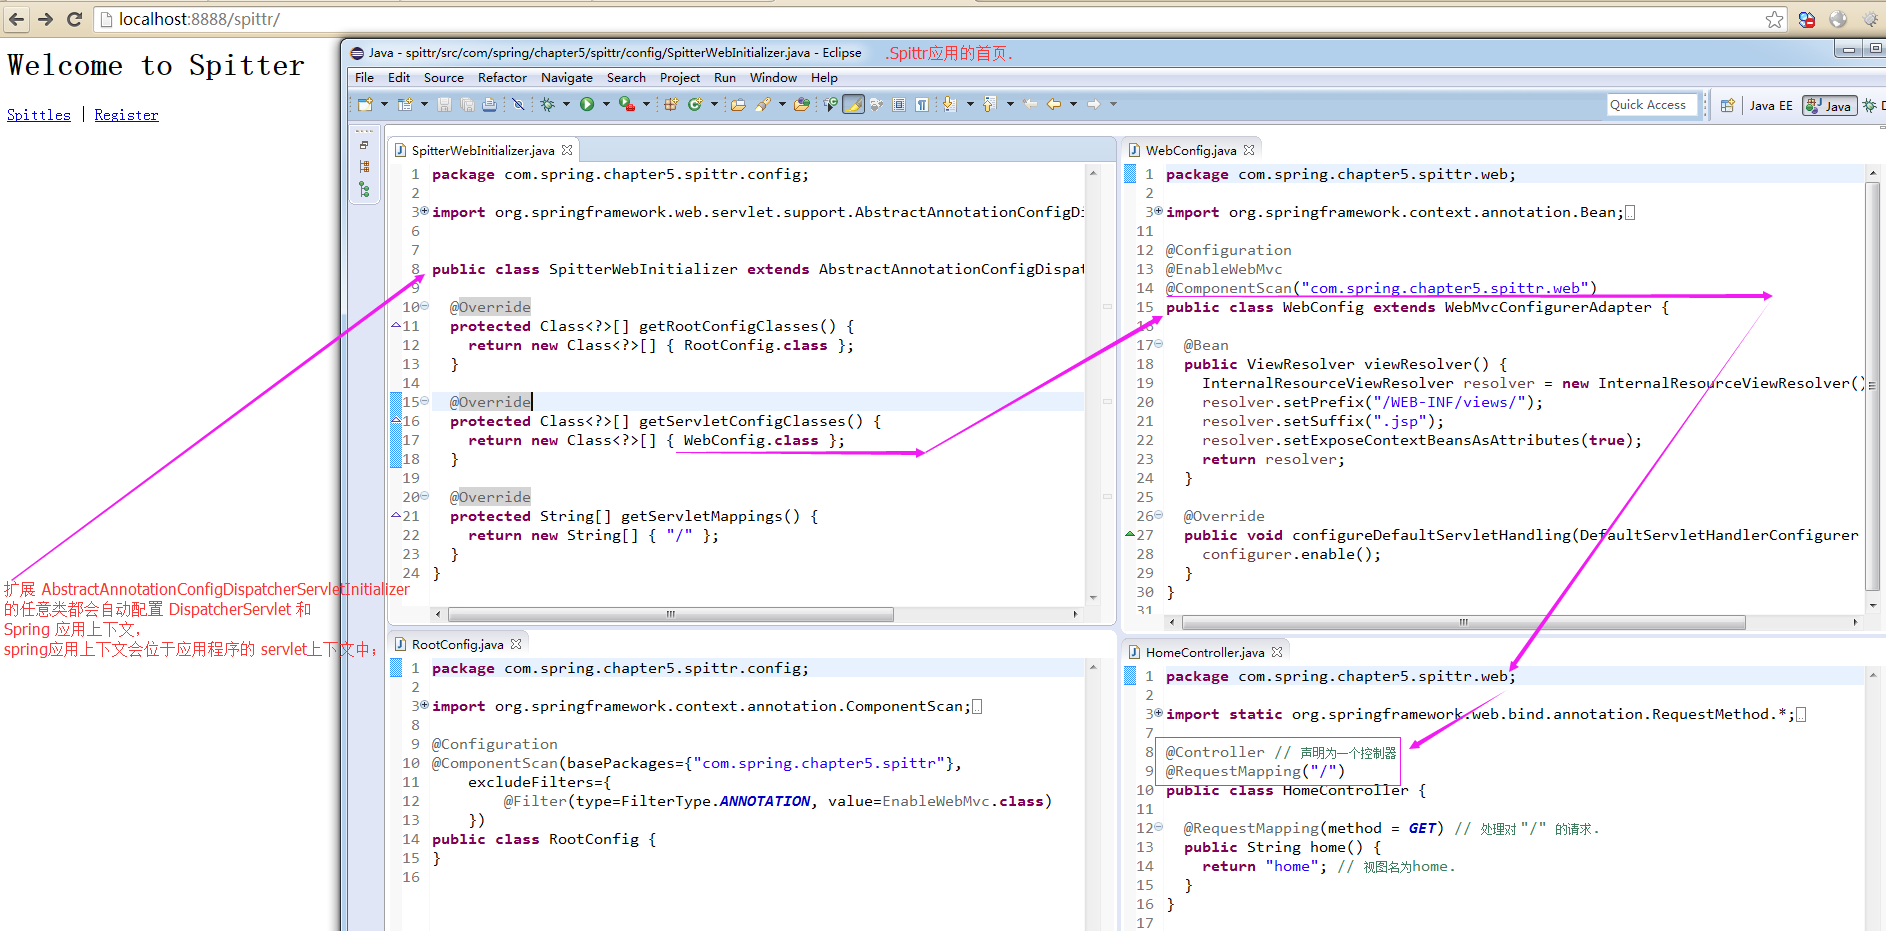
2)使用java 将 DispatchServlet 配置在 servlet容器中,而不会再使用 web.xml 文件;
对上述代码的分析(Analysis):要理解上述代码是如何工作的?我们只需要知道扩展 AbstractAnnotationConfigDispatcherServletInitializer 的任意类都会自动配置 DispatcherServlet
和 Spring 应用上下文,spring应用上下文会位于应用程序的 servlet上下文中;
3)关于 AbstractAnnotationConfigDispatcherServletInitializer 的剖析:在 servlet3.0环境中,容器会在类路径中查找实现 javax.servlet.ServletContainerInitializer 接口的类,如果能发现的话,就会用来配置 servlet容器;
3.1)spring 提供了这个接口的实现,名为 SpringServletContainerInitializer:这个类反过来又会查找实现 WebApplicationInitializer 的类并将配置的任务交给它们来完成;
3.2)spring3.2 引入了一个便利的 WebApplicationInitializer 基础实现,也就是AbstractAnnotationConfigDispatcherServletInitializer。因为我们的SpitterWebInitializer扩展了 AbstractAnnotationConfigDispatcherServletInitializer(同时也就实现了
WebApplicationInitializer) ,。因此当部署到 servlet3.0 容器的时候,容器会自动发现它,并用它来配置servlet上下文;

4)上述代码中的SpitterWebInitializer 类 重写了三个AbstractAnnotationConfigDispatcherServletInitializer 的方法:
method1)getServletMappings方法:它会将一个或多个路径映射到 DispatcherServlet上;在本例中,它映射的是“/“,这表示它会是 应用的默认 servlet,它会处理进入应用的所有请求;(为了理解其他两个方法,首先要理解
DispatcherServlet和一个 servlet 监听器的关系)
【1.2.2】 两个应用上下文之间的故事
1)当 DispatcherServlet启动的时候,它会创建spring 应用上下文,并加载配置文件或配置类中所声明的 bean;在getServletConfigClasses()方法中,我们要求 DispatcherServlet 加载应用上下文时,使用定义在
WebConfig配置类(使用java 配置)中的 bean;(在spring 应用中,还有另外一个应用上下文,由 ContextLoaderListener 创建)
2)我们希望 DispatcherServlet加载包含 Web组件的bean,如控制器,视图解析器以及处理器映射,而 ContextLoaderListener 要加载应用中的其他bean。这些bean 通常是 驱动应用后端的中间层 和 数据层组件;
3)实际上,AbstractAnnotationConfigDispatcherServletInitializer 会同时创建 DispatcherServlet 和 ContextLoaderListener。
3.1)getServletConfigClasses()方法:返回的带有 @Configuration注解的类将会用来定义 DispatcherServlet应用上下文中的bean。
3.2)getRootConfigClasses()方法:返回的带有@Configuration注解的类将会用来配置 ContextLoaderListener 创建的应用上下文中的bean;
4)如果按照这种方式配置 DispatcherServlet,而不使用web.xml的话。唯一的问题在于:它只能部署到支持 servlet3.0 的服务器中才能正常工作;
【1.2.3】启用spring mvc
1)启动 spring mvc组件的方法也不止一种:可以使用 <mvc: annotation-driven>启用注解驱动的spring mcv;
2)我们创建的最简单的spring mvc 配置是一个带有 @EnableWebMvc注解的类:
2.1)以上代码的确能够启用 spring mvc,但还有不少问题要解决:(problems)
problem1)没有配置视图解析器:这样的话,spring默认会使用 BeanNameViewResolver,这个视图解析器会查找ID 与 视图名称匹配的bean,并且查找的bean 要实现 View 接口,它以这样的方式来解析视图;
problem2)没有启用组件扫描:这样的话,spring 只能找到显式声明在配置类中的控制器;
problem3)这样配置的话,这样配置的话,DispatcherServlet 会映射为 应用的默认servlet:所以它会处理所有的请求,包括对静态资源的请求,如图片等;(大多数cases下,这不是你想要的效果)
2.2)修改WebConfig这个spring mvc配置类, 修改后的内容为:
对以上代码的分析(Analysis):新的 WebConfig 扩展了WebMvcConfigurerAdapter类,重写了其 configureDefaultServletHandling()方法,通过调用 DefaultServletHandlerConfigurer .enable()方法,我们要求
DispatcherServlet 将对静态资源的请求转发到 Servlet容器中默认的Servlet上,而不是使用 DispatcherServlet 本身来处理此类请求;
3)RootConfig 的源码定义如下:
【1.3】Spittr 应用简介(Spittr 应用 == Twitter系统)
1)Spitter 应用有两个基本的概念: 应用用户 和 用户发布的info(Spittle)
2)通过配置 DispatcherServlet来启用基本的 spring mvc 组件并确定了目标应用,让我们进入核心内容:使用 spring mvc 控制器处理 web 请求;
【2】编写基本的控制器
1)intro:控制器只是方法上添加了 @RequestMapping 注解 的类,该注解声明了它们所要处理的请求;(干货——注解@RequestMapping的作用)
2)看个荔枝:若控制器类要处理 ”/“ 请求,并渲染应用的首页,控制器定义如下:
对上述代码的分析(Analysis):
A1)@Controller注解:是一个构造型注解,它基于 @Component注解。在这里,它的目的是 辅助实现组件扫描,因为 HomeController 带有 @Controller注解,因此组件扫描器会自动找到 HomeController,并将其声明为
spring应用上下文中的一个 bean;(干货——@Controller注解的作用)
A2)@RequestMapping注解:它的value属性指定了这个方法所要处理的请求路径,method细化了所要处理的HTTP方法;
3)鉴于配置InternalResourceViewResolver的方式,视图名"home" 将会解析为 "WEB-INF/views/home.jsp"路径的JSP(参见【1.2.3】章节下面的2.2)下面的InternalResourceViewResolver定义及其其前缀和后缀);Spitter
应用的首页为:
【2.1】测试控制器
1)测试用例如下:上面的测试用例貌似很low,没有断言当接收到针对 ”/“ GET 请求时会调用home()方法;
2)spring包含了一种 mock spring mvc 并针对控制器执行 HTTP 请求的机制:这样的话,就没有必要再启动web 服务器和浏览器了;(干货——引入了mock
spring mvc 并针对控制器执行 HTTP 请求的机制)
3)如何测试 spring mvc的控制器?
对以上代码的分析(Analysis): 这次没有直接调用 home()方法,而是发起了对 "/" 的 GET 请求,并断言结果视图 名称为 home;(这个测试用例,一点干货都没得,哎)
【2.2】定义类级别的请求处理
1)拆分 @RequestMapping注解,并将其路径映射部分放到类级别上;
2)也可以设置多个映射路径,修改@RequestMapping注解如下:
【2.3】传递模型数据到视图中
1)在 Spittr 应用中,需要有一个页面展现最近提交的 Spittle列表;
2)处理steps:
step1)首先,需要定义一个数据访问的 Repository(能够获取 Spittle列表的 Repository);
step2)Spittle 的源码如下:
对以上代码的分析(Analysis):使用了 Apache Common Lang
包来实现了 equals()方法 和 hashCode()方法;(downloading from
apache commons lang)
step3)测试 SpittleController处理针对 "/spittles" 的GET请求:(使用 spring 的 MockMvc 来断言新的处理器方法中你所期望的行为)
step4)SpittleController:在模型中放入最新的 Spittle列表
A1)当调用 addAttribute()方法而不指定key时,那么key 会根据值的对象类型推断确定。因为它是一个List<Spittle>,所以推断key == spittleList。
A2)如果你想显示指定模型的key的话,可以这样指定:
"/spittles" 的 GET请求,所以视图名称会是 spittles(去掉斜线即可);
Attention)不管选择哪种方式编写 spittles()方法,所达到的效果是一样的。
A1)模型中会存储一个Spittle列表,key 为 spitleList,然后该列表会被发送到 spittles的视图中;
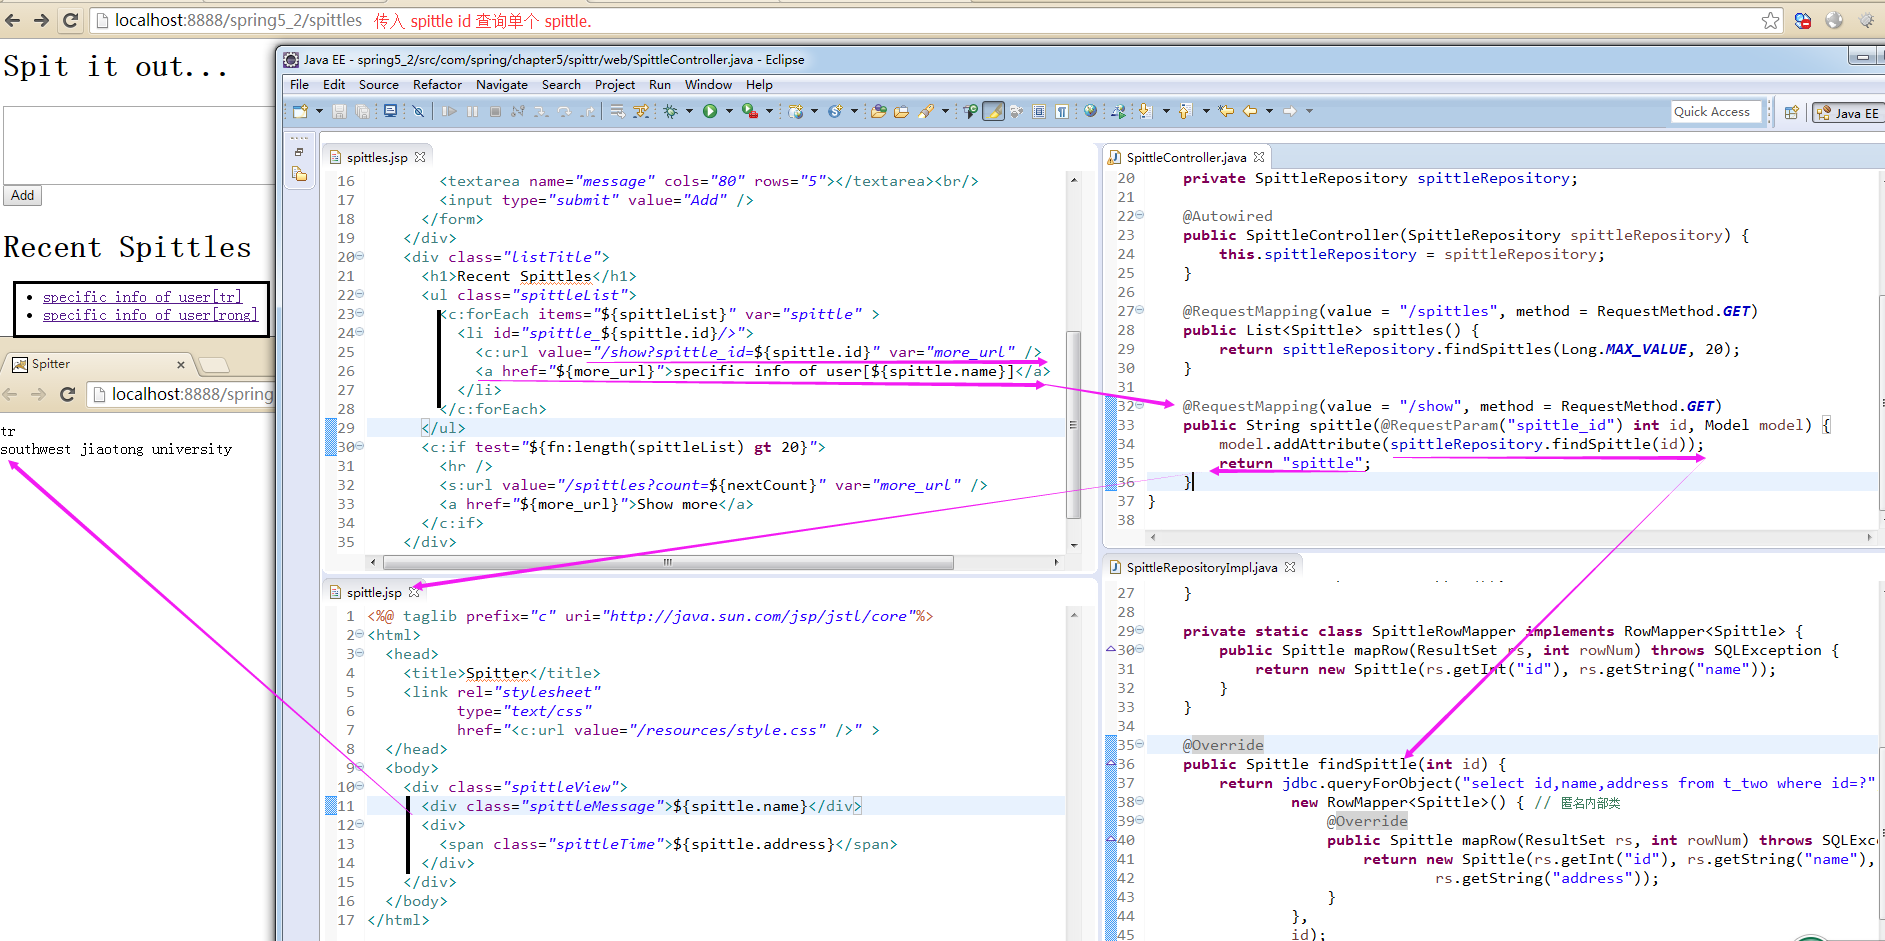
A2)按照 InternalResourceViewResolver, 视图解析器的配置,视图的JSP将是 /WEB-INF/views/spittles.jsp;该jsp的源码如下:
【3】接收请求的输入
1)spring mvc 以多种方式将客户端中的数据传送到控制器的处理器方法中包括:查询参数, 表单参数,路径变量等;
【3.1】处理查询参数
1)Spittr应用需求的第一件事: 展现分页的 Spittle列表;
2)为了实现分页,处理器方法要接受如下参数:
parameter1)before参数:表明查询出的id 要在这个值之前;
parameter2)count参数:表明每页的 Spittle 数量;
对以上代码的分析(Analysis):上述方法的关键区别在于它针对 "/spittles" 发送 GET 请求,同时还传入了 max 和 count参数;
3)SpittleController中的处理器方法要同时处理有参数和没有参数的case,修改 @RequestParam注解,让它能够接收参数;@RequestParam注解的 defaultValue 属性可以完成这个任务.
【3.2】通过路径参数接收输入
1)应用需求:工具给定 Id 来展现某个 Spittle 记录,通过使用 @RequestParam 注解,让它接收ID 作为查询参数;
对以上代码的分析(Analysis):对 "/spittles/12345" 发起 GET 请求要优于对 "/spittles/show/spittle_id=12345" 发起请求。前者能够识别出查询的资源,而后者描述的是带有参数的一个操作——本质上是通过 HTTP 发起的 RPC(远程过程调用协议);
2)Spittr应用以面向资源的控制器作为目标,下面给出测试用例
3)我们编写的 @RequestMapping注解要包含变量部分,这部分代表了 Spittle ID;为了实现这种路径变量,spring mvc 允许我们 在 @RequestMapping 路径中添加占位符。占位符的名称要用 大括号"({})" 括起来;下面的方法使用了占位符:

【4】处理表单
1)展现一个表单,允许用户注册
2)测试展现表单的控制器方法;
3)注册表单的JSP
【4.1】编写处理表单的控制器
1)intro:控制器需要接受表单数据并将其保存为 Spitter对象;
2)测试处理表单的控制器方法
2)处理所提交的表单并注册新用户
Attention)除了前缀 "redirect:", InternalResourceViewResolver 视图解析器哈可以识别 "forward:"前缀:当发现此前缀时,请求将会前往(forward) 指定的URL 路径,而不是重定向了;

【4.2】校验表单
1)intro:如果输入的username 或 password为空的话,如果不处理的话,就会出现安全问题;
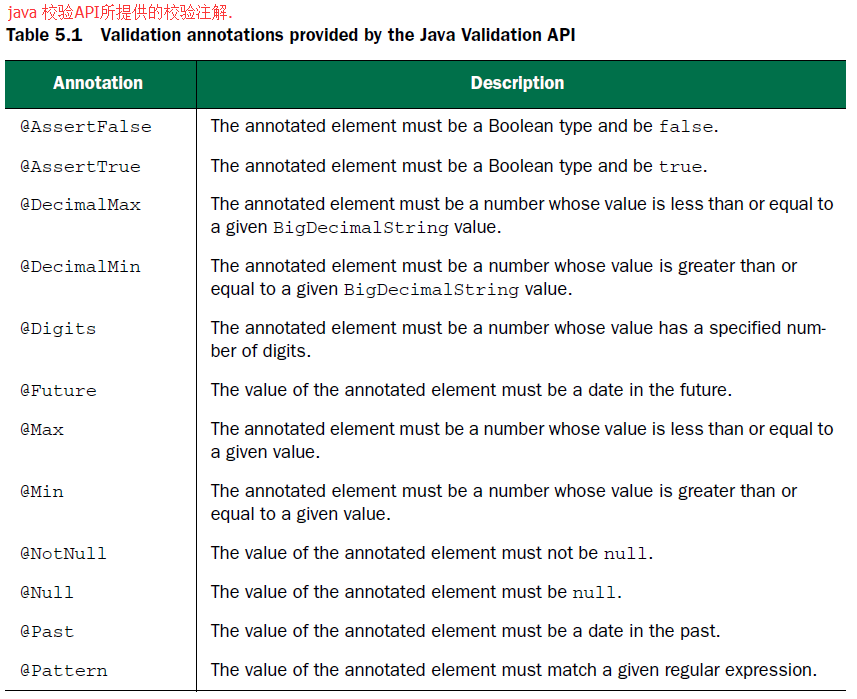
2)使用spring 对 java 校验API的支持: 从spring3.0 开始,在 spring mvc中提供了对ajva 校验API的支持。在spring mvc中要使用 java校验API的话,并不需要什么额外的配置。只要保证在类路径下包含这个java API的实现即可;
3)java校验API 定义了多个注解,位于 javax.validataion.constraints 包中;

4)Spitter 包含了要提交到 Spittle Post 请求中的域;
2)启用校验功能的processRegistration()方法;
Attention)
A1)@Valid注解:告知spring, 需要确保这个对象满足校验限制;
A2)在 Spiter属性上添加校验限制并不能阻止表单提交。即便用户没有填写某个域或者某个域所给定的值超过了最大长度,processRegistration方法依然会被调用;
1)本文部分文字描述转自:“Spring In Action(中/英文版)”,旨在review “spring(5)构建 spring web 应用程序” 的相关知识;
【1】spring mvc 起步
【1.1】跟踪spring mvc的请求
1)请求时一个十分繁忙的家伙,下图展示了请求使用spring mvc所经历的 站点;
对以上调用过程的分析(Analysis):(不能再干货——请求使用spring mvc 所经历的调用过程)
step1)请求旅程的第一站是spring 的 DispatchServlet: 与大多数java web 框架一样,spring mvc所有请求都会通过一个前端控制器 servlet,而DispatchServlet就是前端控制器;
step2)接着,DispatchServlet的任务是将请求发送给 spring mvc控制器。因为应用程序中有很多控制器,在发送之前DispatchServlet需要查询一个或多个控制器映射来确定请求的下一站在哪里;处理器映射会根据所携带的URL信息来进行决策;
step3)DispatchServlet会将请求发送给选中的控制器;到了控制器 , 请求会卸下其负载(用于提交的info),并耐心等待控制器处理这些 info;
step4)处理器完成逻辑处理后,会产生一些info,这些info 需要返回给用户并在浏览器上显示。这些info 被称为 模型;(干货——模型的定义);这些info
需要以用户友好的方式进行格式化,一般会是 HTML,所以,info需要发送给一个视图(view),通常会是 JSP;控制器所做的最后一件事情是将模型数据打包,并标示出用于渲染输出的视图名。它接下来会将请求连同模型和视图名发送回 DispatchServlet;(总结:这样,控制器就不会与特定的视图相耦合了,传递给DispatchServlet的视图名并不直接表示某个特定的JSP,。实际上,它仅仅传递了一个逻辑名称,这个名字将会用来产生结果的真正视图)(干货——引入了逻辑名称,由控制器传递给DispatchServlet,前者还传递了模型(响应info的打包))
step5)DispatchServlet将会使用视图解析器来将逻辑视图名匹配为一个特定的视图实现,可能是也可能不是JSP;
step6)通过控制器传递过来的逻辑名称,DispatchServlet知道由哪个视图渲染结果。DispatchServlet交付模型数据到某个视图的实现,请求的任务完成了;
step7)视图将使用模型数据渲染输出,这个输出会通过响应对象传递给客户端;
【1.2】搭建spring mvc
【1.2.1】配置DispatchServlet
1)intro to DispatchServlet:DispatchServlet 是 spring mvc的核心,它负责将请求路由到其他组件中;(干货——引入了路由的概念,路由分发)
2)使用java 将 DispatchServlet 配置在 servlet容器中,而不会再使用 web.xml 文件;
<span style="font-family:SimSun;font-size:18px;">public class SpitterWebInitializer extends AbstractAnnotationConfigDispatcherServletInitializer {
@Override
protected Class<?>[] getRootConfigClasses() {
return new Class<?>[] { RootConfig.class };
}
@Override
protected Class<?>[] getServletConfigClasses() {  // 指定配置类.
return new Class<?>[] { WebConfig.class };
}
@Override
protected String[] getServletMappings() { // 将DispatcherServlet映射到 "/"
return new String[] { "/" };
}
}</span>
<span style="font-family:SimSun;font-size:18px;">public abstract class AbstractAnnotationConfigDispatcherServletInitializer
extends AbstractDispatcherServletInitializer { // org.springframework.web.servlet.support.AbstractAnnotationConfigDispatcherServletInitializer
@Override
protected WebApplicationContext createRootApplicationContext() {
Class<?>[] configClasses = getRootConfigClasses();
if (!ObjectUtils.isEmpty(configClasses)) {
AnnotationConfigWebApplicationContext rootAppContext = new AnnotationConfigWebApplicationContext();
rootAppContext.register(configClasses);
return rootAppContext;
}
else {
return null;
}
}
@Override
protected WebApplicationContext createServletApplicationContext() {
AnnotationConfigWebApplicationContext servletAppContext = new AnnotationConfigWebApplicationContext();
Class<?>[] configClasses = getServletConfigClasses();
if (!ObjectUtils.isEmpty(configClasses)) {
servletAppContext.register(configClasses);
}
return servletAppContext;
}
protected abstract Class<?>[] getRootConfigClasses();
protected abstract Class<?>[] getServletConfigClasses();
}</span>对上述代码的分析(Analysis):要理解上述代码是如何工作的?我们只需要知道扩展 AbstractAnnotationConfigDispatcherServletInitializer 的任意类都会自动配置 DispatcherServlet
和 Spring 应用上下文,spring应用上下文会位于应用程序的 servlet上下文中;
3)关于 AbstractAnnotationConfigDispatcherServletInitializer 的剖析:在 servlet3.0环境中,容器会在类路径中查找实现 javax.servlet.ServletContainerInitializer 接口的类,如果能发现的话,就会用来配置 servlet容器;
3.1)spring 提供了这个接口的实现,名为 SpringServletContainerInitializer:这个类反过来又会查找实现 WebApplicationInitializer 的类并将配置的任务交给它们来完成;
3.2)spring3.2 引入了一个便利的 WebApplicationInitializer 基础实现,也就是AbstractAnnotationConfigDispatcherServletInitializer。因为我们的SpitterWebInitializer扩展了 AbstractAnnotationConfigDispatcherServletInitializer(同时也就实现了
WebApplicationInitializer) ,。因此当部署到 servlet3.0 容器的时候,容器会自动发现它,并用它来配置servlet上下文;
4)上述代码中的SpitterWebInitializer 类 重写了三个AbstractAnnotationConfigDispatcherServletInitializer 的方法:
method1)getServletMappings方法:它会将一个或多个路径映射到 DispatcherServlet上;在本例中,它映射的是“/“,这表示它会是 应用的默认 servlet,它会处理进入应用的所有请求;(为了理解其他两个方法,首先要理解
DispatcherServlet和一个 servlet 监听器的关系)
【1.2.2】 两个应用上下文之间的故事
1)当 DispatcherServlet启动的时候,它会创建spring 应用上下文,并加载配置文件或配置类中所声明的 bean;在getServletConfigClasses()方法中,我们要求 DispatcherServlet 加载应用上下文时,使用定义在
WebConfig配置类(使用java 配置)中的 bean;(在spring 应用中,还有另外一个应用上下文,由 ContextLoaderListener 创建)
2)我们希望 DispatcherServlet加载包含 Web组件的bean,如控制器,视图解析器以及处理器映射,而 ContextLoaderListener 要加载应用中的其他bean。这些bean 通常是 驱动应用后端的中间层 和 数据层组件;
3)实际上,AbstractAnnotationConfigDispatcherServletInitializer 会同时创建 DispatcherServlet 和 ContextLoaderListener。
3.1)getServletConfigClasses()方法:返回的带有 @Configuration注解的类将会用来定义 DispatcherServlet应用上下文中的bean。
3.2)getRootConfigClasses()方法:返回的带有@Configuration注解的类将会用来配置 ContextLoaderListener 创建的应用上下文中的bean;
4)如果按照这种方式配置 DispatcherServlet,而不使用web.xml的话。唯一的问题在于:它只能部署到支持 servlet3.0 的服务器中才能正常工作;
【1.2.3】启用spring mvc
1)启动 spring mvc组件的方法也不止一种:可以使用 <mvc: annotation-driven>启用注解驱动的spring mcv;
2)我们创建的最简单的spring mvc 配置是一个带有 @EnableWebMvc注解的类:
<span style="font-family:SimSun;font-size:18px;">@Configuration
@EnableWebMvc
public class WebConfig {
}</span>
2.1)以上代码的确能够启用 spring mvc,但还有不少问题要解决:(problems)
problem1)没有配置视图解析器:这样的话,spring默认会使用 BeanNameViewResolver,这个视图解析器会查找ID 与 视图名称匹配的bean,并且查找的bean 要实现 View 接口,它以这样的方式来解析视图;
problem2)没有启用组件扫描:这样的话,spring 只能找到显式声明在配置类中的控制器;
problem3)这样配置的话,这样配置的话,DispatcherServlet 会映射为 应用的默认servlet:所以它会处理所有的请求,包括对静态资源的请求,如图片等;(大多数cases下,这不是你想要的效果)
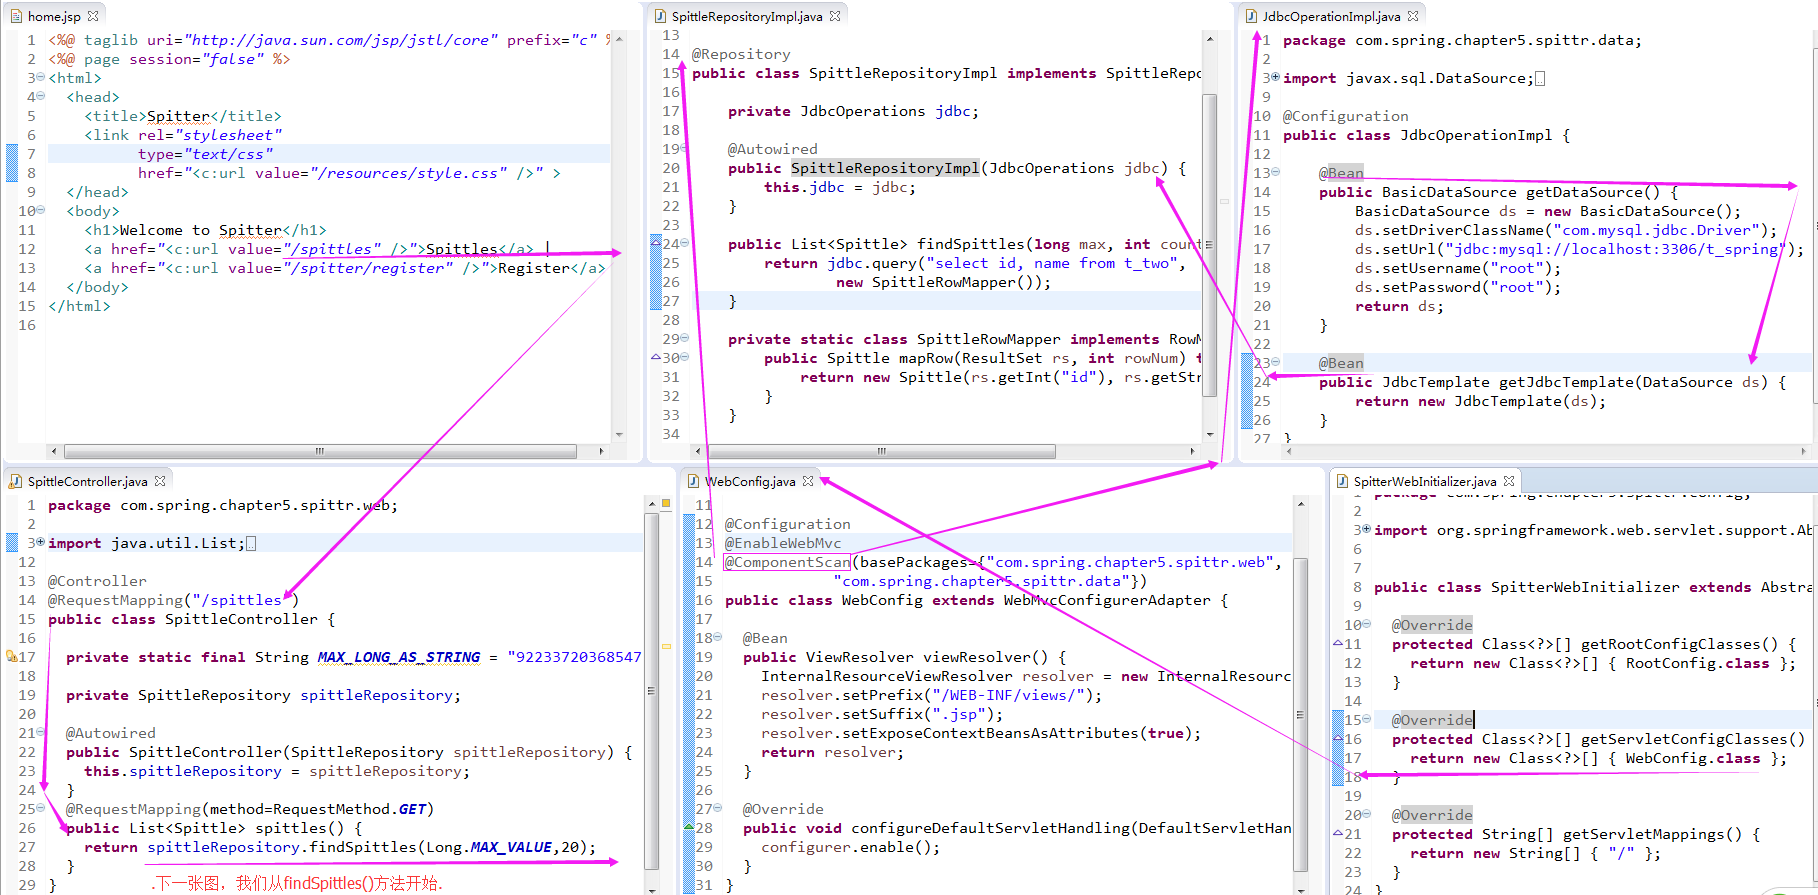
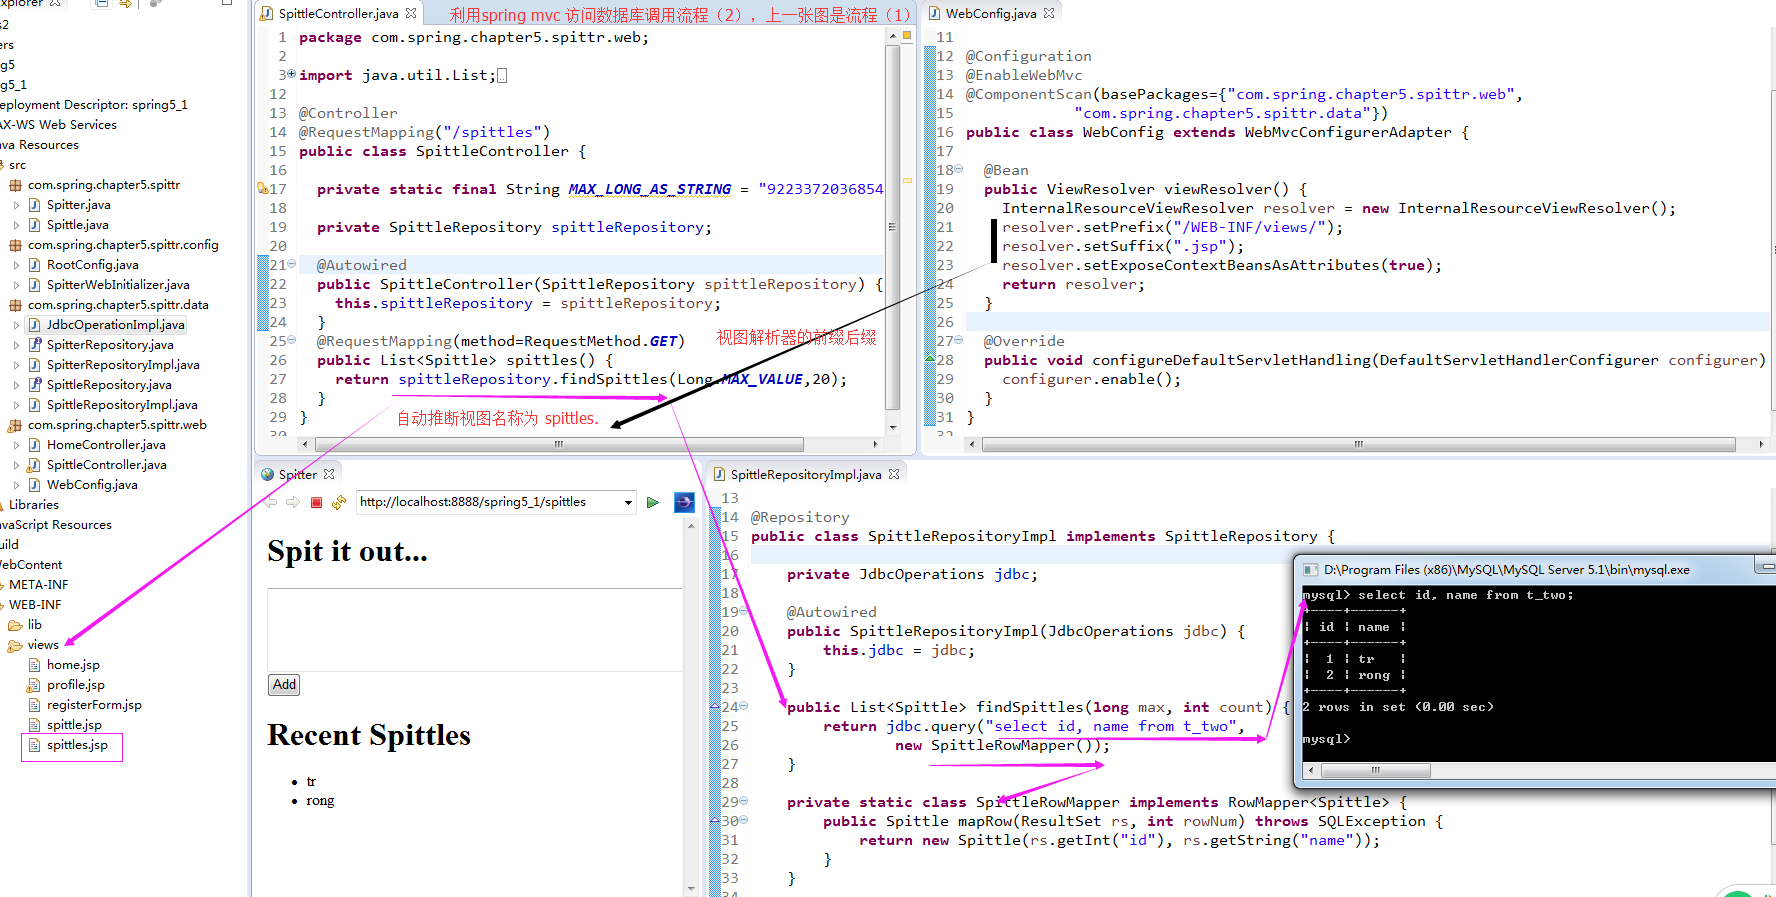
2.2)修改WebConfig这个spring mvc配置类, 修改后的内容为:
<span style="font-family:SimSun;font-size:18px;">@Configuration
@EnableWebMvc //启用spring mvc.
@ComponentScan("com.spring.chapter5.spittr.web") // 启用组件扫描.
public class WebConfig extends WebMvcConfigurerAdapter {
@Bean
public ViewResolver viewResolver() { // 配置JSP视图解析器.
InternalResourceViewResolver resolver = new InternalResourceViewResolver();
resolver.setPrefix("/WEB-INF/views/");
resolver.setSuffix(".jsp");
return resolver;
}
@Override
public void configureDefaultServletHandling(DefaultServletHandlerConfigurer configurer) { // 配置静态资源处理.
configurer.enable();
}
@Override
public void addResourceHandlers(ResourceHandlerRegistry registry) {
// TODO Auto-generated method stub
super.addResourceHandlers(registry);
}
}</span>对以上代码的分析(Analysis):新的 WebConfig 扩展了WebMvcConfigurerAdapter类,重写了其 configureDefaultServletHandling()方法,通过调用 DefaultServletHandlerConfigurer .enable()方法,我们要求
DispatcherServlet 将对静态资源的请求转发到 Servlet容器中默认的Servlet上,而不是使用 DispatcherServlet 本身来处理此类请求;
3)RootConfig 的源码定义如下:
@Configuration
@ComponentScan(basePackages={"com.spring.chapter5.spittr"},
excludeFilters={
@Filter(type=FilterType.ANNOTATION, value=EnableWebMvc.class)
})
public class RootConfig {
}
【1.3】Spittr 应用简介(Spittr 应用 == Twitter系统)
1)Spitter 应用有两个基本的概念: 应用用户 和 用户发布的info(Spittle)
2)通过配置 DispatcherServlet来启用基本的 spring mvc 组件并确定了目标应用,让我们进入核心内容:使用 spring mvc 控制器处理 web 请求;
【2】编写基本的控制器
1)intro:控制器只是方法上添加了 @RequestMapping 注解 的类,该注解声明了它们所要处理的请求;(干货——注解@RequestMapping的作用)
2)看个荔枝:若控制器类要处理 ”/“ 请求,并渲染应用的首页,控制器定义如下:
<span style="font-family:SimSun;font-size:18px;">@Controller // 声明一个控制器
@RequestMapping("/")
public class HomeController {
@RequestMapping(method = GET) // 处理对 ”/“ 的get请求;
public String home(Model model) {
return "home"; //视图名为home
}
}</span>
对上述代码的分析(Analysis):
A1)@Controller注解:是一个构造型注解,它基于 @Component注解。在这里,它的目的是 辅助实现组件扫描,因为 HomeController 带有 @Controller注解,因此组件扫描器会自动找到 HomeController,并将其声明为
spring应用上下文中的一个 bean;(干货——@Controller注解的作用)
A2)@RequestMapping注解:它的value属性指定了这个方法所要处理的请求路径,method细化了所要处理的HTTP方法;
3)鉴于配置InternalResourceViewResolver的方式,视图名"home" 将会解析为 "WEB-INF/views/home.jsp"路径的JSP(参见【1.2.3】章节下面的2.2)下面的InternalResourceViewResolver定义及其其前缀和后缀);Spitter
应用的首页为:
<span style="font-family:SimSun;font-size:18px;"><%@ taglib uri="http://java.sun.com/jsp/jstl/core" prefix="c" %>
<%@ page session="false" %>
<html>
<head>
<title>Spitter</title>
<link rel="stylesheet"
type="text/css"
href="<c:url value="/resources/style.css" />" >
</head>
<body>
<h1>Welcome to Spitter</h1>

<a href="<c:url value="/spittles" />">Spittles</a> |
<a href="<c:url value="/spitter/register" />">Register</a>
</body>
</html></span>
【2.1】测试控制器
1)测试用例如下:上面的测试用例貌似很low,没有断言当接收到针对 ”/“ GET 请求时会调用home()方法;
2)spring包含了一种 mock spring mvc 并针对控制器执行 HTTP 请求的机制:这样的话,就没有必要再启动web 服务器和浏览器了;(干货——引入了mock
spring mvc 并针对控制器执行 HTTP 请求的机制)
3)如何测试 spring mvc的控制器?
public class HomeControllerTest {

@Test
public void testHomePage() throws Exception {
HomeController controller = new HomeController();
String result = controller.home(null);
System.out.println(result);
}
}
对以上代码的分析(Analysis): 这次没有直接调用 home()方法,而是发起了对 "/" 的 GET 请求,并断言结果视图 名称为 home;(这个测试用例,一点干货都没得,哎)
【2.2】定义类级别的请求处理
1)拆分 @RequestMapping注解,并将其路径映射部分放到类级别上;
<span style="font-family:SimSun;font-size:18px;"> //拆分前
@Controller
public class HomeController {
@RequestMapping(value="/", method = GET)
public String home(Model model) {
return "home";
}
}

//拆分后
@Controller
@RequestMapping("/")
public class HomeController {
@RequestMapping(method = GET)
public String home(Model model) {
return "home";
}
}</span>
2)也可以设置多个映射路径,修改@RequestMapping注解如下:
<span style="font-family:SimSun;font-size:18px;">@Controller
@RequestMapping({"/" ,"/homepage"}) // 设置多个映射路径.
public class HomeController() {
......
}</span>
【2.3】传递模型数据到视图中
1)在 Spittr 应用中,需要有一个页面展现最近提交的 Spittle列表;
2)处理steps:
step1)首先,需要定义一个数据访问的 Repository(能够获取 Spittle列表的 Repository);
<span style="font-family:SimSun;font-size:18px;">public interface SpittleRepository {
List<Spittle> findRecentSpittles();
List<Spittle> findSpittles(long max, int count);
Spittle findOne(long id);
void save(Spittle spittle);
}
// 为了获取最新的20个 Spittle 对象,我们可以这样调用 findSpittles(long max, int count):
// List<Spittle> recent =  spittleRepository.findSpittles(Long.MAX_VALUE, 20);</span>
step2)Spittle 的源码如下:
public class Spittle {

private final Long id;
private final String message;
private final Date time;
private Double latitude;
private Double longitude;

public Spittle(String message, Date time) {
this(null, message, time, null, null);
}

public Spittle(Long id, String message, Date time, Double longitude,
Double latitude) {
this.id = id;
this.message = message;
this.time = time;
this.longitude = longitude;
this.latitude = latitude;
}

public long getId() {
return id;
}

public String getMessage() {
return message;
}

public Date getTime() {
return time;
}

public Double getLongitude() {
return longitude;
}

public Double getLatitude() {
return latitude;
}

@Override
public boolean equals(Object that) {
return EqualsBuilder.reflectionEquals(this, that, "id", "time");
}

@Override
public int hashCode() {
return HashCodeBuilder.reflectionHashCode(this, "id", "time");
}
}对以上代码的分析(Analysis):使用了 Apache Common Lang
包来实现了 equals()方法 和 hashCode()方法;(downloading from
apache commons lang)
step3)测试 SpittleController处理针对 "/spittles" 的GET请求:(使用 spring 的 MockMvc 来断言新的处理器方法中你所期望的行为)
@Test
public void shouldShowRecentSpittles() throws Exception {
List<Spittle> expectedSpittles = createSpittleList(20);
SpittleRepository mockRepository = mock(SpittleRepository.class);
when(mockRepository.findSpittles(Long.MAX_VALUE, 20)).thenReturn(
expectedSpittles);
SpittleController controller = new SpittleController(mockRepository);
SpittleController controller = new SpittleController(mockRepository);
MockMvc mockMvc = standaloneSetup(controller).setSingleView(
new InternalResourceView("/WEB-INF/views/spittles.jsp"))
.build();
mockMvc.perform(get("/spittles"))
.andExpect(view().name("spittles"))
.andExpect(model().attributeExists("spittleList"))
.andExpect(
model().attribute("spittleList",
hasItems(expectedSpittles.toArray())));
}

private List<Spittle> createSpittleList(int count) {
List<Spittle> spittles = new ArrayList<Spittle>();
for (int i = 0; i < count; i++) {
spittles.add(new Spittle("Spittle " + i, new Date()));
}
return spittles;
}step4)SpittleController:在模型中放入最新的 Spittle列表
@Controller
@RequestMapping("/spittles")
public class SpittleController {

private static final String MAX_LONG_AS_STRING = "9223372036854775807";

private SpittleRepository spittleRepository;

@Autowired
public SpittleController(SpittleRepository spittleRepository) {
this.spittleRepository = spittleRepository;
}
@RequestMapping(method = RequestMethod.GET)
public String spittles(Model model) { // Model实际上就是一个Map,他会传递给视图,这样就能渲染到client.
model.addAttribute(spittleRepository.findSpittles(Long.MAX_VALUE, 20));
return "spittles";
}
}对上述代码的分析(Analysis):A1)当调用 addAttribute()方法而不指定key时,那么key 会根据值的对象类型推断确定。因为它是一个List<Spittle>,所以推断key == spittleList。
A2)如果你想显示指定模型的key的话,可以这样指定:
@RequestMapping(method = RequestMethod.GET)
public String spittles(Model model) {
model.addAttribute("spittleList", spittleRepository.findSpittles(Long.MAX_VALUE, 20));
return "spittles";
}A3)我们还可以将该方法改写为:当处理器方法像这样返回对象或集合时,这个值会被放到模型中,且模型key会被推断为 spittleList;且逻辑视图的名称将会根据请求路径推断得出,因为请求路径是"/spittles" 的 GET请求,所以视图名称会是 spittles(去掉斜线即可);
@RequestMapping(method=RequestMethod.GET)
public List<Spittle> spittles() {
return spittleRepository.findSpittles(Long.MAX_VALUE, 20));
}
Attention)不管选择哪种方式编写 spittles()方法,所达到的效果是一样的。
A1)模型中会存储一个Spittle列表,key 为 spitleList,然后该列表会被发送到 spittles的视图中;
A2)按照 InternalResourceViewResolver, 视图解析器的配置,视图的JSP将是 /WEB-INF/views/spittles.jsp;该jsp的源码如下:
<%@ taglib prefix="c" uri="http://java.sun.com/jsp/jstl/core"%>
<%@ taglib prefix="s" uri="http://www.springframework.org/tags"%>
<%@ taglib prefix="fn" uri="http://java.sun.com/jsp/jstl/functions" %>

<html>
<head>
<title>Spitter</title>
<link rel="stylesheet" type="text/css" href="<c:url value="/resources/style.css" />" >
</head>
<body>
<div class="spittleForm">
<h1>Spit it out...</h1>
<form method="POST" name="spittleForm">
<input type="hidden" name="latitude">
<input type="hidden" name="longitude">
<textarea name="message" cols="80" rows="5"></textarea><br/>
<input type="submit" value="Add" />
</form>
</div>
<div class="listTitle">
<h1>Recent Spittles</h1>
<ul class="spittleList">
<c:forEach items="${spittleList}" var="spittle" >
<li id="spittle_<c:out value="spittle.id"/>">
<div class="spittleMessage"><c:out value="${spittle.message}" /></div>
<div>
<span class="spittleTime"><c:out value="${spittle.time}" /></span>
<span class="spittleLocation">(<c:out value="${spittle.latitude}" />, <c:out value="${spittle.longitude}" />)</span>
</div>
</li>
</c:forEach>
</ul>
<c:if test="${fn:length(spittleList) gt 20}">
<hr />
<s:url value="/spittles?count=${nextCount}" var="more_url" />
<a href="${more_url}">Show more</a>
</c:if>
</div>
</body>
</html>
【3】接收请求的输入
1)spring mvc 以多种方式将客户端中的数据传送到控制器的处理器方法中包括:查询参数, 表单参数,路径变量等;
【3.1】处理查询参数
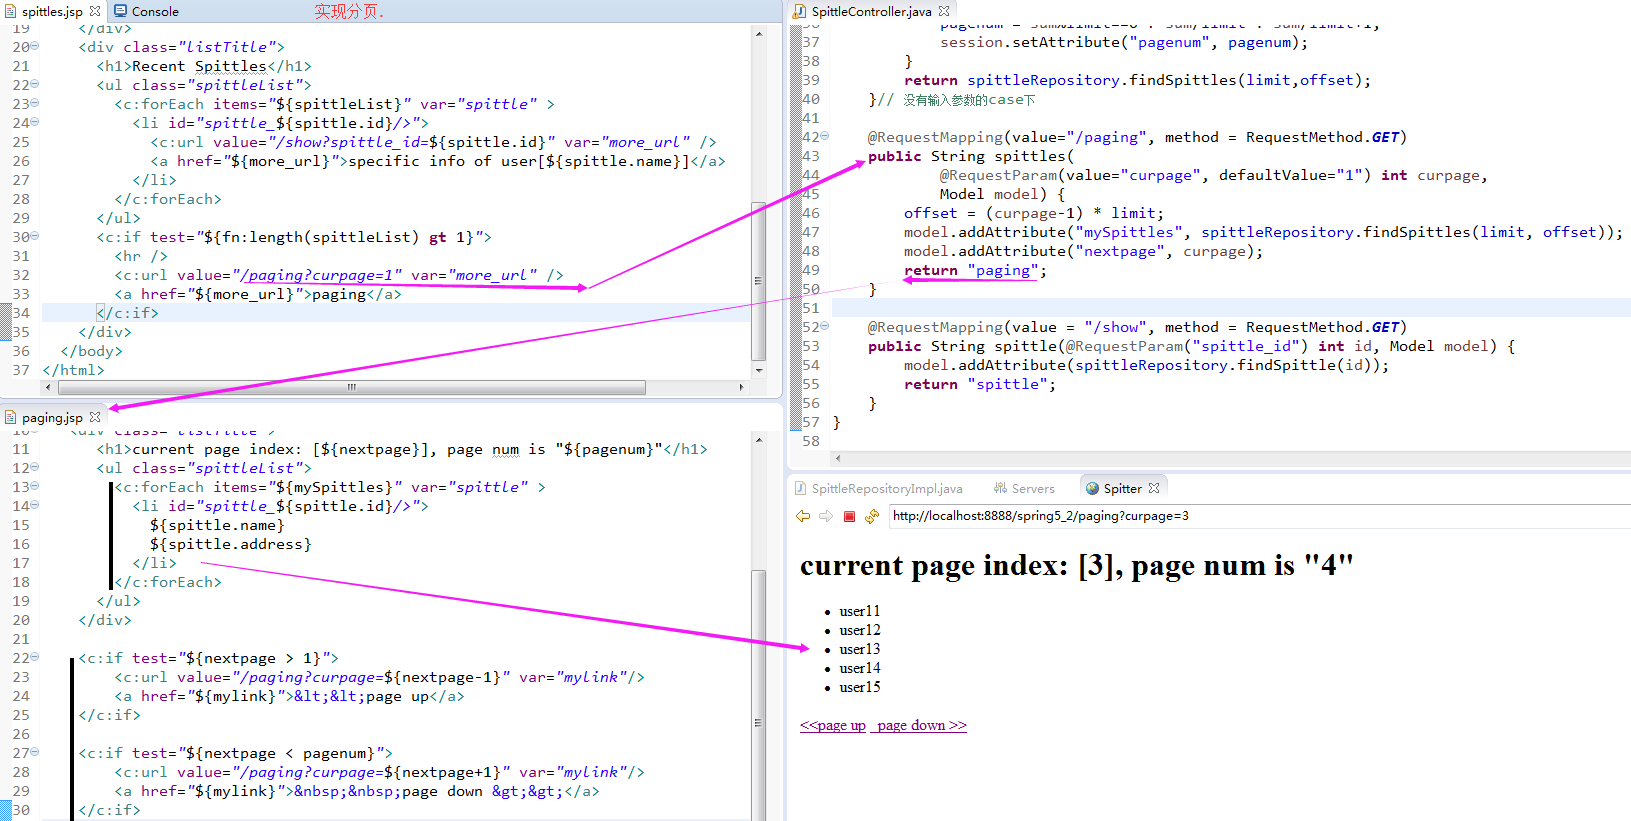
1)Spittr应用需求的第一件事: 展现分页的 Spittle列表;
2)为了实现分页,处理器方法要接受如下参数:
parameter1)before参数:表明查询出的id 要在这个值之前;
parameter2)count参数:表明每页的 Spittle 数量;
<span style="font-family:SimSun;font-size:18px;">@Test
public void shouldShowPagedSpittles() throws Exception {
List<Spittle> expectedSpittles = createSpittleList(50);
SpittleRepository mockRepository = mock(SpittleRepository.class);
when(mockRepository.findSpittles(238900, 50)).thenReturn(
expectedSpittles);
SpittleController controller = new SpittleController(mockRepository);
MockMvc mockMvc = standaloneSetup(controller).setSingleView(
new InternalResourceView("/WEB-INF/views/spittles.jsp"))
.build();
mockMvc.perform(get("/spittles?max=238900&count=50"))
.andExpect(view().name("spittles"))
.andExpect(model().attributeExists("spittleList"))
.andExpect(
model().attribute("spittleList",
hasItems(expectedSpittles.toArray())));</span>对以上代码的分析(Analysis):上述方法的关键区别在于它针对 "/spittles" 发送 GET 请求,同时还传入了 max 和 count参数;
<span style="font-family:SimSun;font-size:18px;">@RequestMapping(method=RequestMethod.GET)
public List<Spittle> spittles(
@RequestParam("max") long max,
@RequestParam("count") int count) {
return spittleRepository.findSpittles(max, count);
}</span>
<span style="font-family:SimSun;font-size:18px;">@RequestMapping(method = RequestMethod.GET)
public List<Spittle> spittles(
@RequestParam("max") long max,
@RequestParam("count") int count) {
return spittleRepository.findSpittles(max, count);
}</span>3)SpittleController中的处理器方法要同时处理有参数和没有参数的case,修改 @RequestParam注解,让它能够接收参数;@RequestParam注解的 defaultValue 属性可以完成这个任务.
<span style="font-family:SimSun;font-size:18px;">@RequestMapping(method = RequestMethod.GET)
public List<Spittle> spittles(
@RequestParam(value = "max", defaultValue = MAX_LONG_AS_STRING) long max,
@RequestParam(value = "count", defaultValue = "20") int count) {
return spittleRepository.findSpittles(max, count);
}</span>4)请求中的查询参数是往控制器中传递信息的常用手段。另外一种方式很流行,就是将传递参数作为请求路径的一部分;【3.2】通过路径参数接收输入
1)应用需求:工具给定 Id 来展现某个 Spittle 记录,通过使用 @RequestParam 注解,让它接收ID 作为查询参数;
<span style="font-family:SimSun;font-size:18px;">@RequestMapping(value = "/show", method = RequestMethod.GET)
public String showSpittle(@RequestParam("spittle_id") long spittleId,
Model model) {
model.addAttribute(spittleRepository.findOne(spittleId));
return "spittle";
}</span>对以上代码的分析(Analysis):对 "/spittles/12345" 发起 GET 请求要优于对 "/spittles/show/spittle_id=12345" 发起请求。前者能够识别出查询的资源,而后者描述的是带有参数的一个操作——本质上是通过 HTTP 发起的 RPC(远程过程调用协议);
2)Spittr应用以面向资源的控制器作为目标,下面给出测试用例
<span style="font-family:SimSun;font-size:18px;">@Test
public void testSpittle() throws Exception {
Spittle expectedSpittle = new Spittle("Hello", new Date());
SpittleRepository mockRepository = mock(SpittleRepository.class);
when(mockRepository.findOne(12345)).thenReturn(expectedSpittle);
SpittleController controller = new SpittleController(mockRepository);
MockMvc mockMvc = standaloneSetup(controller).build();
mockMvc.perform(get("/spittles/12345"))
.andExpect(view().name("spittle"))
.andExpect(model().attributeExists("spittle"))
.andExpect(model().attribute("spittle", expectedSpittle));
}</span>
3)我们编写的 @RequestMapping注解要包含变量部分,这部分代表了 Spittle ID;为了实现这种路径变量,spring mvc 允许我们 在 @RequestMapping 路径中添加占位符。占位符的名称要用 大括号"({})" 括起来;下面的方法使用了占位符:
<span style="font-family:SimSun;font-size:18px;">@RequestMapping(value = "/{spittleId}", method = RequestMethod.GET)
public String spittle(@PathVariable("spittleId") long spittleId, Model model) {
model.addAttribute(spittleRepository.findOne(spittleId));
return "spittle";
}</span>
<span style="font-family:SimSun;font-size:18px;">// 因为 方法的参数名与占位符的名称相同,所以可以去掉 @PathVariable 中的value属性;
// 如果@PathVariable 中 没有 value属性,它会假设占位符的名称与方法的参数名相同;
@RequestMapping(value = "/{spittleId}", method = RequestMethod.GET)
public String spittle(@PathVariable long spittleId, Model model) {
model.addAttribute(spittleRepository.findOne(spittleId));
return "spittle";
}</span>【4】处理表单
1)展现一个表单,允许用户注册
<span style="font-family:SimSun;font-size:18px;">@Controller
@RequestMapping("/spitter")
public class SpitterController {
@RequestMapping(value = "/register", method = GET)  // 这意味 这将会使用 /WEB-INF/views/registerForm.jsp 这个JSP 来渲染注册表单;
public String showRegistrationForm() {
return "registerForm";
}
}</span>
2)测试展现表单的控制器方法;
<span style="font-family:SimSun;font-size:18px;">public void shouldShowRegistration() throws Exception {
SpitterController controller = new SpitterController();
MockMvc mockMvc = standaloneSetup(controller).build();
mockMvc.perform(get("/spitter/register")).andExpect(
view().name("registerForm"));
}</span>
3)注册表单的JSP
【4.1】编写处理表单的控制器
1)intro:控制器需要接受表单数据并将其保存为 Spitter对象;
2)测试处理表单的控制器方法
<span style="font-family:SimSun;font-size:18px;">@Test
public void shouldProcessRegistration() throws Exception {
SpitterRepository mockRepository = mock(SpitterRepository.class);
Spitter unsaved = new Spitter("jbauer", "24hours", "Jack", "Bauer");
Spitter saved = new Spitter(24L, "jbauer", "24hours", "Jack", "Bauer");
when(mockRepository.save(unsaved)).thenReturn(saved);
SpitterController controller = new SpitterController(mockRepository);
MockMvc mockMvc = standaloneSetup(controller).build();
mockMvc.perform(
post("/spitter/register").param("firstName", "Jack")
.param("lastName", "Bauer").param("username", "jbauer")
.param("password", "24hours")).andExpect(
redirectedUrl("/spitter/jbauer"));
verify(mockRepository, atLeastOnce()).save(unsaved);
}</span>
2)处理所提交的表单并注册新用户
<span style="font-family:SimSun;font-size:18px;">@Controller
@RequestMapping("/spitter")
public class SpitterController {
private SpitterRepository spitterRepository;

@Autowired
public SpitterController(SpitterRepository spitterRepository) {
this.spitterRepository = spitterRepository;
}

@RequestMapping(value = "/register", method = GET)
public String showRegistrationForm() {
return "registerForm";
}

@RequestMapping(value = "/register", method = POST)
public String processRegistration(Spitter spitter) {
spitterRepository.save(spitter);
return "redirect:/spitter/" + spitter.getUsername();  // 当InternalResourceViewResolver 视图解析器看到 "redirect:" 前缀时,它就知道要将其解析为重定向的规则,而不是视图名称;
}
}</span>
Attention)除了前缀 "redirect:", InternalResourceViewResolver 视图解析器哈可以识别 "forward:"前缀:当发现此前缀时,请求将会前往(forward) 指定的URL 路径,而不是重定向了;
【4.2】校验表单
1)intro:如果输入的username 或 password为空的话,如果不处理的话,就会出现安全问题;
2)使用spring 对 java 校验API的支持: 从spring3.0 开始,在 spring mvc中提供了对ajva 校验API的支持。在spring mvc中要使用 java校验API的话,并不需要什么额外的配置。只要保证在类路径下包含这个java API的实现即可;
3)java校验API 定义了多个注解,位于 javax.validataion.constraints 包中;
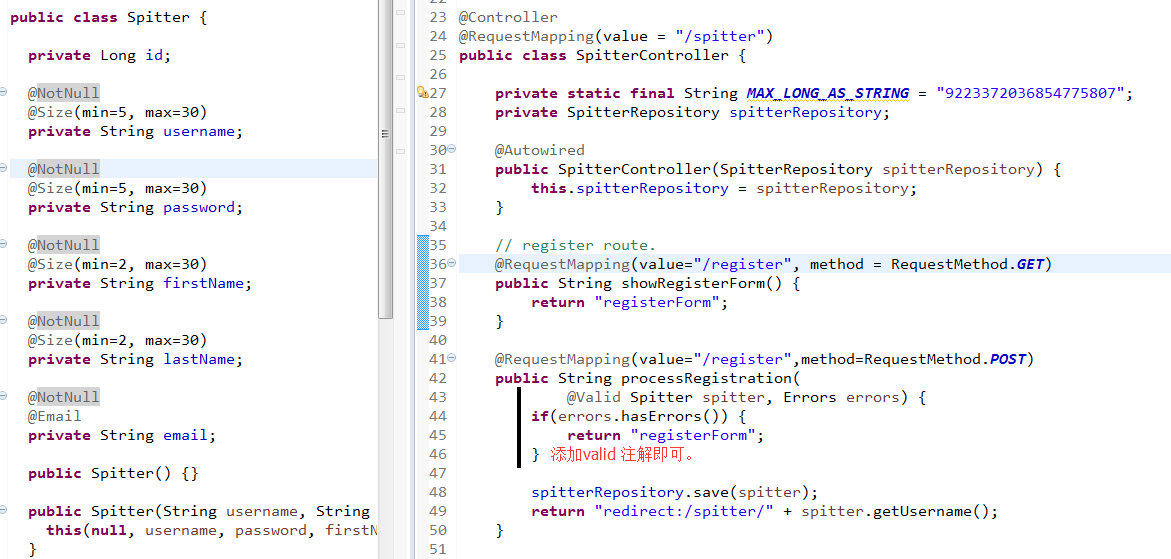
4)Spitter 包含了要提交到 Spittle Post 请求中的域;
<span style="font-family:SimSun;font-size:18px;">public class Spitter {
private Long id;
@NotNull
@Size(min=5, max=16)
private String username;

@NotNull
@Size(min=5, max=25)
private String password;

@NotNull
@Size(min=2, max=30)
private String firstName;

@NotNull
@Size(min=2, max=30)
private String lastName;
...
}</span>
2)启用校验功能的processRegistration()方法;
<span style="font-family:SimSun;font-size:18px;">@RequestMapping(value = "/register", method = POST)
public String processRegistration(@Valid Spitter spitter, Errors errors) {
if (errors.hasErrors()) {
return "registerForm";
}
spitterRepository.save(spitter);
return "redirect:/spitter/" + spitter.getUsername();
}</span>
Attention)
A1)@Valid注解:告知spring, 需要确保这个对象满足校验限制;
A2)在 Spiter属性上添加校验限制并不能阻止表单提交。即便用户没有填写某个域或者某个域所给定的值超过了最大长度,processRegistration方法依然会被调用;

相关文章推荐
- Java对BigDecimal常用方法的归类
- Spring拦截器中@Value无效的解决办法
- 半深入理解Java属性继承
- Java优化考虑构建器创建对象
- struts2与页面交互参数的3种模式
- Eclipse中自动添加注释(作者,时间)
- (转)编码规范系列(一):Eclipse Code Templates设置
- JAVA并发-减少锁的竞争
- java中,MD5加密
- Java的GC的内部原理
- java23种设计模式提纲
- quartz单独使用,不整合spring实例
- java 读excel xlsx
- 【转-整理】JavaWeb框架中,各层的解释和关系
- RSA加密算法原理和java简单实现
- 深入理解java垃圾回收机制----
- myeclipse 修改项目路径
- spring与Quartz整合
- java
- 常见的中间件有哪些