ios常见的页面传值方式
2016-06-02 07:31
513 查看
iOS页面间的传值细分有很多种,基本的传值方式有三种:委托Delegate传值、通知NSNotification传值、Block传值,其他在项目中可能会遇到的还有:UserDefault或文件方式传值、单例模式传值、通过设置属性传值,再有其他的传值方式没有遇到使用过在此不做说明。场景适合,自己使用舒服就是好的方式。
在iOS开发的过程中,常见的页面跳转传值方式大致可以分为两种,现归纳总结一下:
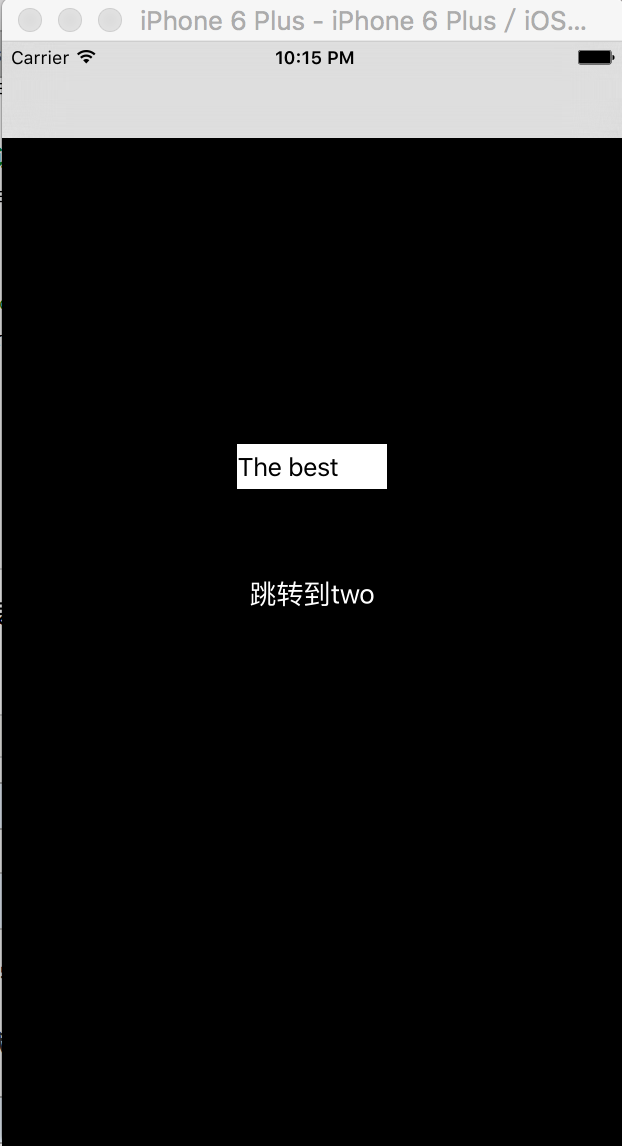
第一种:OneViewController页面跳转到TwoViewController页面(即顺传)
方法:在TwoViewController页面的控制器中,编写对应的属性,在OneViewController页面跳转到TwoViewController页面的地方,给TwoViewController的属性赋值即可
在A页面的试图控制器中
oneViewController的代码实例
第二种:A页面跳转到B页面,B页面再跳转回A页面
方法 :主流方案
1)通过委托delegate的方式实现
1 在B页面设置代理协议,代理属性
2 在A页面设置代理对象,实现代理方法
3 在回到B页面调用代理方法完成质的传递
oneViewController.m的代码实例
TwoViewController.h的代码实例
TwoViewController.m的代码实例
效果:
代理方法实现传值过程中,最重要也是最容易忽略的,就是一定要设置delegate的指向。
(2)通知NSNotification传值方式实现
1 在OneViewController页面的控制器中注册通知,实现通知方法接收传递值(以子典形式传递),通知结束并销毁通知
2 在TwoViewController页面的控制器中发送通知
OneViewController.m代码示例
TwoViewController.m代码示例
效果相同,在此就不贴图了。
(3)block方式实现
1 在TwoViewController视图控制器中,定义一个block,参数为字符串
2 在OneViewController图显示,回调block
TwoViewController.h代码示例
TwoViewController.m代码示例
OneViewController.m代码示例
以上就是三种基本的传值方式,也是我们在项目开发过程中最常使用的传值方式。
下面介绍两种在项目开发过程中也曾经遇到过,但是并不常用的传值方式。
(1)通过一个单例来传值
1 由于要用到单例模式,所以要创建一个继承于NSObject的DataSource类,存放数据
DataSource.h代码示例
DataSource.m代码示例
TwoViewController.m代码示例
OneViewController.m代码示例
(2)NSUserdefault来传值,这种传值方法并不常用,代码量也比较少就不粘贴详细代码了,当作了解就阔以啦。
OneViewController.m示例代码
TwoViewController.m示例代码
在iOS开发的过程中,常见的页面跳转传值方式大致可以分为两种,现归纳总结一下:
第一种:OneViewController页面跳转到TwoViewController页面(即顺传)
方法:在TwoViewController页面的控制器中,编写对应的属性,在OneViewController页面跳转到TwoViewController页面的地方,给TwoViewController的属性赋值即可
1 /**
2  *  接收页面传递的值
3  */
4 @property(nonatomic,copy)NSString *text;
在A页面的试图控制器中
oneViewController的代码实例
@interface OneViewController ()

/**
*  输入框
*/
@property(weak,nonatomic)UITextField *txtField;

@end

@implementation OneViewController

- (void)viewDidLoad {
[super viewDidLoad];

#pragma mark - 创建UITextField

//创建UITextField对象
UITextField *txtField = [[UITextField alloc]initWithFrame:CGRectMake(self.view.center.x - 50, self.view.center.y - 100, 100, 30)];

//设置背景色
txtField.backgroundColor = [UIColor whiteColor];

//添加
[self.view addSubview:txtField];

//赋值
_txtField = txtField;

#pragma mark - 创建btn

//创建button对象
UIButton *pushBtn = [[UIButton alloc]initWithFrame:CGRectMake(200, 300, 100, 100)];

//设置按钮位置
pushBtn.center = self.view.center;

//设置标题
[pushBtn setTitle:@"跳转" forState:UIControlStateNormal];

//添加按钮点击事件
[pushBtn addTarget:self action:@selector(pushBtnClick) forControlEvents:UIControlEventTouchUpInside];

//添加
[self.view addSubview:pushBtn];
}

/**
*  点击事件的方法
*/
- (void)pushBtnClick {

//创建TwoViewController对象
TwoViewController *twoVc = [[TwoViewController alloc]init];

//接收oneViewController传递值
twoVc.text = self.txtField.text;

//执行push操作
[self.navigationController pushViewController:twoVc animated:YES];

}
@end
第二种:A页面跳转到B页面,B页面再跳转回A页面
方法 :主流方案
1)通过委托delegate的方式实现
1 在B页面设置代理协议,代理属性
2 在A页面设置代理对象,实现代理方法
3 在回到B页面调用代理方法完成质的传递
oneViewController.m的代码实例
1 //遵守代理协议
2 @interface OneViewController () <TwoViewControllerDelegate>
3
4 /**
5  *  文本框
6  */
7 @property(weak,nonatomic)UILabel *lable;
8
9 @end
10
11 @implementation OneViewController
12
13 - (void)viewDidLoad {
14     [super viewDidLoad];
15
16 #pragma mark - 创建UILable
17
18     //创建UILable对象
19     UILabel *lable = [[UILabel alloc]initWithFrame:CGRectMake(self.view.center.x - 50, self.view.center.y - 100, 100, 30)];
20
21     //设置背景色
22     lable.backgroundColor = [UIColor whiteColor];
23
24     //添加
25     [self.view addSubview:lable];
26
27     //赋值
28     _lable = lable;
29
30 #pragma mark - 创建btn
31
32     //创建button对象
33     UIButton *pushBtn = [[UIButton alloc]initWithFrame:CGRectMake(200, 300, 100, 100)];
34
35     //设置按钮位置
36     pushBtn.center = self.view.center;
37
38     //设置标题
39     [pushBtn setTitle:@"跳转到two" forState:UIControlStateNormal];
40
41     //添加按钮点击事件
42     [pushBtn addTarget:self action:@selector(pushBtnClick) forControlEvents:UIControlEventTouchUpInside];
43
44     //添加
45     [self.view addSubview:pushBtn];
46 }
47
48 /**
49  *  点击事件的方法
50  */
51 - (void)pushBtnClick {
52
53     //创建TwoViewController对象
54     TwoViewController *twoVc = [[TwoViewController alloc]init];
55
56     //接收oneViewController传递值
57     twoVc.text = self.lable.text;
58
59     //设置代理对象
60     twoVc.delegate = self;
61
62     //执行push操作
63     [self.navigationController pushViewController:twoVc animated:YES];
64
65 }
66
67 /**
68  *  实现代理方法设置lable文本
69  *
70  *  @param text 传递值
71  */
72 -(void)setLableText:(NSString *)text {
73
74     self.lable.text = text;
75 }
76
77 @end
TwoViewController.h的代码实例
1 #import <UIKit/UIKit.h>
2
3 //代理协议
4 @protocol TwoViewControllerDelegate <NSObject>
5
6 @optional
7 /**
8  *  代理方法 给OneViewController的lable赋值
9  */
10 - (void)setLableText:(NSString *)text;
11
12 @end
13
14 @interface TwoViewController : UIViewController
15
16 /**
17  *  接收 A页面传递的值
18  */
19 @property(nonatomic,copy)NSString *text;
20
21 /**
22  *  设置代理(为防止循环引用,此次采用了weak)
23  */
24 @property(nonatomic,weak)id <TwoViewControllerDelegate>delegate;
25
26 @end
TwoViewController.m的代码实例
#import "TwoViewController.h"
@interface TwoViewController ()
/**
* 输入框
*/
@property(weak,nonatomic)UITextField *twoTxtField;
@end
@implementation TwoViewController
- (void)viewDidLoad {
[super viewDidLoad];
self.view.backgroundColor = [UIColor grayColor];
#pragma mark - 创建UILable
//创建UITextField对象
UITextField *txtField = [[UITextField alloc]initWithFrame:CGRectMake(self.view.center.x - 50, self.view.center.y - 100, 100, 30)];
//设置背景色
txtField.backgroundColor = [UIColor whiteColor];
//添加
[self.view addSubview:txtField];
//赋值
_twoTxtField = txtField;
#pragma mark - 创建button
//创建UIButton对象
UIButton *btn = [[UIButton alloc]initWithFrame:CGRectMake(200, 200, 100, 100)];
//设置button的位置
btn.center = self.view.center;
//设置button标题
[btn setTitle:@"返回one" forState:UIControlStateNormal];
//添加点击事件
[btn addTarget:self action:@selector(returnToOne) forControlEvents:UIControlEventTouchUpInside];
//添加
[self.view addSubview:btn];
}
/**
* 返回one 按钮点击事件
*
* @param field oneViewController输入框
*/
- (void)returnToOne {
//判断是否响应
if ([self.delegate respondsToSelector:@selector(setLableText:)]) {
//调用代理方法
[self.delegate setLableText:self.twoTxtField.text];
}
//执行pop方法返回OneViewController页面
[self.navigationController popToRootViewControllerAnimated:YES];
}
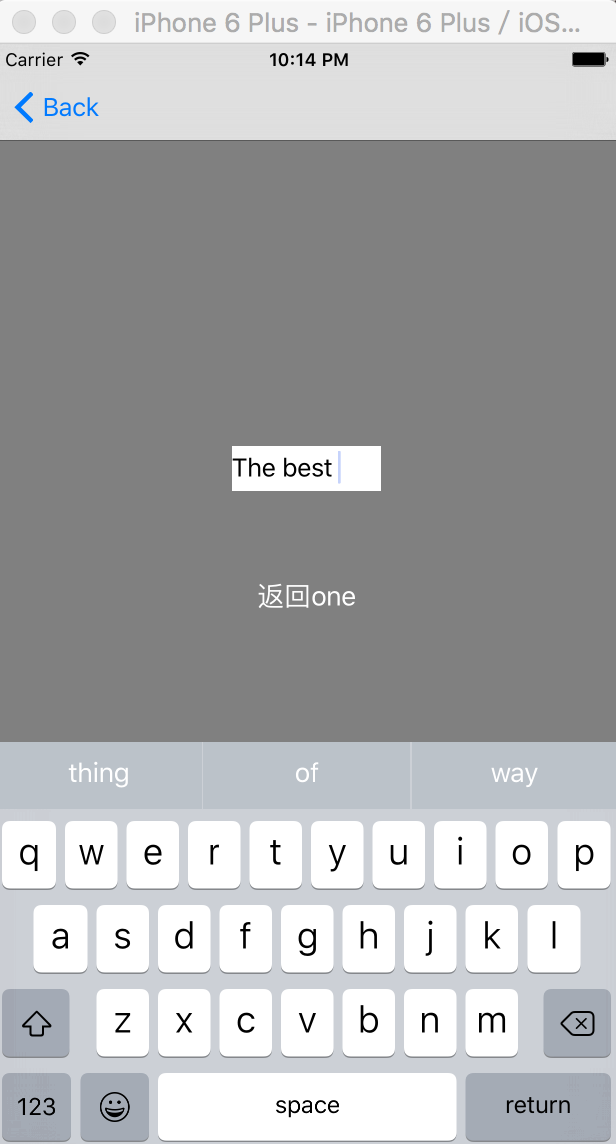
@end效果:
代理方法实现传值过程中,最重要也是最容易忽略的,就是一定要设置delegate的指向。
(2)通知NSNotification传值方式实现
1 在OneViewController页面的控制器中注册通知,实现通知方法接收传递值(以子典形式传递),通知结束并销毁通知
2 在TwoViewController页面的控制器中发送通知
OneViewController.m代码示例
1 @interface OneViewController ()
2
3 /**
4  *  文本框
5  */
6 @property(weak,nonatomic)UILabel *lable;
7
8 @end
9
10 @implementation OneViewController
11
12 - (void)viewDidLoad {
13     [super viewDidLoad];
14
15 #pragma mark - 注册通知
16     //注册通知 name参数就是指通知名
17     [[NSNotificationCenter defaultCenter]addObserver:self selector:@selector(setLableText:) name:@"setLableNsnotification" object:nil];
18
19 #pragma mark - 创建UILable
20
21     //创建UILable对象
22     UILabel *lable = [[UILabel alloc]initWithFrame:CGRectMake(self.view.center.x - 50, self.view.center.y - 100, 100, 30)];
23
24     //设置背景色
25     lable.backgroundColor = [UIColor whiteColor];
26
27     //添加
28     [self.view addSubview:lable];
29
30     //赋值
31     _lable = lable;
32
33 #pragma mark - 创建btn
34
35     //创建button对象
36     UIButton *pushBtn = [[UIButton alloc]initWithFrame:CGRectMake(200, 300, 100, 100)];
37
38     //设置按钮位置
39     pushBtn.center = self.view.center;
40
41     //设置标题
42     [pushBtn setTitle:@"跳转到two" forState:UIControlStateNormal];
43
44     //添加按钮点击事件
45     [pushBtn addTarget:self action:@selector(pushBtnClick) forControlEvents:UIControlEventTouchUpInside];
46
47     //添加
48     [self.view addSubview:pushBtn];
49 }
50
51 /**
52  *  点击事件的方法
53  */
54 - (void)pushBtnClick {
55
56     //创建TwoViewController对象
57     TwoViewController *twoVc = [[TwoViewController alloc]init];
58
59     //接收oneViewController传递值
60     twoVc.text = self.lable.text;
61
62     //执行push操作
63     [self.navigationController pushViewController:twoVc animated:YES];
64
65 }
66
67 /**
68  *  实现通知方法设置lable文本
69  *
70  *  @param notification 通知信息
71  */
72 -(void)setLableText:(NSNotification *)notification {
73
74     //创建一个字典用来传递通知信息
75     NSDictionary *nameDictionary = [notification userInfo]; self.lable.text = [nameDictionary objectForKey:@"text"];
76 }
77
78 /**
79  *  使用结束 销毁通知
80  */
81 - (void)dealloc {
82
83     //移除通知
84     [[NSNotificationCenter defaultCenter]removeObserver:self];
85 }
86 @end
TwoViewController.m代码示例
1 @interface TwoViewController ()
2
3 /**
4  *  输入框
5  */
6 @property(weak,nonatomic)UITextField *twoTxtField;
7 @end
8
9 @implementation TwoViewController
10
11 - (void)viewDidLoad {
12     [super viewDidLoad];
13
14     self.view.backgroundColor = [UIColor grayColor];
15
16 #pragma mark - 创建UILable
17     //创建UITextField对象
18     UITextField *txtField = [[UITextField alloc]initWithFrame:CGRectMake(self.view.center.x - 50, self.view.center.y - 100, 100, 30)];
19
20     //设置背景色
21     txtField.backgroundColor = [UIColor whiteColor];
22
23     //添加
24     [self.view addSubview:txtField];
25
26     //赋值
27     _twoTxtField = txtField;
28
29 #pragma mark - 创建button
30
31     //创建UIButton对象
32     UIButton *btn = [[UIButton alloc]initWithFrame:CGRectMake(200, 200, 100, 100)];
33
34     //设置button的位置
35     btn.center = self.view.center;
36
37     //设置button标题
38     [btn setTitle:@"返回one" forState:UIControlStateNormal];
39
40     //添加点击事件
41     [btn addTarget:self action:@selector(returnToOne:) forControlEvents:UIControlEventTouchUpInside];
42
43     //添加
44     [self.view addSubview:btn];
45 }
46
47 /**
48  *  返回one 按钮点击事件
49  *
50  *  @param field oneViewController输入框
51  */
52 - (void)returnToOne:(id) sender {
53
54     //发送通知
55     [[NSNotificationCenter defaultCenter]postNotificationName:@"setLableNsnotification" object:self userInfo:@{@"text" : self.twoTxtField.text}];
56
57     //执行pop方法返回OneViewController页面
58     [self.navigationController popToRootViewControllerAnimated:YES];
59
60 }
61
62
63 @end
效果相同,在此就不贴图了。
(3)block方式实现
1 在TwoViewController视图控制器中,定义一个block,参数为字符串
2 在OneViewController图显示,回调block
TwoViewController.h代码示例
1 /**
2  *  设置参数为NSString类型block 为myBlock
3  */
4 typedef void (^myBlock)(NSString *str);
5
6 @interface TwoViewController : UIViewController
7
8 /**
9  *  接收 A页面传递的值
10  */
11 @property(nonatomic,copy)NSString *text;
12
13 /**
14  * 定义一个myBlock 类型的block
15  */
16 @property(nonatomic,copy)myBlock block;
17
18 @end
TwoViewController.m代码示例
1 @interface TwoViewController ()
2
3 /**
4  *  输入框
5  */
6 @property(weak,nonatomic)UITextField *twoTxtField;
7 @end
8
9 @implementation TwoViewController
10
11 - (void)viewDidLoad {
12     [super viewDidLoad];
13
14     self.view.backgroundColor = [UIColor grayColor];
15
16 #pragma mark - 创建UILable
17     //创建UITextField对象
18     UITextField *txtField = [[UITextField alloc]initWithFrame:CGRectMake(self.view.center.x - 50, self.view.center.y - 100, 100, 30)];
19
20     //设置背景色
21     txtField.backgroundColor = [UIColor whiteColor];
22
23     //添加
24     [self.view addSubview:txtField];
25
26     //赋值
27     _twoTxtField = txtField;
28
29 #pragma mark - 创建button
30
31     //创建UIButton对象
32     UIButton *btn = [[UIButton alloc]initWithFrame:CGRectMake(200, 200, 100, 100)];
33
34     //设置button的位置
35     btn.center = self.view.center;
36
37     //设置button标题
38     [btn setTitle:@"返回one" forState:UIControlStateNormal];
39
40     //添加点击事件
41     [btn addTarget:self action:@selector(returnToOne) forControlEvents:UIControlEventTouchUpInside];
42
43     //添加
44     [self.view addSubview:btn];
45 }
46
47 /**
48  *  返回one 按钮点击事件
49  *
50  *  @param field oneViewController输入框
51  */
52 - (void)returnToOne {
53
54     if (self.block) {
55
56         //把当前输入框的text值给block
57         self.block(self.twoTxtField.text);
58     }
59
60     //执行pop方法返回OneViewController页面
61     [self.navigationController popToRootViewControllerAnimated:YES];
62
63 }
64
65
66 @end
OneViewController.m代码示例
1 @interface OneViewController ()
2
3 /**
4  *  文本框
5  */
6 @property(weak,nonatomic)UILabel *lable;
7
8 @end
9
10 @implementation OneViewController
11
12 - (void)viewDidLoad {
13     [super viewDidLoad];
14
15
16 #pragma mark - 创建UILable
17
18     //创建UILable对象
19     UILabel *lable = [[UILabel alloc]initWithFrame:CGRectMake(self.view.center.x - 50, self.view.center.y - 100, 100, 30)];
20
21     //设置背景色
22     lable.backgroundColor = [UIColor whiteColor];
23
24     //添加
25     [self.view addSubview:lable];
26
27     //赋值
28     _lable = lable;
29
30 #pragma mark - 创建btn
31
32     //创建button对象
33     UIButton *pushBtn = [[UIButton alloc]initWithFrame:CGRectMake(200, 300, 100, 100)];
34
35     //设置按钮位置
36     pushBtn.center = self.view.center;
37
38     //设置标题
39     [pushBtn setTitle:@"跳转到two" forState:UIControlStateNormal];
40
41     //添加按钮点击事件
42     [pushBtn addTarget:self action:@selector(pushBtnClick) forControlEvents:UIControlEventTouchUpInside];
43
44     //添加
45     [self.view addSubview:pushBtn];
46 }
47
48 /**
49  *  点击事件的方法
50  */
51 - (void)pushBtnClick {
52
53     //创建TwoViewController对象
54     TwoViewController *twoVc = [[TwoViewController alloc]init];
55
56     //接收oneViewController传递值
57     twoVc.text = self.lable.text;
58
59     //回调block 拿到传递值设置lable的text
60     twoVc.block = ^(NSString *str){
61
62         self.lable.text = str;
63     };
64
65     //执行push操作
66     [self.navigationController pushViewController:twoVc animated:YES];
67
68 }
69
70
71
72 @end
以上就是三种基本的传值方式,也是我们在项目开发过程中最常使用的传值方式。
下面介绍两种在项目开发过程中也曾经遇到过,但是并不常用的传值方式。
(1)通过一个单例来传值
1 由于要用到单例模式,所以要创建一个继承于NSObject的DataSource类,存放数据
DataSource.h代码示例
1 #import <Foundation/Foundation.h>
2 @class DataSource;
3
4 @interface DataSource : NSObject
5
6 /**
7  *  存放传递值的属性
8  */
9 @property (nonatomic, strong) NSString *text;
10
11 /**
12  *  返回单例对象的类方法
13  */
14 +(DataSource*)sharedDataSource;
15
16 @end
DataSource.m代码示例
#import "DataSource.h"

@implementation DataSource

+(DataSource *)sharedDataSource {

static DataSource *dataSource = nil;

static dispatch_once_t once;

//dispach_once函数中的代码块只会被执行一次,而且还是线程安全的。
dispatch_once(&once, ^{

dataSource = [DataSource new];
});

return dataSource;
}
TwoViewController.m代码示例
1 #import "TwoViewController.h"
2 #import "DataSource.h"
3
4 @interface TwoViewController ()
5
6 /**
7  *  输入框
8  */
9 @property(weak,nonatomic)UITextField *twoTxtField;
10 @end
11
12 @implementation TwoViewController
13
14 - (void)viewDidLoad {
15     [super viewDidLoad];
16
17     self.view.backgroundColor = [UIColor grayColor];
18
19 #pragma mark - 创建UILable
20     //创建UITextField对象
21     UITextField *txtField = [[UITextField alloc]initWithFrame:CGRectMake(self.view.center.x - 50, self.view.center.y - 100, 100, 30)];
22
23     //设置背景色
24     txtField.backgroundColor = [UIColor whiteColor];
25
26     //添加
27     [self.view addSubview:txtField];
28
29     //赋值
30     _twoTxtField = txtField;
31
32 #pragma mark - 创建button
33
34     //创建UIButton对象
35     UIButton *btn = [[UIButton alloc]initWithFrame:CGRectMake(200, 200, 100, 100)];
36
37     //设置button的位置
38     btn.center = self.view.center;
39
40     //设置button标题
41     [btn setTitle:@"返回one" forState:UIControlStateNormal];
42
43     //添加点击事件
44     [btn addTarget:self action:@selector(returnToOne) forControlEvents:UIControlEventTouchUpInside];
45
46     //添加
47     [self.view addSubview:btn];
48 }
49
50 /**
51  *  返回one 按钮点击事件
52  *
53  *  @param field oneViewController输入框
54  */
55 - (void)returnToOne {
56
57     //获取唯一实例对象
58     DataSource *dataSource = [DataSource sharedDataSource];
59
60     //给单例对象属性赋值
61     dataSource.text = self.twoTxtField.text;
62
63     //执行pop方法返回OneViewController页面
64     [self.navigationController popToRootViewControllerAnimated:YES];
65
66 }
67
68
69 @end
OneViewController.m代码示例
1 #import "OneViewController.h"
2 #import "TwoViewController.h"
3 #import "DataSource.h"
4
5 @interface OneViewController ()
6
7 /**
8  *  文本框
9  */
10 @property(weak,nonatomic)UILabel *lable;
11
12 @end
13
14 @implementation OneViewController
15
16 - (void)viewDidLoad {
17     [super viewDidLoad];
18
19
20 #pragma mark - 创建UILable
21
22     //创建UILable对象
23     UILabel *lable = [[UILabel alloc]initWithFrame:CGRectMake(self.view.center.x - 50, self.view.center.y - 100, 100, 30)];
24
25     //设置背景色
26     lable.backgroundColor = [UIColor whiteColor];
27
28     //添加
29     [self.view addSubview:lable];
30
31     //赋值
32     _lable = lable;
33
34 #pragma mark - 创建btn
35
36     //创建button对象
37     UIButton *pushBtn = [[UIButton alloc]initWithFrame:CGRectMake(200, 300, 100, 100)];
38
39     //设置按钮位置
40     pushBtn.center = self.view.center;
41
42     //设置标题
43     [pushBtn setTitle:@"跳转到two" forState:UIControlStateNormal];
44
45     //添加按钮点击事件
46     [pushBtn addTarget:self action:@selector(pushBtnClick) forControlEvents:UIControlEventTouchUpInside];
47
48     //添加
49     [self.view addSubview:pushBtn];
50 }
51
52 /**
53  *  点击事件的方法
54  */
55 - (void)pushBtnClick {
56
57     //创建TwoViewController对象
58     TwoViewController *twoVc = [[TwoViewController alloc]init];
59
60     //接收oneViewController传递值
61     twoVc.text = self.lable.text;
62
63
64     //执行push操作
65     [self.navigationController pushViewController:twoVc animated:YES];
66
67 }
68
69
70 -(void)viewDidAppear:(BOOL)animated{
71
72     [super viewDidAppear:animated];
73
74     //获取唯一实例
75     DataSource *dataSource = [DataSource sharedDataSource];
76
77     //判断单例对象的属性值是否为空
78     if ([dataSource.text length] != 0) {
79
80         //把单例对象的属性值赋值给lable
81         self.lable.text = dataSource.text;
82
83         //把单例对象属性值清空
84         dataSource.text = @"";
85
86      }
87 }
88
89 @end
(2)NSUserdefault来传值,这种传值方法并不常用,代码量也比较少就不粘贴详细代码了,当作了解就阔以啦。
OneViewController.m示例代码
1 -(void)viewDidAppear:(BOOL)animated{
2
3     [super viewDidAppear:animated];
4
5      if ([[[NSUserDefaults standardUserDefaults] objectForKey:@"myLableText"] length] != 0){
6
7         self.lable.text = [[NSUserDefaults standardUserDefaults] objectForKey:@"myLableText"]; [[NSUserDefaults standardUserDefaults] setObject:@"" forKey:@"myLableText"];
8      }
9
10 }
TwoViewController.m示例代码
1 /**
2  *  返回one 按钮点击事件
3  *
4  *  @param field oneViewController输入框
5  */
6 - (void)returnToOne {
7
8    [[NSUserDefaults standardUserDefaults] setObject:self.twoTxtField.text forKey:@"myLableText"];
9
10     //执行pop方法返回OneViewController页面
11     [self.navigationController popToRootViewControllerAnimated:YES];
12
13 }

相关文章推荐
- iOS内存分配大小
- Xcode Unknown type name 'NSString'
- ios获取设备唯一标识
- ios图文混排
- iOS毛玻璃效果
- ios aes 加密 与 nodejs aes 不一样 解决方法
- IOS博客项目搭建-19-项目重构-封装业务工具类
- iOS沙盒机制
- ios runtime基础知识
- iOS监听系统键盘的弹起和回收
- 【转】【iOS】导航栏那些事儿
- 【转】iOS中设置导航栏标题的字体颜色和大小
- iOS中关于atomic和nonatomic,assign、weak、strong、retain的使用、区别
- iOS 判断字符是全角还是半角
- 根据Facebook内存的管理使用,浅谈在iOS上自动检测内存泄漏问题
- 根据Facebook内存的管理使用,浅谈在iOS上自动检测内存泄漏问题
- iOS监听横竖屛通知
- 最新cocoa pods的安装流程
- NSURLSession
- iOS-Network学习笔记(二)——NSURLConnection