SpringMVC实现用户登录实例
2016-05-23 15:33
537 查看
今天分享一下SpringMVC的一个登陆小案例
添加相关的jar包,构建路径
创建springMVC-servlet.xml,及完善web.xml
创建代码逻辑
个人建议:注意其中的springMVC-servlet.xml的位置。以及源代码包的名称。
然后是小管家springMVC-servlet.xml:
再就是一个登陆界面了,login.jsp:
login.jsp对应的那个action就是要进行处理的后台页面,也就是我们的Login.java:
最后就是ok.jsp和no.jsp了:
然后就可以对代码进行测试了。本人亲测好用,这里就不再贴图了。
在WEB-INF文件夹中创建springMVC-servlet.xml配置文件
@Controller、@RequestMapping、@RequestParam以及Model域对象等的使用
表单以post方式,或者使用get方式都是可以的
下面是注解的小技巧:
@Controller就是对应于springMVC-servlet.xml中的
准备工作
创建一个Dynamic Web Project(本人是Eclipse)添加相关的jar包,构建路径
创建springMVC-servlet.xml,及完善web.xml
创建代码逻辑
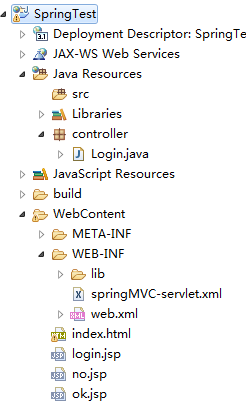
目录结构如下
对于新手而言,有一个项目的完整的目录结构是多么幸福的一件事啊。个人建议:注意其中的springMVC-servlet.xml的位置。以及源代码包的名称。
代码实战
首先是大管家,web.xml:<?xml version="1.0" encoding="UTF-8"?> <web-app xmlns:xsi="http://www.w3.org/2001/XMLSchema-instance" xmlns="http://xmlns.jcp.org/xml/ns/javaee" xsi:schemaLocation="http://xmlns.jcp.org/xml/ns/javaee http://xmlns.jcp.org/xml/ns/javaee/web-app_3_1.xsd" id="WebApp_ID" version="3.1"> <display-name>SpringTest</display-name> <welcome-file-list> <welcome-file>index.html</welcome-file> </welcome-file-list> <servlet> <servlet-name>springMVC</servlet-name> <servlet-class>org.springframework.web.servlet.DispatcherServlet</servlet-class> </servlet> <servlet-mapping> <servlet-name>springMVC</servlet-name> <url-pattern>*.spring</url-pattern> </servlet-mapping> </web-app>
然后是小管家springMVC-servlet.xml:
<?xml version="1.0" encoding="UTF-8"?>
<beans xmlns="http://www.springframework.org/schema/beans"
xmlns:xsi="http://www.w3.org/2001/XMLSchema-instance" xmlns:p="http://www.springframework.org/schema/p"
xmlns:context="http://www.springframework.org/schema/context"
xsi:schemaLocation="http://www.springframework.org/schema/beans http://www.springframework.org/schema/beans/spring-beans-3.0.xsd http://www.springframework.org/schema/context http://www.springframework.org/schema/context/spring-context-3.0.xsd http://www.springframework.org/schema/mvc http://www.springframework.org/schema/mvc/spring-mvc-3.0.xsd http://www.springframework.org/schema/util http://www.springframework.org/schema/util/spring-util-3.0.xsd">
<!-- 最简单的配置,让Spring自己去探索-->
<context:component-scan base-package="controller"></context:component-scan>

</beans>
再就是一个登陆界面了,login.jsp:
<%@ page language="java" contentType="text/html; charset=UTF-8"
pageEncoding="UTF-8"%>
<!DOCTYPE html PUBLIC "-//W3C//DTD HTML 4.01 Transitional//EN" "http://www.w3.org/TR/html4/loose.dtd">
<html>
<head>
<meta http-equiv="Content-Type" content="text/html; charset=UTF-8">
<title>登陆界面</title>
</head>
<body>

<form action="login.spring" method="post">
username:<input type="text" name="username"><br /> Password:<input
type="password" name="password"><br /> <input type="submit"
value="登陆">
</form>
</body>
</html>
login.jsp对应的那个action就是要进行处理的后台页面,也就是我们的Login.java:
package controller;

import org.springframework.stereotype.Controller;
import org.springframework.ui.Model;
import org.springframework.web.bind.annotation.RequestMapping;
import org.springframework.web.bind.annotation.RequestParam;

@Controller // @Controller 代表本Java类是controller控制层
public class Login {

/**
* @RequestParam注解的作用是:根据参数名从URL中取得参数值
* @param username
*            用户名,一定要对应着表单的name才行
* @param password
*            用户密码,也应该对应表单的数据项
* @param model
*            一个域对象,可用于存储数据值
* @return
*/
@RequestMapping("/login") // @RequestMapping 注解可以用指定的URL路径访问本控制层
public String login(@RequestParam("username") String username, @RequestParam("password") String password,
Model model) {

if (username.equals("admin") && password.equals("admin")) {
model.addAttribute("username", username);
return "ok.jsp";
} else {
model.addAttribute("username", username);
return "no.jsp";
}
}

}
最后就是ok.jsp和no.jsp了:
<%@ page language="java" contentType="text/html; charset=UTF-8"
pageEncoding="UTF-8"%>
<!DOCTYPE html PUBLIC "-//W3C//DTD HTML 4.01 Transitional//EN" "http://www.w3.org/TR/html4/loose.dtd">
<html>
<head>
<meta http-equiv="Content-Type" content="text/html; charset=UTF-8">
<title>Insert title here</title>
</head>
<body>
<font color="green">${username } </font>欢迎你!

</body>
</html>

<%@ page language="java" contentType="text/html; charset=UTF-8"
pageEncoding="UTF-8"%>
<!DOCTYPE html PUBLIC "-//W3C//DTD HTML 4.01 Transitional//EN" "http://www.w3.org/TR/html4/loose.dtd">
<html>
<head>
<meta http-equiv="Content-Type" content="text/html; charset=UTF-8">
<title>Insert title here</title>
</head>
<body>

<font color="red">Sorry</font>,没有${username }这个用户!
<br />
<a href="login.jsp">重试一下!</a>

</body>
</html>
测试
在你的浏览器上输入http://localhost:8080/SpringTest/login.jsp然后就可以对代码进行测试了。本人亲测好用,这里就不再贴图了。
总结
在web.xml中配置DispatcherServlet核心控制器在WEB-INF文件夹中创建springMVC-servlet.xml配置文件
@Controller、@RequestMapping、@RequestParam以及Model域对象等的使用
表单以post方式,或者使用get方式都是可以的
下面是注解的小技巧:
@Controller就是对应于springMVC-servlet.xml中的

相关文章推荐
- SpringMVC实现用户登录实例
- java面向对象...
- java简单匿名内部类练习
- RxJava操作符 debounce 和 distinctUntilChanged
- java中文乱码解决之道(4):java编码转换过程
- Java面向对象编程概述
- Spring使用Cache、整合Ehcache
- java中文乱码解决之道(3):编码详情:伟大的创想—Unicode编码
- 第一个Java应用
- java中文乱码解决之道(2):字符编码详解:基础知识 + ASCII + GB**
- java中文乱码解决之道(1):认识字符集
- Java 数字转换为汉语中人民币的大写
- java中文乱码解决之道(7):JSP页面编码过程
- 【Spring】【笔记】《Spring In Action》第3章 简化XML配置
- Spring Boot下配置MyBatis多数据源
- JAVA多线程(三)生产者消费者模式及实现方法
- mac jdk 1.6下载地址
- ArrayList源码分析(JDK1.8)
- Java导出jar包(并用bat命令执行)
- eclipse not found servlet.api