Java_Java Compiler 应用实例
2016-05-18 10:34
567 查看
转自:http://hejiangtao.iteye.com/blog/1399122
一直在用JDK1.5, 一直搞不清楚JDK1.6有啥特性, 就翻了翻, 发现这个Compiler API(JSR 199)动态编译Java源文件功能很有意思. Compiler API如果和反射功能一起使用, 就可以实现java源代码的动态编译并执行这些代码,有点动态语言的特征. 利用这些API普通用户也可以方便的开发自己的编译器,动态生成代码,编译并运行. 本文就通过一个动态编译并运行源文件的例子简单说明下Compile API的基本功能, 有兴趣的可以深入研究下. 本实例的完成工程代码可以从这里 下载: http://dl.iteye.com/topics/download/0807c557-4f0d-3aba-956f-9fe5c9b83962
实例中实现的功能描述:
1. 使用JavaCompiler对象的run方法编译java源代码,并在源代码所在目录生成对应的class文件
2. 使用JavaCompiler对象的getTask方法编译java源代码,并将对应的class文件生成到指定目录, 并执行所生成类中指定的"printClassName"方法
环境准备:
首先回顾一下JDK, JRE,JVM的概念和关系:
JRE是java的运行环境, 说白了有JRE才能运行java类; 同时java类是运行于虚拟机(JVM)上的, 其实虚拟机是JRE的一部分, 具体来讲,在windows上就是JRE下面的一个JVM.dll文件; JDK就是java开发工具箱, 具有编译java类的功能和运行java类的功能(自身包含了一个JRE).
知道了JDK,JRE,JVM的关系,我们就应该明白,如果要在eclipse里面使用java的编译功能必须在eclipse里面使用JDK作为Library,否则在eclipse中获取不了JavaCompiler的对象. 设置如下图:
懒得找JDK1.6,我就直接下载了个1.7装了下,然后开发工具使用MyEclipse (当然用的是免费版的 -:)).
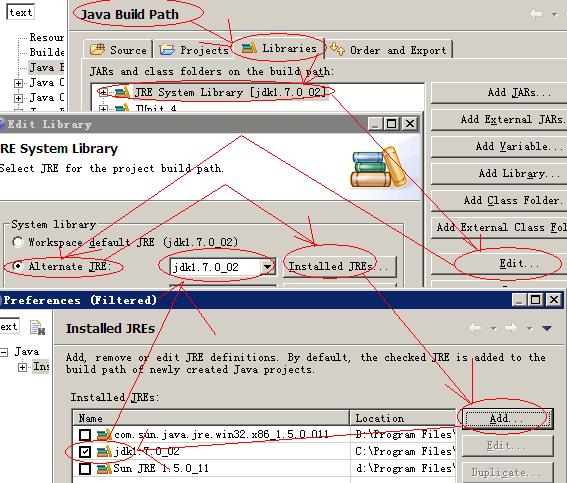
在看我们的实例分析及源码:
首先看下run方法编译java源文件, run方法比较简单,但不能指定输出路径,监控错误信息, 调用后就在源码所在目录生成class文件,run方法的声明如下:
[plain] view plain copy
int run(InputStream in,
OutputStream out,
OutputStream err,
String... arguments)使用给定 I/O 通道和参数运行工具。按照惯例,工具如果运行成功,则返回 0;如果出现错误,则返回非 0 值。任何生成的诊断都将以某种未指定的格式写入 out 或 err。
参数:
in - “标准”输入;如果为 null,则使用 System.in
out - “标准”输出;如果为 null,则使用 System.out
err - “标准”错误;如果为 null,则使用 System.err
arguments - 要传递给工具的参数
返回:
如果成功,则返回 0;否则返回非 0 值
抛出:
NullPointerException - 如果参数数组包含任何 null 元素。
实例源码,注释比较详细,不再解释,Compiler.java中代码片段:
[java] view plain copy
/**
* Author: Jiangtao He; Email: ross.jiangtao.he@gmail.com
* @param sFullFileName: the java source file name with full path
* @return bRet: true-compile successfully, false - compile unsuccessfully
* Description: Compile java source file to java class with run method
*/
public boolean compileFile(String sFullFileName)
{
boolean bRet = false ;
// get compiler
JavaCompiler oJavaCompiler = ToolProvider.getSystemJavaCompiler();
// compile the java source code by run method
int iCompileRet = oJavaCompiler.run( null , null , null , sFullFileName);
// set compile result
if ( 0 == iCompileRet)
{
bRet = true ;
}
return bRet;
}
再看下我们的getTask方法编译java源代码, 这个方法其实是构造了一个JavaCompiler.CompilationTask对象, 然后在调用这个对象的call方法, 在构造对象的过程中, 可以指定class的生成路径,监控错误信息,调用过程如下:
1) 生成JavaCompiler对象,用于构造CompilationTask对象,并编译java源代码
2) 构造DiagnosticCollector对象,用于存储诊断信息
3) 构造oStandardJavaFileManager对象,用于设置类的生成路径, 为了方便使用java反射方法,我直接将本实例中的输出路径设置为工程bin目录.实际应用中应根据场景生成道不同的目录--比如可以根据配置或者包名来做.
4) 生成源文件迭代器Iterable对象, 用于存储java源代码文件完整的路径
5) 根据上面生成的对象, 调用JavaCompiler对象的getTask构造CompilationTask对象, 并调用其call方法,编译源代码
再看下getTask方法的声明:
[plain] view plain copy
JavaCompiler.CompilationTask getTask(Writer out,
JavaFileManager fileManager,
DiagnosticListener<? super JavaFileObject> diagnosticListener,
Iterable<String> options,
Iterable<String> classes,
Iterable<? extends JavaFileObject> compilationUnits) 使用给定组件和参数创建编译任务的 future。该编译可能没有完成,正如 CompilationTask 接口中所述。
如果提供了文件管理器,则它必须能够处理 StandardLocation 中定义的所有位置。
参数:
out - 用于来自编译器的其他输出的 Writer;如果为 null,则使用 System.err
fileManager - 文件管理器;如果为 null,则使用编译器的标准文件管理器
diagnosticListener - 诊断侦听器;如果为 null,则使用编译器的默认方法报告诊断信息
options - 编译器选项;null 表示没有选项
classes - 类名称(用于注释处理),null 表示没有类名称
compilationUnits - 要编译的编译单元;null 表示没有编译单元
返回:
表示编译的对象
抛出:
RuntimeException - 如果在用户提供的组件中发生不可恢复的错误。cause 为用户代码中的错误。
IllegalArgumentException - 如果给定的任一编译单元具有不同于 source 的类型
源码清单如下,Compiler.java中代码片段:
[java] view plain copy
/**
* Author: Jiangtao He; Email: ross.jiangtao.he@gmail.com
* @param sFullFileName: the java source file name with full path
* @param sOutputPath: the output path of java class file
* @return bRet: true-compile successfully, false - compile unsuccessfully
* Description: Compile java source file to java class with getTask
* method, it can specify the class output path and catch diagnostic
* information
* @throws IOException
*/
public boolean compileFile(String sFullFileName, String sOutputPath) throws IOException
{
boolean bRet = false ;
// get compiler
JavaCompiler oJavaCompiler = ToolProvider.getSystemJavaCompiler();
// define the diagnostic object, which will be used to save the
// diagnostic information
DiagnosticCollector<JavaFileObject> oDiagnosticCollector = new DiagnosticCollector<JavaFileObject>();
// get StandardJavaFileManager object, and set the diagnostic for the
// object
StandardJavaFileManager oStandardJavaFileManager = oJavaCompiler
.getStandardFileManager(oDiagnosticCollector, null , null );
// set class output location
Location oLocation = StandardLocation.CLASS_OUTPUT;
try
{
oStandardJavaFileManager.setLocation(oLocation, Arrays
.asList(new File[] { new File(sOutputPath) }));
// get JavaFileObject object, it will specify the java source file.
Iterable<? extends JavaFileObject> oItJavaFileObject = oStandardJavaFileManager
.getJavaFileObjectsFromFiles(Arrays.asList(new File(
sFullFileName)));
// compile the java source code by using CompilationTask's call
// method
bRet = oJavaCompiler.getTask(null , oStandardJavaFileManager,
oDiagnosticCollector, null , null , oItJavaFileObject).call();
//print the Diagnostic's information
for (Diagnostic oDiagnostic : oDiagnosticCollector
.getDiagnostics())
{
System.out.println("Error on line: "
+ oDiagnostic.getLineNumber() + "; URI: "
+ oDiagnostic.getSource().toString());
}
}
catch (IOException e)
{
//exception process
System.out.println("IO Exception: " + e);
throw e;
}
finally
{
//close file manager
if ( null != oStandardJavaFileManager)
{
oStandardJavaFileManager.close();
}
}
return bRet;
}
编译的方法就这两个简单吧, 下面我们测试下这两个方法:
首先, 声明下我们的compiler类的对象,初始化下编译的类和输出类的路径,MyMain.java中代码片段:
[plain] view plain copy
// get compiler object
Compiler oCompiler = new Compiler();
// the java source file name with full path
String sFullFileName = "E:\\myspace\\CompilerSample\\Sample.java";
// define the output path of java class, since this demo is ran into
// eclipse, so set it as bin
String sOutputPath = "bin/";
测试run方法:
[java] view plain copy
// Compile java source file to java class with run method
boolean bRet = oCompiler.compileFile(sFullFileName);
// print result
if (bRet)
{
System.out.println("Compile the source code \"" + sFullFileName
+ "\" successfully" );
}
else
{
System.out.println("Compile the source code \"" + sFullFileName
+ "\" unsuccessfully" );
}
run方法测试,控制台信息:
[plain] view plain copy
Compile the source code "E:\myspace\CompilerSample\Sample.java" successfully
生成的类文件抓图:

测试getTask方法,并利用java反射运行所生成类中的"printClassName"方法:
[java] view plain copy
// Compile java source file, and output the class file into specified
// path
bRet = oCompiler.compileFile(sFullFileName, sOutputPath);
// print result
if (bRet)
{
System.out.println("Compile the source code \"" + sFullFileName
+ "\" successfully" );
// if compile success, then execute the printClassName method of the
// compiled class
System.out
.println("Execute the printClassName method of the compiled class: " );
System.out.print(" " );
// load the class
Class oClass = Class.forName("Sample" );
// new an object of sample class
Object oObject = oClass.newInstance();
// get object of printClassName method
Method oMethod = oClass.getMethod("printClassName" );
oMethod.invoke(oObject);
}
else
{
System.out.println("Compile the source code \"" + sFullFileName
+ "\" unsuccessfully" );
}
}
运行测试方法后,控制台打印信息:
[plain] view plain copy
Compile the source code "E:\myspace\CompilerSample\Sample.java" successfully
Execute the printClassName method of the compiled class:
Print the class name: Sample
生成的类文件抓图:

至此, 通过java Compiler API动态编译并运行源文件的例子就完了.
一直在用JDK1.5, 一直搞不清楚JDK1.6有啥特性, 就翻了翻, 发现这个Compiler API(JSR 199)动态编译Java源文件功能很有意思. Compiler API如果和反射功能一起使用, 就可以实现java源代码的动态编译并执行这些代码,有点动态语言的特征. 利用这些API普通用户也可以方便的开发自己的编译器,动态生成代码,编译并运行. 本文就通过一个动态编译并运行源文件的例子简单说明下Compile API的基本功能, 有兴趣的可以深入研究下. 本实例的完成工程代码可以从这里 下载: http://dl.iteye.com/topics/download/0807c557-4f0d-3aba-956f-9fe5c9b83962
实例中实现的功能描述:
1. 使用JavaCompiler对象的run方法编译java源代码,并在源代码所在目录生成对应的class文件
2. 使用JavaCompiler对象的getTask方法编译java源代码,并将对应的class文件生成到指定目录, 并执行所生成类中指定的"printClassName"方法
环境准备:
首先回顾一下JDK, JRE,JVM的概念和关系:
JRE是java的运行环境, 说白了有JRE才能运行java类; 同时java类是运行于虚拟机(JVM)上的, 其实虚拟机是JRE的一部分, 具体来讲,在windows上就是JRE下面的一个JVM.dll文件; JDK就是java开发工具箱, 具有编译java类的功能和运行java类的功能(自身包含了一个JRE).
知道了JDK,JRE,JVM的关系,我们就应该明白,如果要在eclipse里面使用java的编译功能必须在eclipse里面使用JDK作为Library,否则在eclipse中获取不了JavaCompiler的对象. 设置如下图:
懒得找JDK1.6,我就直接下载了个1.7装了下,然后开发工具使用MyEclipse (当然用的是免费版的 -:)).
在看我们的实例分析及源码:
首先看下run方法编译java源文件, run方法比较简单,但不能指定输出路径,监控错误信息, 调用后就在源码所在目录生成class文件,run方法的声明如下:
[plain] view plain copy
int run(InputStream in,
OutputStream out,
OutputStream err,
String... arguments)使用给定 I/O 通道和参数运行工具。按照惯例,工具如果运行成功,则返回 0;如果出现错误,则返回非 0 值。任何生成的诊断都将以某种未指定的格式写入 out 或 err。
参数:
in - “标准”输入;如果为 null,则使用 System.in
out - “标准”输出;如果为 null,则使用 System.out
err - “标准”错误;如果为 null,则使用 System.err
arguments - 要传递给工具的参数
返回:
如果成功,则返回 0;否则返回非 0 值
抛出:
NullPointerException - 如果参数数组包含任何 null 元素。
实例源码,注释比较详细,不再解释,Compiler.java中代码片段:
[java] view plain copy
/**
* Author: Jiangtao He; Email: ross.jiangtao.he@gmail.com
* @param sFullFileName: the java source file name with full path
* @return bRet: true-compile successfully, false - compile unsuccessfully
* Description: Compile java source file to java class with run method
*/
public boolean compileFile(String sFullFileName)
{
boolean bRet = false ;
// get compiler
JavaCompiler oJavaCompiler = ToolProvider.getSystemJavaCompiler();
// compile the java source code by run method
int iCompileRet = oJavaCompiler.run( null , null , null , sFullFileName);
// set compile result
if ( 0 == iCompileRet)
{
bRet = true ;
}
return bRet;
}
再看下我们的getTask方法编译java源代码, 这个方法其实是构造了一个JavaCompiler.CompilationTask对象, 然后在调用这个对象的call方法, 在构造对象的过程中, 可以指定class的生成路径,监控错误信息,调用过程如下:
1) 生成JavaCompiler对象,用于构造CompilationTask对象,并编译java源代码
2) 构造DiagnosticCollector对象,用于存储诊断信息
3) 构造oStandardJavaFileManager对象,用于设置类的生成路径, 为了方便使用java反射方法,我直接将本实例中的输出路径设置为工程bin目录.实际应用中应根据场景生成道不同的目录--比如可以根据配置或者包名来做.
4) 生成源文件迭代器Iterable对象, 用于存储java源代码文件完整的路径
5) 根据上面生成的对象, 调用JavaCompiler对象的getTask构造CompilationTask对象, 并调用其call方法,编译源代码
再看下getTask方法的声明:
[plain] view plain copy
JavaCompiler.CompilationTask getTask(Writer out,
JavaFileManager fileManager,
DiagnosticListener<? super JavaFileObject> diagnosticListener,
Iterable<String> options,
Iterable<String> classes,
Iterable<? extends JavaFileObject> compilationUnits) 使用给定组件和参数创建编译任务的 future。该编译可能没有完成,正如 CompilationTask 接口中所述。
如果提供了文件管理器,则它必须能够处理 StandardLocation 中定义的所有位置。
参数:
out - 用于来自编译器的其他输出的 Writer;如果为 null,则使用 System.err
fileManager - 文件管理器;如果为 null,则使用编译器的标准文件管理器
diagnosticListener - 诊断侦听器;如果为 null,则使用编译器的默认方法报告诊断信息
options - 编译器选项;null 表示没有选项
classes - 类名称(用于注释处理),null 表示没有类名称
compilationUnits - 要编译的编译单元;null 表示没有编译单元
返回:
表示编译的对象
抛出:
RuntimeException - 如果在用户提供的组件中发生不可恢复的错误。cause 为用户代码中的错误。
IllegalArgumentException - 如果给定的任一编译单元具有不同于 source 的类型
源码清单如下,Compiler.java中代码片段:
[java] view plain copy
/**
* Author: Jiangtao He; Email: ross.jiangtao.he@gmail.com
* @param sFullFileName: the java source file name with full path
* @param sOutputPath: the output path of java class file
* @return bRet: true-compile successfully, false - compile unsuccessfully
* Description: Compile java source file to java class with getTask
* method, it can specify the class output path and catch diagnostic
* information
* @throws IOException
*/
public boolean compileFile(String sFullFileName, String sOutputPath) throws IOException
{
boolean bRet = false ;
// get compiler
JavaCompiler oJavaCompiler = ToolProvider.getSystemJavaCompiler();
// define the diagnostic object, which will be used to save the
// diagnostic information
DiagnosticCollector<JavaFileObject> oDiagnosticCollector = new DiagnosticCollector<JavaFileObject>();
// get StandardJavaFileManager object, and set the diagnostic for the
// object
StandardJavaFileManager oStandardJavaFileManager = oJavaCompiler
.getStandardFileManager(oDiagnosticCollector, null , null );
// set class output location
Location oLocation = StandardLocation.CLASS_OUTPUT;
try
{
oStandardJavaFileManager.setLocation(oLocation, Arrays
.asList(new File[] { new File(sOutputPath) }));
// get JavaFileObject object, it will specify the java source file.
Iterable<? extends JavaFileObject> oItJavaFileObject = oStandardJavaFileManager
.getJavaFileObjectsFromFiles(Arrays.asList(new File(
sFullFileName)));
// compile the java source code by using CompilationTask's call
// method
bRet = oJavaCompiler.getTask(null , oStandardJavaFileManager,
oDiagnosticCollector, null , null , oItJavaFileObject).call();
//print the Diagnostic's information
for (Diagnostic oDiagnostic : oDiagnosticCollector
.getDiagnostics())
{
System.out.println("Error on line: "
+ oDiagnostic.getLineNumber() + "; URI: "
+ oDiagnostic.getSource().toString());
}
}
catch (IOException e)
{
//exception process
System.out.println("IO Exception: " + e);
throw e;
}
finally
{
//close file manager
if ( null != oStandardJavaFileManager)
{
oStandardJavaFileManager.close();
}
}
return bRet;
}
编译的方法就这两个简单吧, 下面我们测试下这两个方法:
首先, 声明下我们的compiler类的对象,初始化下编译的类和输出类的路径,MyMain.java中代码片段:
[plain] view plain copy
// get compiler object
Compiler oCompiler = new Compiler();
// the java source file name with full path
String sFullFileName = "E:\\myspace\\CompilerSample\\Sample.java";
// define the output path of java class, since this demo is ran into
// eclipse, so set it as bin
String sOutputPath = "bin/";
测试run方法:
[java] view plain copy
// Compile java source file to java class with run method
boolean bRet = oCompiler.compileFile(sFullFileName);
// print result
if (bRet)
{
System.out.println("Compile the source code \"" + sFullFileName
+ "\" successfully" );
}
else
{
System.out.println("Compile the source code \"" + sFullFileName
+ "\" unsuccessfully" );
}
run方法测试,控制台信息:
[plain] view plain copy
Compile the source code "E:\myspace\CompilerSample\Sample.java" successfully
生成的类文件抓图:
测试getTask方法,并利用java反射运行所生成类中的"printClassName"方法:
[java] view plain copy
// Compile java source file, and output the class file into specified
// path
bRet = oCompiler.compileFile(sFullFileName, sOutputPath);
// print result
if (bRet)
{
System.out.println("Compile the source code \"" + sFullFileName
+ "\" successfully" );
// if compile success, then execute the printClassName method of the
// compiled class
System.out
.println("Execute the printClassName method of the compiled class: " );
System.out.print(" " );
// load the class
Class oClass = Class.forName("Sample" );
// new an object of sample class
Object oObject = oClass.newInstance();
// get object of printClassName method
Method oMethod = oClass.getMethod("printClassName" );
oMethod.invoke(oObject);
}
else
{
System.out.println("Compile the source code \"" + sFullFileName
+ "\" unsuccessfully" );
}
}
运行测试方法后,控制台打印信息:
[plain] view plain copy
Compile the source code "E:\myspace\CompilerSample\Sample.java" successfully
Execute the printClassName method of the compiled class:
Print the class name: Sample
生成的类文件抓图:
至此, 通过java Compiler API动态编译并运行源文件的例子就完了.

相关文章推荐
- Rxjava中toList操作符
- java web 监听器listener
- javadoc解决中文乱码问题
- spring源码分析(一)- 源码下载和导入eclipse
- C# 实现java中 wiat/notify机制
- 为什么Java中字符串是不可变的
- MyEclipse如何对Hibernate进行逆向工程
- 代码获取spring管理的javabean
- 安装winPcap和jpcap
- java实现在线预览--poi实现word、excel、ppt转html
- Unresolved inclusion: <jni.h>
- java枚举常用场景小结
- Spring MVC学习笔记——Welcome
- 如何在Java程序中访问mysql数据库中的数据并进行简单的操作
- Java并发编程学习路线图
- Java NIO使用及原理分析 (四)
- WebService加入WS-Security的应用
- java基础--关于map的遍历keySet和entrySet
- JAVA的环境变量配置及详解
- Spring整合Hibernate 声明式的事务管理