Spring MVC整合Velocity
2016-05-05 14:32
483 查看
velocity学习参考:http://www.ibm.com/developerworks/cn/java/j-lo-velocity1/
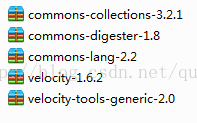
Spring MVC整合Velocity,就要引入相关的包,需要导入的包如下图
然后,就是进行很简单的配置了,那在这里,就修改下springMvc-servlet.xml内容,内容修改如下
[html] view
plain copy
<?xml version="1.0" encoding="UTF-8"?>
<!--看到下面的beans这个元素标签没有,必须有标签的声明 -->
<beans xmlns="http://www.springframework.org/schema/beans"
xmlns:xsi="http://www.w3.org/2001/XMLSchema-instance"
xmlns:context="http://www.springframework.org/schema/context"
xmlns:mvc="http://www.springframework.org/schema/mvc"
xsi:schemaLocation="http://www.springframework.org/schema/beans
http://www.springframework.org/schema/beans/spring-beans.xsd
http://www.springframework.org/schema/context
http://www.springframework.org/schema/context/spring-context.xsd
http://www.springframework.org/schema/mvc
http://www.springframework.org/schema/mvc/spring-mvc.xsd">
<!-- 对web包中的所有类进行扫描,以完成Bean创建和自动依赖注入的功能 -->
<context:component-scan base-package="qust.thb.*" />
<!-- 支持spring3.0新的mvc注解 -->
<mvc:annotation-driven />
<!-- 启动Spring MVC的注解功能,完成请求和注解POJO的映射 -->
<bean class="org.springframework.web.servlet.mvc.annotation.AnnotationMethodHandlerAdapter"/>
<!-- ViewResolver -->
<!--
<bean class="org.springframework.web.servlet.view.InternalResourceViewResolver">
<property name="viewClass" value="org.springframework.web.servlet.view.JstlView" />
<property name="prefix" value="/WEB-INF/" />
<property name="suffix" value=".jsp" />
</bean>
-->
<bean id="velocityConfig" class="org.springframework.web.servlet.view.velocity.VelocityConfigurer">
<property name="resourceLoaderPath" value="/WEB-INF/"/>
<property name="configLocation" value="/WEB-INF/velocity.properties"/>
</bean>
<bean id="viewResolver" class="org.springframework.web.servlet.view.velocity.VelocityViewResolver">
<property name="cache" value="true"/>
<property name="prefix" value=""/>
<property name="suffix" value=".vm"/>
</bean>
</beans>
然后在WEB-INF文件夹下创建velocity.properties文件,里面内容很简单,就两句话
input.encoding=UTF-8
output.encoding=UTF-8
然后,将view文件夹下的hello.jsp删除掉,新建一个文件,名为hello.vm,里面内容也很简单,如下
[html] view
plain copy
<div>
${message}
</div>
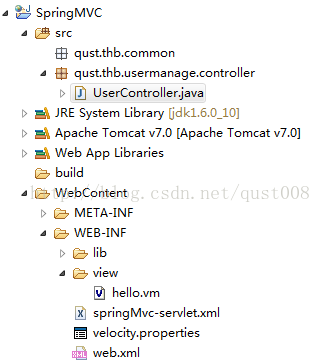
整体的目录结构如下图所示
输入地址http://localhost:8080/SpringMVC/user/getUser.do,访问正常访问
用到velocity,肯定要用到SiteMesh进行修饰,使得我们在由大量页面工程的项目中创建一致的页面布局和外观,如一致的导航条、一致的banner、一致的版权等。
下一篇介绍Spring MVC利用SiteMesh修饰velocity
http://blog.csdn.net/qust008/article/details/9625179
Spring MVC整合Velocity,就要引入相关的包,需要导入的包如下图
然后,就是进行很简单的配置了,那在这里,就修改下springMvc-servlet.xml内容,内容修改如下
[html] view
plain copy
<?xml version="1.0" encoding="UTF-8"?>
<!--看到下面的beans这个元素标签没有,必须有标签的声明 -->
<beans xmlns="http://www.springframework.org/schema/beans"
xmlns:xsi="http://www.w3.org/2001/XMLSchema-instance"
xmlns:context="http://www.springframework.org/schema/context"
xmlns:mvc="http://www.springframework.org/schema/mvc"
xsi:schemaLocation="http://www.springframework.org/schema/beans
http://www.springframework.org/schema/beans/spring-beans.xsd
http://www.springframework.org/schema/context
http://www.springframework.org/schema/context/spring-context.xsd
http://www.springframework.org/schema/mvc
http://www.springframework.org/schema/mvc/spring-mvc.xsd">
<!-- 对web包中的所有类进行扫描,以完成Bean创建和自动依赖注入的功能 -->
<context:component-scan base-package="qust.thb.*" />
<!-- 支持spring3.0新的mvc注解 -->
<mvc:annotation-driven />
<!-- 启动Spring MVC的注解功能,完成请求和注解POJO的映射 -->
<bean class="org.springframework.web.servlet.mvc.annotation.AnnotationMethodHandlerAdapter"/>
<!-- ViewResolver -->
<!--
<bean class="org.springframework.web.servlet.view.InternalResourceViewResolver">
<property name="viewClass" value="org.springframework.web.servlet.view.JstlView" />
<property name="prefix" value="/WEB-INF/" />
<property name="suffix" value=".jsp" />
</bean>
-->
<bean id="velocityConfig" class="org.springframework.web.servlet.view.velocity.VelocityConfigurer">
<property name="resourceLoaderPath" value="/WEB-INF/"/>
<property name="configLocation" value="/WEB-INF/velocity.properties"/>
</bean>
<bean id="viewResolver" class="org.springframework.web.servlet.view.velocity.VelocityViewResolver">
<property name="cache" value="true"/>
<property name="prefix" value=""/>
<property name="suffix" value=".vm"/>
</bean>
</beans>
然后在WEB-INF文件夹下创建velocity.properties文件,里面内容很简单,就两句话
input.encoding=UTF-8
output.encoding=UTF-8
然后,将view文件夹下的hello.jsp删除掉,新建一个文件,名为hello.vm,里面内容也很简单,如下
[html] view
plain copy
<div>
${message}
</div>
整体的目录结构如下图所示
输入地址http://localhost:8080/SpringMVC/user/getUser.do,访问正常访问
用到velocity,肯定要用到SiteMesh进行修饰,使得我们在由大量页面工程的项目中创建一致的页面布局和外观,如一致的导航条、一致的banner、一致的版权等。
下一篇介绍Spring MVC利用SiteMesh修饰velocity
http://blog.csdn.net/qust008/article/details/9625179

相关文章推荐
- java NIO流代码
- Java中关于Double 类型的数据比较
- Spring Security 4 安全视图片段 使用标签(Spring Security 标签)
- 多文件预览上传基于Struts
- 【第二章】 IoC 之 2.1 IoC基础 ——跟我学Spring3
- Spring+SpringMVC+MyBatis+Maven框架整合
- Java使用stringTemplate导出大批量数据Excel(百千万级)
- MyEclipse 中出现Could not create the view: An unexpected exception was thrown.
- java中的本地缓存
- java中的不可变类
- Maven学习总结(七)——eclipse中使用Maven创建Web项目
- java设计模式之观察者模式
- java字符串全排列问题(经典)
- Java SE 8 中的 55 个新特性
- java中Double的isInfinite()和isNaN()
- JAVA Web 定时任务
- Java中的基础----序列化与反序列化的作用
- Spring MVC 系列(三)——Spring MVC 参数传递与表单交互
- java.lang.OutOfMemoryError: PermGen space及其解决方法
- org.springframework.dao.DataAccessResourceFailureException: could not execute query; nested exceptio