Apache HTTP Server 2.4编译安装及其新特性(四)
2016-04-15 07:56
483 查看
一、安装环境说明
系统环境:CentOS 6.5-x86_64所需软件源码包:apr-1.5.2.tar.gz apr(Apache Portable Runtime)apr-util-1.5.4.tar.gzhttpd-2.4.18.tar.bz2Perl-Compatible Regular Expressions Library(PCRE): pcre-devel二、Apache 组成结构

根据上图,我们就能够更好理解为什么需要安装 apr这个软件包了。 apr工作于OS上的一层,用于封装底层操作系统的不同,从而实现跨平台。apache 2.4 依赖于更高版本(1.5以上)的apr及apr-util包。
三、Apache 2.4编译安装
3.1 准备工作## 临时关闭 SELinux # setenforce 0 ## 关闭 iptables # service iptables stop ## 同步系统时间 # ntpdate time.nist.gov3.2 配置编译环境
## 安装开发工具包
# yum groupinstall -y "Development tools"

## 安装 pcre-devel
# yum install -y pcre-devel

# yum install -y zlib-devel
# yum install -y openssl-devel
3.3 编译安装 apr及apr-util
## 安装 apr-1.5.2
# tar xf apr-1.5.2.tar.gz
# cd apr-1.5.2
# ./configure --prefix=/usr/local/apr
# make && make install

## 安装 apr-util-1.5.4
# tar xf apr-util-1.5.4.tar.gz
# cd apr-util-1.5.4
# ./configure --prefix=/usr/local/apr-util --with-apr=/usr/local/apr/
# make && make install
3.4 编译安装 httpd 2.4
# tar xf httpd-2.4.18.tar.bz2
# cd httpd-2.4.18
# ./configure --prefix=/usr/local/apache --sysconfdir=/etc/httpd \
--enable-so --enable-ssl --enable-cgi --enable-rewrite --with-z --with-pcre \
--with-apr=/usr/local/apr --with-apr-util=/usr/local/apr-util/ \
--enable-modules=most --enable-mpms-shared=all --with-mpm=event
# make && make install

## 各编译参数详解
--prefix:    #安装路径
--sysconfdir:#指定配置文件路径
--enable-so: #DSO兼容,DSO=Dynamic Shared Object,动态共享对象,可实现模块动态加载
--enable-ssl:#支持SSL/TLS,可以实现https访问
--enable-cgi:#支持CGI脚本(默认对非线程的MPM模式开启)
--enable-rewrite:#启用Rewrite功能
--with-z:#使用指定的zlib库,不指定路径会自动寻找
--with-pcre:#使用指定的PCRE库,不指定路径会自动寻找
--with-apr:#指定apr安装路径
--with-apr-util:#指定apr-util安装路径
--enable-modules:#支持动态启用的模块,可选参数有“all”,“most”,“few”,“reallyall”
--enable-mpms-shared:#支持动态加载的MPM模块,可选“all”
--with-mpm:#设置默认启用的MPM模式

## 查看安装的模块
# /usr/local/apache/bin/httpd -l
Compiled in modules:
core.c
mod_so.c
http_core.c
3.5 编译完成后的基本配置
## 编辑 /etc/httpd/httpd.conf, 设置 httpd pid 路径
PidFile "/var/run/httpd.pid"

## 添加PATH环境变量
# vim /etc/profile.d/httpd.sh #必须要以.sh结尾,并且放在这里可以单独管理,不要的时候可以直接删除,添加如下内容
export PATH=/usr/local/apache/bin:$PATH

# . /etc/profile.d/httpd.sh
# httpd -t
3.6 导出头文件以及man手册
## 导出头文件
# ln -sv /usr/local/apache/include/ /usr/local/include/httpd
`/usr/local/include/httpd' -> `/usr/local/apache/include/'

## 导出man手册,编辑 /etc/man.config
MANPATH /usr/man
MANPATH /usr/share/man
MANPATH /usr/local/man
MANPATH /usr/local/share/man
MANPATH /usr/X11R6/man
MANPATH /usr/local/apache/man        # 添加这一行
3.7 Apache 服务启动脚本
# vim /etc/init.d/httpd
#!/bin/bash
#
# httpd        Startup script for the Apache HTTP Server
#
# chkconfig: - 85 15
# description: Apache is a World Wide Web server.  It is used to serve \
#        HTML files and CGI.
# processname: httpd
# config: /etc/httpd/conf/httpd.conf
# config: /etc/sysconfig/httpd
# pidfile: /var/run/httpd.pid
# Source function library.
. /etc/rc.d/init.d/functions
if [ -f /etc/sysconfig/httpd ]; then
. /etc/sysconfig/httpd
fi
# Start httpd in the C locale by default.
HTTPD_LANG=${HTTPD_LANG-"C"}
# This will prevent initlog from swallowing up a pass-phrase prompt if
# mod_ssl needs a pass-phrase from the user.
INITLOG_ARGS=""
# Set HTTPD=/usr/sbin/httpd.worker in /etc/sysconfig/httpd to use a server
# with the thread-based "worker" MPM; BE WARNED that some modules may not
# work correctly with a thread-based MPM; notably PHP will refuse to start.
# Path to the apachectl script, server binary, and short-form for messages.
apachectl=/usr/local/apache/bin/apachectl
httpd=${HTTPD-/usr/local/apache/bin/httpd}
prog=httpd
pidfile=${PIDFILE-/var/run/httpd.pid}
lockfile=${LOCKFILE-/var/lock/subsys/httpd}
RETVAL=0
start() {
echo -n $"Starting $prog: "
LANG=$HTTPD_LANG daemon --pidfile=${pidfile} $httpd $OPTIONS
RETVAL=$?
echo
[ $RETVAL = 0 ] && touch ${lockfile}
return $RETVAL
}
stop() {
echo -n $"Stopping $prog: "
killproc -p ${pidfile} -d 10 $httpd
RETVAL=$?
echo
[ $RETVAL = 0 ] && rm -f ${lockfile} ${pidfile}
}
reload() {
echo -n $"Reloading $prog: "
if ! LANG=$HTTPD_LANG $httpd $OPTIONS -t >&/dev/null; then
RETVAL=$?
echo $"not reloading due to configuration syntax error"
failure $"not reloading $httpd due to configuration syntax error"
else
killproc -p ${pidfile} $httpd -HUP
RETVAL=$?
fi
echo
}
# See how we were called.
case "$1" in
start)
start;;
stop)
stop;;
status)
status -p ${pidfile} $httpd
RETVAL=$?;;
restart)
stop
start;;
condrestart)
if [ -f ${pidfile} ] ; then
stop
start
fi;;
reload)
reload;;
graceful|help|configtest|fullstatus)
$apachectl $@
RETVAL=$?;;
*)
echo $"Usage: $prog {start|stop|restart|condrestart|reload|status|fullstatus|graceful|help|configtest}"
exit 1
esac
exit $RETVAL

## end of script

## 添加可执行权限
# chmod +x /etc/init.d/httpd
3.8 启动httpd## 设置开机启动 # chkconfig httpd on ## 检查配置 # service httpd configtest Syntax OK ## 启动httpd # service httpd start # ss -tulpn | grep 80 ## 访问测试 # curl http://localhost <html><body><h1>It works!</h1></body></html>到此,我们就成功编译安装完成 httpd 2.4.
四、Apache 2.4配置
1、与rpm包或yum安装的不同,编译安装时许多默认配置在 /etc/httpd/extra目录。2、与apache 2.2不同, apache 2.4 正式支持 event 模型。3、与apache 2.2不同, apache 2.4 配置基于主机名的虚拟主机时,不再需要NameVirtualHost指令。4.1 配置基于主机名的虚拟主机1、编辑 /etc/httpd/extra/httpd-vhosts.conf文件,定义虚拟主机# vi /etc/httpd/extra/httpd-vhosts.conf <VirtualHost *:80> DocumentRoot "/web/vhost/a.com" ServerName www.a.com ErrorLog "logs/a.com-error_log" CustomLog "logs/a.com-access_log" common <Directory "/web/vhost/a.com"> Require all granted </Directory> </VirtualHost> <VirtualHost *:80> DocumentRoot "/web/vhost/b.org" ServerName www.b.org ErrorLog "logs/b.org-error_log" CustomLog "logs/b.org-access_log" common <Directory "/web/vhost/b.org"> Require all granted </Directory> </VirtualHost>2、创建相关目录以及默认主页
# mkdir -pv /web/vhost/{a.com,b.org}
# echo "<h1>www.a.com<h1>" > /web/vhost/a.com/index.html
# echo "<h1>www.b.org<h1>" > /web/vhost/b.org/index.html
3、修改主配置文件 httpd.conf, 注释中心主机,以及取消注释Include 虚拟主机行# vi /etc/httpd/httpd.conf #DocumentRoot "/usr/local/apache/htdocs" # Virtual hosts Include /etc/httpd/extra/httpd-vhosts.conf4、检查配置,启动httpd
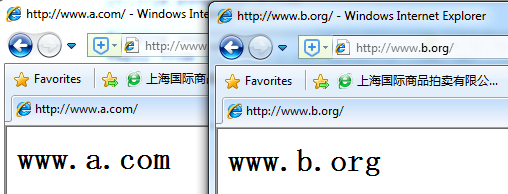
# service httpd configtest
# service httpd restart
5、通过 其他机器访问(这里是win7)首先修改 win7 的hosts文件,绑定不同的域名。 C:\Windows\System32\drivers\etc
192.168.1.31  www.a.com
192.168.1.31  www.b.org
检查是否解析成功
[c:\~]$ ping www.b.org

Pinging www.b.org [192.168.1.31] with 32 bytes of data:
Reply from 192.168.1.31: bytes=32 time=29ms TTL=64
Reply from 192.168.1.31: bytes=32 time<1ms TTL=64

Ping statistics for 192.168.1.31:
Packets: Sent = 2, Received = 2, Lost = 0 (0% loss),
Approximate round trip times in milli-seconds:
Minimum = 0ms, Maximum = 29ms, Average = 14ms
[c:\~]$ ping www.a.com

Pinging www.a.com [192.168.1.31] with 32 bytes of data:
Reply from 192.168.1.31: bytes=32 time<1ms TTL=64
Reply from 192.168.1.31: bytes=32 time<1ms TTL=64

Ping statistics for 192.168.1.31:
Packets: Sent = 2, Received = 2, Lost = 0 (0% loss),
Approximate round trip times in milli-seconds:
Minimum = 0ms, Maximum = 0ms, Average = 0ms
通过浏览器访问
五、Apache 2.4访问控制用户认证
## 配置httpd.conf
AuthType Basic                         # 用户认证类型
AuthName "Restricted Site"             # 认证时显示的名字
AuthUserFile /etc/httpd/conf/htpasswd  # 认证时用户的账号密码文件
AuthGroupFile /etc/httpd/conf/htgroup  # 基于组的认证
# Require user tom                     # 只有tom用户才能登录
# Require group myusers                # 允许哪个组中的用户登录
Require valid-user                     # 出现在账号密码文件中的用户都能登录

## 创建/etc/httpd/conf/htpasswd文件,及用户
使用htpasswd命令创建用户,在第一次创建时加-c可创建文件
# htpasswd -c -m /etc/httpd/conf/htpasswd  tom
# htpasswd -m /etc/httpd/conf/htpasswd  jerry

## 创建组文件/etc/httpd/conf/htgroup
在文件中写入一行
myusers:  tom  jerry
IP限制
#语法:
<directory "paht/to/somedir">
<RequireAll>
Require all granted       #允许所有IP访问
Require all denied        #不允许任何IP访问
Require ip  192.168       #IP地址的简写方式
Require ip  192.168.1.0/24       #允许某个网段的IP访问
Require not ip  192.168.80.0/24  #不允许某个网段的IP访问
Require host test.com  #不允许主机名是test.com的主机访问
</RequireAll>
#注:Require的限制策略遵循“最后匹配原则”,即后一条规则会部分覆盖前一条规则(取交集)。

下面给出了几个例子在2.4版本上的配置
1. 仅允许IP为192.168.1.1的主机访问
<RequireAll>
require all  granted
require ip 192.168.1.1
</RequireAll>

2.仅允许192.168.0.0/24网络的主机访问
<RequireAll>
require all  granted
require ip 192.168.1.0/24
</RequireAll>

3.禁止192.168.1.2的主机访问,其他的都允许访问
<RequireAll>
require all  granted
require not ip 192.168.1.2
</RequireAll>

4.允许所有访问
require all  granted

注,这个可以不用加容器<RequireAll> ......  </RequireAll>
直接,写在 <Directory ""> .....</Directory>里面就可以了

5.拒绝所有访问
require all  denied

相关文章推荐
- Android IPC进程间通讯机制
- android之定时器AlarmManager
- axis备忘
- 互联网业内的迷雾 谨慎选择虚拟主机
- 选定虚拟主机 性能凸显优势
- 开通虚拟主机时提示Server.CreateObject失败的解决办法
- 用vbs实现虚拟主机和域名查循的脚本
- 星外虚拟主机平台国内五大域名接口设置方法
- Windows XP Service Pack 3 RC1 v.3244 winxp补丁3 提供下载
- Run As Service runassrv.exe 详细参数第1/2页
- 安装MySQL在最后的start service停住了解决方法
- android使用Messenger绑定Service的多种实现方法
- asp.net Web Service 接口大量数据传输解决方案
- Silverlight中动态获取Web Service地址
- 本地机apache配置基于域名的虚拟主机详解
- 有史以来最好的windows 虚拟主机安全配置
- winxp apache用php建本地虚拟主机的方法
- android调用web service(cxf)实例应用详解
- 在Android中 获取正在运行的Service 实例
- apache的多站点虚拟主机配置方法