Nagios
2016-04-08 20:49
429 查看
Nagios
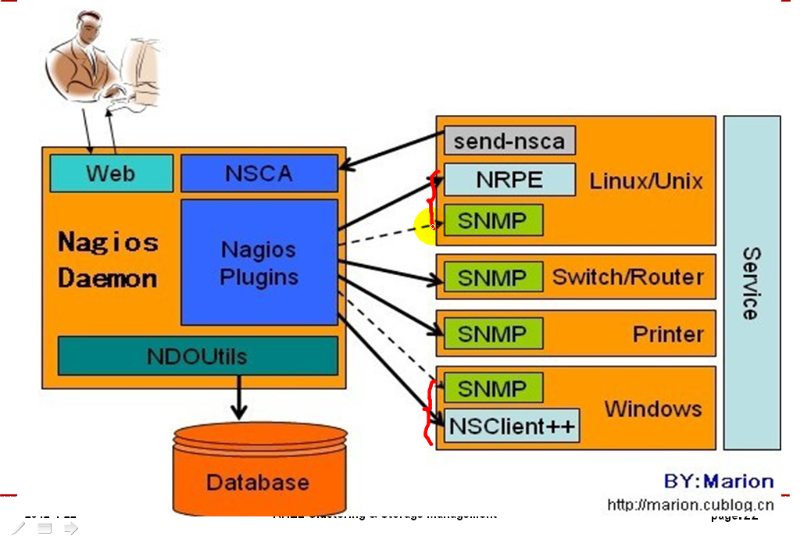
监控原理:
Nagios监控linux 时,linux 启动nrpe 进程,Nagios发起对nrpe监控请求。
windows 装NSClient++ ,Nagios用check_nt 来探测windows信息
NSClient++ 同时也提供 check_nrpe来检测, 也可以启动NSCA进程。Nagios被动来检测
一:需求环境:
1:安装LAMP环境:监控机ip假定为192.168.2.20
2:添加nagios运行所需要的用户和组:
# groupadd nagcmd
# useradd -G nagcmd nagios
# passwd nagios
把apache加入到nagcmd组,以便于在通过web Interface操作nagios时能够具有足够的权限:
# usermod -a -G nagcmd apache
3:编译安装nagios:
# tar zxf nagios-4.1.1.tar.gz
# cd nagios-4.1.1
# ./configure --with-command-group=nagcmd --enable-event-broker
# ./configure --sysconfdir=/etc/nagios --with-command-group=nagcmd --enable-event-broker
# make all
# make install
# make install-init
# make install-commandmode
# make install-config
# make install-webconf
默认nagios会在httpd的配置文件目录(conf.d)中创建Nagios的Web程序配置文件:
注意:因为我是编译安装的httpd,所以改为如下
# cp sample-config/httpd.conf /etc/httpd/extra/nagios.conf
在httpd.conf文件打开对nagios 支持
Include /etc/httpd/extra/nagios.conf
创建一个登录nagios web程序的用户,这个用户帐号在以后通过web登录nagios认证时所用:
# htpasswd -c /usr/local/nagios/etc/htpasswd.users nagiosadmin
注意:因为我是编译安装的httpd,所以改为如下
# /usr/local/httpd/bin/htpasswd -c /etc/nagios/htpasswd.users nagiosadmin
以上过程配置结束以后需要重新启动httpd:
LoadModule cgid_module modules/mod_cgid.so
LoadModule actions_module modules/mod_actions.so
# service httpd restart
4:编译、安装nagios-plugins
nagios的所有监控工作都是通过插件完成的,因此,在启动nagios之前还需要为其安装官方提供的插件。
# tar xf nagios-plugins-2.1.1.tar.gz
# cd nagios-plugins-2.1.1
# ./configure --with-nagios-user=nagios --with-nagios-group=nagios
# make && make install
5、配置并启动Nagios
(1)把nagios添加为系统服务并将之加入到自动启动服务队列:
# chkconfig --add nagios
# chkconfig nagios on
(2)检查其主配置文件的语法是否正确:
# /usr/local/nagios/bin/nagios -v /etc/nagios/nagios.cfg
二:被监控端安装NRPE,假定被监控机ip为192.168.2.3
1:先添加nagios用户,安装nagios插件
# useradd -s /sbin/nologin nagios
# tar xf nagios-plugins-2.1.1.tar.gz
# ./configure --with-nagios-user=nagios --with-nagios-group=nagios
# make && make install
2:安装nrpe,他的默认端口为5666
# tar xf nrpe-2.15.tar.gz
# cd nrpe-2.15
# ./configure --with-nrpe-user=nagios \
--with-nrpe-group=nagios \
--with-nagios-user=nagios \
--with-nagios-group=nagios \
--enable-command-args \
--enable-ssl \
--sysconfdir=/etc/nrpe
# make all
# make install-plugin
# make install-daemon
# make install-daemon-config
3: 修改 /etc/nrpe/nrpe.conf 文件。
allowed_hosts=192.168.2.20 要允许服务器IP监控
server_address=192.168.2.3 被监控机自己IP
4: 手动启动 nagios
# /usr/local/nagios/bin/nrpe -c /usr/local/nagios/etc/nrpe.cfg –d
配置nrpe的启动脚本如下:
#!/bin/bash
# chkconfig: 2345 88 12
# description: NRPE DAEMON
NRPE=/usr/local/nagios/bin/nrpe
NRPECONF=/etc/nrpe/nrpe.cfg
case "$1" in
start)
echo -n "Starting NRPE daemon..."
$NRPE -c $NRPECONF -d
echo " done."
;;
stop)
echo -n "Stopping NRPE daemon..."
pkill -u nagios nrpe
echo " done."
;;
restart)
$0 stop
sleep 2
$0 start
;;
*)
echo "Usage: $0 start|stop|restart"
;;
esac
exit 0
三:服务器监控端口安装NRPE插件:
1: # tar xf nrpe-2.15.tar.gz
# cd nrpe-2.15
# ./configure
--with-nrpe-user=nagios
--with-nrpe-group=nagios
--with-nagios-user=nagios
--with-nagios-group=nagios
--enable-command-args
--enable-ssl --sysconfdir=/etc/nrpe
# make all
# make install-plugin
2:探测:能否与被监控机通讯
[root@centos ~]# /usr/local/nagios/libexec/check_nrpe -H 192.168.2.3
NRPE v2.15
注意:通过NRPE监控远程Linux主机要使用chech_nrpe插件进行,其语法格式如下:
check_nrpe -H <host> [-n] [-u] [-p <port>] [-t <timeout>] [-c <command>] [-a <arglist...>]
四:配置文件设置:
1:在linux被监控机:/etc/nrpe.conf 定义监控具体的执行命令
command[check_sda1]=/usr/local/nagios/libexec/check_disk -w 20% -c 10% -p /
定义个监控名[check_sda1]执行后面/usr/local/nagios/libexec/check_disk -w 20% -c 10% -p /。 [check_sda1]自己随便定义名。后面会被调用。
2:Nagios 监控机:
define command {
command_name check_nrpe 定义命令名为check_nrpe,这个名可以自己取。下面调用名
command_line $USER1$/check_nrpe -H "$HOSTADDRESS$" -c $ARG1$
}
说明:定义个check_nrpe命令,并定义一个参数$ARG1$
define service{
use generic-service
host_name nginx
service_description check_sda1
check_command check_nrpe!check_sda1
}
说明:调用上面定义的check_nrpe这个命令名,并把check_sda1传递给$ARG1$

相关文章推荐
- MySQL中的integer 数据类型
- MySQL存储过程
- mysql中int、bigint、smallint 和 tinyint的区别与长度
- mysql load data 导出、导入 csv
- source命令执行SQL脚本文件
- MySQL创建用户及权限控制
- MySQL管理数据表
- linux下mysql添加用户
- mysql procedure
- mysql触发器
- 网络监控器Nagios全攻略
- MySQL 备份和恢复策略
- mac下安装mysql(转载)
- mysql 修改编码 Linux/Mac/Unix/通用(杜绝修改后无法启动的情况!)
- MySQL数据的导出、导入(mysql内部命令:mysqldump、mysql)
- mysql数据行转列
- Linux下修改MySQL编码的方法
- MySQL Server 日志
- MySQL 安全事宜