iOS自定义转场动画(下)
2016-04-04 14:19
363 查看
添加 UIViewControllerAnimatedTransitioning
添加一个 Cocoa Touch Class,继承自 NSObject,取名 BWFlipTransionPush(名字嘛,你开心就好。),遵守 UIViewControllerAnimatedTransitioning 协议。
实现协议的两个方法,并在其中编写 Push 的动画。 具体的动画实现过程都在代码的注释里 :
func
animateTransition(transitionContext: UIViewControllerContextTransitioning) {
let fromVC = transitionContext.viewControllerForKey(UITransitionContextFromViewControllerKey) as! FirstViewController
let toVC = transitionContext.viewControllerForKey(UITransitionContextToViewControllerKey) as! SecondViewController
let container = transitionContext.containerView()
container.addSubview(toVC.view)
container.bringSubviewToFront(fromVC.view)
//改变m34
var transfrom = CATransform3DIdentity
transfrom.m34 =
-0.002
container.layer.sublayerTransform = transfrom
//设置anrchPoint
和 position
let initalFrame = transitionContext.initialFrameForViewController(fromVC)
toVC.view.frame = initalFrame
fromVC.view.frame = initalFrame
fromVC.view.layer.anchorPoint = CGPointMake(0, 0.5)
fromVC.view.layer.position = CGPointMake(0, initalFrame.height / 2.0)
//添加阴影效果
let shadowLayer = CAGradientLayer()
shadowLayer.colors = [UIColor(white: 0, alpha: 1).CGColor, UIColor(white: 0, alpha: 0.5).CGColor, UIColor(white: 1, alpha: 0.5)]
shadowLayer.startPoint = CGPointMake(0, 0.5)
shadowLayer.endPoint = CGPointMake(1, 0.5)
shadowLayer.frame = initalFrame
let shadow = UIView(frame: initalFrame)
shadow.backgroundColor = UIColor.clearColor()
shadow.layer.addSublayer(shadowLayer)
fromVC.view.addSubview(shadow)
shadow.alpha = 0
//动画
UIView.animateWithDuration(transitionDuration(transitionContext), delay: 0, options: UIViewAnimationOptions.CurveEaseOut, animations: { () -> Void in
fromVC.view.layer.transform = CATransform3DMakeRotation(CGFloat(-M_PI_2), 0, 1, 0)
shadow.alpha = 1.0
}) { (finished: Bool) -> Void in
fromVC.view.layer.anchorPoint = CGPointMake(0.5, 0.5)
fromVC.view.layer.position = CGPointMake(CGRectGetMidX(initalFrame), CGRectGetMidY(initalFrame))
fromVC.view.layer.transform = CATransform3DIdentity
shadow.removeFromSuperview()
transitionContext.completeTransition(!transitionContext.transitionWasCancelled())
}
}
动画的过程我就不多说了,仔细看就会明白。
使用动画
让 FirstViewController 遵守 UIViewControllerTransitioningDelegate 协议,并将 self.transitioningDelegate 设置为 self。
实现 UIViewControllerTransitioningDelegate 协议的两个方法,用来指定动画类。
//动画Push
func
animationControllerForPresentedController(presented: UIViewController, presentingController presenting: UIViewController, sourceController source: UIViewController) -> UIViewControllerAnimatedTransitioning? {
return BWFlipTransionPush()
}
//动画Pop
func
animationControllerForDismissedController(dismissed: UIViewController) -> UIViewControllerAnimatedTransitioning? {
return BWFlipTransionPop()
}
OK,如果你完成了Pop动画,那么现在就可以实现自定义 Modal 转场了。现在只差手势驱动了。
手势驱动
想要同时实现 Push 和 Pop 手势,就需要给两个 viewController.view 添加手势。首先在 FirstViewController 中给自己添加一个屏幕右边的手势,在 prepareForSegue() 方法中给 SecondViewController.view 添加一个屏幕左边的手势,让它们使用同一个手势监听方法。
实现监听方法,不多说,和之前一样,但还是有仔细看,因为本示例中转场动画比较特殊,而且有两个手势,所以这里计算百分比使用的是 KeyWindow。同时不要忘了:UIPercentDrivenInteractiveTransition属性。
func
edgePanGesture(edgePan: UIScreenEdgePanGestureRecognizer) {
let progress = abs(edgePan.translationInView(UIApplication.sharedApplication().keyWindow!).x) / UIApplication.sharedApplication().keyWindow!.bounds.width
if edgePan.state == UIGestureRecognizerState.Began {
self.percentDrivenTransition = UIPercentDrivenInteractiveTransition()
if edgePan.edges == UIRectEdge.Right {
self.performSegueWithIdentifier("present", sender: nil)
} else if edgePan.edges == UIRectEdge.Left {
self.dismissViewControllerAnimated(true, completion: nil)
}
} else if edgePan.state == UIGestureRecognizerState.Changed {
self.percentDrivenTransition?.updateInteractiveTransition(progress)
} else if edgePan.state == UIGestureRecognizerState.Cancelled || edgePan.state == UIGestureRecognizerState.Ended {
if progress > 0.5 {
self.percentDrivenTransition?.finishInteractiveTransition()
} else {
self.percentDrivenTransition?.cancelInteractiveTransition()
}
self.percentDrivenTransition = nil
}
}
实现 UIViewControllerTransitioningDelegate 协议的另外两个方法,分别返回 Present 和 Dismiss 动画的百分比。
//百分比Push
func
interactionControllerForPresentation(animator: UIViewControllerAnimatedTransitioning) -> UIViewControllerInteractiveTransitioning? {
return self.percentDrivenTransition
}
//百分比Pop
func
interactionControllerForDismissal(animator: UIViewControllerAnimatedTransitioning) -> UIViewControllerInteractiveTransitioning? {
return self.percentDrivenTransition
}
现在,基于 Modal 的自定义转场动画示例就完成了。获取完整源代码:FlipTransion
Segue
这种方法比较特殊,是将 Stroyboard 中的拖线与自定义的 UIStoryboardSegue 类绑定自实现定义转场过程动画。
首先我们来看看 UIStoryboardSegue 是什么样的。
@availability(iOS, introduced=5.0)
class UIStoryboardSegue : NSObject {
//
Convenience constructor for returning a segue that performs a handler block in its -perform method.
@availability(iOS, introduced=6.0)
convenience
init(identifier: String?, source: UIViewController, destination: UIViewController, performHandler: () -> Void)
init!(identifier: String?, source: UIViewController, destination: UIViewController) //
Designated initializer
var identifier: String? { get }
var sourceViewController: AnyObject { get }
var destinationViewController: AnyObject { get }
func
perform()
}
以上是 UIStoryboardSegue 类的定义。从中可以看出,只有一个方法 perform(),所以很明显,就是重写这个方法来自定义转场动画。
再注意它的其他属性:sourceViewController 和 destinationViewController,通过这两个属性,我们就可以访问一个转场动画中的两个主角了,于是自定义动画就可以随心所欲了。
只有一点需要注意:在拖线的时候,注意在弹出的选项中选择 custom。然后就可以和自定义的 UIStoryboardSegue 绑定了。
那么,问题来了,这里只有 perform,那 返回时的动画怎么办呢?请往下看:
Dismiss
由于 perfrom 的方法叫做:segue,那么返回转场的上一个控制器叫做: unwind segue
解除转场(unwind segue)通常和正常自定义转场(segue)一起出现。
要解除转场起作用,我们必须重写perform方法,并应用自定义动画。另外,导航返回源视图控制器的过渡效果不需要和对应的正常转场相同。
其实现步骤 为:
创建一个 IBAction 方法,该方法在解除转场被执行的时候会选择地执行一些代码。这个方法可以有你想要的任何名字,而且不强制包含其它东西。它需要定义,但可以留空,解除转场的定义需要依赖这个方法。
解除转场的创建,设置的配置。这和之前的转场创建不太一样,等下我们将看看这个是怎么实现的。
通过重写 UIStoryboardSegue 子类里的 perform() 方法,来实现自定义动画。
UIViewController类 提供了特定方法的定义,所以系统知道解除转场即将执行。
当然,这么说有一些让人琢磨不透,不知道什么意思。那么,下面再通过一个示例来深入了解一下。
Segue 示例
这个示例是我自己写的,源代码地址:SegueTransion,开门见山,直接上图。
GIF演示
初始化
创建两个 UIViewController, 分别命名为:FirstViewController 和 SecondViewController。并在 Storyboard 中添加两个 UIViewController 并绑定。
分别给两个控制器添加背景图片或使用不同的背景色,用以区分。在 FirstViewController 中添加一个触发按钮,并拖线到 SecondViewController 中,在弹出的选项中选择 custion。

Present
添加一个 Cocoa Touch Class,继承自 UIStoryboardSegue,取名 FirstSegue(名字请随意)。并将其绑定到上一步中拖拽的 segue 上。
重写 FirstSegue 中的 perform() 方法,在其中编写动画逻辑。
override
func perform() {
var firstVCView = self.sourceViewController.view as UIView!
var secondVCView = self.destinationViewController.view as UIView!
let screenWidth = UIScreen.mainScreen().bounds.size.width
let screenHeight = UIScreen.mainScreen().bounds.size.height
secondVCView.frame = CGRectMake(0.0, screenHeight, screenWidth, screenHeight)
let window = UIApplication.sharedApplication().keyWindow
window?.insertSubview(secondVCView, aboveSubview: firstVCView)
UIView.animateWithDuration(0.5, delay: 0, usingSpringWithDamping: 0.5, initialSpringVelocity: 0, options: UIViewAnimationOptions.CurveLinear, animations: { () -> Void in
secondVCView.frame = CGRectOffset(secondVCView.frame, 0.0, -screenHeight)
}) { (finished: Bool) -> Void in
self.sourceViewController.presentViewController(self.destinationViewController as! UIViewController,
animated: false,
completion: nil)
}
}
还是一样,动画的过程自己看,都是很简单的。
Present手势
这里需要注意,使用这种方式自定义的转场动画不能动态手势驱动,也就是说不能根据手势百分比动态改变动画完成度。
所以,这里只是简单的添加一个滑动手势(swip)。
在 FisrtViewController 中添加手势:
var swipeGestureRecognizer: UISwipeGestureRecognizer = UISwipeGestureRecognizer(target: self, action: "showSecondViewController")
swipeGestureRecognizer.direction = UISwipeGestureRecognizerDirection.Up
self.view.addGestureRecognizer(swipeGestureRecognizer)
实现手势监听方法:
func
showSecondViewController() {
self.performSegueWithIdentifier("idFirstSegue", sender: self)
}
现在已经可以 present 了,接下来实现 dismiss。
Dismiss
在 FirstViewController 中添加一个 IBAction 方法,方法名可以随便,有没有返回值都随便。
在 Storyboard 中选择 SecondViewController 按住 control键 拖线到 SecondViewController 的 Exit 图标。并在弹出选项中选择上一步添加 IBAction 的方法。
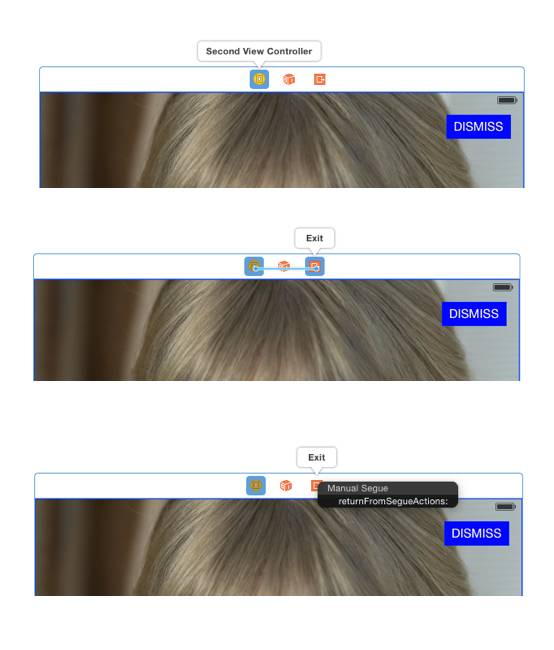
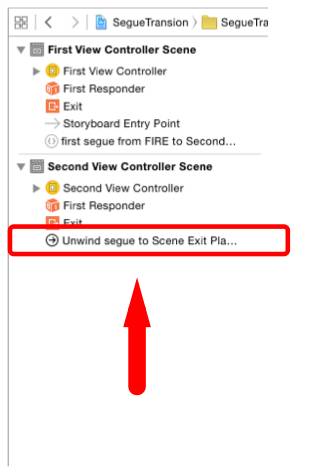
在 Storyboard 左侧的文档视图中找到上一步拖的 segue,并设置 identifier
再添加一个 Cocoa Touch Class,继承自 UIStoryboardSegue,取名 FirstSegueUnWind(名字请随意)。并重写其 perform() 方法,用来实现 dismiss 动画。
在 FirstViewController 中重写下面方法。并根据 identifier 判断是不是需要 dismiss,如果是就返回刚刚创建的 FirstUnWindSegue。
override
func segueForUnwindingToViewController(toViewController: UIViewController, fromViewController: UIViewController, identifier: String?) -> UIStoryboardSegue {
if identifier == "firstSegueUnwind" {
return FirstUnwindSegue(identifier: identifier, source: fromViewController, destination: toViewController, performHandler: { () -> Void in
})
}
return super.segueForUnwindingToViewController(toViewController, fromViewController: fromViewController, identifier: identifier)
}
最后一步,在 SecondViewController 的按钮的监听方法中实现 dismiss, 注意不是调用 self.dismiss...!
@IBAction
func shouldDismiss(sender: AnyObject) {
self.performSegueWithIdentifier("firstSegueUnwind", sender: self)
}
给 SecondViewController 添加手势,将手势监听方法也设置为以上这个方法, 参考代码:SegueTransion。
总结
一张图总结一下3种方法的异同点。

添加一个 Cocoa Touch Class,继承自 NSObject,取名 BWFlipTransionPush(名字嘛,你开心就好。),遵守 UIViewControllerAnimatedTransitioning 协议。
实现协议的两个方法,并在其中编写 Push 的动画。 具体的动画实现过程都在代码的注释里 :
func
animateTransition(transitionContext: UIViewControllerContextTransitioning) {
let fromVC = transitionContext.viewControllerForKey(UITransitionContextFromViewControllerKey) as! FirstViewController
let toVC = transitionContext.viewControllerForKey(UITransitionContextToViewControllerKey) as! SecondViewController
let container = transitionContext.containerView()
container.addSubview(toVC.view)
container.bringSubviewToFront(fromVC.view)
//改变m34
var transfrom = CATransform3DIdentity
transfrom.m34 =
-0.002
container.layer.sublayerTransform = transfrom
//设置anrchPoint
和 position
let initalFrame = transitionContext.initialFrameForViewController(fromVC)
toVC.view.frame = initalFrame
fromVC.view.frame = initalFrame
fromVC.view.layer.anchorPoint = CGPointMake(0, 0.5)
fromVC.view.layer.position = CGPointMake(0, initalFrame.height / 2.0)
//添加阴影效果
let shadowLayer = CAGradientLayer()
shadowLayer.colors = [UIColor(white: 0, alpha: 1).CGColor, UIColor(white: 0, alpha: 0.5).CGColor, UIColor(white: 1, alpha: 0.5)]
shadowLayer.startPoint = CGPointMake(0, 0.5)
shadowLayer.endPoint = CGPointMake(1, 0.5)
shadowLayer.frame = initalFrame
let shadow = UIView(frame: initalFrame)
shadow.backgroundColor = UIColor.clearColor()
shadow.layer.addSublayer(shadowLayer)
fromVC.view.addSubview(shadow)
shadow.alpha = 0
//动画
UIView.animateWithDuration(transitionDuration(transitionContext), delay: 0, options: UIViewAnimationOptions.CurveEaseOut, animations: { () -> Void in
fromVC.view.layer.transform = CATransform3DMakeRotation(CGFloat(-M_PI_2), 0, 1, 0)
shadow.alpha = 1.0
}) { (finished: Bool) -> Void in
fromVC.view.layer.anchorPoint = CGPointMake(0.5, 0.5)
fromVC.view.layer.position = CGPointMake(CGRectGetMidX(initalFrame), CGRectGetMidY(initalFrame))
fromVC.view.layer.transform = CATransform3DIdentity
shadow.removeFromSuperview()
transitionContext.completeTransition(!transitionContext.transitionWasCancelled())
}
}
动画的过程我就不多说了,仔细看就会明白。
使用动画
让 FirstViewController 遵守 UIViewControllerTransitioningDelegate 协议,并将 self.transitioningDelegate 设置为 self。
实现 UIViewControllerTransitioningDelegate 协议的两个方法,用来指定动画类。
//动画Push
func
animationControllerForPresentedController(presented: UIViewController, presentingController presenting: UIViewController, sourceController source: UIViewController) -> UIViewControllerAnimatedTransitioning? {
return BWFlipTransionPush()
}
//动画Pop
func
animationControllerForDismissedController(dismissed: UIViewController) -> UIViewControllerAnimatedTransitioning? {
return BWFlipTransionPop()
}
OK,如果你完成了Pop动画,那么现在就可以实现自定义 Modal 转场了。现在只差手势驱动了。
手势驱动
想要同时实现 Push 和 Pop 手势,就需要给两个 viewController.view 添加手势。首先在 FirstViewController 中给自己添加一个屏幕右边的手势,在 prepareForSegue() 方法中给 SecondViewController.view 添加一个屏幕左边的手势,让它们使用同一个手势监听方法。
实现监听方法,不多说,和之前一样,但还是有仔细看,因为本示例中转场动画比较特殊,而且有两个手势,所以这里计算百分比使用的是 KeyWindow。同时不要忘了:UIPercentDrivenInteractiveTransition属性。
func
edgePanGesture(edgePan: UIScreenEdgePanGestureRecognizer) {
let progress = abs(edgePan.translationInView(UIApplication.sharedApplication().keyWindow!).x) / UIApplication.sharedApplication().keyWindow!.bounds.width
if edgePan.state == UIGestureRecognizerState.Began {
self.percentDrivenTransition = UIPercentDrivenInteractiveTransition()
if edgePan.edges == UIRectEdge.Right {
self.performSegueWithIdentifier("present", sender: nil)
} else if edgePan.edges == UIRectEdge.Left {
self.dismissViewControllerAnimated(true, completion: nil)
}
} else if edgePan.state == UIGestureRecognizerState.Changed {
self.percentDrivenTransition?.updateInteractiveTransition(progress)
} else if edgePan.state == UIGestureRecognizerState.Cancelled || edgePan.state == UIGestureRecognizerState.Ended {
if progress > 0.5 {
self.percentDrivenTransition?.finishInteractiveTransition()
} else {
self.percentDrivenTransition?.cancelInteractiveTransition()
}
self.percentDrivenTransition = nil
}
}
实现 UIViewControllerTransitioningDelegate 协议的另外两个方法,分别返回 Present 和 Dismiss 动画的百分比。
//百分比Push
func
interactionControllerForPresentation(animator: UIViewControllerAnimatedTransitioning) -> UIViewControllerInteractiveTransitioning? {
return self.percentDrivenTransition
}
//百分比Pop
func
interactionControllerForDismissal(animator: UIViewControllerAnimatedTransitioning) -> UIViewControllerInteractiveTransitioning? {
return self.percentDrivenTransition
}
现在,基于 Modal 的自定义转场动画示例就完成了。获取完整源代码:FlipTransion
Segue
这种方法比较特殊,是将 Stroyboard 中的拖线与自定义的 UIStoryboardSegue 类绑定自实现定义转场过程动画。
首先我们来看看 UIStoryboardSegue 是什么样的。
@availability(iOS, introduced=5.0)
class UIStoryboardSegue : NSObject {
//
Convenience constructor for returning a segue that performs a handler block in its -perform method.
@availability(iOS, introduced=6.0)
convenience
init(identifier: String?, source: UIViewController, destination: UIViewController, performHandler: () -> Void)
init!(identifier: String?, source: UIViewController, destination: UIViewController) //
Designated initializer
var identifier: String? { get }
var sourceViewController: AnyObject { get }
var destinationViewController: AnyObject { get }
func
perform()
}
以上是 UIStoryboardSegue 类的定义。从中可以看出,只有一个方法 perform(),所以很明显,就是重写这个方法来自定义转场动画。
再注意它的其他属性:sourceViewController 和 destinationViewController,通过这两个属性,我们就可以访问一个转场动画中的两个主角了,于是自定义动画就可以随心所欲了。
只有一点需要注意:在拖线的时候,注意在弹出的选项中选择 custom。然后就可以和自定义的 UIStoryboardSegue 绑定了。
那么,问题来了,这里只有 perform,那 返回时的动画怎么办呢?请往下看:
Dismiss
由于 perfrom 的方法叫做:segue,那么返回转场的上一个控制器叫做: unwind segue
解除转场(unwind segue)通常和正常自定义转场(segue)一起出现。
要解除转场起作用,我们必须重写perform方法,并应用自定义动画。另外,导航返回源视图控制器的过渡效果不需要和对应的正常转场相同。
其实现步骤 为:
创建一个 IBAction 方法,该方法在解除转场被执行的时候会选择地执行一些代码。这个方法可以有你想要的任何名字,而且不强制包含其它东西。它需要定义,但可以留空,解除转场的定义需要依赖这个方法。
解除转场的创建,设置的配置。这和之前的转场创建不太一样,等下我们将看看这个是怎么实现的。
通过重写 UIStoryboardSegue 子类里的 perform() 方法,来实现自定义动画。
UIViewController类 提供了特定方法的定义,所以系统知道解除转场即将执行。
当然,这么说有一些让人琢磨不透,不知道什么意思。那么,下面再通过一个示例来深入了解一下。
Segue 示例
这个示例是我自己写的,源代码地址:SegueTransion,开门见山,直接上图。
GIF演示
初始化
创建两个 UIViewController, 分别命名为:FirstViewController 和 SecondViewController。并在 Storyboard 中添加两个 UIViewController 并绑定。
分别给两个控制器添加背景图片或使用不同的背景色,用以区分。在 FirstViewController 中添加一个触发按钮,并拖线到 SecondViewController 中,在弹出的选项中选择 custion。
Present
添加一个 Cocoa Touch Class,继承自 UIStoryboardSegue,取名 FirstSegue(名字请随意)。并将其绑定到上一步中拖拽的 segue 上。
重写 FirstSegue 中的 perform() 方法,在其中编写动画逻辑。
override
func perform() {
var firstVCView = self.sourceViewController.view as UIView!
var secondVCView = self.destinationViewController.view as UIView!
let screenWidth = UIScreen.mainScreen().bounds.size.width
let screenHeight = UIScreen.mainScreen().bounds.size.height
secondVCView.frame = CGRectMake(0.0, screenHeight, screenWidth, screenHeight)
let window = UIApplication.sharedApplication().keyWindow
window?.insertSubview(secondVCView, aboveSubview: firstVCView)
UIView.animateWithDuration(0.5, delay: 0, usingSpringWithDamping: 0.5, initialSpringVelocity: 0, options: UIViewAnimationOptions.CurveLinear, animations: { () -> Void in
secondVCView.frame = CGRectOffset(secondVCView.frame, 0.0, -screenHeight)
}) { (finished: Bool) -> Void in
self.sourceViewController.presentViewController(self.destinationViewController as! UIViewController,
animated: false,
completion: nil)
}
}
还是一样,动画的过程自己看,都是很简单的。
Present手势
这里需要注意,使用这种方式自定义的转场动画不能动态手势驱动,也就是说不能根据手势百分比动态改变动画完成度。
所以,这里只是简单的添加一个滑动手势(swip)。
在 FisrtViewController 中添加手势:
var swipeGestureRecognizer: UISwipeGestureRecognizer = UISwipeGestureRecognizer(target: self, action: "showSecondViewController")
swipeGestureRecognizer.direction = UISwipeGestureRecognizerDirection.Up
self.view.addGestureRecognizer(swipeGestureRecognizer)
实现手势监听方法:
func
showSecondViewController() {
self.performSegueWithIdentifier("idFirstSegue", sender: self)
}
现在已经可以 present 了,接下来实现 dismiss。
Dismiss
在 FirstViewController 中添加一个 IBAction 方法,方法名可以随便,有没有返回值都随便。
在 Storyboard 中选择 SecondViewController 按住 control键 拖线到 SecondViewController 的 Exit 图标。并在弹出选项中选择上一步添加 IBAction 的方法。
在 Storyboard 左侧的文档视图中找到上一步拖的 segue,并设置 identifier
再添加一个 Cocoa Touch Class,继承自 UIStoryboardSegue,取名 FirstSegueUnWind(名字请随意)。并重写其 perform() 方法,用来实现 dismiss 动画。
在 FirstViewController 中重写下面方法。并根据 identifier 判断是不是需要 dismiss,如果是就返回刚刚创建的 FirstUnWindSegue。
override
func segueForUnwindingToViewController(toViewController: UIViewController, fromViewController: UIViewController, identifier: String?) -> UIStoryboardSegue {
if identifier == "firstSegueUnwind" {
return FirstUnwindSegue(identifier: identifier, source: fromViewController, destination: toViewController, performHandler: { () -> Void in
})
}
return super.segueForUnwindingToViewController(toViewController, fromViewController: fromViewController, identifier: identifier)
}
最后一步,在 SecondViewController 的按钮的监听方法中实现 dismiss, 注意不是调用 self.dismiss...!
@IBAction
func shouldDismiss(sender: AnyObject) {
self.performSegueWithIdentifier("firstSegueUnwind", sender: self)
}
给 SecondViewController 添加手势,将手势监听方法也设置为以上这个方法, 参考代码:SegueTransion。
总结
一张图总结一下3种方法的异同点。

相关文章推荐
- 峰回路转,Firefox 浏览器即将重返 iOS 平台
- 峰回路转,Firefox 浏览器即将重返 iOS 平台
- 不可修补的 iOS 漏洞可能导致 iPhone 4s 到 iPhone X 永久越狱
- iOS 12.4 系统遭黑客破解,漏洞危及数百万用户
- 每日安全资讯:NSO,一家专业入侵 iPhone 的神秘公司
- [转][源代码]Comex公布JailbreakMe 3.0源代码
- Gifski:一个跨平台的高质量 GIF 编码器
- 模仿动画的放大缩小容器
- jQuery 1.9.1源码分析系列(十五)动画处理之缓动动画核心Tween
- Android实现定制返回按钮动画效果的方法
- Android中ViewFlipper的使用及设置动画效果实例详解
- jQuery实现美观的多级动画效果菜单代码
- php判断GIF图片是否为动画的方法
- jQuery实现动画效果circle实例
- HTML5游戏引擎LTweenLite实现的超帅动画效果(附demo源码下载)
- 浅析JavaScript动画
- js排序动画模拟-插入排序
- javascript+HTML5的Canvas实现Lab单车动画效果
- 基于javascript实现漂亮的页面过渡动画效果附源码下载