iOS开发--动画篇之layout动画深入
2016-03-23 16:14
351 查看
"不得不说,单单是文章的标题,可能不足以说明本文的内容。因此,在继续讲述约束动画之前,我先放上本文要实现的动画效果。"
编辑:Bison
投稿:Sindri的小巢
约束动画并不是非常复杂的技巧,在你熟练使用约束之后,你总能创建些独具匠心的动画。在上一篇autolayout动画初体验中,我们根据监听列表视图的滚动偏移来不断改变约束值,从而制作出动画的效果。但上个动画的实现更像是我们制作了一帧帧连续的界面从而达成动画的效果 —— 这未免太过繁杂。而在本文我们将抛弃这种繁杂的方式,通过调用
UIView的重绘制视图方法来实现动画。
本文的动画主要存在这么几个:
账户纪录列表的弹出和收回
登录按钮的点击形变
登录按钮被点击后的转圈动画(不做详细讲述)
实际上来说,上述的转圈动画我是通过
CoreAnimation框架的动画+定时器的方式实现的,当然这也意味着在本篇文章是约束动画的终结
准备
首先我们需要把所有控件的层次弄清楚,然后搭建整个界面。在demo中,在动画开始前可视的控件总共有五个 —— 用户头像、账户输入框、下拉按钮、密码输入框以及登录按钮,还有一个保存账号信息的列表在账户输入框下面。我们通过修改这个列表跟账户顶部约束值来使其下移出现: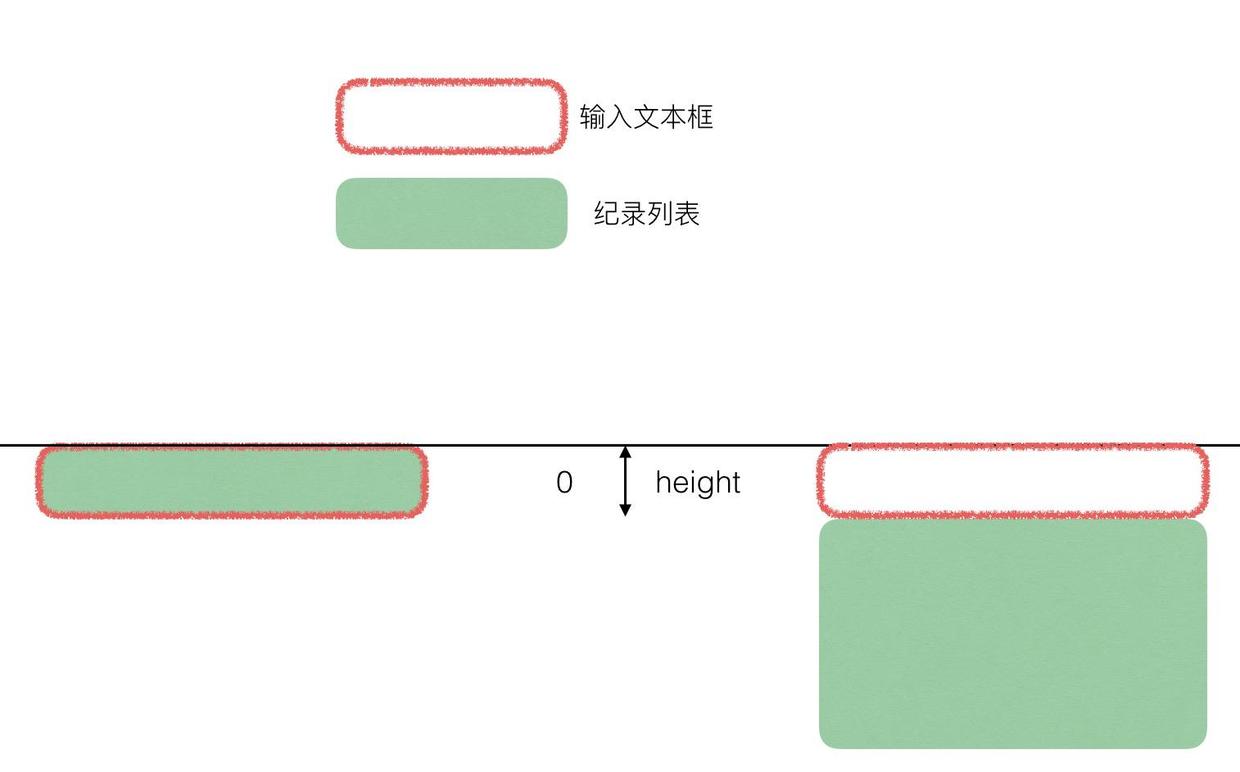
在这些控件的约束中我们需要在代码中改变用到的约束包括:
纪录列表的顶部约束
listTopConstraint,修改后可以让列表向下移动出现
纪录列表的高度约束
listHeightConstraint,用来设置产生展开动画
账户输入框的高度约束
accountHeightConstraint,用来设置列表的下移量
登录按钮左右侧相对于父视图的间距约束
loginLeftConstraint以及
loginRightConstraint,通过改变这两个约束来使按钮缩小
登录按钮的高度约束
loginHeightConstraint,用来计算缩小后的按钮宽度
除了约束属性之外,我们还需要一些数据来支持我们的动画:
@property(assign, nonatomic) BOOL isAnimating;   // 用来判断登录按钮的动画状态
@property(strong, nonatomic) NSArray * records;  // 列表的数据源,demo中存储五个字符串
为了保证列表出现的时候不被其他视图遮挡,设置的视图层级关系如下:
下拉按钮 > 账户输入框 > 纪录列表 > 头像 = 登录按钮 = 密码输入框
下拉动画
在这里我把demo的动画分为两小节来讲解,因为这两个动画的实现方式有很大的差别。当然了,这两者都能通过直接修改约束的constant值来实现,但这不是本文的讲解目的。
在我们点击下拉按钮的时候会出现两个动画,包括下拉列表的180°旋转以及下拉或者隐藏消失。正常来说,我们需要使用一个
BOOL类型的变量来标识列表是否处在展开的状态以此来决定动画的方式,但在关联事件方法的时候作为发送者的下拉按钮已经提供给了我们这个变量
isSelected,通过修改这个值来完成标记列表展开状态。因此旋转下拉按钮的代码如下:
/// 点击打开或者隐藏列表
- (IBAction)actionToOpenOrCloseList:(UIButton *)sender {
[self.view endEditing: YES];
[self animateToRotateArrow: sender.selected];
sender.isSelected ? [self showRecordList] : [self hideRecordList];
}

/// 按钮转向动画
- (void)animateToRotateArrow: (BOOL)selected
{
CATransform3D transform = selected ? CATransform3DIdentity : CATransform3DMakeRotation(M_PI, 0, 0, 1);
[_dropdownButton setSelected: !selected];
[UIView animateWithDuration: 0.25 animations: ^{
_dropdownButton.layer.transform = transform;
}];
}
可以看到我们的代码中根据按钮的
isSelected属性来决定列表的展开或者收回,对此我们需要修改列表的listHeightConstraint和listTopConstraint来设置列表的大小和位置,而且我们需要给展开的列表加上一个弹出来的动画:
/// 显示纪录列表
- (void)showRecordList
{
[UIView animateWithDuration: 0.25 delay: 0 usingSpringWithDamping: 0.4 initialSpringVelocity: 5 options: UIViewAnimationOptionCurveEaseInOut | UIViewAnimationOptionAllowUserInteraction animations: ^{
_listTopConstraint.constant = _accountHeightConstraint.constant;
_listHeightConstraint.constant = _accountHeightConstraint.constant * 5;
} completion: nil];
}

/// 隐藏纪录列表
- (void)hideRecordList
{
[UIView animateWithDuration: 0.25 animations: ^{
_listTopConstraint.constant = 0;
_listHeightConstraint.constant = 0;
} completion: nil];
}
好,运行你的代码,看看效果,这肯定不会是你想要的效果。
在
UIView动画中有趣的一件事情是:如果你直接在动画的
block中提交修改了视图的相关属性时,它们会按照你预期的效果执行产生动画。但在你修改约束值的时候会直接计算出约束生效后的布局结果,并且直接显示 —— 即便你把修改约束的代码放在了动画的
block当中执行。
针对这个问题,iOS为所有视图提供了一个方法
- (void)layoutIfNeeded用来立刻刷新界面,这个方法会调用当前视图上面所有的子视图的
- (void)layoutSubviews让子视图进行重新布局。如果我们先设置好约束值,然后在动画的执行代码调用
layoutIfNeeded就能让界面不断重新绘制产生动画效果。因此,上面的展开收回代码改成下面这样:
/// 显示纪录列表
- (void)showRecordList
{
_listTopConstraint.constant = _accountHeightConstraint.constant;
_listHeightConstraint.constant = _accountHeightConstraint.constant * 5;
[UIView animateWithDuration: 0.25 delay: 0 usingSpringWithDamping: 0.4 initialSpringVelocity: 5 options: UIViewAnimationOptionCurveEaseInOut | UIViewAnimationOptionAllowUserInteraction animations: ^{
[self.view layoutIfNeeded];
} completion: nil];
}

/// 隐藏纪录列表
- (void)hideRecordList
{
_listTopConstraint.constant = 0;
_listHeightConstraint.constant = 0;
[UIView animateWithDuration: 0.25 animations: ^{
[self.view layoutIfNeeded];
} completion: nil];
}
现在再次运行你的代码,纪录列表已经能够正常的实现弹出展开以及收回的动画了
登录按钮动画
毫不客气的说,在本次的demo中,我最喜欢的是登录按钮点击之后的动画效果。当然,这也意味着这个动画效果是耗时最长的。由于如demo动画所示,在点击登录动画的时候按钮中间会有进度的旋转动画。如果在controller中实现这个效果,需要涉及到
layer层的操作,而这不应该是控制器的职能,因此我将登录按钮单独封装出来处理,并提供了两个接口:
- (void)start和
- (void)stop方便控制器调用来开始和停止动画。这两个方法内部实现如下:
const NSTimeInterval duration = 1.2;
///动画开始隐藏文字
- (void)start
{
[self addAnimate];
if (_timer) {
[_timer invalidate];
}
NSTimer * timer = [NSTimer scheduledTimerWithTimeInterval: duration target: self selector: @selector(addAnimate) userInfo: nil repeats: YES];
_timer = timer;

[UIView animateWithDuration: 0.5 animations: ^{
_circle.opacity = 1;
[self setTitleColor: [UIColor colorWithWhite: 1 alpha: 0] forState: UIControlStateNormal];
}];
}

///动画结束时显示文字
- (void)stop
{
if (_timer) {
[_timer invalidate];
}

[self.circle removeAllAnimations];
[UIView animateWithDuration: 0.5 animations: ^{
_circle.opacity = 0;
[self setTitleColor: [UIColor colorWithWhite: 1 alpha: 1] forState: UIControlStateNormal];
}];
}
前文我已经说过按钮的转圈动画基于定时器和
CoreAnimation框架动画实现,由于这不属于约束动画范畴,我就不对具体实现进行阐述了,感兴趣的可以到本文的demo中去查看实现。
除了按钮自身转圈、文字隐藏显示的动画之外,还包括了自身的尺寸变化代码。在缩小之后按钮依旧保持在视图的x轴中心位置,因此如果我们修改左右约束,那么要保证这两个值是相等的。在动画前后按钮的高度都没有发生变化,在缩小的过程中宽度缩小成和高度一样的大小,我们现在有按钮的高度
height,通过代码计算出左右新约束:
/// 点击登录动画
- (IBAction)actionToSignIn:(UIButton *)sender {
_isAnimating = !_isAnimating;
if (_isAnimating) {
[_signInButton start];
[self animateToMakeButtonSmall];
} else {
[_signInButton stop];
[self animateToMakeButtonBig];
}
}

///缩小动画
- (void)animateToMakeButtonSmall {
CGFloat height = _loginHeightConstraint.constant;
CGFloat screenWidth = CGRectGetWidth(self.view.frame);
CGFloat spacingConstant = (screenWidth - height) / 2;
_loginLeftConstraint.constant = _loginRightConstraint.constant = spacingConstant;

[UIView animateWithDuration: 0.15 delay: 0 options: UIViewAnimationOptionCurveEaseOut animations: ^{
[self.view layoutIfNeeded];
} completion: nil];
}

///放大动画
- (void)animateToMakeButtonBig {
_loginLeftConstraint.constant = _loginRightConstraint.constant = 0;
[UIView animateWithDuration: 0.15 delay: 0 options: UIViewAnimationOptionCurveEaseOut animations: ^{
[self.view layoutIfNeeded];
} completion: nil];
}
我们通过了计算左右间隔设置好了登录按钮的动画,这很好,但是我们想想,上面的动画实现思路是:
获取按钮高度和父视图宽度 -> 计算按钮左右间隔 -> 实现动画
可是我们最开始的实现思路是什么?
按钮变小,保持宽高一致 -> 按钮居中 -> 实现动画
这说起来有些荒谬,虽然动画实现了,但是这并不应该是我们的实现方式。因此,为了保证我们的思路能够正确执行,我们的操作步骤应该如下:
1、移除登录按钮左右约束
2、添加宽高等比约束
3、添加按钮相对于父视图的居中约束
在执行这些步骤之前,我们先来看看关于约束的计算公式以及这些计算的变量在
NSLayoutConstraint对象中代表的属性:
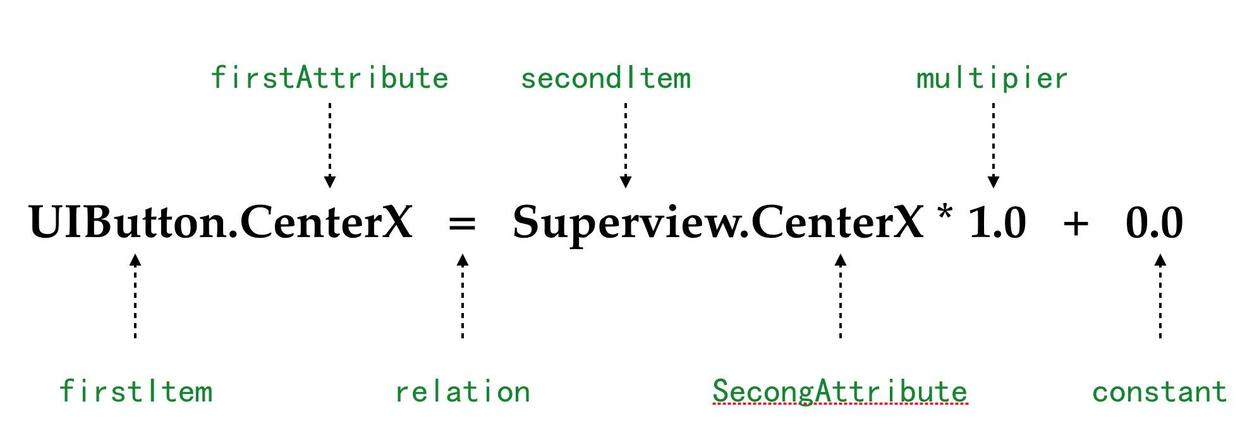
根据这个公式假设我现在要给当前视图上的一个按钮添加水平居中的约束,那么约束的创建代码如下:
NSLayoutConstraint * centerXConstraint = [NSLayoutConstraint
constraintWithItem: _button                   //firstItem
attribute: NSLayoutAttributeCenterX  //firstAttribute
relatedBy: NSLayoutRelationEqual     //relation
toItem: _button.superview         //secondItem
attribute: NSLayoutAttributeCenterX  //secondAttribute
multiplier: 1.0                       //multiplier
constant: 0];                       //constant
我们可以通过上面这段代码清楚的看到布局的相关属性和代码的对应,如果你在xcode中通过查找进入到了
NSLayoutConstraint的类文件中,你还会发现这些属性中只有
constant是可写的,这意味着你没办法通过正常方式设置
multipier这样的值来改变某个控件在父视图中的宽度。尽管KVC可以做到这一点,但这不应该是解决方式。
因此,我们需要通过创建新的约束并且移除旧的约束来实现登录按钮的动画效果。在iOS8之前这个工作无疑是繁杂的,我们需要通过
- (void)addConstraint:(NSLayoutConstraint *)constraint;
- (void)addConstraints:(NSArray<__kindof NSLayoutConstraint *> *)constraints;
- (void)removeConstraint:(NSLayoutConstraint *)constraint;
- (void)removeConstraints:(NSArray<__kindof NSLayoutConstraint *> *)constraints;
这一系列方法来增删约束,但在iOS8之后,
NSLayoutConstraint提供了
active的BOOL类型的变量供我们提供设置约束是否有效,这个值设置
NO的时候约束就失效。同样我们创建了一个约束对象之后只需要设置
active为
YES之后就会自动生效了。因此,根据上面的公式,我们修改代码如下:
/// 缩小按钮
- (void)animateToMakeButtonSmall {
_loginLeftConstraint.active = NO;
_loginRightConstraint.active = NO;

//创建宽高比约束
NSLayoutConstraint * ratioConstraint = [NSLayoutConstraint constraintWithItem: _signInButton attribute: NSLayoutAttributeWidth relatedBy: NSLayoutRelationEqual toItem: _signInButton attribute: NSLayoutAttributeHeight multiplier: 1. constant: 0];
ratioConstraint.active = YES;
_loginRatioConstraint = ratioConstraint;

//创建居中约束
NSLayoutConstraint * centerXConstraint = [NSLayoutConstraint constraintWithItem: _signInButton attribute: NSLayoutAttributeCenterX relatedBy: NSLayoutRelationEqual toItem: _signInButton.superview attribute: NSLayoutAttributeCenterX multiplier: 1. constant: 0.];
centerXConstraint.active = YES;
_loginCenterXConstraint = centerXConstraint;

[UIView animateWithDuration: 0.15 delay: 0 options: UIViewAnimationOptionCurveEaseIn animations: ^{
[self.view layoutIfNeeded];
} completion: nil];
}

/// 还原按钮
- (void)animateToMakeButtonBig {
_loginCenterXConstraint.active = NO;
_loginRatioConstraint.active = NO;

NSLayoutConstraint * leftConstraint = [NSLayoutConstraint constraintWithItem: _signInButton attribute: NSLayoutAttributeLeading relatedBy: NSLayoutRelationEqual toItem: _signInButton.superview attribute: NSLayoutAttributeLeading multiplier: 1. constant: 25];
_loginLeftConstraint = leftConstraint;
leftConstraint.active = YES;

NSLayoutConstraint * rightConstraint = [NSLayoutConstraint constraintWithItem: _signInButton attribute: NSLayoutAttributeTrailing relatedBy: NSLayoutRelationEqual toItem: _signInButton.superview attribute: NSLayoutAttributeTrailing multiplier: 1. constant: -25];
_loginRightConstraint = rightConstraint;
rightConstraint.active = YES;

[UIView animateWithDuration: 0.15 delay: 0 options: UIViewAnimationOptionCurveEaseOut animations: ^{
[self.view layoutIfNeeded];
} completion: nil];
}
增删约束实现动画时,你还要记住的是当一个约束的
active属性被设为
NO之后,即便我们重新将其激活,这个约束依旧是无效的,必须重新创建。
在上面的代码中我还添加了两个属性
loginRatioConstraint和
loginCenterXConstraint使其分别指向每次动画创建的新约束,方便在停止动画时使约束无效化。当然,除了这种引用的方式,我们还可以直接通过判断约束双方对象以及约束的属性类型来获取对应的约束并使其无效:
[_signInButton.constraints enumerateObjectsWithOptions: NSEnumerationReverse usingBlock: ^(__kindof NSLayoutConstraint * _Nonnull obj, NSUInteger idx, BOOL * _Nonnull stop) {
if (obj.firstItem == _signInButton && obj.firstAttribute == NSLayoutAttributeCenterX) {
obj.active = NO;
} else if (obj.firstAttribute == NSLayoutAttributeWidth && obj.secondAttribute == NSLayoutAttributeHeight) {
obj.active = NO;
}
}];
这段代码就等同于上面的
_loginCenterXConstraint.active = NO;
_loginRatioConstraint.active = NO;
虽然使用代码移除约束的方式更加复杂,但是在我们封装控件的时候,总是有可能用到的,所以这也是我们需要掌握的技巧。当然了,这种判断的方式也确实过于麻烦,
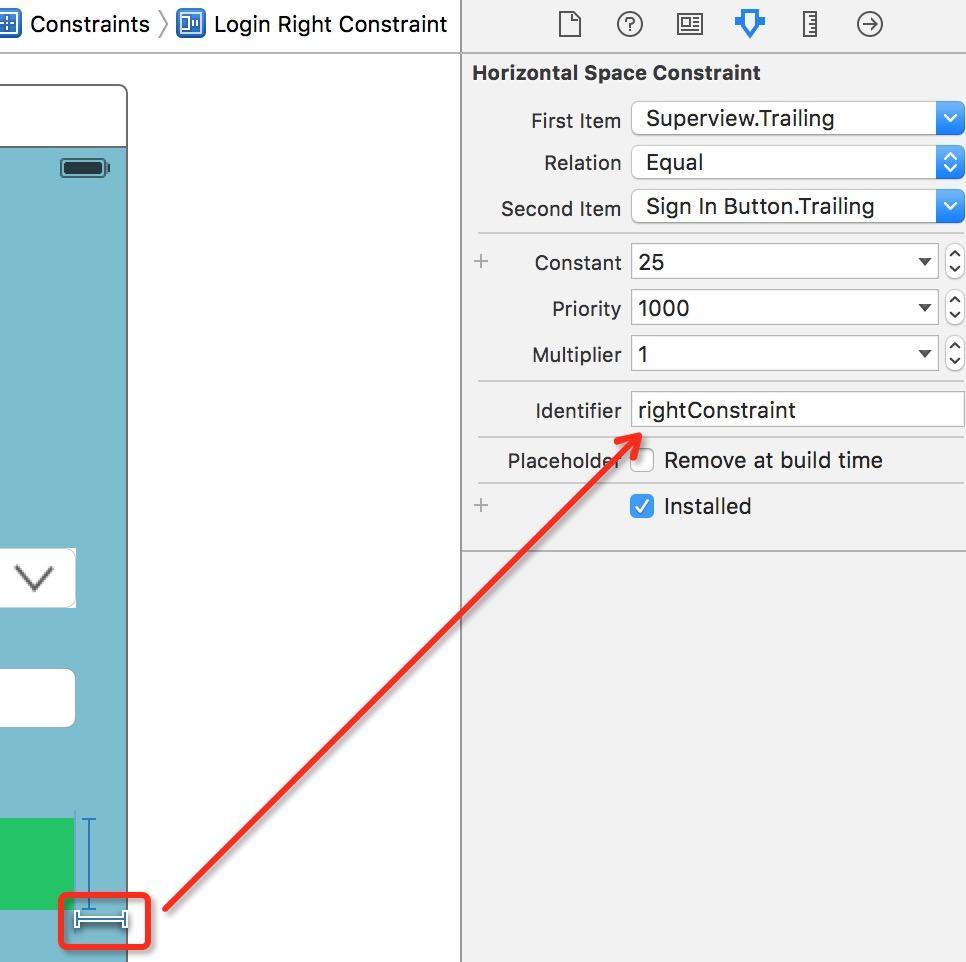
NSLayoutConstraint还提供了类型为字符串
identifier属性帮助我们识别约束。在故事板中我们可以通过右侧的属性栏直接看到该属性并且进行设置:
这样上面的判断代码就可以简化成简单的判断id:
static NSString * centerXIdentifier = @"centerXConstraint";
static NSString * ratioIdentifier = @"ratioIdentifier";

/// 缩小按钮
- (void)animateToMakeButtonSmall {
......
//创建宽高比约束
NSLayoutConstraint * ratioConstraint  = ...//create ratioConstraint
ratioConstraint.identifier = ratioIdentifier;

//创建居中约束
NSLayoutConstraint * centerXConstraint = ...//create centerXConstraint
centerXConstraint.identifier = centerXIdentifier;
......
}

/// 还原按钮
- (void)animateToMakeButtonBig {
......
[_signInButton.constraints enumerateObjectsWithOptions: NSEnumerationReverse usingBlock: ^(__kindof NSLayoutConstraint * _Nonnull obj, NSUInteger idx, BOOL * _Nonnull stop) {
if ([obj.identifier isEqualToString: centerXIdentifier]) {
obj.active = NO;
} else if ([obj.identifier isEqualToString: ratioIdentifier]) {
obj.active = NO;
}
}];
......
}
尾言
距离约束动画的开篇也有一段时间了,约束动画的制作对于我来说很长一段时间以来都是空白,直到这段时间开笔了动画文章才接触使用,感触颇深。同之前的文章一样,这篇文章意味着我对约束动画的文章的终结,在本文的demo中我还掺杂了核心动画的内容,或许这也说明了我对于约束动画使用的浅薄之处。对于动画而言,我所了解以及掌握的太少太少,或者说思想力不足以支撑我对于动画制作的野心。当然,我会继续努力追求更酷炫易用的动画。
掌握约束应该是我们iOS开发者的必备本领。一方面,IB可视化编程在我的工作日常中已经是离不开的,它极大的提高了我的开发效率(以往需要动画的地方我都是纯代码创建控件);另一方面,苹果手机的尺寸难保不会继续增加,
class size和
autolayout都是我们适配不同屏幕的最佳帮手。因此,希望这篇文章能给大家带来约束使用上的更多内容。

相关文章推荐
- IOS学习 autolayout 自动布局 代码与界面设置截图
- iOS与JS交互实战篇(ObjC版)
- iOS开发:创建真机调试证书
- iOS KVC 和 KVO 简单介绍
- IOS绘图的基本步骤
- iOS Core Data简单演练
- iOS 开发--转场动画
- ios XCODE 7.2版本的多语言本地化国际化
- IOS中关于闭包的使用
- shouldAutorotate不调用问题的解决
- ListView - 仿照IOS拉到上下底部仍可继续拉并自动回弹
- iOS - 类扩展与分类的区别
- iOS 申请测试用的远程推送证书
- Undefined symbols for architecture arm64:问题解决方法
- 百度地图集成问题(ios)
- IOS 开发创建xib文件并且与视图控制器绑定
- iOS 动画Animation-4-2: CALayer子类:CAGradientLayer,CATextLayer,CATiledLayer
- 手势解锁demo
- iOS 宏(define)与常量(const)使用
- 探究iOS开发中多线程之间的通信