多线程——Java多线程实现的三种方式
2016-03-22 20:30
169 查看
最近接触了多线程,孤陋寡闻的自己只尝试过继承Thread类和实现Runnable接口这两种方式,新接触了通过Callable和Future创建线程。特此记录下来。Java中创建线程主要有三种方式:继承Thread、实现Runnable接口、使用ExecutorService、Callable、Future实现由返回结果的多线程。
run( )方法只是普通的方法,是顺序执行的,虽然我们是写了一个线程,但是并没有体现出多线程的意义。为了体现多线程,应该使用start(
)方法来启动线程,start()方法会自动调用run( )方法。所以上面的代码改为:
通过start( )方法启动的线程。不管th1.start(
)调用的run( )方法是否执行完,都继续执行th2.start( )。如果下面有别的代码也同样不需要等待th2.start(
)执行完而继续执行。
其实Thread类也是实现了Runnable接口,代表了一个线程的实例,并且启动线程唯一的方法就是通过Thread类的start(
)方法。所以第二种实现多线程的方法必须要提拔个工艺new一个Thread类去启动线程。同样的,也不能只是运行run(
)方法,因为这样只是一个线程。
返回结果:
)来启动线程。
一、继承Thread类创建线程类
重写父类run( )方法public class thread1 extends Thread {
public void run() {
for (int i = 0; i < 10000; i++) {
System.out.println("线程一"+i);
}
}
public static void main(String[] args) {
thread1 th1 = new thread1();
thread1 th2 = new thread1();
th1.run();
th2.run();
}
}run( )方法只是普通的方法,是顺序执行的,虽然我们是写了一个线程,但是并没有体现出多线程的意义。为了体现多线程,应该使用start(
)方法来启动线程,start()方法会自动调用run( )方法。所以上面的代码改为:
public class thread1 extends Thread {
public void run() {
for (int i = 0; i < 10000; i++) {
System.out.println("线程一"+i);
}
}

public static void main(String[] args) {
thread1 th1 = new thread1();
thread1 th2 = new thread1();
th1.start();
th2.start();
}

}
通过start( )方法启动的线程。不管th1.start(
)调用的run( )方法是否执行完,都继续执行th2.start( )。如果下面有别的代码也同样不需要等待th2.start(
)执行完而继续执行。
二、实现Runnable接口创建线程类
public class thread2 implements Runnable {
public String ThreadName;

public thread2(String tName){
ThreadName = tName;
}

public void run() {
for (int i = 0; i < 10000; i++) {
System.out.println(ThreadName);
}
}

public static void main(String[] args) {
thread2 th1 = new thread2("线程A");
thread2 th2 = new thread2("线程B");
Thread myth1 = new Thread(th1);
Thread myth2 = new Thread(th2);
myth1.start();
myth2.start();
}
}
其实Thread类也是实现了Runnable接口,代表了一个线程的实例,并且启动线程唯一的方法就是通过Thread类的start(
)方法。所以第二种实现多线程的方法必须要提拔个工艺new一个Thread类去启动线程。同样的,也不能只是运行run(
)方法,因为这样只是一个线程。
三、使用ExecutorService、Callable、Future实现由返回结果的多线程
这种方式是之前没有尝试过的,ExecutorService是一个线程池接口,可返回值的任务必须实现Callable接口,无返回值得任务必须实现Runnable接口。执行Callable任务后,可以获取一个Future对象,在该对象上调用get就可以获取到Callable任务返回的Object了,再结合ExecutorService接口就可以实现有返回结果的多线程了。/**
* 有返回值的线程
*/
@SuppressWarnings("unchecked")
class Test {
public static void main(String[] args) throws ExecutionException,
InterruptedException {
System.out.println("----程序开始运行----");
Date date1 = new Date();
int taskSize = 5;
// 创建一个线程池
ExecutorService pool = Executors.newFixedThreadPool(taskSize);
// 创建多个有返回值的任务
List<Future> list = new ArrayList<Future>();
for (int i = 0; i < taskSize; i++) {
Callable c = new MyCallable(i + " ");
// 执行任务并获取Future对象
Future f = pool.submit(c);
// System.out.println(">>>" + f.get().toString());
list.add(f);
}
// 关闭线程池
pool.shutdown();
// 获取所有并发任务的运行结果
for (Future f : list) {
// 从Future对象上获取任务的返回值,并输出到控制台
System.out.println(">>>" + f.get().toString());
}
Date date2 = new Date();
System.out.println("----程序结束运行----,程序运行时间【"
+ (date2.getTime() - date1.getTime()) + "毫秒】");
}
}
class MyCallable implements Callable<Object> {
private String taskNum;
MyCallable(String taskNum) {
this.taskNum = taskNum;
}
public Object call() throws Exception {
System.out.println(">>>" + taskNum + "任务启动");
Date dateTmp1 = new Date();
Thread.sleep(1000);
Date dateTmp2 = new Date();
long time = dateTmp2.getTime() - dateTmp1.getTime();
System.out.println(">>>" + taskNum + "任务终止");
return taskNum + "任务返回运行结果,当前任务时间【" + time + "毫秒】";
}
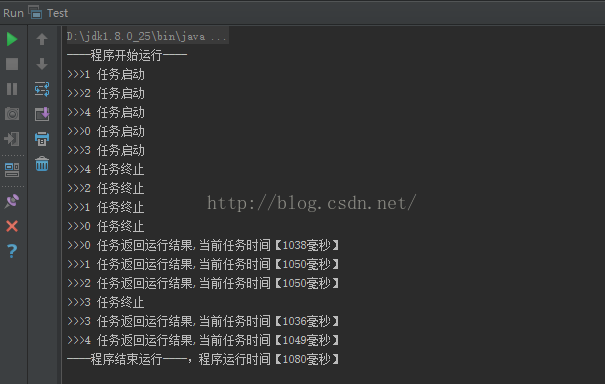
}返回结果:
总结
实现多线程的几种方式,建议使用runable实现,不管如何最终都需要thread.start()来启动线程。

相关文章推荐
- Java keyword具体解释
- JDK的安装与环境变量配置
- Java 设计模式-工厂模式
- Java基础算法集50题
- java中的坐标转换及测距
- Java读取图片Metadata元数据Exif
- Java的多线程机制系列:不得不提的volatile及指令重排序
- 多线程之指令重排序
- MyEclipse快捷键大全
- 在Myeclipse buildpath 加server lib
- Java——接口
- 对Java-Static 关键字的理解
- MyEclipse快捷键大全
- java中volatile 关键字
- Java POI 读取Office excel (2003,2007)及相关jar包
- Java代理模式
- Java之 redirect 和 forward【整理】
- Spring_boot 框架的简单的搭建
- 【转】Eclipse关闭XML文件验证的方法
- eclipse导出jar包的笔记