Oracle ADF Development Essentials - Part 4
2016-03-19 21:55
537 查看
Building Projects with Ant
Tips for building Oracle Application Development Framework projects with Apache Ant outside of the Oracle JDeveloper environment.By John Stegeman
Published February 2010
Downloads:
Oracle JDeveloper Studio Edition
Ant
Sample app (HR Schema install required)
Oracle Database XE (if needed)
Oracle JDeveloper 11g makes it easy to compile applications, generate deployment artifacts (such as Java archives [JARs], Web application archives (WARs), and enterprise archives [EARs]), and deploy applications from within
the IDE, but what if you want to be able to perform such tasks outside of the Oracle JDeveloper IDE? For example, if you are using a continuous-build tool or if you need to build an EAR file from a machine that does not have Oracle JDeveloper installed? You
could create hand-coded scripts to do these tasks, but that would be quite tedious. The alternative is to use a build tool such as Ant.
Ant is a Java-based build tool that has become a de facto standard for building Java projects. You may have heard of another popular build tool called Maven, which is different in that it enforces a common project structure as well as providing
ways to compile and build applications. Most modern Java IDEs, including Oracle JDeveloper, support the development of Ant build files and running them from within the IDE; Ant can also be run independently of any IDE, making it useful for the use cases described
above.
Using Ant inside the Oracle JDeveloper IDE is simple and straightforward, because you have access to all of your project settings. However, in this article, I am going to tackle the issue of running Ant outside of the Oracle JDeveloper IDE. I’ll
explain Ant concepts and show how to set up an Ant build script for building an Oracle Application Development Framework (Oracle ADF) application without having Oracle JDeveloper installed on your machine.
Ant Concepts
Build files. Ant build files, the conceptual equivalent of makefiles for the Make utility, are XML files that describe the tasks needed to build a specific target and the dependenciesamong targets. Although Ant build files are usually named build.xml, you are not required to follow this naming convention.
Targets. Targets are the basic building blocks of an Ant build file and are analogous to makefile targets. Among the common/conventionally used targets:
clean – Removes temporary directories, class files, JAR files, and other generated artifacts
init – Sets up any initial properties for a build (By convention, most of the other targets in a build file will depend on the init target.)
prepare – Creates any temporary/output directories needed by other targets (An example of this type of directory would be the classes directory to which the .java source code files are compiled)
compile – Compiles the application’s .java source code files
deploy – Deploys the application to an application server (This target is often supported by custom Ant tasks supplied by the application server vendor.)
jar/war/ear – Creates a JAR/WAR/EAR file
Tasks. Ant tasks are the steps that must be followed to build a target. Ant has more than 100 built-in types of tasks, such as invoking the Java compiler, creating a JAR file, and invoking the Javadoc tool. In addition, because
Ant is Java-based, you can write your own Ant task and invoke that task as part of building a target.
Dependencies. Ant dependencies are a mechanism for declaratively controlling the order in which targets must be built. For example, the application source code must be compiled into .class files before a JAR file can be built.
In this case, assuming that the Ant build file contains compile and jar targets, we can say that jar depends on compile. In this way, when you tell Ant to build the jar target,
Ant will automatically ensure that the compile target is built first. In fact, Ant is smart enough to know whether the .class files on disk are up-to-date and will perform the actual “compile” tasks only if they are required.
You can read more about Ant in the online manual, the well-regarded print book Ant in Action and
the many online tutorials you can find by searching the internet.
A Note on ojdeploy
Oracle JDeveloper 11g includes a new command-line tool called ojdeploy that can compile and create JAR/WAR/EAR files by referring to the information in the application (jws) andproject (jpr) files; ojdeploy also has a corresponding Ant task, so you can use the same capabilities from within Ant. However, a drawback of ojdeploy (both the command-line tool and the Ant task) is that it requires Oracle JDeveloper to be installed on the
machine on which you are doing the build. In addition, at the time of this writing, there appears to be a bug in the Ant task for ojdeploy that prevents it from creating the
application EAR file properly. This article will show you how to build your applications with Ant without using ojdeploy, in order to eliminate these two drawbacks.
Overview of Using Ant to Build an Oracle ADF Project
In this article, you use the same sample project that was used for the initial parts of this series. Your goal isto create a set of Ant build scripts that will enable you to check out a copy of the application code from Subversion and build it on a “clean” computer containing only a Java Development Kit (JDK) and Ant software (and no installation of Oracle JDeveloper
or Oracle WebLogic Server). Being able to build your application from a clean computer will enable you to use other techniques that will be explained later in this series, such as using a continuous integration server.
You create the build scripts by following these steps:
Create an Oracle JDeveloper project to hold the Oracle ADF libraries and other libraries normally provided by Oracle JDeveloper. You do this so the required libraries will be available on the “clean” computer.
Create an Ant script containing library definitions for all the required libraries.
Identify the JAR files that comprise the required libraries and copy them from the Oracle JDeveloper installation to the new project’s directory.
Create an Ant build script to compile the Model project.
Create an Ant build script to compile the ViewController project.
Create an Ant build script to create WAR/EAR files.
The remainder of this article gives you the instructions for completing each of the steps.
Installing the JDevLibsForAnt Extension
The examples in this article use an Oracle JDeveloper Extension to help manage the Oracle ADF Libraries in the Ant build scripts. To install JDevLibsForAnt:From the Oracle JDeveloper Help menu, choose Check for Updates.
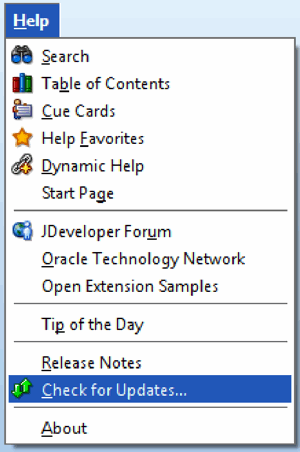
Figure 1 Checking for updates
Review the Welcome page (if it is shown), and click Next.

Figure 2 Check for Updates Wizard Welcome page
Ensure that at least the Open Source and Partners option is selected:

Figure 3 Selecting the Update Center to search
Select
4000
the JDevLibsForAnt extension and click Next.

Figure 4 Selecting the JDevLibsForAnt extension
Click Finish on the Check for Updates summary page.
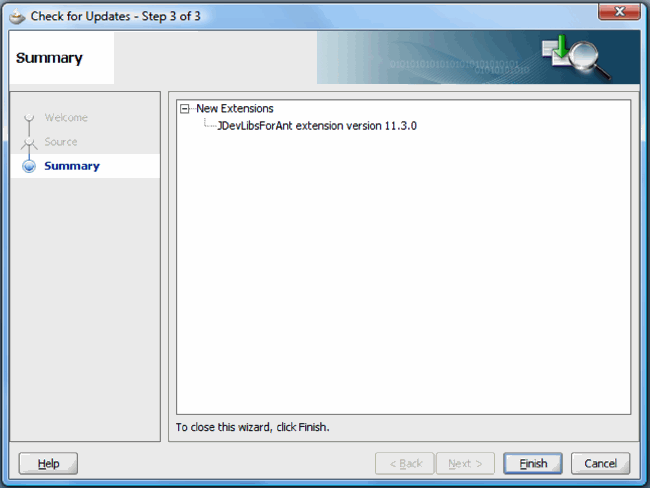
Figure 5 Check for Updates summary page
The project is now visible in the Application Navigator, although there are no files visible when expanding it:
Restart Oracle JDeveloper when you are prompted to finish installing the extension. When asked whether you want to migrate user settings from a previous release, answer No.
Creating a Project for the Oracle JDeveloper Libraries
To be able to compile an Oracle ADF application without having the Oracle JDeveloper IDE installed, the Java compiler needs to have access to the Oracle ADF and other required libraries used by the application. There are tools such as Maven and Ivy availablethat can help manage library dependencies automatically; however, those tools work best when there is a public/private repository available with the library definitions. As of this writing, there was no public Maven repository for the Oracle ADF libraries.
The technique I have used to ensure that the libraries are available to the application is the one I outlined in Part 3 of the ADF Essentials Series for managing third-party libraries. If you set up your application to include
a project containing the Oracle JDeveloper libraries’ JAR files, you will be able to build the application on a computer that doesn’t have Oracle JDeveloper installed.
If you have been following along with the example project in this series, you will have an application containing three projects as shown here.
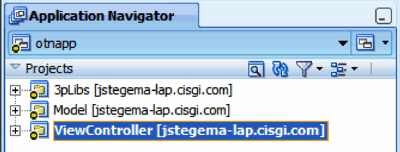
Figure 6 Current application with three projects
The first step is to create a new project to hold the Oracle JDeveloper libraries. To do this, go to the shortcut menu in the Application Navigator and select New Project
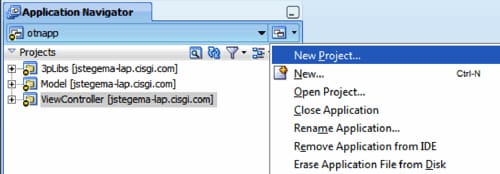
Figure 7 Creating a new project
When prompted, choose the Generic Project type.
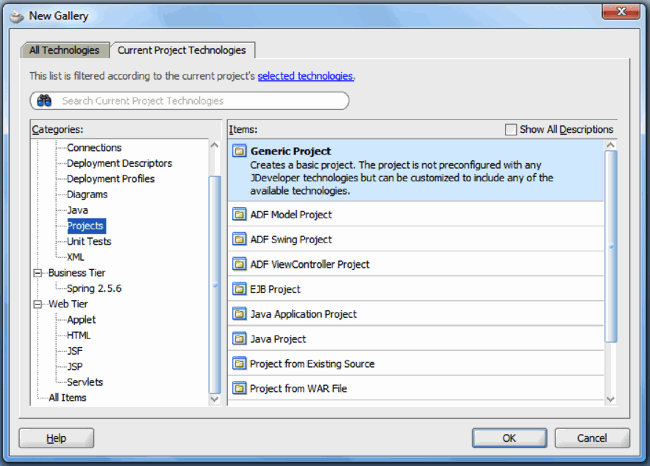
Figure 8 Selecting a generic project
Finally, provide a descriptive name for the project, such as JDeveloperLibs. You do not need to select any technologies for the project, because the project is just a placeholder for the required libraries and an associated Ant script you will
create in the next step:
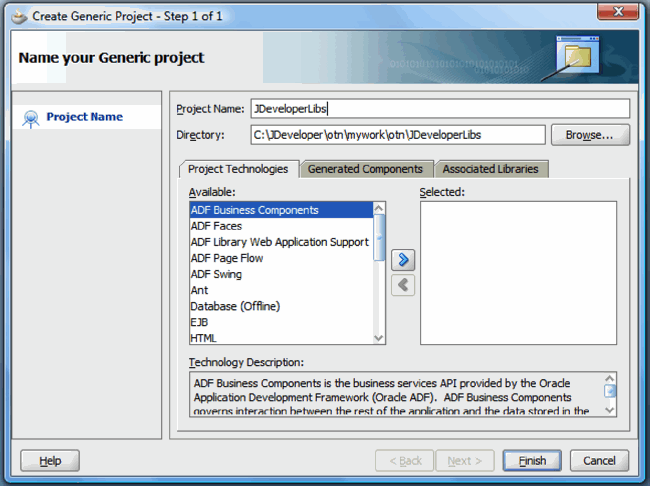
Figure 9 Naming the new project
Your new application should now look like this screen shot:
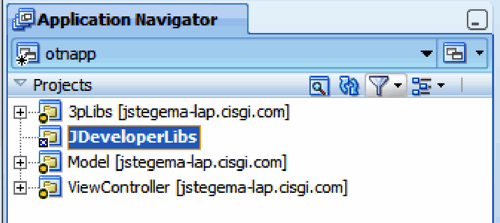
Figure 10 Application with new JDeveloperLibs project
If you are using version control for your project, now would be a good time to add the new project (that step isn’t shown here).
Setting Up Library References for the JDeveloperLibs Project
The next step is to set up the new project to reference all the required libraries for the application. To do so, you determine all the libraries referenced by all the projects in the application. First, let’s find out what libraries are used bythe Model project. To do that, double-click the Model project to show the project’s properties and then select the Libraries and Classpath category in the properties window.
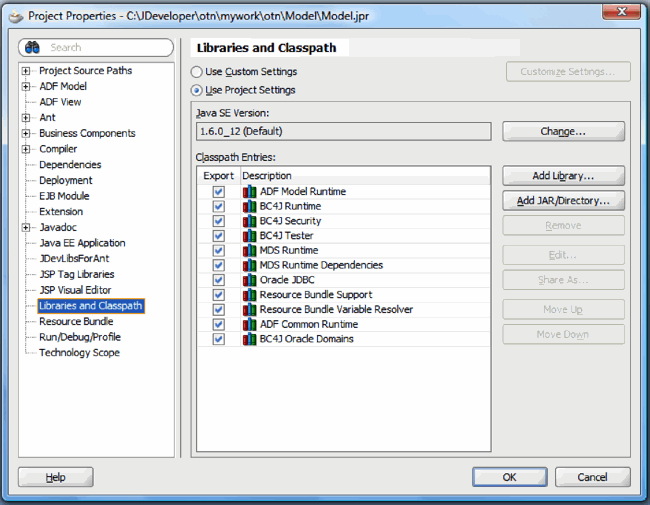
Figure 11 Model project’s libraries
Make a note of all the libraries referenced by this project (there are 11 in this example). Then cancel the Project Properties dialog box and double-click the JDeveloperLibs project to display its properties.
Finally, click the Add Library button to add all the libraries you noted from the Model project. The order of the libraries doesn’t matter, although you may find it easier to reconcile if they are. Next, repeat this
same process with the ViewController project to add any other library references from the ViewController project to theJDeveloperLibs project. Note that there will be some overlap between the
libraries from the Model project and ViewController project; you do not need to add the libraries a second time. When you are finished, the list of libraries referenced by your JDeveloperLibsproject
should look like this (again, the order of the libraries isn’t important):
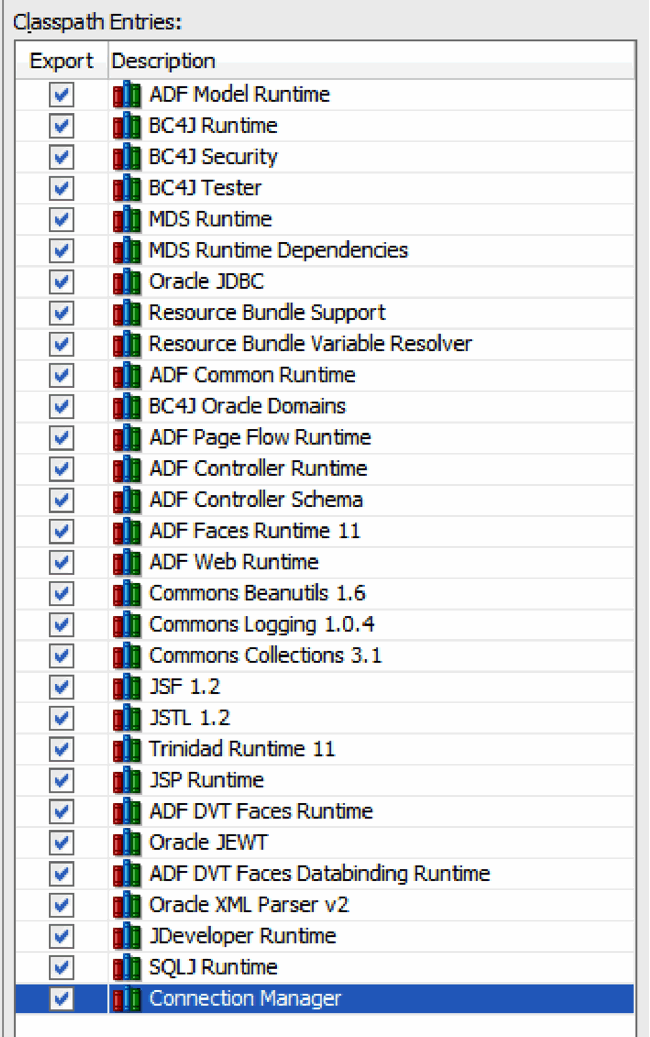
Figure 12 Complete list of libraries for the JDeveloperLibs project
Creating the jdev-libs.xml Ant Script
The next step is to create an Ant script that contains library definitions for all the libraries referenced for the application. To do this, you will use the JDevLibsForAnt extension you installed earlier. You first need to configure the extension;to do that, double-click theJDeveloperLibs project to display the Project Properties dialog box, and select the JDevLibsForAnt category. Then provide the filename jdev-libs.xml as the output
file location and click OK.
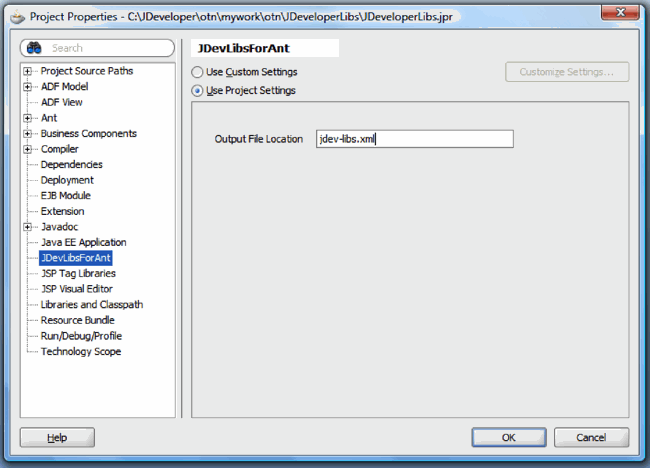
Figure 13 Configuring JDevLibsForAnt
Now you can use the JDevLibsForAnt extension to create a file (it will be called jdev-libs.xml) that contains path references for all the Oracle JDeveloper libraries. To do this, right-click the JDeveloperLibs project
and select merge JDevLibsForAnt.
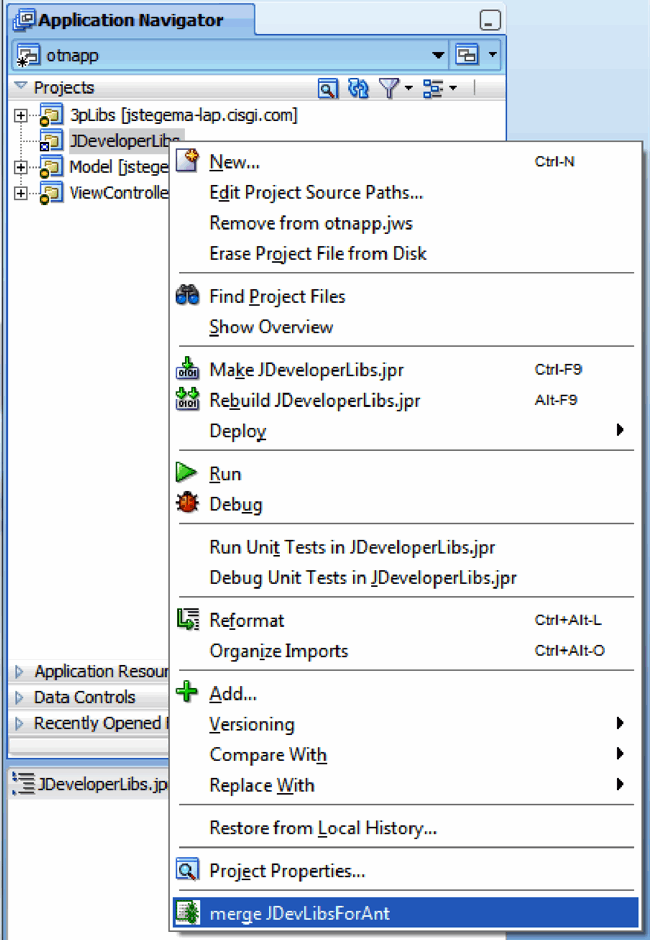
Figure 14 Running merge JDevLibsForAnt
After running merge JDevLibsForAnt, click the Refresh button in the Application Navigator to see the jdev-libs.xml file that was created.
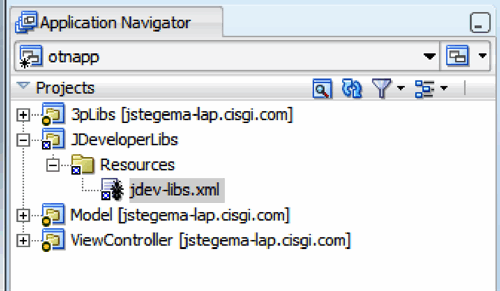
Figure 15 The jdev-libs.xml file in the hierarchy
Finally, remove references to the JDeveloper home directory in jdev-libs.xml, by doing a global search-and-replace as shown here:
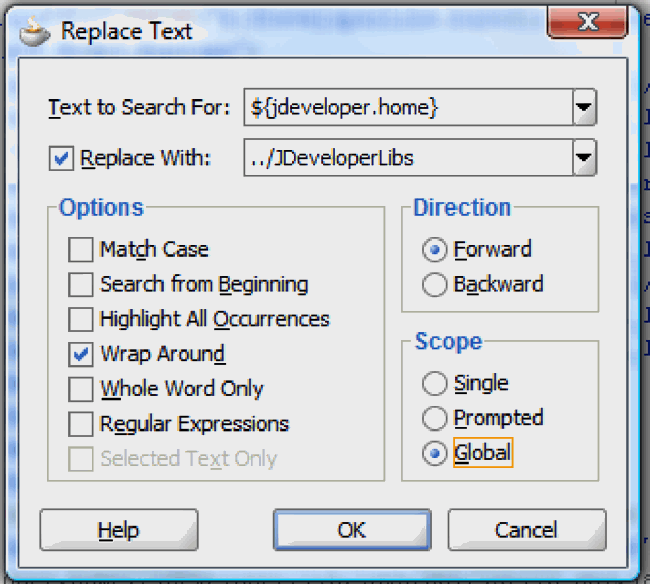
Figure 16 ADF Model Runtime library definition
This will ensure that the path references point to the JDeveloperLibs project directory instead of the JDeveloper installation directory.
Copying the Oracle JDeveloper Libraries to the JDeveloperLibs Project Directory
If you are to be able to compile and build your Oracle ADF application, the appropriate libraries must be available at compile time. When you are building the application from within Oracle JDeveloper, there are no problems, because the libraries’JAR files are available from the Oracle JDeveloper install. To support compiling on a machine that doesn’t have Oracle JDeveloper installed, you need to make the library JAR files available in another fashion. You will do this by copying them to the JDeveloperLibs project
directory and adding them to version control, so that anyone who checks out a copy of the application will also get the required JAR files.
The initial copying of the libraries can be tedious, but once you have accomplished it, you will not have to do it again; you will only have to refresh the JAR files if you upgrade Oracle JDeveloper or install a patch, and you will have to add any
new libraries if you add more libraries to your application’s project(s).
To copy the libraries’ JAR files, you will use the jdev-libs.xml file as a reference. You need to copy the JAR files from the JDeveloper home directory, maintaining the same general directory structure. As an example, let’s
take the ADF Model Runtime library:
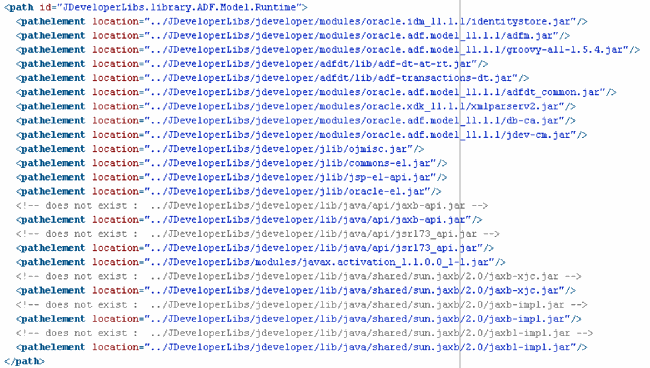
Figure 17 Including content from subfolders
To copy the JAR files for this library, you need to create the same directory structure in your JDeveloperLibs project directory and copy the referenced JAR files from the JDeveloper installation directory. One thing to note
is that some of the supplied JDeveloper library definitions refer to files that don’t exist! The JDevLibsForAnt extension helpfully flags these files in its generated script; for this example, there are five “missing” JAR files you do not need to copy.
As an example, let’s take a look at the first JAR file that’s part of the ADF Model Runtime library definition, identitystore.jar. You can find that file in the <JDEVELOPER_INSTALL_DIRECTORY>/jdeveloper/modules/oracle.idm_11.1.1 directory. You should
create the jdeveloper/modules/oracle.idm_11.1.1 directory structure inside the JDeveloperLibs project directory and copy identitystore.jar there. You should also configure the JDeveloperLibs project’s Resources folder
to show the JAR files you’ve copied. To do this, double-click the JDeveloperLibs project to display the Project Properties dialog box. Next, expand the Project Source Paths node and select theResources subnode.
Then click the Include Contents from Subfolders check box:
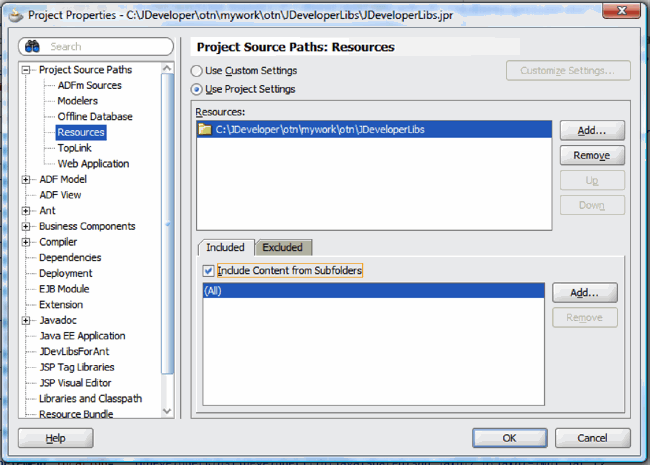
Figure 18 Excluding the classes folder
Finally, on the Excluded tab, click the Add button; in the Add Exclude Filters dialog box, select the classes folder
and click OK.
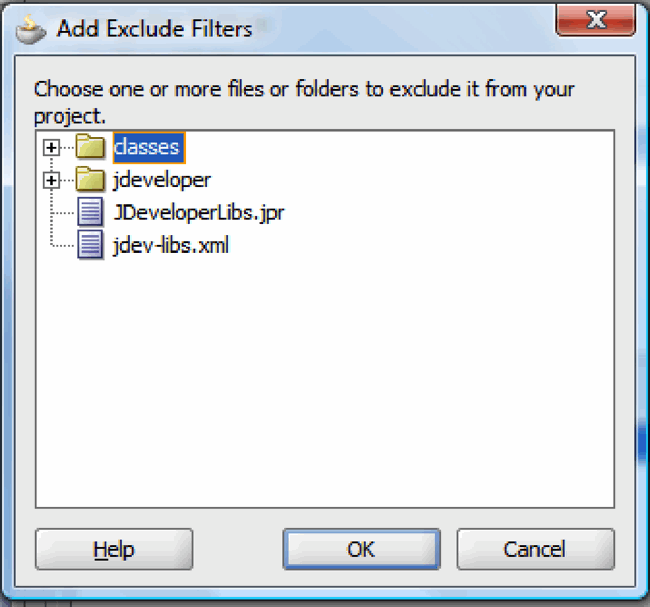
Figure 19 The identitystore.jar file shown in the Application Navigator
You should now be able to see the identitystore.jar file in the Application Navigator in the appropriate directory structure:
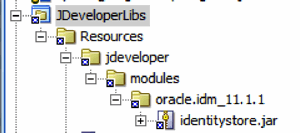
Figure 20 Adding Ant to the Model project technology scope
You can now copy all the JAR files referenced in the jdev-libs.xml file into the JDeveloperLibs directory (remembering to create the proper subdirectory structure). Don’t forget to add the new files to your version control
system as well!
Creating the Ant Build File for the Model Project
The next step is to create an Ant build file for the Model project. To do this, you can use Oracle JDeveloper to create a default build file and then modify the default file to suit your needs. To create the default build file,first ensure that the Model project contains Ant in the list of project technologies. To do this, double-click the Model project to display the project properties, select the Technology
Scopecategory, shuttle Ant to the list of selected technologies, and click OK:
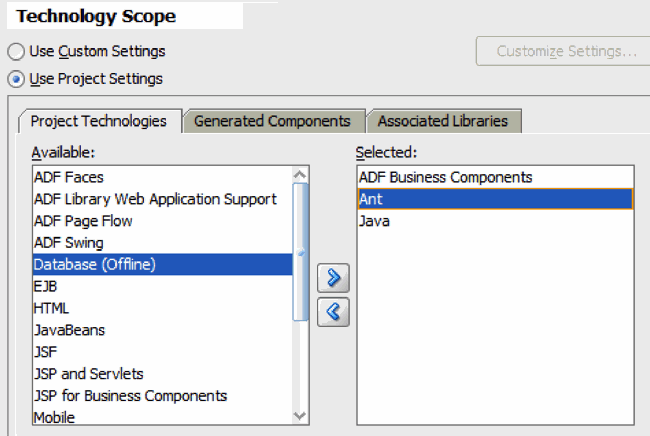
Figure 21 Creating the default Ant build file
Now you can create the default Ant build file by right-clicking the Model project and selecting New. Next, in the New Gallery, select Antfrom the General category, select Buildfile
from Project, and click OK:
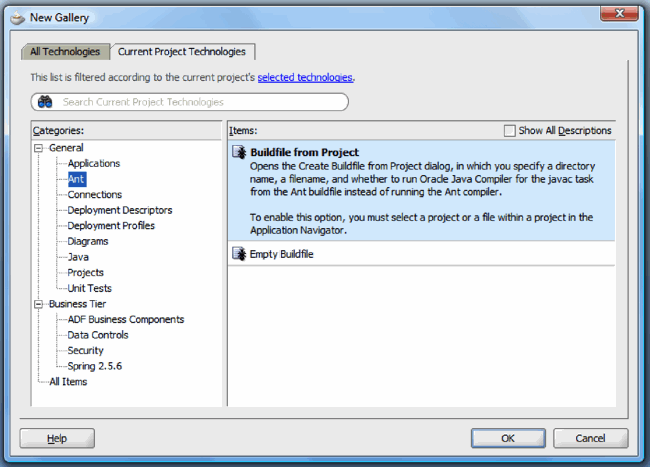
Figure 22 Creating the build file for the Model project
In the Create Buildfile from Project dialog box, leave all the default options selected and click OK:
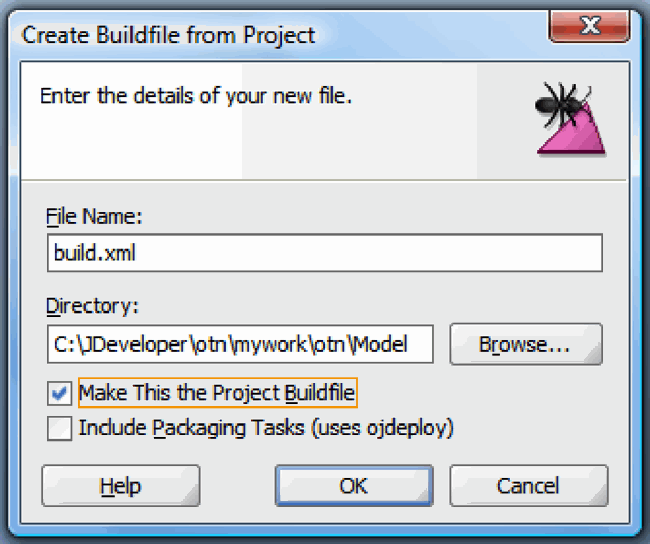
Figure 23 Buildfile options
Once you have completed these steps, you will see two new files in the Resources category for the Model project. The build.xml file contains the Ant targets and library definitions, and the build.properties file
contains some properties used by the build script. You will now make some small changes to the properties and build files to enable the build to work on a clean machine. The first change is to the build.properties file. There are two
properties you can comment out (remove) from the file. First, the oracle.home property refers to JDeveloper installation directory. Because you have set up the library references to be independent of the JDeveloper home directory, you can remove this line
from the build.properties file. Similarly, the build.compiler property specifies that Ant should use the Oracle Java compiler to compile the Java files. You can also remove this line from the file, because the clean machine will not have
the Oracle Java compiler installed. After you have removed the two unnecessary properties, your build.properties file should look something like this:
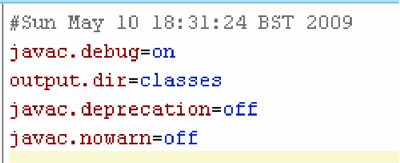
Figure 24 Modified build.properties file
Now you can change the build.xml script to replace the library references that are hard-coded to the JDeveloper installation directory with the references you created in the JDeveloperLibs project. To do this, open the build.xml file
for the Model project. You should see a series of <path> definitions (11 of them, to be exact) that correspond to the 11 libraries that are referenced by your project. For example, the ADF Model Runtime path looks like this:
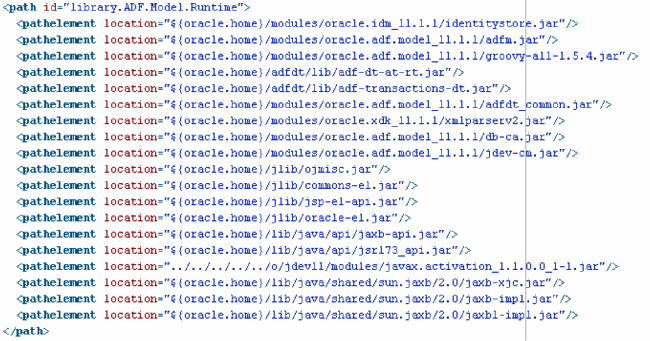
Figure 25 ADF Model Runtime <path> element
<
f254
p>You should delete all these path definitions, because they all point to the JDeveloper installation directory (be sure to leave the “classpath” path reference). Once you’ve removed the <path> elements corresponding to the libraries, the start of
your build.xml file should look like this:
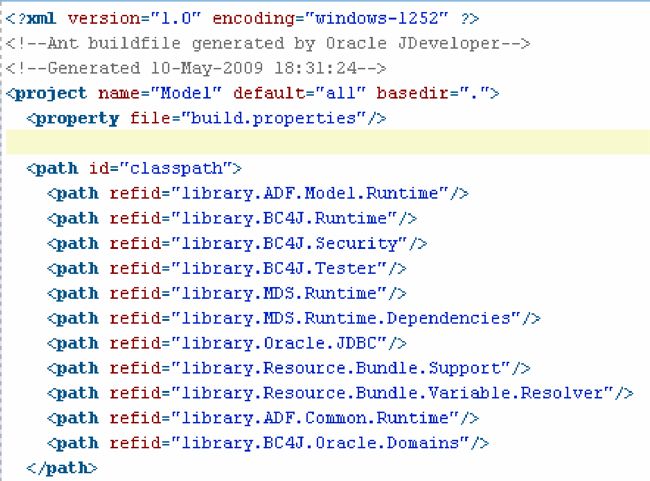
Figure 26 Start of build.xml with <path> elements removed
Now you can add an <import> element to the file to incorporate the jdev-libs.xml file you created earlier. Add the <import> element before the classpath <path> element like this:

Figure 27 Importing jdev-libs.xml
The <import> element will put the jdev-libs.xml file into the build.xml script when the Ant targets are invoked. Finally, you may have noticed that the <path> IDs used in jdev-libs.xml are slightly different
from the <path> IDs expected in build.xml; for example, inbuild.xml, the ADF Model Runtime has a <path> ID of library.ADF.Model.Runtime whereas the <path> ID for that library in jdev-libs.xmlis
JDeveloperLibs.library.ADF.Model.Runtime. To reconcile these differences, edit all the refids in build.xml to include JDeveloperLibs. at the start, as shown here:
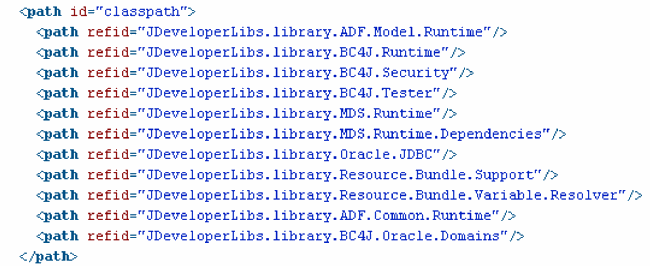
Figure 28 Changing the path IDs in build.xml
That’s all there is to changing the files. Now let’s have a look at the targets that are in build.xml. If you open build.xml and look at the structure window, you should see something like this
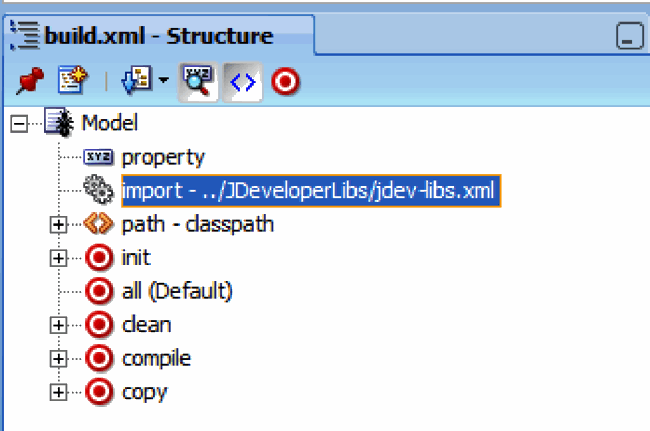
Figure 29 build.xml structure
In that structure, you can see that there are five targets— init, all, clean, compile, and copy— and that the all target
is the default. If you like, you can look through the build.xml script to see what each of the targets does. Here is a high-level description of each target:
init – creates the output directory (called “classes”) to hold the compiled classes
clean – deletes the output directory and any files inside
compile – compiles any Java source code (Note that our simple Model project doesn’t have any Java files!)
copy – copies any additional files (configuration files, properties files, and so on) to the correct location in the output directory
all – executes the compile and copy targets
Use Offline Database Objects to store your object definitions. When the definition of the object changes, you can use Oracle JDeveloper to reconcile the new object definition against the database.
Use DDL scripts to store your object definitions. Once the database schema is relatively stable, you can then start creating "alter" scripts that modify database objects when going from one version to another.
You will also see that certain targets depend on other targets; for example, for Ant to execute the compile target, the output (target) directory for the compiled Java classes must exist; hence, the compile target
depends on the init target.
To avoid naming conflicts when building multiple projects in to an application, it’s a good idea to rename all the targets to include the project name as a prefix. For example, instead of a compile target, the Model project
should have a model.compile target. To do this, edit the build.xml file and change all the target names to start with “model.” Change the names of the targets in the depends sections as well.
Additionally, because classpath is a common name for a path, change the <path> id from classpath to model.classpath (in two places: the <path> id itself and the classpathref element of the <javac> element).
You can now also test the Ant targets from within Oracle JDeveloper. Let’s do this by running the all target. To do this, right-click thebuild.xml file and select the model.all target
from the Run Ant Target submenu:
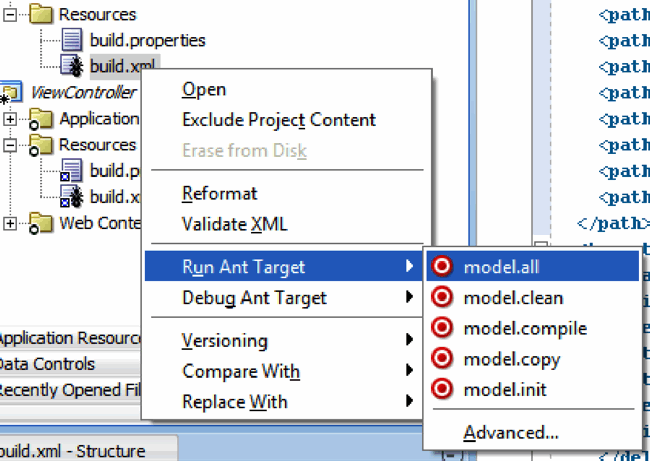
Figure 30 Running the model.all Ant target
You can verify that the target executed successfully, by looking at the Apache Ant - Log window:
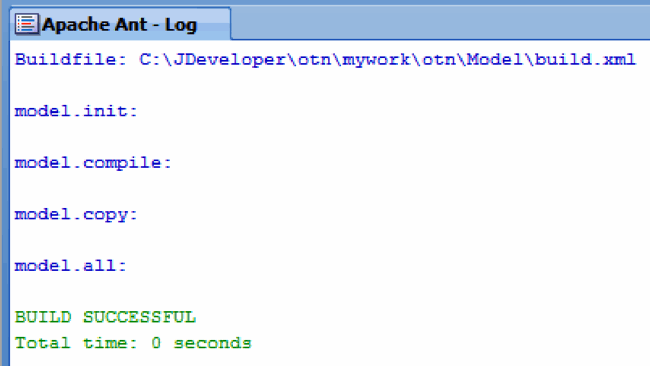
Figure 31 Apache Ant - Log window
Creating the Ant Build File for the ViewController Project
Now you can use a similar process to create and modify the Ant build script for the ViewController project. Follow the same steps you did for the Model project:Add Ant to the project technology scope.
Create the build file for the project.
Remove oracle.home and build.compiler from the build.properties file.
Remove <path> definitions from JDeveloper libraries.
Add an <import> element to import jdev-libs.xml.
Rename the <path> IDs to match the IDs used in jdev-libs.xml.
Change the target names to include “viewcontroller” as the prefix.
Change the classpath ID to viewcontroller.classpath.
A few more steps are needed for completing the ViewController project’s build.xml file. The first step is to remove all the pathelement items that correspond to the JDeveloper libraries. You will find
these under the top-level <path id="viewcontroller.classpath"> element in the file. Be sure you don’t remove the <pathelement location="../Model/classes"/> item, because it corresponds to the classes from theModel project. When you have
done this step, you should have something like this for the viewcontroller.classpath path:

Figure 32 Updated viewcontroller.classpath path
The next step is to add a dependency to the build file so that the Model project is compiled (if it is out-of-date) before the ViewControllerproject is compiled. To do this, modify the depends element
in the viewcontroller.compile Ant target so that it depends on themodel.compile target. Because this target is defined in the build.xml file for the Model project, you
will also need to include that file in the ViewController project’s build.xml file. To include the Model project’s build.xml file, add an “import” directive to the ViewController’sbuild.xml file
like this:

Figure 33 Importing the Model build.xml file
Then modify the viewcontroller.compile target to depend on the model.compile target, like this:

Figure 34 Adding dependency to the viewcontroller.compile target
If you run the Ant viewcontroller.compile target at this point, you’ll see that Ant gets a bit confused and doesn’t compile the files you think it should. The problem is related to the paths in use; because you are running
the target from the build.xml file located in theViewController project directory, all the path references are relative to that directory. The final step to make Ant work with this multiproject setup is to change
all the directory references so that they work properly. All path references will need to “jump up” a directory and then “jump back down” to the project directory. For example, regardless of whether you are in the Model directory or the ViewController directory,
you can always refer to the Model directory by using the path reference ../Model and to the UserInterface directory by using the reference ../UserInterface.
To fix up all the directory references, you will need to edit the build.properties and build.xml files for both the Model project and theViewController project.
Let’s start with the Model project. First, in the build.properties file, change the name of the output.dir variable to model.output.dir (to avoid a name collision with output.dir for the ViewController project)
and change the path reference as shown here:

Figure 35 model.output.dir
Next, add a variable called model.src.dir, like this:

Figure 36 model.src.dir
Do the same thing to the build.properties file for the ViewController project, so that it looks like this:
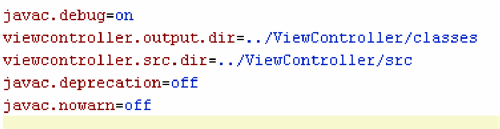
Figure 37 build.properties for the ViewController project
Now you will need to change the build.xml files so that all the path references are correct and refer to the variables defined inbuild.properties. There are six items that need to be changed in each file
(the examples below show the changes for the Model projectbuild.xml file—you should make similar changes to the ViewController one):
The property file path (use a relative reference as described above):

The mkdir element of the model.init target (variable name changed):

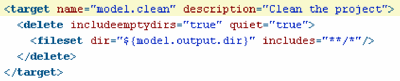
The fileset element of the model.clean target (variable name changed):
In the model.compile target, change the destdir property of the javac element (variable name changed):

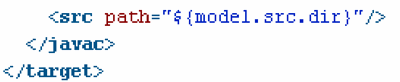
In the model.compile target, change the path property of the src element (use the newly defined model.src.dir variable):
In the model.copy target, change the copy and fileset elements (change the variable name and use the newly defined variable for src):
Once you have made the above changes for both the Model and ViewController build files, you should be able to successfully run the viewcontroller.compile target and see the following output:
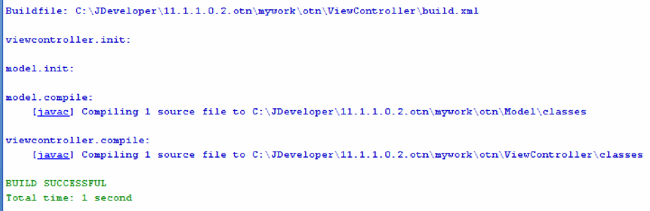
Figure 38 Ant output for successful viewcontroller.compile
Adding a WAR Target
Now that you are able to compile the entire application, you can create additional Ant targets to create the deployment artifacts (WAR and EAR files) for the application. Because Ant already includes tasks for building such files, it is quite easy
to add these targets. The easiest way I have found to create the Ant targets properly is to use Oracle JDeveloper to create the appropriate file (WAR or EAR) and then to unzip the file to have a look at the structure. By doing this, you can ensure that the
resulting file will have the correct structure. For example, you can right-click the ViewController project and use the context menu to create a WAR file:
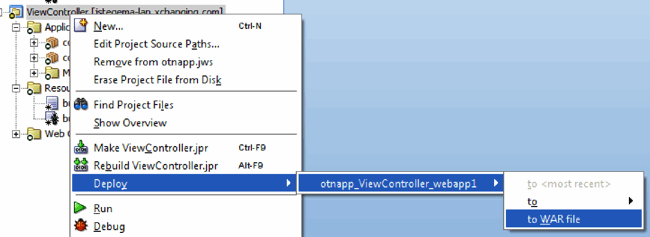
Figure 39 Creating a WAR file
If you then expand the WAR file, using any unzip utility, you will find that the file contains:
The contents of the ViewController’s public_html directory (excluding WEB-INF)
A WEB-INF directory containing
Some configuration files ( adfc-config.xml, faces-config.xml, trinidad-config.xml, web.xml, and weblogic.xml)
A lib subdirectory containing some ADF libraries
A classes subdirectory containing all the classes from both the Model project and the ViewController project, together with the ADF Business Component XML files
A META-INF directory, also in the classes subdirectory, containing the adfm.xml file
Armed with this knowledge, you can create the appropriate target in the build.xml file. To follow the pattern we have used so far, let’s create three additional properties in the ViewController project’s build.properties file
for use in the Ant script:

Figure 40 Adding three more properties
Next, update the viewcontroller.init and viewcontroller.clean targets to create this new directory and delete it, respectively:
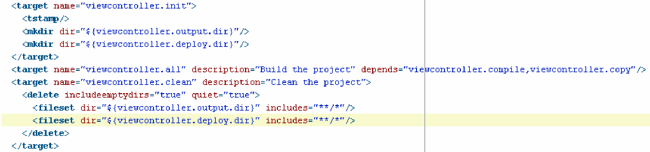
Figure 41 Updated viewcontroller.init and viewcontroller.clean targets
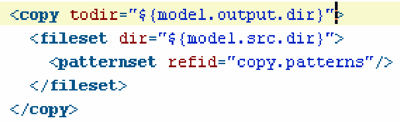
Next, you may notice that the viewcontroller.copy target does not copy the page definition and related ADF Model configuration files. You can fix that by changing the viewcontroller.copy target to look
like this:
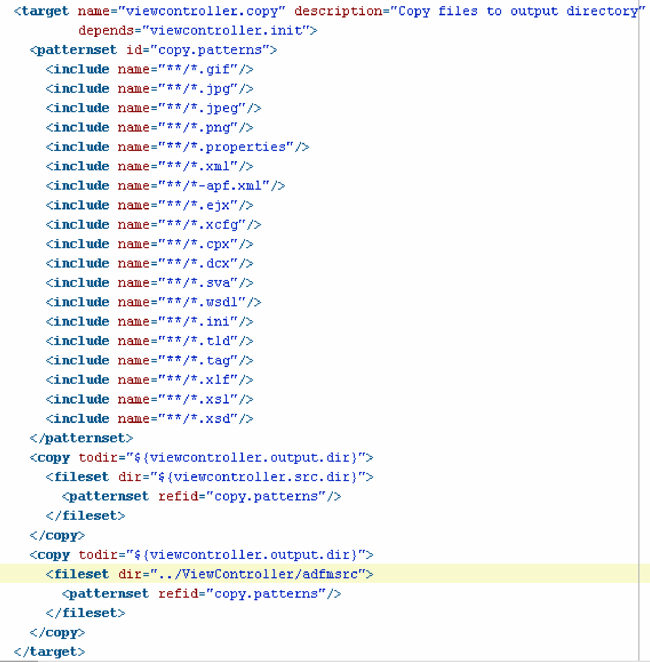
Figure 42 Updated viewcontroller.copy target
The final preparation step is to create three Ant “patternset” references to use for copying the public_html directory and the appropriate ADF libraries that belong in the WAR file:
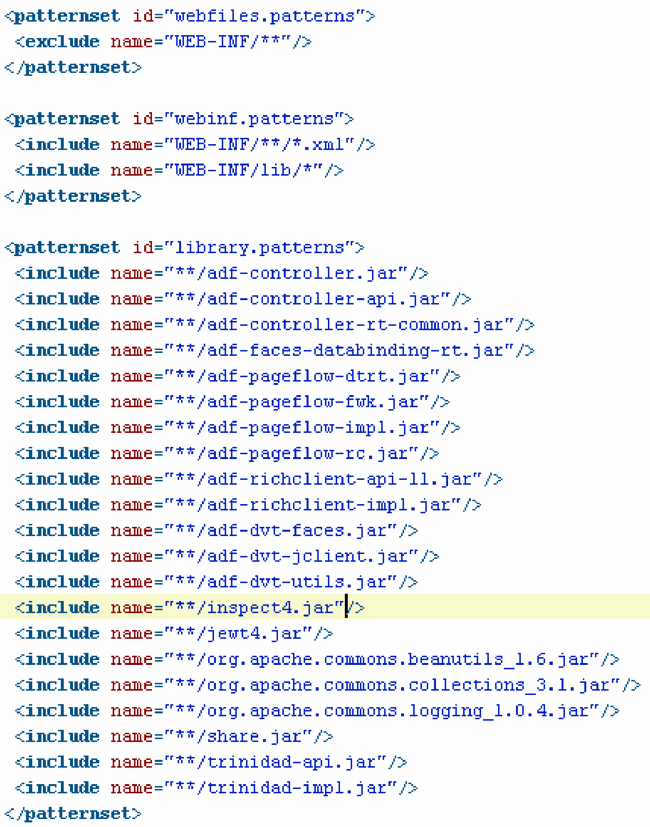
Figure 43 Additional patternsets used for the WAR file
Once you have done the preceding preliminary work, you can create the viewcontroller.war target like this:
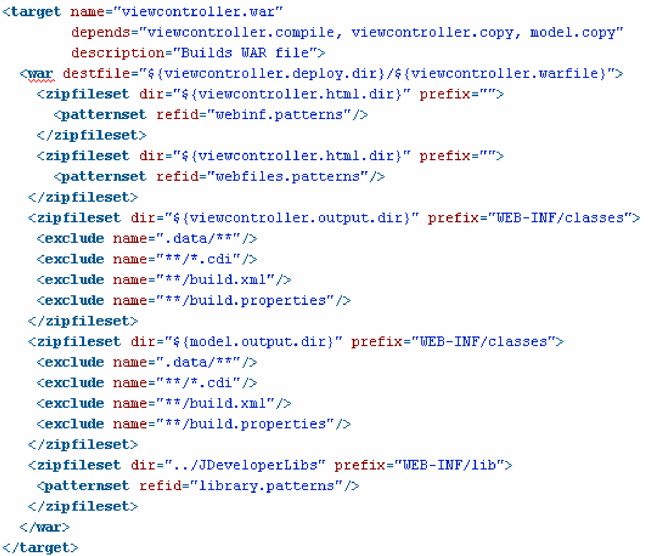
Figure 44 The viewcontroller.war target
Running the viewcontroller.war target from within Oracle JDeveloper should generate the appropriate WAR file. Although this article does not show the steps, you can easily apply the same technique to create an EAR target as
well.
Building the Application from the Command Line
Now that you have a build.xml file that you can use to build your application, it’s time to try running the build from outside Oracle JDeveloper. Because you have added all the ADF libraries required for compilation to theproject, you should be able to check out the application from Subversion on a machine without Oracle JDeveloper installed and build the application (provided you have installed Apache Ant and a suitable JDK on the machine). In the example below, the machine
has both Ant and a JDK installed and has environment variables set for Ant_HOME and JAVA_HOME pointing to those installations:
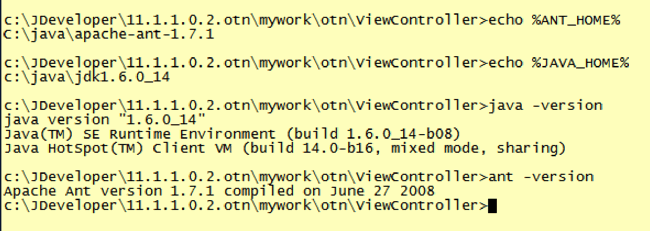
Figure 45 JDK and Ant are installed
Now you can run Ant from the command line to build the WAR file like this:
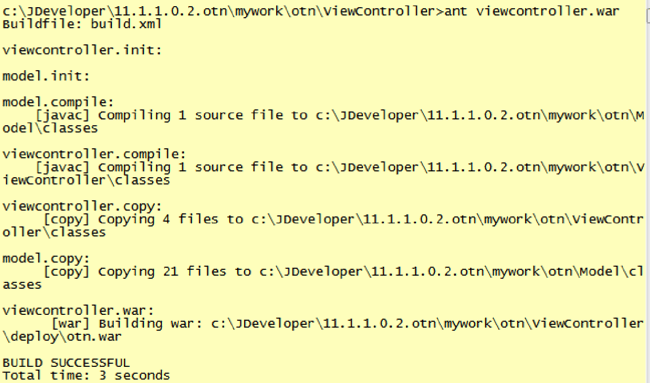
Figure 46 Building the WAR file from a command prompt
Conclusion
You have now learned how to create a set of Ant build scripts for building an ADF project, either from within Oracle JDeveloper or from a standalone “clean” computer containing only a JDK and Ant installation. You should be ready to review the Antdocumentation and add more targets and steps to your build scripts.
You may also want to read in the Oracle documentation about the WebLogic Scripting Tool (wslt), which is a tool that can help you automate deployments to WebLogic servers (as an alternative to the WebLogic Ant tasks).
Go to Part 5 | Back
to TOC
John Stegeman ( http://stegemanoracle.wordpress.com) is an Oracle ACE director (Oracle Fusion Middleware) and the principal architect in the EMEA region
for Cambridge Solutions, a global BPO and IT services firm. He has been working with Oracle products since 1990 and with Oracle JDeveloper since Release 3.

相关文章推荐
- 关于oracle数据库(2)
- 【转】ORA-12154: TNS: 无法解析指定的连接标识符
- oracle数据库用户、表空间创建、删除、授权
- 关于oracle数据库(1)
- oracle 11gR2 client安装(Red Hat Enterprise Linux Server release 5.5 (Tikanga) 安装ORACLE客户端)
- java操作oracle的blob,clob数据
- Oracle 10046跟踪事件使用方法
- 【DBaas】Oracle数据库云服务(Oracle Database Cloud Service)
- Oracle学习笔记(2)——系统用户与表空间
- oracle job延迟执行
- 迁移/备份oracle12c服务器数据
- Oracle建表SQL语句实现id自增
- UDEV SCSI Rules Configuration for ASM in Oracle Linux 5, 6 and 7
- 【ORACLE】ORACLE 12c PDB 基础
- oracle建表语句
- oracle忘记sys/system/scott用户密码了,如何重置oracle密码?
- (转)ORACLE触发器详解
- Oracle 12c创建用户时出现“ORA-65096: invalid common user or role name”的错误
- oracle 12c 13姨
- oracle 12c 13姨