Qt之模型/视图(自定义进度条)
2016-03-17 20:05
537 查看
简述
在之前的章节中分享过关于QHeaderView表头排序、添加复选框等内容,相信大家模型/视图、自定义风格有了一定的了解,下面我们来分享一个更常用的内容-自定义进度条。实现方式:
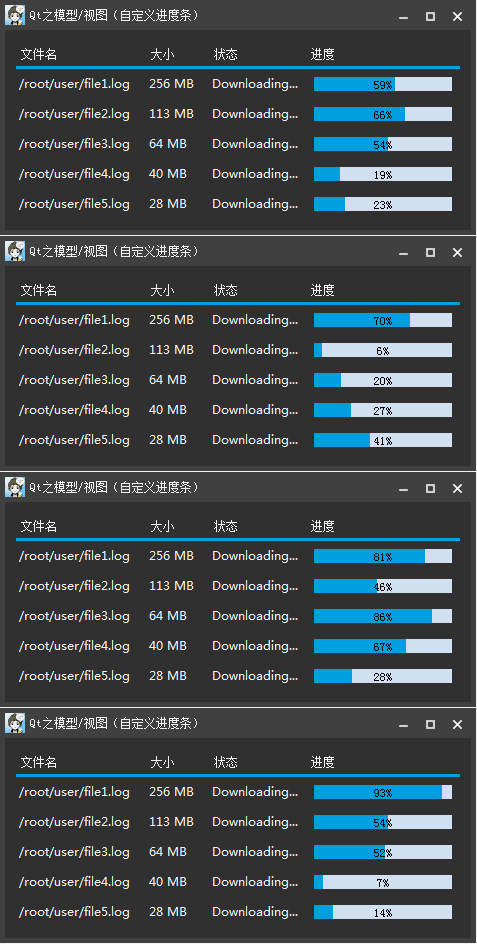
从QAbstractTableModel中设置对应的进度数据,因为我们需要显示进度条,而不是直接显示进度文本,所以原始的数据不需要直接显示在界面上,所以不需要使用Qt::DisplayRole,可以使用Qt::UserRole来代替。
委托QStyledItemDelegate中根据进度索引所对应的数据来获取进度,然后为QStyleOptionProgressBar设置进度值、显示文本等信息。
设置样式,这里需要QStyle在绘制的时候设置drawControl的最后一个参数,是一个QWidget *,这里我们使用QProgressBar即可。
简述
效果
数据结构
QStyledItemDelegate
源码
QThread
样式
衍伸
效果

数据结构
下面定义了文件名、大小、状态、进度所对应的列,以及一个保存数据的结构体。#define FILE_DOWNLOAD_FILE_NAME_COLUMN 0
#define FILE_DOWNLOAD_SIZE_COLUMN 1
#define FILE_DOWNLOAD_STATUS_COLUMN 2
#define FILE_DOWNLOAD_PROGRESS_COLUMN 3
// 下载记录
struct FileDownloadRecord
{
QString strFileName; //文件名称
qint64 nSize; //大小
int nStatus; //状态
int nProgress; //进度
};QStyledItemDelegate
这里只有绘制部分的代码,model对应的代码这里不再列出,可以参考其它对应的文章。源码
void ProgressBarDelegate::paint(QPainter *painter, const QStyleOptionViewItem &option, const QModelIndex &index) const
{
QStyleOptionViewItem viewOption(option);
initStyleOption(&viewOption, index);
if (option.state.testFlag(QStyle::State_HasFocus))
viewOption.state = viewOption.state ^ QStyle::State_HasFocus;

QStyledItemDelegate::paint(painter, viewOption, index);

if (index.column() == FILE_DOWNLOAD_PROGRESS_COLUMN)
{
int nProgress = index.model()->data(index, Qt::UserRole).toInt();
int nLeft = 8;
int nTop = 8;
int nWidth = option.rect.width() - 2 * nLeft;
int nHeight = option.rect.height() - 2 * nTop;

// 设置进度条的风格
QStyleOptionProgressBar progressBarOption;
progressBarOption.initFrom(option.widget);
// 设置进度条显示的区域
progressBarOption.rect = QRect(option.rect.left() + nLeft, option.rect.top() + nTop,  nWidth, nHeight);
// 设置最小值
progressBarOption.minimum = 0;
// 设置最大值
progressBarOption.maximum = 100;
// 设置对齐方式
progressBarOption.textAlignment = Qt::AlignCenter;
// 设置进度
progressBarOption.progress = nProgress;
// 设置文本(百分比)
progressBarOption.text = QString("%1%").arg(nProgress);
// 设置文本可见
progressBarOption.textVisible = true;

QProgressBar progressBar;

//绘制进度条
QApplication::style()->drawControl(QStyle::CE_ProgressBar, &progressBarOption, painter, &progressBar);
}
}
QThread
为了模拟真实性,所以起了一个线程,每隔1秒刷新一次。FileDownloadThread::FileDownloadThread(QObject *parent)
: QThread(parent)
{
qRegisterMetaType<QList<FileDownloadRecord>>("QList<FileDownloadRecord>");
}
FileDownloadThread::~FileDownloadThread()
{
requestInterruption();
wait();
}
void FileDownloadThread::run()
{
while (!isInterruptionRequested())
{
QTime time;
time= QTime::currentTime();
qsrand(time.msec()+time.second()*1000);
QList<FileDownloadRecord> list;
for (int i = 0; i < 5; ++i)
{
FileDownloadRecord record;
record.strFileName = QString("/root/user/file%1.log").arg(i + 1);
record.nSize = 1024 / ((i + 2) *(i + 2)) ;
record.nStatus = i;
record.nProgress = qrand() % 100 + 1;
list.append(record);
}
emit transfer(list);
msleep(1000);
}
}样式
QProgressBar{
border: none;
text-align: center;
background: rgb(210, 225, 240);
}
QProgressBar::chunk {
background: rgb(0, 160, 230);
}
衍伸
这里为了美观,我设置进度条距离左、上、右、下的距离均为8px,而且单元格里面只显示了一个进度条。这里只需要控制好单元格绘制区域位置rect即可,你可以在里面添加任意自定义的控件,而且可以添加任意多个,随意排列组合。
相关文章推荐
- QT学习 第一章:基本对话框
- 使用Shiboken为C++和Qt库创建Python绑定
- Qt 5.6更新至RC版,最终版本近在咫尺
- Qt定时器和随机数详解
- Qt实现图片移动实例(图文教程)
- Qt for Android开发实例教程
- QModelIndex/Role/Model介紹<二>
- 基于PyQt5的快速开发框架QFramer
- OSX下安装PyQt
- ok6410开发板移植DirectFB手记
- 【笔记】给Qt内嵌一个Chrome吧
- 【算法】最短路径之A*搜索
- qt入门必备
- 在 Qt4 中使用 C++11
- Hello Word ~ v0.2.2 背单词软件发布 -- By WHYPRO
- ubuntu下opencv和qt的安装配置
- linux下opengl的安装(with qt)
- qt 学习小节
- QT编译时Cannot find -lGL
- QT的命名风格
