iOS中 第三方LBXScan库二维码扫描
2016-03-04 15:05
501 查看
实现功能的话就是常见的二维码、条形码的扫描识别。该库都已将完全封装好了,可以直接使用。当然了也可以自己定制样式的。
1、首先需要
cocoaPods导入pod ‘LBXScan’, ‘~> 1.1.1’
在此不做过多介绍,如有需要手动导入,可自行上网搜索下载,将JQScan文件夹直接拖到你的工程中即可。
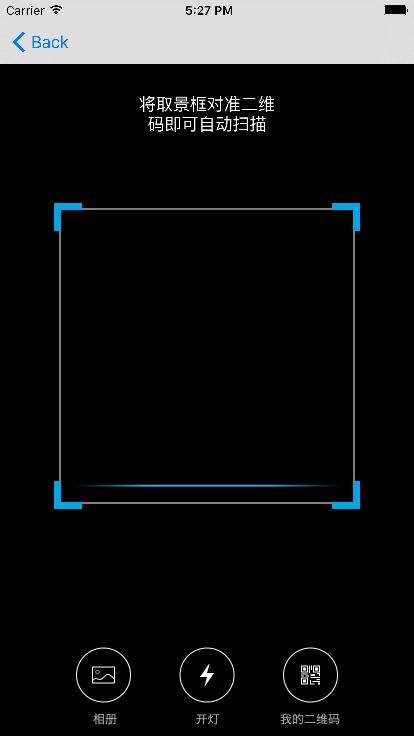
2、界面效果如下,可以扫描相册二维码,打开闪光灯,生成二维码。
3、界面和功能都集中在SubLBXScanViewController.m中,如需修改可直接修改。
二维码的生成在MyQRViewController.m
4、我在我工程首页的导航栏添加了扫描按钮
实现相应方法,更改扫描界面的布局样式
其中最后的这个方法就是在父类中写的push推出,再次我就不再更改。
父类方法如下:
5、扫描显示页面的定制
BLHScanViewController
1、首先需要
cocoaPods导入pod ‘LBXScan’, ‘~> 1.1.1’
在此不做过多介绍,如有需要手动导入,可自行上网搜索下载,将JQScan文件夹直接拖到你的工程中即可。
2、界面效果如下,可以扫描相册二维码,打开闪光灯,生成二维码。
3、界面和功能都集中在SubLBXScanViewController.m中,如需修改可直接修改。
二维码的生成在MyQRViewController.m
4、我在我工程首页的导航栏添加了扫描按钮
//扫描按钮
UIButton *scannerBtn = [UIButton buttonWithType:UIButtonTypeCustom];
[scannerBtn setImage:GetImage(@"icon_sao.png") forState:UIControlStateNormal];
[scannerBtn addTarget:self action:@selector(scanner:) forControlEvents:UIControlEventTouchUpInside];
[backView addSubview:scannerBtn];
[scannerBtn mas_makeConstraints:^(MASConstraintMaker *make){
make.size.mas_equalTo(CGSizeMake(16, 16));
make.leftMargin.equalTo(@16);
make.topMargin.equalTo(@36);

}];
实现相应方法,更改扫描界面的布局样式
-(void)scanner:(id)sender
{
//设置扫码区域参数设置

//创建参数对象
LBXScanViewStyle *style = [[LBXScanViewStyle alloc]init];

//矩形区域中心上移,默认中心点为屏幕中心点
style.centerUpOffset = 24;

//扫码框周围4个角的类型,设置为外挂式
style.photoframeAngleStyle = LBXScanViewPhotoframeAngleStyle_Outer;

//扫码框周围4个角绘制的线条宽度
style.photoframeLineW = 6;

//扫码框周围4个角的宽度
style.photoframeAngleW = 20;

//扫码框周围4个角的高度
style.photoframeAngleH = 20;
style.colorAngle = [UIColor whiteColor];
//扫码框内 动画类型 --线条上下移动
style.anmiationStyle = LBXScanViewAnimationStyle_LineMove;

//线条上下移动图片
//  style.animationImage = [UIImage imageNamed:@"CodeScan.bundle/qrcode_scan_light_green"];
style.animationImage = GetImage(@"line_red");
//SubLBXScanViewController继承自LBXScanViewController
//添加一些扫码或相册结果处理
BLHScanViewController *vc = [BLHScanViewController new];
vc.style = style;

vc.isQQSimulator = YES;
vc.hidesBottomBarWhenPushed = YES;
[self bPushViewController:vc animated:YES];
}
其中最后的这个方法就是在父类中写的push推出,再次我就不再更改。
[self bPushViewController:vc animated:YES];
}
父类方法如下:
#pragma mark - 自定义导航push和pop
- (void)bPushViewController:(UIViewController *)viewController animated:(BOOL)animated {
[self.navigationController pushViewController:viewController animated:animated];
}
5、扫描显示页面的定制
BLHScanViewController
#import "LBXScanViewController.h"

@interface BLHScanViewController : LBXScanViewController
#pragma mark -模仿qq界面

@property (nonatomic, assign) BOOL isQQSimulator;

@property (nonatomic, strong) UIView *backView;
@property (nonatomic, strong) UIButton  *backBtn;
@property (nonatomic, strong) UIButton  *historyBtn;
@property (nonatomic, strong) UILabel   *titleLable;

#pragma mark - 底部几个功能:开启闪光灯、相册、我的二维码
//底部显示的功能项
@property (nonatomic, strong) UIView *bottomItemsView;
//相册
@property (nonatomic, strong) UIButton *btnPhoto;
//闪光灯
@property (nonatomic, strong) UIButton *btnFlash;
//我的二维码
@property (nonatomic, strong) UIButton *btnMyQR;
@end

//
//  BLHScanViewController.m
//  Bolaihui
//
//  Created by mac on 16/1/11.
//  Copyright © 2016年 Bolaihui. All rights reserved.
//

#import "BLHScanViewController.h"
#import "LBXScanResult.h"
#import "LBXScanWrapper.h"
#import "UIUtil.h"
#import "SIAlertView.h"

@interface BLHScanViewController ()

@end

@implementation BLHScanViewController

- (void)viewDidLoad {
[super viewDidLoad];
// Do any additional setup after loading the view.

if ([self respondsToSelector:@selector(setEdgesForE
f35c
xtendedLayout:)]) {

self.edgesForExtendedLayout = UIRectEdgeNone;
}

self.view.backgroundColor = [UIColor blackColor];
}

-(void)viewWillAppear:(BOOL)animated
{
[super viewWillAppear:animated];
[self.navigationController setNavigationBarHidden:YES animated:YES];
}

-(void)viewWillDisappear:(BOOL)animated
{

[super viewWillDisappear:animated];
[self.navigationController setNavigationBarHidden:NO animated:YES];
}

- (void)viewDidAppear:(BOOL)animated
{
[super viewDidAppear:animated];
[self drawCustomTitleView];

if (_isQQSimulator) {

[self drawBottomItems];
}

}

-(void)clickLeftBtn:(id)sender
{
[self.navigationController popViewControllerAnimated:YES];
}

-(void)clickHistoryBtn:(id)sender
{

}

-(void)drawCustomTitleView
{
if (_backView) {

return;
}

_backView = [[UIView alloc] initWithFrame:CGRectMake(0, 0, SCREEN_WIDTH, 66)];
[self.view addSubview:_backView];

//返回按钮
_backBtn= [UIButton buttonWithType:UIButtonTypeCustom];
_backBtn.frame = CGRectMake(16, 26, 33, 33);
[_backBtn setImage:GetImage(@"icon_top_left.png") forState:UIControlStateNormal];
[_backBtn addTarget:self action:@selector(clickLeftBtn:) forControlEvents:UIControlEventTouchUpInside];
[_backView addSubview:_backBtn];

//扫描历史
_historyBtn= [UIButton buttonWithType:UIButtonTypeCustom];
_historyBtn.frame = CGRectMake(SCREEN_WIDTH-16-33, 26, 33, 33);
[_historyBtn setImage:GetImage(@"icon_top_history.png") forState:UIControlStateNormal];
[_historyBtn addTarget:self action:@selector(clickHistoryBtn:) forControlEvents:UIControlEventTouchUpInside];
[_backView addSubview:_historyBtn];

_titleLable = [[UILabel alloc] initWithFrame:CGRectMake(CGRectGetMaxX(_backBtn.frame)+5, 26, CGRectGetMinX(_historyBtn.frame) - 5 - 5 - CGRectGetMaxX(_backBtn.frame), 33)];
_titleLable.textAlignment = NSTextAlignmentCenter;
_titleLable.backgroundColor = [UIColor clearColor];
_titleLable.text = @"二维码/条形码";
_titleLable.textColor = [UIColor whiteColor];
_titleLable.font = GetFont(16.0f);
[_backView addSubview:_titleLable];
}

//底部功能添加:闪光灯
- (void)drawBottomItems
{
if (_bottomItemsView) {

return;
}

self.bottomItemsView = [[UIView alloc]initWithFrame:CGRectMake(0, CGRectGetMaxY(self.view.frame)-111-48,
CGRectGetWidth(self.view.frame), 111+48)];

[self.view addSubview:_bottomItemsView];
self.btnFlash = [[UIButton alloc]init];
[_btnFlash setFrame:CGRectMake((self.view.frame.size.width - 48)/2, 0, 48, 48)];
[_btnFlash setImage:GetImage(@"icon_lights_a") forState:UIControlStateNormal];
[_btnFlash addTarget:self action:@selector(openOrCloseFlash) forControlEvents:UIControlEventTouchUpInside];

[_bottomItemsView addSubview:_btnFlash];
}

//扫描结果
- (void)scanResultWithArray:(NSArray<LBXScanResult*>*)array
{

if (array.count < 1)
{
[self popAlertMsgWithScanResult:nil];

return;
}

//经测试,可以同时识别2个二维码,不能同时识别二维码和条形码
for (LBXScanResult *result in array) {

NSLog(@"scanResult:%@",result.strScanned);
}

LBXScanResult *scanResult = array[0];

NSString*strResult = scanResult.strScanned;

self.scanImage = scanResult.imgScanned;

if (!strResult) {

[self popAlertMsgWithScanResult:nil];

return;
}

//震动提醒
[LBXScanWrapper systemVibrate];
//声音提醒
[LBXScanWrapper systemSound];

[self popAlertMsgWithScanResult:strResult];

//  [self showNextVCWithScanResult:scanResult];

}

//扫描结果
- (void)popAlertMsgWithScanResult:(NSString*)strResult
{
if (!strResult) {

strResult = @"识别失败";
}

__weak __typeof(self) weakSelf = self;

SIAlertView *alertView = [[SIAlertView alloc] initWithTitle:@"扫码内容" andMessage:strResult];
[alertView addButtonWithTitle:BoLocalizedString(@"confirm") type:SIAlertViewButtonTypeDefault handler:^(SIAlertView *alertView){
[weakSelf reStartDevice];
}];

[alertView show];
[UIUtil addAlertDefault:alertView];
}

- (void)showNextVCWithScanResult:(LBXScanResult*)strResult
{
//  ScanResultViewController *vc = [ScanResultViewController new];
//  vc.imgScan = strResult.imgScanned;
//
//  vc.strScan = strResult.strScanned;
//
//  vc.strCodeType = strResult.strBarCodeType;
//
//  [self.navigationController pushViewController:vc animated:YES];
}

#pragma mark -底部功能项
//开关闪光灯
- (void)openOrCloseFlash
{

[super openOrCloseFlash];

if (self.isOpenFlash)
{
[_btnFlash setImage:GetImage(@"icon_lights_b") forState:UIControlStateNormal];
}
else
[_btnFlash setImage:GetImage(@"icon_lights_a") forState:UIControlStateNormal];
}

/*
#pragma mark - Navigation

// In a storyboard-based application, you will often want to do a little preparation before navigation
- (void)prepareForSegue:(UIStoryboardSegue *)segue sender:(id)sender {
// Get the new view controller using [segue destinationViewController].
// Pass the selected object to the new view controller.
}
*/

@end

相关文章推荐
- 峰回路转,Firefox 浏览器即将重返 iOS 平台
- 峰回路转,Firefox 浏览器即将重返 iOS 平台
- 不可修补的 iOS 漏洞可能导致 iPhone 4s 到 iPhone X 永久越狱
- iOS 12.4 系统遭黑客破解,漏洞危及数百万用户
- 每日安全资讯:NSO,一家专业入侵 iPhone 的神秘公司
- [转][源代码]Comex公布JailbreakMe 3.0源代码
- 修复mysql数据库
- nodejs中的fiber(纤程)库详解
- 批处理制作二维码生成器
- 桌面中心(一)创建数据库
- Node.js 条形码识别程序构建思路详解
- jquery插件qrcode在线生成二维码
- JavaScript生成二维码图片小结
- 基于C#生成条形码操作知识汇总附源码下载
- php制作中间带自己定义图片二维码的方法
- 浅析C语言头文件和库的一些问题
- php实现在线生成条形码示例分享(条形码生成器)
- zbar解码二维码和条形码示例