Ubuntu在标题栏显示CPU、内存、网速和温度
2016-02-03 15:53
597 查看
先是安装Indicator-sysmonitor,也就是system monitor indicator
sudo add-apt-repository ppa:alexeftimie/ppa
sudo apt-get update
sudo apt-get install indicator-sysmonitor
也可以通过网站下载安装:https://launchpad.net/indicator-sysmonitor/trunk/4.0/+download/indicator-sysmonitor_0.4.3_all.deb
默认只显示CPU、内存,要显示上下行网速和温度的话
sudo apt-get install dstat
sudo apt-get install acpi
下载sysmon文件,放入主目录,重命名为.sysmon,sysmon文件的源代码如下:
settings中想显示的设为true,不想显示的设为false
在设置界面按下图配置,Customize output中有{sysmon}就可以

由于软件默认显示图标是 sysmonitor.svg,而在 Ubuntu 14.04 系统中没有这个图标,这导致图标显示错误,很不美观。于是要把软件默认使用的图标改成一个存在的图标,当然也可以自己动手制作一个图标。但是系统中已经有很多图标了,找个好点的直接用上就行!
系统图标存放在:/usr/share/icons/Humanity/apps/ XX目录下(XX 为:128 16 192 22 24 32 48 64 中任一个,对应同一图标的不同尺寸,同一图标并不是每个尺寸都有,其中48的最多)。打开/usr/share/icons/Humanity/apps/48
,发现utilities-system-monitor.svg 还不错,所以我就用这个图标了!当然用其他的或者自己制作也是可以的!
找到喜欢的图标后,记下图标的文件名(不包括后缀),下面开始进行替换。终端执行命令:
sudo gedit /usr/bin/indicator-sysmonitor
将 724 行的 sysmonitor 改为刚才记下的utilities-system-monitor
下方为以前的版本,sysmon文件的由来及修改,可无视
sudo apt-get install dstat
mkdir -p ~/.Indicator-Sysmonitor-Scripts
cd ~/.Indicator-Sysmonitor-Scripts
wget http://webupd8.googlecode.com/files/sysmon_0.2.tar.gz
tar -xvf sysmon_0.2.tar.gz
在设置中选中Use this command,输入:
$HOME/.Indicator-Sysmonitor-Scripts/sysmon

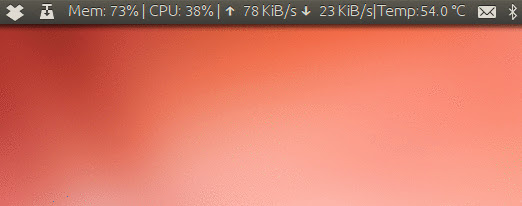
效果:

不过这样一来就不能显示CPU温度了。 安装acpi
sudo apt-get install acpi
终端下:
a-nerd:~$ acpi -t
Thermal 0: ok, 49.0 degrees C
得到的结果中第16-20字符是CPU温度 此时需要稍微修改一下sysmon文件:
sudo gedit .Indicator-Sysmonitor-Scripts/sysmon
在“The Indicator Sysmonitor actual output”上方空白处加上:
#------------------- acpitemp --------------------------
if [ $temp = true ]; then
#将acpi -t这个命令显示出第16-20个字符即CPU温度赋给acpitemp
acpitemp=$(acpi -t| cut -c 16-20)°C
fi
在“The Indicator Sysmonitor actual output”下方文本的末尾处加上:
$(if [ $temp = true ]; then echo \|Temp:$acpitemp; fi)
#当temp为True时显示acpitemp即CPU温度
最后在Setting部分加上
temp=true
以显示CPU温度。
如果感觉太占地方了可以去掉分隔符、简写Men/CPU/Temp等。 可以参考本人的sysmon文件。
sudo add-apt-repository ppa:alexeftimie/ppa
sudo apt-get update
sudo apt-get install indicator-sysmonitor
也可以通过网站下载安装:https://launchpad.net/indicator-sysmonitor/trunk/4.0/+download/indicator-sysmonitor_0.4.3_all.deb
默认只显示CPU、内存,要显示上下行网速和温度的话
sudo apt-get install dstat
sudo apt-get install acpi
下载sysmon文件,放入主目录,重命名为.sysmon,sysmon文件的源代码如下:
#!/bin/bash

#settings:
netspeed=true
ram=true
cpu=true
temp=false
#---------------- initialize ---------------------------
rm /tmp/.sysmon > /dev/null 2>&1
dstat --net --mem --cpu --output=/tmp/.sysmon 1 1 > /dev/null 2>&1
#----------- up/down speed -----------------------------
if [ $netspeed = true ]; then
upspeed=$(echo $(cat /tmp/.sysmon | tail -1 | cut -d ',' -f2)/1024 | bc)
upkbmb=$(if [ $upspeed -gt 1024 ]; then
up1=$(echo $(cat /tmp/.sysmon | tail -1 | cut -d ',' -f2)/1024/1024 | bc -l)
echo $up1 | head -c 4
else
echo $upspeed | head -c 3
fi)
downspeed=$(echo $(cat /tmp/.sysmon | tail -1 | cut -d ',' -f1)/1024 | bc)
downkbmb=$(if [ $downspeed -gt 1024 ]; then
down1=$(echo $(cat /tmp/.sysmon | tail -1 | cut -d ',' -f1)/1024/1024 | bc -l)
echo $down1 | head -c 4
else
echo $downspeed | head -c 3
fi)
#---------------- up/down speed unit --------------------
upunit=$(if [ $upspeed -gt 1024 ]; then echo "MiB/s"; else echo "KiB/s"; fi)
downunit=$(if [ $downspeed -gt 1024 ]; then echo "MiB/s"; else echo "KiB/s"; fi)
fi
#------------------- CPU % used -------------------------
if [ $cpu = true ]; then
cpufree=$(cat /tmp/.sysmon | tail -1 | cut -d ',' -f9)
cpuused=$(echo 100-$cpufree | bc | sed -e 's/\..*//')
fi
#------------------- RAM % used --------------------------
if [ $ram = true ]; then
memused=$(free -m | grep buffers/cache | tr -s ' ' | cut -d' ' -f 3)
memfree=$(free -m | grep buffers/cache | tr -s ' ' | cut -d' ' -f 4)
memtotal=$(echo $memused+$memfree | bc -l)
memusedpercent=$(echo 100-100*$memfree/$memtotal | bc)
fi
#------------------- CPU °C Temp-------------------------
if [ $temp = true ]; then
cputemp=$(acpi -t | cut -c 16-20)°C
fi
#------------------ The Indicator Sysmonitor actual output -
echo $(if [ $cpu = true ]; then echo CPU: $cpuused% \|; fi) $(if [ $ram = true ]; then echo Mem: $memusedpercent% \|; fi) $(if [ $temp = true ]; then echo Temp: $cputemp \|; fi)  $(if [ $netspeed = true ]; then echo ↑ $upkbmb $upunit  ↓ $downkbmb $downunit; fi)
settings中想显示的设为true,不想显示的设为false
在设置界面按下图配置,Customize output中有{sysmon}就可以
由于软件默认显示图标是 sysmonitor.svg,而在 Ubuntu 14.04 系统中没有这个图标,这导致图标显示错误,很不美观。于是要把软件默认使用的图标改成一个存在的图标,当然也可以自己动手制作一个图标。但是系统中已经有很多图标了,找个好点的直接用上就行!
系统图标存放在:/usr/share/icons/Humanity/apps/ XX目录下(XX 为:128 16 192 22 24 32 48 64 中任一个,对应同一图标的不同尺寸,同一图标并不是每个尺寸都有,其中48的最多)。打开/usr/share/icons/Humanity/apps/48
,发现utilities-system-monitor.svg 还不错,所以我就用这个图标了!当然用其他的或者自己制作也是可以的!
找到喜欢的图标后,记下图标的文件名(不包括后缀),下面开始进行替换。终端执行命令:
sudo gedit /usr/bin/indicator-sysmonitor
将 724 行的 sysmonitor 改为刚才记下的utilities-system-monitor
下方为以前的版本,sysmon文件的由来及修改,可无视
sudo apt-get install dstat
mkdir -p ~/.Indicator-Sysmonitor-Scripts
cd ~/.Indicator-Sysmonitor-Scripts
wget http://webupd8.googlecode.com/files/sysmon_0.2.tar.gz
tar -xvf sysmon_0.2.tar.gz
在设置中选中Use this command,输入:
$HOME/.Indicator-Sysmonitor-Scripts/sysmon
效果:
不过这样一来就不能显示CPU温度了。 安装acpi
sudo apt-get install acpi
终端下:
a-nerd:~$ acpi -t
Thermal 0: ok, 49.0 degrees C
得到的结果中第16-20字符是CPU温度 此时需要稍微修改一下sysmon文件:
sudo gedit .Indicator-Sysmonitor-Scripts/sysmon
在“The Indicator Sysmonitor actual output”上方空白处加上:
#------------------- acpitemp --------------------------
if [ $temp = true ]; then
#将acpi -t这个命令显示出第16-20个字符即CPU温度赋给acpitemp
acpitemp=$(acpi -t| cut -c 16-20)°C
fi
在“The Indicator Sysmonitor actual output”下方文本的末尾处加上:
$(if [ $temp = true ]; then echo \|Temp:$acpitemp; fi)
#当temp为True时显示acpitemp即CPU温度
最后在Setting部分加上
temp=true
以显示CPU温度。
如果感觉太占地方了可以去掉分隔符、简写Men/CPU/Temp等。 可以参考本人的sysmon文件。

相关文章推荐
- innodb的redo log以及与binary log的区别
- 当下流行的分布式文件系统大阅兵
- OPC与OPC UA
- 关于大型网站技术演进的思考(四):存储的瓶颈(4)
- Behave + Selenium(Python) 四
- php中获取网站访客来源的关键词方法
- [破解实例][OllyDbg] CrackMe001-Acid burn
- SQLyog导入数据库
- 40个Java多线程问题小结
- Newtonsoft.Json高级用法
- Linux curl命令参数详解--转载
- java分页工具类
- Threadlocal的一二三四五
- 自定义异常/导包/JUnit/设置快捷键/ myeclipse自带的数据库/生成API的html文档
- 图片上传
- jquery 处理返回数据 html json xml
- Linux命令:rm
- 对Spinner
- 【数据挖掘结果】大数据企业的汇总信息
- spring配置文件中<bean>的id和name属性区别,以及identifier和aliases