#Objective - C - UI-design - 第二天 - UIKit框架-UIKit-基本控件-相关习题
2016-01-09 19:55
435 查看
UI四大常用控件:UILabel, UITextField, UIButton, UIImageView及相关小习题
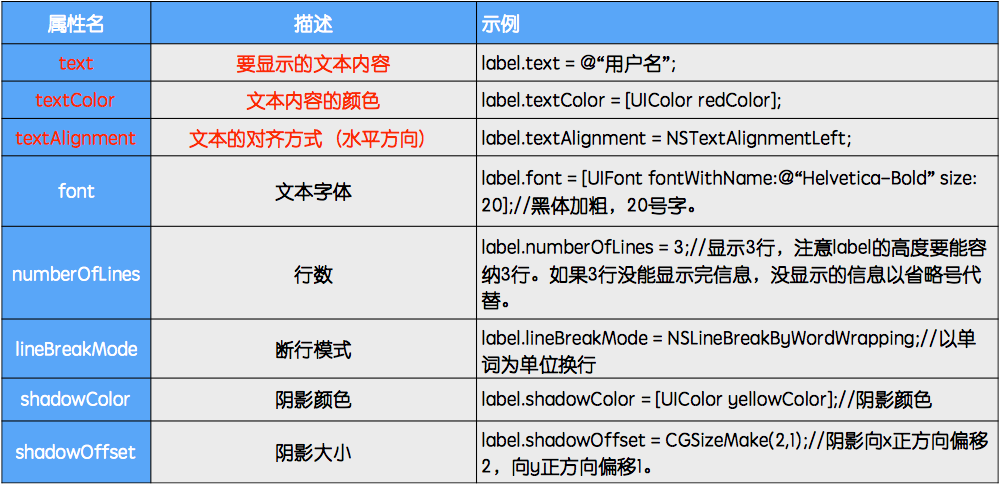
UILabel是UIView子类,UILabel是能显⽰示文字的视图。
UILabel属性设置:
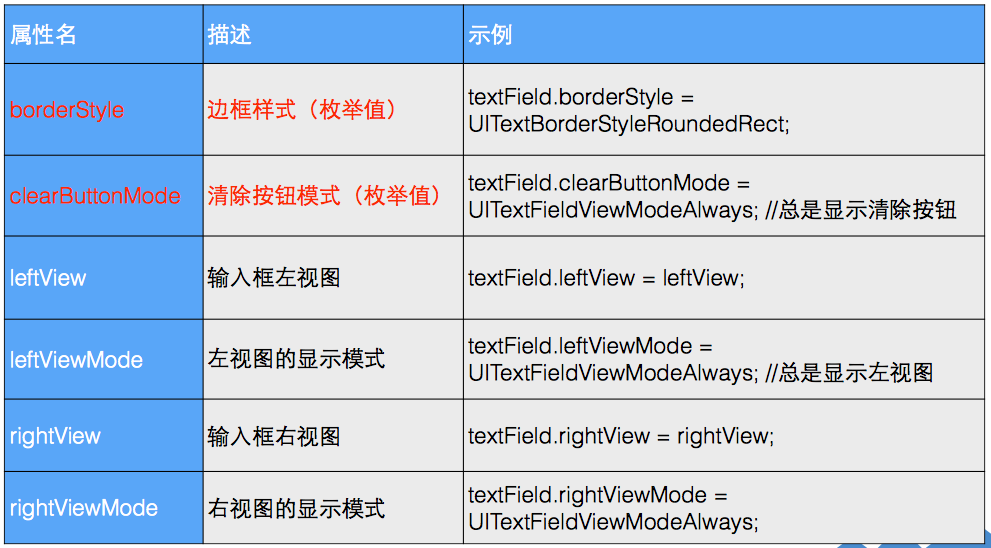
UITextField允许用户编辑文字(输入)
占位符:
placeholder:占位字符串(没有任何输入时,给出的提示字符串)
输入控制属性:

外观属性:
TextField常用代理方法:
UIbutton初始化方法相对不同
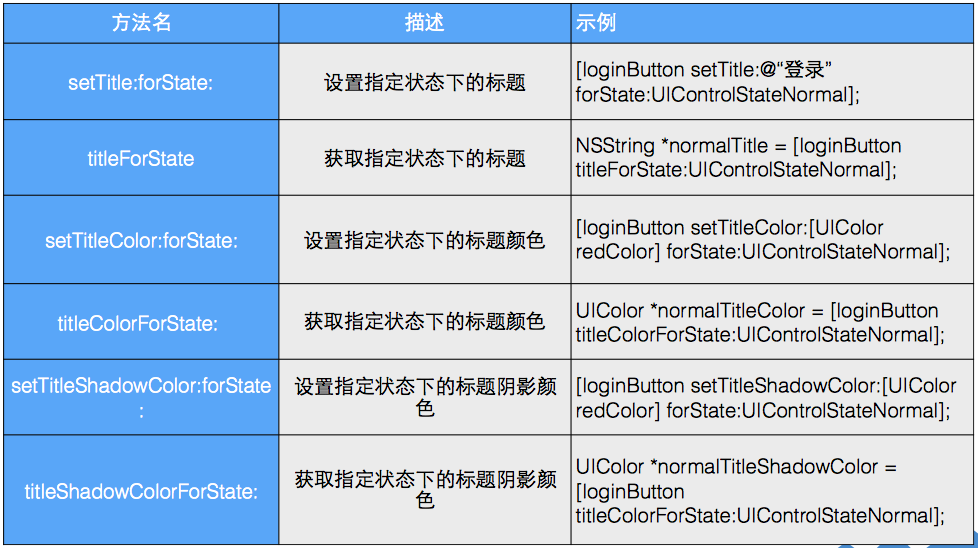
UIButton外观
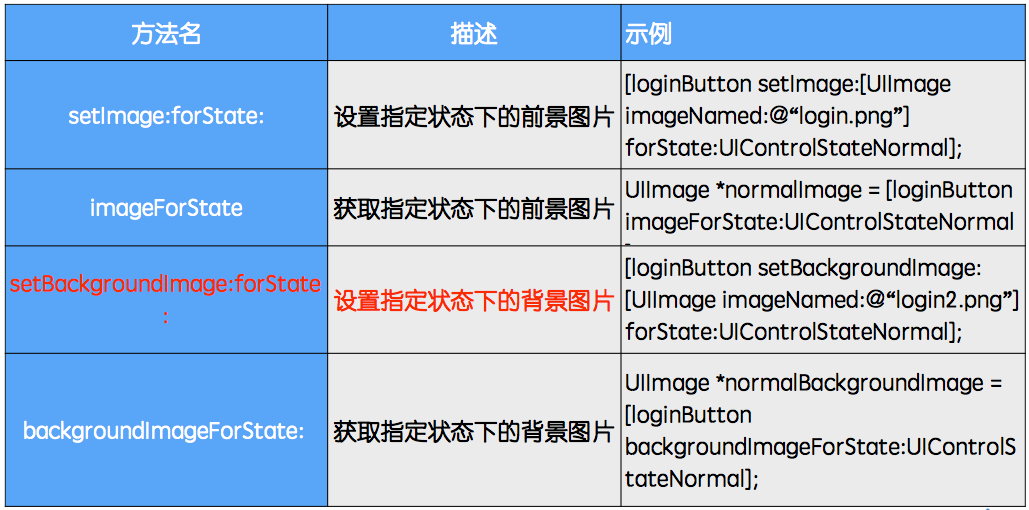
外观二
创建image:
UIImageView的动态图(实现动画)
animationImages //设置一组动态图片
animationDuration //设置播放一组动态图片的时间
animationRepeatCount //设置重复次数
startAnimating //开始动画
stopAnimating //结束动画
(全注释):
全局变量,添加代理方法
实现:
点击事件:
但是当做完的时候才发现 原来也并不是那么复杂 哈哈
UILabel
UILabel(标签): 是显示文本的控件UILabel是UIView子类,UILabel是能显⽰示文字的视图。
UILabel *userNameLabel = [[UILabel alloc]initWithFrame:CGRectMake(30, 100, 100, 30)];
userNameLabel.text = @“用户名”;
[containerView addSubview:userNameLabel];
[userNameLabel release];
注:containerView 已经添加到根视图上
UILabel属性设置:
UITextField
UITextField(输入框):是控制文本输入和显示的控件。UITextField允许用户编辑文字(输入)
// 使⽤用初始化⽅方法创建对象
UITextField *userNameTextField = [[UITextField
alloc] initWithFrame:CGRectMake(100, 100, 190, 30)];
// 设置边框⻛风格
userNameTextField.borderStyle =
UITextBorderStyleRoundedRect;
// 设置占位符
userNameTextField.placeholder = @“⼿手机号/邮箱";
[containerView addSubview:userNameTextField];
[userNameTextField release];
占位符:
placeholder:占位字符串(没有任何输入时,给出的提示字符串)
textField.placeholder = @“请输⼊入⽤用户名”;
输入控制属性:
外观属性:
TextField常用代理方法:
//当textField将要开始编辑的时候告诉委托人
- (BOOL)textFieldShouldBeginEditing:(UITextField
*)textField
//当textField已经编辑的时候告诉委托人
- (void)textFieldDidBeginEditing:(UITextField
*)textField
//当textField将要完成编辑的时候告诉委托人
- (BOOL)textFieldShouldEndEditing:(UITextField
*)textField
//当textField已经完成编辑的时候告诉委托人
- (void)textFieldDidEndEditing:(UITextField *)textField
//当点击键盘上回车按键时候告诉委托人
- (BOOL)textFieldShouldReturn:(UITextField *)textField
//- 注: 委托⼈人即delegate
UIButton
UIButton(按钮):是响应用户点击的控件。UIbutton初始化方法相对不同
// 便利构造器方法创建对象
UIButton *loginButton = [UIButton buttonWithType:UIButtonTypeSystem];
loginButton.frame = CGRectMake(30, 200, 60, 30);
// 设置button的标题
[loginButton setTitle:@"登录" forState:UIControlStateNormal];
// 添加点击事件
[loginButton addTarget:self action:@selector(login:) forControlEvents:UIControlEventTouchUpInside];
[containerView addSubview:loginButton];
UIButton外观
外观二
UIImageView
UIImageView是IOS里用来显示图片的类创建image:
// 图片文件路径
NSString *path = [[NSBundle mainBundle]
pathForResource:@"1" ofType:@"jpg"];
// 创建一个UIImage对象,使用initWithContentOfFile: 方法
UIImage *image = [UIImage
imageWithContentsOfFile:path];
// 创建一个UIImageView对象,使用initWithImage: 方法
UIImageView *imageView = [[UIImageView alloc]
initWithImage:image];
imageView.frame = CGRectMake(100, 100, 100, 100);
[self.view addSubview:imageView];
UIImageView的动态图(实现动画)
animationImages //设置一组动态图片
animationDuration //设置播放一组动态图片的时间
animationRepeatCount //设置重复次数
startAnimating //开始动画
stopAnimating //结束动画
几道小习题
按钮换图
有四张小JPG图片//创建图片
UIImageView *image = [[UIImageView alloc]initWithFrame:CGRectMake(0, 0, self.view.bounds.size.width, 330)];
//创建按钮
UIButton *butt = [[UIButton alloc]initWithFrame:CGRectMake(0, 0, self.view.bounds.size.width, 300)];
//添加事件
[butt addTarget:self action:@selector(buttomClick) forControlEvents:UIControlEventTouchDown];
//加入视图
[self.view addSubview:butt];
[self.view addSubview:image];
//按钮功能
-(void)buttomClick{
if (a > 4) {
a = 1;
}
NSString *string = [NSString stringWithFormat:@"0%d.jpg",a++];
[image setImage:[UIImage imageNamed:string]];
}按钮单选或多选
NSMutableArray *ar = [NSMutableArray array];
for (int i = 50; i < 50 + 90*3; i = i + 90) {
for (int j = 50; j < 50 + 50*2; j += 50) {
UIButton *b1 = [[UIButton alloc]initWithFrame:CGRectMake(i, j, 70, 30)];
[b1 setBackgroundColor:[UIColor grayColor]];
[b1 setTitle:@"未选中" forState:UIControlStateNormal];
[b1 setTitle:@"已选中" forState:UIControlStateSelected];//选择状态后文本变为已选中
[b1 setTitleColor:[UIColor whiteColor] forState:UIControlStateNormal];//正常状态下颜色
[b1 addTarget:self action:@selector(buttonClick:) forControlEvents:UIControlEventTouchDown];
[ar addObject:b1];//加入数组(单选用)
[self.view addSubview:b1];
}
}
//-------多选的按钮实现方法
-(void)buttonClick:(UIButton *)bu{
if (bu.selected == YES) {
[bu setSelected:NO];
}else{
[bu setSelected:YES];
}
//bu.selected =! bu.selected;
}
//-------单选通过遍历实现
-(void)buttonClick:(UIButton *)bu{
for (UIButton *b1 in ar) {
if (b1 == bu) {
b1.selected = YES;
}else{
b1.selected = NO;
}
}
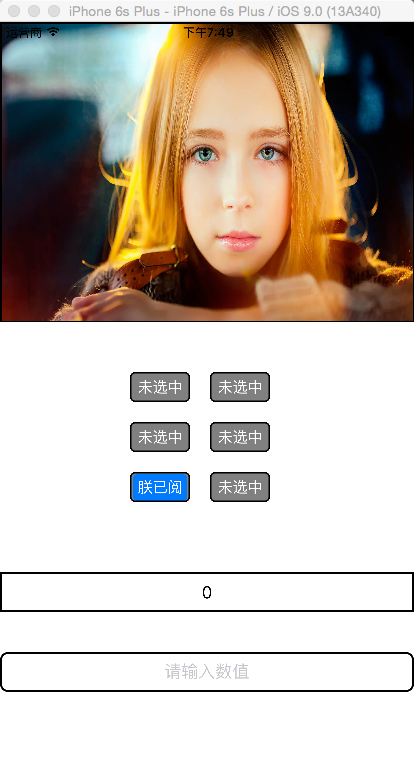
}综合练习(按钮换图单选Label和Text传值)
效果为:(全注释):
全局变量,添加代理方法
@interface ViewController ()<UITextFieldDelegate>
{
//私有全局变量
UIImageView *image;
UILabel *label;
UITextField *field;
UIButton *button;
NSMutableArray *ar;
int a;
UIControl *control;
}
@end
实现:
//初始化不可变数组
ar = [NSMutableArray array];
#pragma mark- 图片
//初始化UIimage
image = [[UIImageView alloc]initWithFrame:CGRectMake(0, 0, self.view.bounds.size.width, 300)];//
//添加图片
[image setImage:[UIImage imageNamed:@"1.jpg"]];
//设置边框 layer
[image.layer setMasksToBounds:YES];
[image.layer setBorderWidth:1.5];
image.layer.borderColor = [[UIColor blackColor]CGColor];
//按钮用来触发切换图片
UIButton *ibut = [[UIButton alloc]initWithFrame:CGRectMake(0, 0, self.view.bounds.size.width, 300)];
//touchdown按下时触发 Click方法 对象为自己触发
[ibut addTarget:self action:@selector(Click) forControlEvents:UIControlEventTouchDown];
//放入屏幕
[self.view addSubview:ibut];
[self.view addSubview:image];

#pragma mark- 单选
//两个循环添加6个按钮
for (int i = 130; i < 130 + 80*2; i += 80) {
for (int j = 350; j < 330 + 50*3; j += 50) {
//按钮样式
button = [UIButton buttonWithType:UIButtonTypeSystem];
//位置
[button setFrame:CGRectMake(i, j, 60, 30)];
//颜色
[button setBackgroundColor:[UIColor grayColor]];
//未选择时的状态(state)
[button setTitle:@"未选中" forState:UIControlStateNormal];
//选择后的状态
[button setTitle:@"朕已阅" forState:UIControlStateSelected];
//按钮标题颜色
[button setTitleColor:[UIColor whiteColor] forState:UIControlStateNormal];
//添加触发方法
[button addTarget:self action:@selector(buttonClick:) forControlEvents:UIControlEventTouchDown];
//边框和圆角
[button.layer setMasksToBounds:YES];
[button.layer setCornerRadius:5.0];
[button.layer setBorderWidth:1.5];
button.layer.borderColor = [[UIColor blackColor]CGColor];
//加入数组(遍历时用)
[ar addObject:button];
[self.view addSubview:button];
}
}

#pragma mark- Label
//初始化位置
label = [[UILabel alloc]initWithFrame:CGRectMake(0, 550, self.view.bounds.size.width, 40)];
//开始时 显示内容为0
[label setText:@"0"];
//文本居中(枚举)
[label setTextAlignment:1];
//边框
[label.layer setMasksToBounds:YES];
[label.layer setBorderWidth:2];
label.layer.borderColor = [[UIColor blackColor]CGColor];
//加入屏幕
[self.view addSubview:label];

#pragma mark- TextField
//初始化位置
field = [[UITextField alloc]initWithFrame:CGRectMake(0, 630, self.view.bounds.size.width, 40)];
//文本居中
[field setTextAlignment:NSTextAlignmentCenter];
//输入前提示语句
[field setPlaceholder:@"请输入数值"];
//字体颜色
[field setTextColor:[UIColor magentaColor]];
//如下
[field setBorderStyle:UITextBorderStyleRoundedRect];//设置边框
[field setClearButtonMode:UITextFieldViewModeAlways];//清除按钮
[field setKeyboardType:UIKeyboardTypeDefault];//输入类型
[field setReturnKeyType:UIReturnKeyDefault];//返回类型
//圆角
[field.layer setMasksToBounds:YES];
[field.layer setBorderWidth:2];
field.layer.borderColor = [[UIColor blackColor]CGColor];
[field.layer setCornerRadius:8.0];//圆角
#pragma mark- control
//control组件,覆盖范围为整个屏幕
control = [[UIControl alloc]initWithFrame:self.view.bounds];
//设置不可见
[control setAlpha:0];
//触发事件
[control addTarget:self action:@selector(knock) forControlEvents:UIControlEventTouchDragInside];
//隐藏
[control setHidden:YES];
//加入大屏幕
[self.view addSubview:control];
[self.view addSubview:field];
#pragma mark- 代理
//指定代理人为本类
[field setDelegate:self];
}
点击事件:
#pragma mark- 换图片方法
-(void)Click{
//当图片到第12张 下一张变为第一张
if (a > 12) {
a = 1;
}
//通过数字文件名来切换图片
NSString *path = [NSString stringWithFormat:@"%d.jpg",a++];
[image setImage:[UIImage imageNamed:path]];
}
#pragma mark- 单选方法
-(void)buttonClick:(UIButton *)butt{
//遍历ar数组(里面装了UIButton)
for (UIButton *b in ar) {
if (butt == b) {    //如果得到的按钮与数组内的相等
b.selected = YES;//那么数组内的按钮状态更改为被选中
}else{
b.selected = NO;//反之 其他全部更改为未选中状态
}
}
}
#pragma mark- 控制输入框
-(void)knock{
//使textfield成为第一响应者(输入)
[field becomeFirstResponder];
}
#pragma mark- 协议内输入框状态下修改
//编辑状态下
-(BOOL)textFieldShouldBeginEditing:(UITextField *)textField{
//使control变为可见(可触发-点击屏幕->缩小输入法)
[control setHidden:NO];
//输入法出现时,整个屏幕向上移动
[self.view setFrame:CGRectMake(self.view.bounds.origin.x, self.view.bounds.origin.y - 230, self.view.bounds.size.width, self.view.bounds.size.height)];
//返回方法实现成功
return YES;
}
//结束编辑后
-(BOOL)textFieldShouldEndEditing:(UITextField *)textField{
//使control隐藏
[control setHidden:YES];
//屏幕回到原来位置
[self.view setFrame:CGRectMake(self.view.bounds.origin.x, self.view.bounds.origin.y, self.view.bounds.size.width, self.view.bounds.size.height)];
return YES;
}
//输入法点击return后
-(BOOL)textFieldShouldReturn:(UITextField *)textField{
//使textfield放弃第一响应者资格
[field resignFirstResponder];
//且label获取field输入的文本
[label setText:field.text];
return YES;
}
小结:
一接触到几个控件宇神就给我们来了一个大招,各种穿插一起,本来以为要弄挺久的但是当做完的时候才发现 原来也并不是那么复杂 哈哈

相关文章推荐
- GUI - Web前端开发框架
- 评价ui设计作品好坏的八个标准(界面/交互设计研究)
- flex 控件的重要属性
- Delphi控件ListView的属性及使用方法详解
- web下载的ActiveX控件自动更新
- WinForm实现按名称递归查找控件的方法
- C#中父窗口和子窗口之间控件互操作实例
- 为Yahoo! UI Extensions Grid增加内置的可编辑器
- Android编程之Button控件用法实例分析
- Android控件之CheckBox、RadioButton用法实例分析
- MFC中动态创建控件以及事件响应实现方法
- Cocos2d-x UI开发之文本类使用实例
- WinForm自定义函数FindControl实现按名称查找控件
- Android控件之ProgressBar用法实例分析
- WinForm拖拽控件生成副本的解决方法
- ASP.NET动态添加用户控件的方法
- ASP.NET的HtmlForm控件学习及Post与Get的区别概述
- 谈谈对jquery ui tabs 的理解
- WinForm实现移除控件某个事件的方法
- 在IE 浏览器中使用 jquery的fadeIn() 效果 英文字符字体加粗