Spring boot构建基于rest的Web服务
2016-01-07 09:08
816 查看

一、介绍:使用Spring Boot我们可以很容易的创建一个可独立运行的Rest web服务,其中内嵌tomact,我们只需“run”就可以查看效果了。
Spring Boot利用Gradle或Maven构建引入第三方库的方式,所以我么不需要去担心我们改引入哪些库,而且使用Spring Boot省去了很多繁琐的配置。
接下来,我们将用Spring Boot实现和c# mvc一样的Rest Web服务。
二、效果:经典的Hello World。
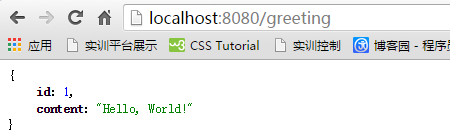
这将是我么最终的效果,毋须配置部署tomact,我们只需一“run”,Rest Web服务就完成了。
三、准备工作:
一个自己称心的IDE,我选的是Eclipse Luna。可以到官网自己去下。
JDK1.8或更高
Gradle2.3+或Maven3.0+
这里我将采用Gradle的构建方式,也是我选Luna的原因,它里边集成了Gradle的工程创建。
四、开始创建,我们打开Eclipse Luna;如果打不开,查看是否安装了jdk及是否在环境变量中配置了JAVA_HOME.
至于配置jdk的方式,网上一大堆,百度或谷歌就能搜到。
首先打开Eclipse Luna,创建一个Gradle Project。
选择New-Other-Gradle-Gradle Project。
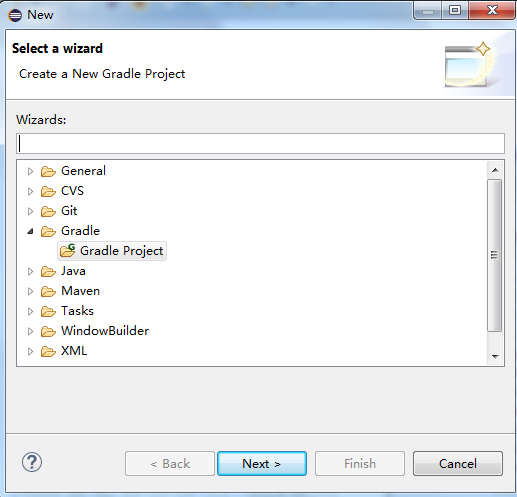
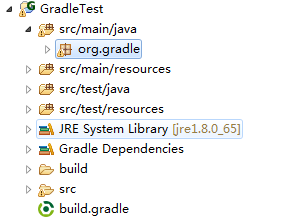
在这里我起名为GradleTestOne。创建完毕后,大概是这个样子的:
我们以上的工作仅仅是创建了一个Gradle Project,我们的目标是构建一个Spring的web程序啊,接下来,好戏登场。
五、在项目中加入spring的相关支持。
请看下边的代码:我们将一下代码替换GradleTestOne中的build.gradle文件。
buildscript {
repositories {
mavenCentral()
}
dependencies {
classpath("org.springframework.boot:spring-boot-gradle-plugin:1.3.1.RELEASE")
}
}

apply plugin: 'java'
apply plugin: 'eclipse'
apply plugin: 'idea'
apply plugin: 'spring-boot'

jar {
baseName = 'gs-rest-service'
version =  '0.1.0'
}

repositories {
mavenCentral()
}

sourceCompatibility = 1.8
targetCompatibility = 1.8

dependencies {
compile("org.springframework.boot:spring-boot-starter-web")
testCompile("junit:junit")
}

task wrapper(type: Wrapper) {
gradleVersion = '2.3'
}
里边都是什么意思,我们先不去管它。
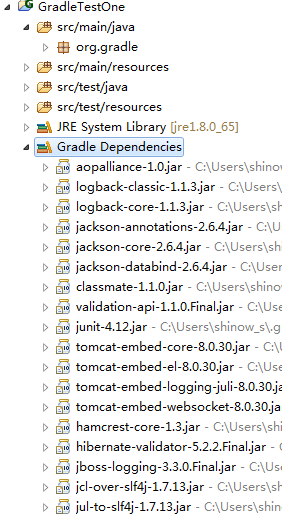
六、利用Gradle自动加入spring 依赖的jar包。
我们在我们新建的项目上右击找到Gradle 选择 refresh All,打开Eclipse Luna的Console视图,我们观察发现,它正在下载相关的jar包,这里不要心急,需要等会,当我们
看到“successful”,输出时,我们可以我们的操作了。我们先来验证spring相关的jar是否加载了。
你构建成功了吗!
七、加入代码,
1、在src org.gradle包下,建立Greeting类。
package org.gradle;

public class Greeting {

private final long id;
private final String content;

public Greeting(long id, String content) {
this.id = id;
this.content = content;
}

public long getId() {
return id;
}

public String getContent() {
return content;
}
}
2、创建资源控制器。好戏登场。
package hello;

import java.util.concurrent.atomic.AtomicLong;
import org.springframework.web.bind.annotation.RequestMapping;
import org.springframework.web.bind.annotation.RequestParam;
import org.springframework.web.bind.annotation.RestController;

@RestController
public class GreetingController {

private static final String template = "Hello, %s!";
private final AtomicLong counter = new AtomicLong();

@RequestMapping("/greeting")
public Greeting greeting(@RequestParam(value="name", defaultValue="World") String name) {
return new Greeting(counter.incrementAndGet(),
String.format(template, name));
}
}
3、引导Spring Application启动。
package hello;

import org.springframework.boot.SpringApplication;
import org.springframework.boot.autoconfigure.SpringBootApplication;

@SpringBootApplication
public class Application {

public static void main(String[] args) {
SpringApplication.run(Application.class, args);
}
}
八、Gradle Build。
在项目中右击找到Gradle选中Gradle Build 在Task参数中该选择build.构建,待构建成功后。
在项目中找到我们创建的Application,点击鼠标右键选择“Run” -“Java application”接下来将是见证奇迹的时刻:
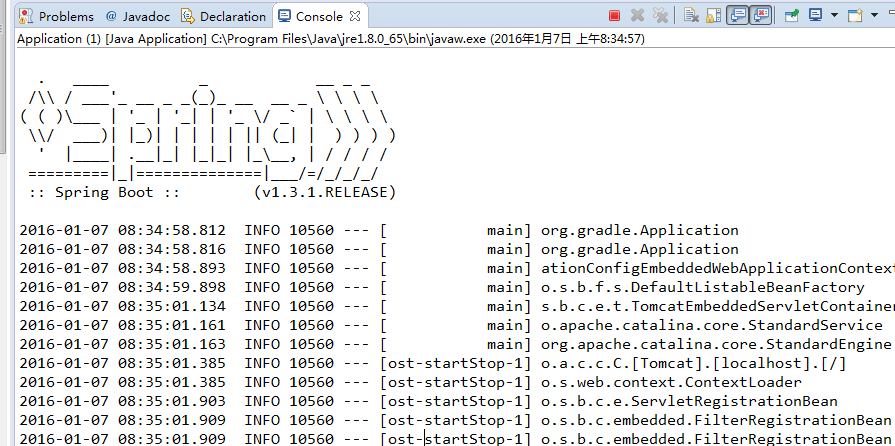
当你看到这样的输出时,你的应用构建成功了,仔细阅读输出:

Tomact已经启动,端口是8080,如果端口被占,把端口占用的应用程序关掉就可以了。
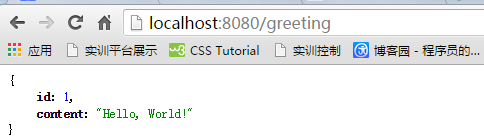
九、浏览器看效果。
十、欢迎技术交流讨论。参照资料:http://spring.io/guides/gs/rest-service/

相关文章推荐
- java160104MakeNameDemo
- java160104JinZhiDemo
- 关于 C# 调用 JavaWebservice服务,版本不一致的问题
- java160104KeyWordDemo
- java160104PackageDemo
- java160104DemoA
- java160104DemoB
- java160104DemoC
- java160102PackageDemo
- POI解析Excel(.xls)和Excel2007(.xlsx)
- java160102DemoA
- java160102DemoB
- [javase学习笔记]-8.8 构造代码块
- JDK SDK NDK ANT ADT
- Spring MVC - 开发 Controller的特性与乱码问题
- Java日期加减操作
- 对Java的面对对象编程中对象和引用以及内部类的理解
- Java回调函数之callback接口
- java自带的工具Jstack截取进程中的堆栈信息
- 判断Struts2的Get/Post请求